Swashplate Posted January 18, 2018 Share Posted January 18, 2018 (edited) A lot of modelers that I know, go to the local trophy shops to get the diorama bases for their builds. These bases come finished, and in all kind of sizes. I choose to make my own bases. One of the main reasons is the cost savings. Other than the paint and plaques, I buy my supplies in bulk, from Lowe's Home Improvement. Another reason Is that I like to build a lot of 1/32nd scale kits. The trophy shops would charge an arm and a legs for a base this big. (If they even have it). From one sheet of 3/4" plywood, I can make around 15 to 20 bases, depending on the sizes. I have a portable table saw to cut the bases. I have a miter saw to cut the 3/4in shoe mold for the edge. I use sandpaper for my surfaces. You can use any type of paint on it. It does a real good of simulating concrete on tarmacs. Its Ok for aircraft carrier decks. For aircraft carrier deck, I use hardwood floor sanding paper as a surface. I can punch holes in the sand paper to facilitate photo etch tie downs from Tom's Model Work's. For my tarmac bases, I use drywall sanding sheets as a surface. They can easily be cut into squares, and attached with contact adhesive. The scale I'm building in, will determine what grit I use for a surface. 1/144th: 220 grit. 1/48th: 100/150 grit, 1/32nd: 80 grit. The wood trim can be added with carpenters glue and finish nails .I have a nail set handy to bury the head of the finish nail just below the surface. I use finish putty to cover the nail holes. I buy 3/4" solid oak shoe mold from Lowes. Is comes natural. I can stain or paint whatever color I want. Edited January 18, 2018 by Swashplate Quote Link to post Share on other sites
Swashplate Posted January 18, 2018 Author Share Posted January 18, 2018 Quote Link to post Share on other sites
Swashplate Posted January 18, 2018 Author Share Posted January 18, 2018 Quote Link to post Share on other sites
Swashplate Posted January 18, 2018 Author Share Posted January 18, 2018 Quote Link to post Share on other sites
picknpluck Posted January 22, 2018 Share Posted January 22, 2018 That's awesome! What grit do you use for your carrier deck bases? Quote Link to post Share on other sites
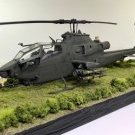
Swashplate Posted January 22, 2018 Author Share Posted January 22, 2018 Picknpluck,this is a close up of the 1/32nd F-18 base. It is 80 grit. The Helo base is 150 grit. Quote Link to post Share on other sites
Swashplate Posted January 22, 2018 Author Share Posted January 22, 2018 This is what a base looks like in raw form. 100 grit for a 1/48th scale model. The sandpaper was attached to the plywood with contact adhesive . Holes punched in sand paper for tiedowns. Holes drill in plywood to add depth for each tiedown. Decorative trim attached to the edge of the plywood. Holes and cracks filled with putty. Quote Link to post Share on other sites
Swashplate Posted January 22, 2018 Author Share Posted January 22, 2018 The completed base. Blue painters tape works really well to airbrush the lines. I used Testors Model Master Enamels, and Tamiya acrylics. I dry brushed artist oil’s on the surface to simulate tire marks. I thinned artist oils with mineral spirits to replicate oil stains. The base measures 11 x 11. Quote Link to post Share on other sites
AlienFrogModeller Posted January 25, 2018 Share Posted January 25, 2018 You sir are an inspiration. Thank you for showing us how to make these bases, this has become my go to reference. appreciate the guidance as I have been looking for something like this to complete the kit. Thank you. Quote Link to post Share on other sites
murad Posted January 25, 2018 Share Posted January 25, 2018 Ditto AFM, results are amazing. Quote Link to post Share on other sites
Swashplate Posted January 25, 2018 Author Share Posted January 25, 2018 Thanks gentlemen. Happy to explain the process. Quote Link to post Share on other sites

Recommended Posts
Join the conversation
You can post now and register later. If you have an account, sign in now to post with your account.