AlienFrogModeller Posted July 14, 2021 Author Share Posted July 14, 2021 20 hours ago, BastianD said: The weathering is absolutely stunning, nice to remind for my next build. Thank you for the compliment, much appreciated. 1 hour ago, Thadeus said: That is a lovelly bunch of Hornets. Sir, thank you. Cheers AFM Quote Link to post Share on other sites
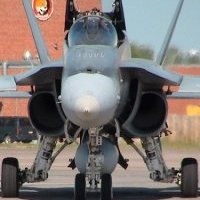
A-10 LOADER Posted July 14, 2021 Share Posted July 14, 2021 Very nice. I really like the tail on 188712. Steve Quote Link to post Share on other sites
AlienFrogModeller Posted July 15, 2021 Author Share Posted July 15, 2021 7 hours ago, A-10 LOADER said: Very nice. I really like the tail on 188712. Steve Thank you, yeah I love that bird, she was a bit leaky, but worked well. Cheers AFM Quote Link to post Share on other sites
AlienFrogModeller Posted July 15, 2021 Author Share Posted July 15, 2021 This is how to hangar Birds at the end of the day.... Cheers AFM Quote Link to post Share on other sites
AlienFrogModeller Posted July 15, 2021 Author Share Posted July 15, 2021 Birds are in the Hangar....ready for my next posting. Made some supports , then hot glued them in place. Cheers AFM Quote Link to post Share on other sites
Scooby Posted July 15, 2021 Share Posted July 15, 2021 8 hours ago, A-10 LOADER said: Very nice. I really like the tail on 188712. Steve Glad you liked it, I put in the request to paint the scheme on 712. Just today I spoke with the engineering officer who approved my submission. Both of us are retired but we live in the same city. We ended up painting it over Xmas vacation. Best Squadron I served in, AFM was/is a fun guy too. Quote Link to post Share on other sites
AlienFrogModeller Posted July 15, 2021 Author Share Posted July 15, 2021 6 minutes ago, Scooby said: Glad you liked it, I put in the request to paint the scheme on 712. Just today I spoke with the engineering officer who approved my submission. Both of us are retired but we live in the same city. We ended up painting it over Xmas vacation. Best Squadron I served in, AFM was/is a fun guy too. Awe schuckx, you're making me blush Scoob. Thank you, you're were/are a pretty guy too. Cheers AFM Quote Link to post Share on other sites
SERNAK Posted July 15, 2021 Share Posted July 15, 2021 5 hours ago, AlienFrogModeller said: Oh boy, oh boy, oh boy!!!! That #20 looks smashing!!!!!! What's the SN? Quote Link to post Share on other sites
AlienFrogModeller Posted July 15, 2021 Author Share Posted July 15, 2021 2 hours ago, SERNAK said: Oh boy, oh boy, oh boy!!!! That #20 looks smashing!!!!!! What's the SN? Thats the OOB from the Kinetic F-18C boxing (K48031). Actual number , I'd have to pull out the instructions to find it... Cheers AFM Quote Link to post Share on other sites
SERNAK Posted July 15, 2021 Share Posted July 15, 2021 4 hours ago, AlienFrogModeller said: Thats the OOB from the Kinetic F-18C boxing (K48031). Actual number , I'd have to pull out the instructions to find it... Cheers AFM No worries mate. I found the instructions online and checked the SN. Quote Link to post Share on other sites
AlienFrogModeller Posted July 15, 2021 Author Share Posted July 15, 2021 12 minutes ago, SERNAK said: No worries mate. I found the instructions online and checked the SN. Nice...thanks for the words appreciated. Cheers AFM Quote Link to post Share on other sites
AlienFrogModeller Posted July 16, 2021 Author Share Posted July 16, 2021 Final Jet in this series...795 Some of the final parts to be applied. The underside where it will house the Sniper Pod and the connection points for the flight controls. Gently sanded the connection points for the flight controls, I wanted a solid connection point. Also added the connection point for the Stn 6. Cheers AFM Quote Link to post Share on other sites
AlienFrogModeller Posted July 18, 2021 Author Share Posted July 18, 2021 Flight controls... Here I am starting to add the Flight controls. The flaps and ailerons added already as the position are fixed and predetermined by the flap/aileron actuators. Here I will show I add the Flap/Aileron shrouds... First I place in position and adjust with tabs of tape. I place flush with the airframe...this maintains good surface area contact with the wing. Then once I place my glue, Tamiya thin, I then place a piece of tape to position the shroud in the down position. There should be a small gap between the shroud and the flap/ailerons. LE Flaps are very similar process as the TE Flaps/Ailerons, no glue at this point, placing the LE Flaps to adjust the tape tabs to ensure left/right asymmetry. Once you have the desired asymmetry and flap down position, simply flip the LE Flap up and apply the applicable glue. I used ICS-200 BSI black glue. Then once I flip the LE Flap into place and gently pressing against the airframe to ensure positive contact and position I place a third tape tab to ensure positive connection and position. Outboard LE Flaps were simply pressed in place w/glue and positioned unalignment with the Inboard LE Flap position and secured with a tape tab. Cheers AFM Quote Link to post Share on other sites
A-10 LOADER Posted July 18, 2021 Share Posted July 18, 2021 Very nice. I really like your attention to all the small details. So worth it in the end. Steve Quote Link to post Share on other sites
AlienFrogModeller Posted July 19, 2021 Author Share Posted July 19, 2021 4 hours ago, A-10 LOADER said: Very nice. I really like your attention to all the small details. So worth it in the end. Steve Thank you, I agree, they can make a nice difference. I love it when friends of mine who worked on the aircraft and they pick out the details. Cheers AFM Quote Link to post Share on other sites
AlienFrogModeller Posted July 19, 2021 Author Share Posted July 19, 2021 In order to change the N2 bottle you have to have a handle to open the clamshell... Cut a notch into the LAU, I place in my hand and cut at the same time t ensure symmetry. The Drill your small holes... Then with your pre made handles, a drop of glue on a sprue rod...cut to length... With a drop of Tamiya thin glue...done. Cheers AFM Quote Link to post Share on other sites
AlienFrogModeller Posted July 19, 2021 Author Share Posted July 19, 2021 (edited) I found the HUD, I mentioned this before, but here is some better pics...is too wide. So I cut in half and slightly trim a little off (optional)..I found if you trimmed a bit off from the center cut it will sit square and flat in the final position, leaving a 90 degree HUD on both sides. I cut in half after I removed from the PE fret, then folded each one separately. Final position with IC-9000 BSI Black CA glue. Time for a black touch up...but I am going to add a couple details before I place the windscreen in place. Cheers AFM Edited July 19, 2021 by AlienFrogModeller Quote Link to post Share on other sites
AlienFrogModeller Posted July 19, 2021 Author Share Posted July 19, 2021 More cow bell...well, more HUD. With a .5mm led pencil for scale... Cheers AFM Quote Link to post Share on other sites
cruiz Posted July 20, 2021 Share Posted July 20, 2021 Nice move in the HUD, taking notes for a future build of this and the other details you are adding. Thanks for sharing, looking forward to the rest. Quote Link to post Share on other sites
AlienFrogModeller Posted July 20, 2021 Author Share Posted July 20, 2021 10 hours ago, cruiz said: Nice move in the HUD, taking notes for a future build of this and the other details you are adding. Thanks for sharing, looking forward to the rest. You are most welcome, and I hope you can take at least one thing away from this build...on my 5th one and still learning...LOL Cheers AFM Quote Link to post Share on other sites
AlienFrogModeller Posted August 17, 2021 Author Share Posted August 17, 2021 Folks, been working on some other projects lately and testing a new airbrush/compressor combo. The items tested is in the shots of the model. i will be using the neatandhandy combo for the remaining build of 795. Some progress with the paint Using some Mr Surfacer to create the anti skid on the Lex. I thinned it down with Mr Leveler and then as it dries, I kept stippling with a stiff brush until i got the desired effect. The application of the paint was impressive with the neatandhandy system. It came with a .3mm needle and has impressive control properties. Easy to clean and a spare battery. I used one battery, stress check, until it dies and was very hot, but performed like a trooper! I used Ammo and Gunze on the Hornet and used Mr Hobby primer 1500 on the Mustang finishing with Splash lacquer based paint for the Grabber Blue! I have to fix some spots on the Hornet and then sand, paint, rinse repeat...in the meantime I am building up my GBU-49s. Cheers AFM Quote Link to post Share on other sites
AlienFrogModeller Posted October 17, 2021 Author Share Posted October 17, 2021 Been some time since I updated, had to complete some other projects, or help them move closer to the finish line. But they are almost done and can concentrate on the last Hornet. As I am working on the staining for the ac, I am also progressing on the armament as well. Starting with the ResKit BRU-55 Then onto the BGU-49s Adding the Thermal protection layers, never done this before and I have tried two ways, one with Tamiya Putty and the other Mr Dissolved Putty. Primed... Until next time Cheers AFM Quote Link to post Share on other sites
AlienFrogModeller Posted October 22, 2021 Author Share Posted October 22, 2021 Made some Cricut custom masks for the major markings And yes, to make it difficult for all modellers, they are different colours, but at least in pairs - nose, Top and bottom. Adding a few more decals and then start the weathering process. Then I'll get to add these guys! Until next time Cheers AFM Quote Link to post Share on other sites
AlienFrogModeller Posted November 7, 2021 Author Share Posted November 7, 2021 Making some progress... Cheers AFM Quote Link to post Share on other sites
Scooby Posted November 7, 2021 Share Posted November 7, 2021 Great stuff Bear! Looks just like when we worked on 795! Quote Link to post Share on other sites

Recommended Posts
Join the conversation
You can post now and register later. If you have an account, sign in now to post with your account.