AlienFrogModeller Posted December 29, 2018 Author Share Posted December 29, 2018 (edited) 51 minutes ago, bradebaugh said: so I should have mentioned it when I saw you...what about scrapping away plastic on the tube instead of on the inner fuselage? Wouldn't it be easier? Bruce I actually had to do both. My first dry fit runs were after I thinnned out the intake tubes; fuselage plastic was getting very thin once I had the assembly fitting...pretty good. Everyone this is my good friend Bruce, we attend the same model club here, and is a great model advisor and my resin mentor. Cheers Edited December 29, 2018 by AlienFrogModeller Quote Link to post Share on other sites
Craig Baldwin Posted December 30, 2018 Share Posted December 30, 2018 Discovered this in my collection Quote Link to post Share on other sites
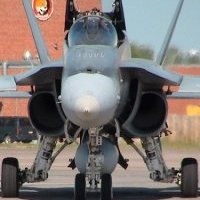
AlienFrogModeller Posted December 30, 2018 Author Share Posted December 30, 2018 (edited) 1 hour ago, Craig Baldwin said: Discovered this in my collection Nice pics. I was on that team, in the bottom pic, Cpl Carmen Bear; I have a complete walkaround just gotta digitize them all. The only pics I am missing is the intake and exhaust covers. I thought I had some...but I guess I don't. RIP SGT Scott "Swampfox" Marsh Edited December 30, 2018 by AlienFrogModeller Quote Link to post Share on other sites
AlienFrogModeller Posted December 30, 2018 Author Share Posted December 30, 2018 If you use the kit supplied cockpit, here is a small suggestion to have the cockpit sit solid on the NLG WW. Quote Link to post Share on other sites
AlienFrogModeller Posted December 30, 2018 Author Share Posted December 30, 2018 Resin cockpit. Here are my tools; wet sanding keeps the resin dust away. Very important if you do not wet sand, dust mask is a must for health reasons. As you can see the file I use, I dip it into the bottle of water. Then I wipe away the resid mud with a wet q tip. I do all of this on a bounty quilted sheet to capture the mud and any residual resin. Quote Link to post Share on other sites
AlienFrogModeller Posted December 30, 2018 Author Share Posted December 30, 2018 Here I scrapped away the front pin point and sanded that flat area down. I figured instead of sanding the resin to get the right seating depth of the cockit tub. Quote Link to post Share on other sites
AlienFrogModeller Posted December 31, 2018 Author Share Posted December 31, 2018 (edited) Some shots with the resin cockpits. Sanding on the bottom to make them sit properly was required and on the sides to have them sit perfectly. But all in all two cockpits tubs placed within a few minutes. Is it fitting that this is my first resin cockpit tub? Edited December 31, 2018 by AlienFrogModeller Quote Link to post Share on other sites
AlienFrogModeller Posted January 5, 2019 Author Share Posted January 5, 2019 Finished glueing the upper and lower fuselages together. Quote Link to post Share on other sites
AlienFrogModeller Posted January 5, 2019 Author Share Posted January 5, 2019 Don't like thi spart....let see if a simple fix is available. Quote Link to post Share on other sites
AlienFrogModeller Posted January 5, 2019 Author Share Posted January 5, 2019 (edited) I placed a .010" outer ring on part number H31 in step 9 of the instructions. At the two tabs near the top I placed an addition .005" and then test fit to ensure best fit possible. After several dry fit attemps, I gently sanded the additional spacer depth to fit. Edited January 5, 2019 by AlienFrogModeller Quote Link to post Share on other sites
AlienFrogModeller Posted January 5, 2019 Author Share Posted January 5, 2019 (edited) In this example, I glued the H31 piece inplace and let set. Then marked the "step" created on the outside of the nose to the fuselage. As you can see I needed to add the spacers in these particular spots. Dry fitting after this allowed for a smooth finish when the two are joined together. Edited January 5, 2019 by AlienFrogModeller Quote Link to post Share on other sites
AlienFrogModeller Posted January 5, 2019 Author Share Posted January 5, 2019 (edited) Dry fitting results, understand that this is one handed with no compession. With a little attitude adjustment and voluntold pressure...it will fit very nicely. Note the mac tac to protect the AOA vane. Edited January 5, 2019 by AlienFrogModeller Quote Link to post Share on other sites
AlienFrogModeller Posted January 8, 2019 Author Share Posted January 8, 2019 (edited) Evening gentlemen, Small tips to my elimination of joint lines, placing masking tape over details I want to protect during the sanding process. Taking a tool such as this dental tool and gently guide it over the joint repair, you will be able to feel the repair. If you feel a bump while dragging the tool you know you need to apply more filler or keep sanding. This could save you time and effort before you prime to expose the minor scratches or repairs before you apply final coat. I borrowed this technique from my Engine repair days on the Hornet when inspecting the #4 bearings, if we felt a scratch, the bearing was replaced.; this usually equated to a .001" scratch. Edited January 8, 2019 by AlienFrogModeller Quote Link to post Share on other sites
AlienFrogModeller Posted January 11, 2019 Author Share Posted January 11, 2019 (edited) Some testing of the canopy position...I had to develop this because I move alot and need a way to remove the canopy easily while trying to retain the proper angle of open. Edited January 11, 2019 by AlienFrogModeller Quote Link to post Share on other sites
skyhawk174 Posted January 13, 2019 Share Posted January 13, 2019 Carmen it looks so good. Some really nice instructions on upgrading this kit. Quote Link to post Share on other sites
AlienFrogModeller Posted January 13, 2019 Author Share Posted January 13, 2019 (edited) 9 hours ago, skyhawk174 said: Carmen it looks so good. Some really nice instructions on upgrading this kit. Thank you sir, your kind words are appreciated. Delays in some pics, been sick and am sanding a priming x3. Trying to ensure I get all the imperfections as good as I can. The problem is, if I work on it too long, I get the "that's good enough", then I set the project down and re-evaluate. Sometimes I shake my head at myself after..."what was I thinking" In the meantime, between priming and sanding, I am also working on a F-100 and a C-17A. Edited January 13, 2019 by AlienFrogModeller Grammar Quote Link to post Share on other sites
skyhawk174 Posted January 14, 2019 Share Posted January 14, 2019 On 1/13/2019 at 8:01 AM, AlienFrogModeller said: Thank you sir, your kind words are appreciated. Delays in some pics, been sick and am sanding a priming x3. Trying to ensure I get all the imperfections as good as I can. The problem is, if I work on it too long, I get the "that's good enough", then I set the project down and re-evaluate. Sometimes I shake my head at myself after..."what was I thinking" In the meantime, between priming and sanding, I am also working on a F-100 and a C-17A. Hope you are feeling better Carmen. Health is more important than modelling. I have a few tips if you are unsure how your sanding is going. 1. I close my eyes and run my finger over the seam. You would be amazed at how sensitive your finger is. Normally good indicator if more sanding is required. 2. The other is hold your part up to a mirror, with some high magnification and have a look. Has worked a couple of times for me. 3. I keep a cloth on my desk that has some Brasso on it. I use an old shoe polishing cloth that I got from a hotel many years ago but any sort of cloth should work. You normally don’t have to rewet it with the Brasso as it stays fine over time. After you have sanded, polish the seam with the Brasso soaked cloth and you should get a lovely shine. I then hold it up to the light and check the seam. Also, I am finally going to pick up one of these kits. A guy at our club has one for a really good price so I am getting it from him at the next meeting. I will then probably start it and follow your mods/updates. Keep them coming. Quote Link to post Share on other sites
AlienFrogModeller Posted January 15, 2019 Author Share Posted January 15, 2019 6 hours ago, skyhawk174 said: Hope you are feeling better Carmen. Health is more important than modelling. I have a few tips if you are unsure how your sanding is going. 1. I close my eyes and run my finger over the seam. You would be amazed at how sensitive your finger is. Normally good indicator if more sanding is required. 2. The other is hold your part up to a mirror, with some high magnification and have a look. Has worked a couple of times for me. 3. I keep a cloth on my desk that has some Brasso on it. I use an old shoe polishing cloth that I got from a hotel many years ago but any sort of cloth should work. You normally don’t have to rewet it with the Brasso as it stays fine over time. After you have sanded, polish the seam with the Brasso soaked cloth and you should get a lovely shine. I then hold it up to the light and check the seam. Also, I am finally going to pick up one of these kits. A guy at our club has one for a really good price so I am getting it from him at the next meeting. I will then probably start it and follow your mods/updates. Keep them coming. Chris nice tips, I will add them to my tool box! Cheers Quote Link to post Share on other sites
AlienFrogModeller Posted January 27, 2019 Author Share Posted January 27, 2019 (edited) Morning, minor updates, just sanding and minor filling before I prime. As I move through each aircraft, I am secretly designing in my head the final set up for each kit. Originally I was thinking a single flight line...not sure yet at this stage, but I am leaning to different bases for each one. Although I like the single flightline idea; it will not technically work for these aircraft as they are different in each config covering a wide time span. Edited January 27, 2019 by AlienFrogModeller Quote Link to post Share on other sites
skyhawk174 Posted January 28, 2019 Share Posted January 28, 2019 Hi Carmen any news on the resin cockpits? I may have missed the notice. Quote Link to post Share on other sites
AlienFrogModeller Posted January 28, 2019 Author Share Posted January 28, 2019 10 hours ago, skyhawk174 said: Hi Carmen any news on the resin cockpits? I may have missed the notice. Morning Chris, I have a lot of moving parts, pardon the pun, on this one. I am about to start my season of travelling and was trying to see if a trip to Canada was in the works. But that part is still up in the air. I do have a few sets ready, but I am now waiting for my boxes for shipping. Once I have those, I will be offering the resin sets for shipping hopefully by beginning Feb. Quote Link to post Share on other sites
skyhawk174 Posted January 28, 2019 Share Posted January 28, 2019 10 hours ago, AlienFrogModeller said: Morning Chris, I have a lot of moving parts, pardon the pun, on this one. I am about to start my season of travelling and was trying to see if a trip to Canada was in the works. But that part is still up in the air. I do have a few sets ready, but I am now waiting for my boxes for shipping. Once I have those, I will be offering the resin sets for shipping hopefully by beginning Feb. Thanks for the info Carmen. No rush on my part since I don't have the kit as yet anyway. Quote Link to post Share on other sites
ALF18 Posted January 29, 2019 Share Posted January 29, 2019 (edited) On 10/28/2018 at 1:11 PM, AlienFrogModeller said: Future; P4" pod external tanks ID light Blanking plate for Id light Cheers for now When you get a chance to make a P4 pod, I'll definitely be interested. Any chance it will look similar to a FACE pod (the satellite comms pod our alert Hornets carry most of the time)? ALF Edited January 29, 2019 by ALF18 Quote Link to post Share on other sites
AlienFrogModeller Posted January 30, 2019 Author Share Posted January 30, 2019 13 hours ago, ALF18 said: When you get a chance to make a P4 pod, I'll definitely be interested. Any chance it will look similar to a FACE pod (the satellite comms pod our alert Hornets carry most of the time)? ALF Currently I am looking at multiple pods. Cheers AFM Quote Link to post Share on other sites
AlienFrogModeller Posted January 31, 2019 Author Share Posted January 31, 2019 (edited) Some updates, almost done sanding the four horsemen Hornets. Here I show the nose to fuselage assy. I did not glue the upper nose assy to the nose fuselage; I glues the main assys together. This allowed me to make final adjustments to the aft IFR probe area. This was the best way I find as to allow final fit, one area at a time. I then glued the upper nose piece to the IFR probe assy. Edited January 31, 2019 by AlienFrogModeller Quote Link to post Share on other sites

Recommended Posts
Join the conversation
You can post now and register later. If you have an account, sign in now to post with your account.