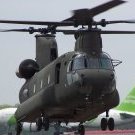
Hooker169 Posted April 13, 2018 Share Posted April 13, 2018 I'm getting ready to start my Italeri 1/48 Chinook and I'm trying to find a way to duplicate or simulate oil saturated paint as seen below. Chinooks were notorious for getting these oil stains below the fwd and aft heads and below the engines. Curious as to how you guys might go about it. Quote Link to post Share on other sites
thegoodsgt Posted April 14, 2018 Share Posted April 14, 2018 I would apply a wash using artist oils, thinned with turpentine. Black might be a bit harsh, so I'd start with a dark olive green color and see how that looks. You might experiment on an old model first to see how the oils lay down or into the underlying paint. Steven Brown Scale Model Soup Quote Link to post Share on other sites
Whiskey Posted April 15, 2018 Share Posted April 15, 2018 That looks more like the 'hook is wet from condensation than oil stains. Quote Link to post Share on other sites
ElectroSoldier Posted May 14, 2018 Share Posted May 14, 2018 I would go with a black wash then highlight by repainting it the lighter none stained colour myself. Quote Link to post Share on other sites
compressorman Posted May 16, 2018 Share Posted May 16, 2018 (edited) Hooker, I used a technique on a ww1 plane I built that might work for you. Do not use a wash, use an entirely different color for the stain, airbrush it on in a really thin mix and use the AB to blow it around. Look at the castor stains on the wings and fuselage of my Fokker and DH2 There are a lot of pics on a forum devoted to ww1 planes, Fokker Chris Edited May 16, 2018 by compressorman Quote Link to post Share on other sites
mgrandison Posted May 18, 2018 Share Posted May 18, 2018 I found a you tube video showing oil stains/grease effects weathering using Mig Fresh Engine Oil. Hope this helps. Quote Link to post Share on other sites
USAFsparkchaser Posted May 28, 2018 Share Posted May 28, 2018 That looks awsome, thanks. I will be ordering that stuff. Quote Link to post Share on other sites
Janissary Posted May 30, 2018 Share Posted May 30, 2018 Yes, thanks for the video. Even though I tend to watch these sorts of things from time to time, I was not aware of the 'fresh engine oil'. I just ordered one. I like hat it is not black (has a brownish tint to it just like real oil) and is translucent. This is ideal for what I have in mind for my current build. Quote Link to post Share on other sites
crackerjazz Posted May 31, 2018 Share Posted May 31, 2018 Wow, yes, that looks so much like real oil. You almost feel like you don't want to put any of it for fear of it not drying : ) Quote Link to post Share on other sites
Hooker169 Posted December 31, 2019 Author Share Posted December 31, 2019 I experimented a bit with an old 1/72 kit this morning, thanks to motivation from @janman The kit was original built 20 years ago and painted with MM Olive drab FS34087, no weathering or washes, just clear coated with Testors Dullcoat. The decals had silvered and the seem work was terrible so it seemed a suitable sacrificial lamb. What I'm trying to achieve is a finish similar to the one below. A well worn "Dirty D" look. You can see that the green CARC paint weathers and fades relatively quickly in service. Random touch-ups were added from CARC rattle cans by the crews. Add leaking engines, dripping rotor heads, soap stains and blobs of WTR (grease) and you get this. This is what I came up with. Keep in mind that I tried several different products and techniques. This is a test piece so Ill try to detail which ones worked and which didn't. Off the bat, the oil under the engine and aft pylon is too dark IMO but I'll get to that a bit later. First I had to lighten the middle of the fuselage since this seemed to fade faster and wasn't really effected by the hydraulic fluid or engine oil. I chose Field Green at first but it didn't seem right so I used FS34201 SAC Bomber tan to lighten the OD. You can see on this side the areas where Field Green didn't really work. SAC tan seemed to be the ticket. I also tried some Army Helo Drab in spots to simulate recently painted or replacement panels. So for the things that didn't work: For the really dark areas on the right side, which I personally don't like, I used Testors CreateFX black acrylic wash straight from the bottle. I blew it around with airbrush air but when it dried it was obviously too dark. On the left side you can see where I thinned the FX wash with acrylic thinner and again blew it around with airbrush air. This seemed to work pretty well for really oily areas. I guess the trick is to thin well and add layers slowly to achieve the desired look. What worked: I used artist oils, (black and green thinned with mineral spirits). I thinned it to basically make a filter or so I thought. While doing a few panels under the engine I accidentally flicked my brush on the edge of the cup and splashed droplets on the tunnel covers. Eureka, a leaking hinge pin seal!!! It instantly soaked into the finish and created the soaked in oil spots I was after! You can also see on the aft pylon the subtle areas where I used the artist oils effectively. All in all, I learned a lot. Both what works, what doesn't and what might if adjusted properly. Thoughts? Quote Link to post Share on other sites

Recommended Posts
Join the conversation
You can post now and register later. If you have an account, sign in now to post with your account.