Janissary Posted June 21, 2018 Share Posted June 21, 2018 (edited) Incredible work. I had a question about the wiring based on your photos (below). How do you attach the wires to the plastic? I assume you spot-weld it using CA. If so, how you progress? Do you first bend the entire wire to shape, or do you glue one spot, let it cure, then bend the wire to the next spot etc? Also, is the Tamiya tape helping with the attachment of the wire to the plastic, or is it just cosmetic? At any rate, it would great to hear your process of adding these wires. Thanks. https://i.imgur.com/xgGDWL7.jpg Edited June 21, 2018 by Janissary Quote Link to post Share on other sites
Major Walt Posted June 24, 2018 Share Posted June 24, 2018 Beautiful job Yufei! Quote Link to post Share on other sites
ching kuo Posted July 8, 2018 Share Posted July 8, 2018 Hi yufei, your posts are missing, rinse us with your progress !!! come on Quote Link to post Share on other sites
viperbite Posted July 12, 2018 Share Posted July 12, 2018 看大舰的WIP本身就是一种享受! Quote Link to post Share on other sites
haneto Posted July 22, 2018 Author Share Posted July 22, 2018 On 6/22/2018 at 3:23 AM, Janissary said: Incredible work. I had a question about the wiring based on your photos (below). How do you attach the wires to the plastic? I assume you spot-weld it using CA. If so, how you progress? Do you first bend the entire wire to shape, or do you glue one spot, let it cure, then bend the wire to the next spot etc? Also, is the Tamiya tape helping with the attachment of the wire to the plastic, or is it just cosmetic? At any rate, it would great to hear your process of adding these wires. Thanks. https://i.imgur.com/xgGDWL7.jpg Thanks for your encouragement. I used ERGO 5400 and 5600 super glue. They dry so fast and so strong, highly recommended. The wire I used are brass from electric wire, neither too soft like weld line nor too hard like normal brass line. Drill a hole at the end of the wiring, glue the wire and use a sharp twizer to bend it to correct shape, then glue at the right place just like real thing, then repeating bend/glue again. Very tiring and time cosuming, but worth all the effort after painting. HTH Yufei Quote Link to post Share on other sites
haneto Posted July 22, 2018 Author Share Posted July 22, 2018 On 7/12/2018 at 12:00 PM, viperbite said: 看大舰的WIP本身就是一种享受! Thanks for every one's watching especially some old buddy from China! ;) Quote Link to post Share on other sites
haneto Posted July 22, 2018 Author Share Posted July 22, 2018 So after the busy May, June and 1st half of July (coutinous biz trips in Wuhan, Beijing, Tianjin, Guangzhou, Dalian and Tokyo), I finally could make some update. Yes I'm still modeling the Flanker little by little. You can find the kit was designed with full rivets lay out, but some rivets are too shallow to hold washing, especially the stabilizers. So I used 0.15mm and 0.2mm drill to deepen them, one by one. Fortunately I do NOT need to add rivets by myself but only deepen them, so just some patience is all you need. Turn on the cooler and Hi-Fi in my work room, one hour before sleeping and it still took me about 10 nights to deepen all the rivets. After coating with Mr. Surface No.1500, I still used No.2000 sand paper to polish the surface, for a definite smooth effect bring to the camo painting. And this is how the final result looks like after surfacing. Rivets on stabilizers are very shallow, be sure to deepen them. Thanks to the good fitting of the kit, I will paint/weather parts before gluing them to avoid the annoying any obvious painting granule around the corners. Quote Link to post Share on other sites
haneto Posted July 22, 2018 Author Share Posted July 22, 2018 (edited) When I was getting mad drilling those rivets, I built some accessories to change the mood... I'm also scratch-building a PLA pilot. To be continued... Edited July 22, 2018 by haneto Quote Link to post Share on other sites
zaxos345 Posted July 22, 2018 Share Posted July 22, 2018 Amazing..... John Quote Link to post Share on other sites
Peterpools Posted July 23, 2018 Share Posted July 23, 2018 Holy Cow - incredible. The level of detail and workmanship is amazing Keep ‘em comin Peter Quote Link to post Share on other sites
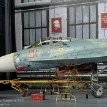
haneto Posted September 8, 2018 Author Share Posted September 8, 2018 Thanks for watching and sorry for the abesence guys. Met some accident during my summer vocation in Koh Samui when I slippered in swimming pool and my foot thumb nail had to be removed by surgery. During my rest at home finally finished weapon painting. Besides the AA missiles provided by GWH I also added B-13L rocket launchers which are very common for PLAAF training. The outloads, look simple but took tons of efforts and patience. Different colours and surface texture means many masking works, both spray work and brush paint. And since outloads are usually stored very well they are generally brand new, which means you need to paint them as neat as you can since no weathering trick to cover your miss. Quote Link to post Share on other sites
haneto Posted September 8, 2018 Author Share Posted September 8, 2018 There's nothing cannot be done by communist rockets, if there is, make it double! Quote Link to post Share on other sites
haneto Posted September 8, 2018 Author Share Posted September 8, 2018 My favourite missile R-27, looks so Russian! Quote Link to post Share on other sites
haneto Posted September 8, 2018 Author Share Posted September 8, 2018 Not a big fan of R-77, looks too Western. Quote Link to post Share on other sites
haneto Posted September 8, 2018 Author Share Posted September 8, 2018 The deadly R-73, no second to AIM-9X even much aged. Quote Link to post Share on other sites
haneto Posted September 8, 2018 Author Share Posted September 8, 2018 Under some aspect you can find the different surface texture on the missiles. Gloss, semi gloss, flat or metalic This shows how good a modeller has spent time to learn and understand the missile in real life. Meanwhile a great fun from modelling as well. Quote Link to post Share on other sites
haneto Posted September 8, 2018 Author Share Posted September 8, 2018 Actually I almost finished camo on main parts, but now pending to Chinese font stencils which are under designing. I cannot paint other colors on other details since I need to spray the semi gloss surface once decals attached, to make different surface texture on the fuselage again, like what I did on missiles. So let me save the explanation to next update. To be continued...... Quote Link to post Share on other sites
EagleAviation Posted September 8, 2018 Share Posted September 8, 2018 Superb work so far, great attention to detail! Quote Link to post Share on other sites
Falconxlvi Posted September 8, 2018 Share Posted September 8, 2018 The missiles and rockets are spectacular. It is truly amazing how much ordnance the Su-35 can carry! Talk about a heavy fighter! Quote Link to post Share on other sites
Janissary Posted September 8, 2018 Share Posted September 8, 2018 Incredible! The extra info in the pics is very useful. Quote Link to post Share on other sites
foxmulder_ms Posted September 8, 2018 Share Posted September 8, 2018 (edited) Looking absolutely GREAT!!! but you mixed the places of camouflage colors on the plane! 🙂 The main color should be lighter blue not the gray.. Edited September 8, 2018 by foxmulder_ms Quote Link to post Share on other sites
haneto Posted September 9, 2018 Author Share Posted September 9, 2018 2 hours ago, foxmulder_ms said: Looking absolutely GREAT!!! but you mixed the places of camouflage colors on the plane! 🙂 The main color should be lighter blue not the gray.. No buddy, PLAAF camo is totally different than RuAF. Main color is light grey instead of blue, check the fuselage camo pattern. Quote Link to post Share on other sites
foxmulder_ms Posted September 9, 2018 Share Posted September 9, 2018 Evidently; I always thought they had the same camo. Quote Link to post Share on other sites
haneto Posted September 9, 2018 Author Share Posted September 9, 2018 (edited) 12 minutes ago, foxmulder_ms said: Evidently; I always thought they had the same camo. PLA camo color are opposite to RusAF, the overall light blue is replaced by light grey. And darkest blue is lighter on PLA than RuAF. Camo pattern is similar but a bit different on wing tips. I have lots of PLA Su-35 photos from my resources but since it's still classifed somehow, I can only post 2 of them with some adds on. Others are from PLAAF official resourse. Edited September 9, 2018 by haneto Quote Link to post Share on other sites
foxmulder_ms Posted September 9, 2018 Share Posted September 9, 2018 I am actually glad. I will be doing the second Su-35 a PLAAf one and now the two Su-35 will differ 😄 Quote Link to post Share on other sites

Recommended Posts
Join the conversation
You can post now and register later. If you have an account, sign in now to post with your account.