stalal Posted October 23, 2018 Share Posted October 23, 2018 Paint work on the exhaust and the imagination you have put in is awesome. Thanks for sharing. Quote Link to post Share on other sites
SebastianP Posted October 29, 2018 Share Posted October 29, 2018 I'm going to cry in a corner for a bit and pretend that your model is 1/8 scale instead of 1/48... because that's what it will look like compared to my results I'm sure, and I haven't even started on mine yet. Quote Link to post Share on other sites
Falconxlvi Posted November 6, 2018 Share Posted November 6, 2018 Wow. Those exhausts! Speechless! Quote Link to post Share on other sites
delayar Posted November 14, 2018 Share Posted November 14, 2018 Just found this thread and I have to say your work is astounding! But what is not less astounding and outstanding is your detailed build report, which can serve as a great reference! Cheers, Markus Quote Link to post Share on other sites
ching kuo Posted December 11, 2018 Share Posted December 11, 2018 (edited) Hy Haneto what news? Edited December 11, 2018 by ching kuo Quote Link to post Share on other sites
Deino Posted December 25, 2018 Share Posted December 25, 2018 🙂 https://m.facebook.com/story.php?story_fbid=533658707151159&id=100015211022791&refid=17&ref=content_filter&_ft_=mf_story_key.533658707151159%3Aog_action_id.533658870484476%3Atop_level_post_id.533658707151159%3Atl_objid.533658707151159%3Acontent_owner_id_new.100015211022791%3Athrowback_story_fbid.533658707151159%3Aphoto_id.533658327151197%3Astory_location.4%3Astory_attachment_style.video_autoplay%3Athid.100015211022791%3A306061129499414%3A2%3A0%3A1546329599%3A627277461923099430&__tn__=*s*s-R Quote Link to post Share on other sites
Falconxlvi Posted December 25, 2018 Share Posted December 25, 2018 Incredible- the metalwork and exhausts are perhaps the best I’ve ever seen done in plastic. Thanks for posting the link 👍🏻 Quote Link to post Share on other sites
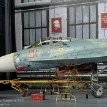
haneto Posted January 22, 2019 Author Share Posted January 22, 2019 Hi guys Happy new year! Sorry for being silent for a while but actually I finished this Flanker in 2018, as the first but also the last aircraft model I done for the year. After that a lot of busy things, most time went to family service and our local regular event, Shanghai New Year Model Contest (SNYMC). We invited Mig, Max Watanabe and Shuichi Hayashi as guests and I was in charge of their translation, especially for the Japanese part. That was some very happy 2 days indeed. Anyway past is past and in China, the new year has not come yet. Yes I mean the China Lunar New Year. Though I'm also very busy for the new Su-27 vanila Flanker design work... So I decide to find some time to make up the WIP pics and share with you guys. Hope this thread could be helpful when you build the GWH Su-35 and also give you some hints on other aircraft modeling. So I first finished camo spray. Both color and camo pattern on PLAAF scheme is different than RusAF, which has been fully reflected on the newest GWH S4810 kit so I'll save my words here. As you can see I have built the radar so I want to show it with radome not glued. I added 3 micro maganets inside the radome and also beneath radar part, to assure radome hold tighter. And I emphasize again: the lightning stripes on Su-35 radome are recessed and silver! Quote Link to post Share on other sites
haneto Posted January 22, 2019 Author Share Posted January 22, 2019 Next is the naked bare metal burnt effect on engine naccels. Many may think it quite headache to replicate but I believe after careful studying on the real life photos, you can find some hints and regular pattern for them. For example, the number of the obvious burnt "lines" on the panels, is same on every aircraft. That is because of the factory manufacture process and AF-41F engine heating features are always SAME. So some quantization work(base color and pattern on panels), plus some sensibility work (weathring effect) will make this replication much easier. Yes, thinking by brain before making by fingers, is always the short cut to success. Model vs real life. Quote Link to post Share on other sites
haneto Posted January 22, 2019 Author Share Posted January 22, 2019 Same logic for the upper side engine naccel. Vs real life. Quote Link to post Share on other sites
haneto Posted January 22, 2019 Author Share Posted January 22, 2019 Stabilizers are bit more complex. On different angles the metal reflection effect is very different, which is more challenging but also interesting. My first thought is to use some laser reflection sheet, but I hate the sheet may come off over several years and painting on the sheet is really no fun. So finally I still decide the paint the effect as more conservative but steady way. And done. Quote Link to post Share on other sites
haneto Posted January 22, 2019 Author Share Posted January 22, 2019 Some details were also painted. Since the PLAAF Su-35 are brand new, parked in hangar and very well maintenanced, I made very little weathering on it. But still my friend who works in PLAAF was not happy enough and commented "it's still not clean enough!". Well in a world where people are use to heavey taste fast food, maybe it's too clean to catch some people's attention, haha! Another word I'd like to emphasize is that I used different texture paint on different areas on the plane. Gloss, semi-gloss, flat, metalic, etc. Why bother that much? Because the real aircraft is just like that! Different paint just has different texture on the real life and I must replicate them after studying so many photos! That's the fun of modelling, isn't it? Quote Link to post Share on other sites
haneto Posted January 22, 2019 Author Share Posted January 22, 2019 (edited) Go on. Check the different texture on surface! All parts painting/weathering done. Ready for final assembling. Edited January 22, 2019 by haneto Quote Link to post Share on other sites
haneto Posted January 22, 2019 Author Share Posted January 22, 2019 As I mentioned in previous reply, cut some material from the install pins, could greatly enhance the assembling of intake/engine parts on fuselage. Look, seamless! Still 2 gaps over wing root, needs to be filled/sanded/painted. No compromise for a geniune air modeller!! I glued wheels at last, to assure all weighted wheels flat surface attach the absolutely flat glass seamless. These tiny skills could greatly improve your model overall finish effect. Devils are in Details! Quote Link to post Share on other sites
haneto Posted January 22, 2019 Author Share Posted January 22, 2019 Time for diorama accessories. PLAAF use some special numbering rules than RusAF, which is also another fun to research within limited references! Quote Link to post Share on other sites
haneto Posted January 22, 2019 Author Share Posted January 22, 2019 3 figures by different manufacture method. PLA pilot: hand scrupt by myself (check Fairy Hobby on eBay) Russian pilot: CAD design+ 3D print Russian ground crew: real human 3D scan + 3D print I used micro magnets, again, to hold figures on diorama base. Quote Link to post Share on other sites
Falconxlvi Posted January 22, 2019 Share Posted January 22, 2019 Wow - right click, save! Thanks you so much for taking the time to detail each photo! I am definitely building one of these in the future and this will be my one stop shop for reference. Your craftsmanship, methodology, and photography is all superb. Thank you! PS- I can’t wait for the new GWH Su-27 🤗 Quote Link to post Share on other sites
ching kuo Posted January 22, 2019 Share Posted January 22, 2019 Yufei, I knew you were going to make a smashing 2019 entry !!! it's a pleasure to see your posts Quote Link to post Share on other sites
dustiepal Posted January 22, 2019 Share Posted January 22, 2019 Fantastic! I love the way that you detailed the build. Thanks for showing your hard work. Dave Quote Link to post Share on other sites
LyIgor Posted January 22, 2019 Share Posted January 22, 2019 Amazing update Yufei! Quote Link to post Share on other sites
Mstor Posted January 23, 2019 Share Posted January 23, 2019 A masterpiece! Simply amazing. I'm throwing in the towel Quote Link to post Share on other sites
haneto Posted January 23, 2019 Author Share Posted January 23, 2019 Thanks for your feedback and encouraging. Russian planes are quite complicated for painting and weathering, especially Flanker family. I can make 3 F-15s instead of only 1 Flanker... Final pics are for carrying hints. I bought biggest aluminium case which is allowed to be carried into cabin, full of 1.5*1.5cm precut pieces of sponge. You only take out the unnecessary sponge piece to match the model outline. Tried the case to bring it to Shanghai New Year Model Contest and it showed perfect protection for the model. Will use this case for my attendance to Shizuoka Hobby Show this May. Quote Link to post Share on other sites
haneto Posted January 23, 2019 Author Share Posted January 23, 2019 This kit has the feature to allow canopy switch between open and close mode. The merit is very obvious: 1. easy to carry and maintenance. 2. you can always enjoy cockpit details and beautiful outline of the Flanker. Some pictures of finished diorama took by audience at Shanghai New Year Model Contest on 31st Dec and 1st Jan 2019. Will take more formal pics outside during the China Lunar New Year holidays. Finale. Quote Link to post Share on other sites
Mstor Posted January 23, 2019 Share Posted January 23, 2019 Yufei, you're not just a master builder, you have a calling. I am in awe. Quote Link to post Share on other sites

Recommended Posts
Join the conversation
You can post now and register later. If you have an account, sign in now to post with your account.