Hammerhead11 Posted August 30, 2019 Share Posted August 30, 2019 I’m new to this forum, but I wanted to share the build I’m doing of Eduard’s F6F-3. Naval aviation has been an area that I haven’t spent much time on and wanted to try my hand at painting some blue. My end goal isn’t to create an accurate Hellcat down to the last rivet, but rather, my interpretation of a Hellcat. To that end, I chose the Eduard kit as the reviews seemed generally more favorable than the other offerings, plus the Profi Pack has the bonus of the resin wheels and photo etch detail sent. I also purchased a set of Brass barrel upgrades and a resin pilot. Quote Link to post Share on other sites
dnl42 Posted August 30, 2019 Share Posted August 30, 2019 Welcome to the forum! Any model of a Grumman aircraft is obviously a brilliant choice! I'll enjoy following along! Quote Link to post Share on other sites
Hammerhead11 Posted August 30, 2019 Author Share Posted August 30, 2019 32 minutes ago, dnl42 said: Welcome to the forum! Any model of a Grumman aircraft is obviously a brilliant choice! I'll enjoy following along! Thank you, I'm still trying to figure out how to get images loaded on here properly, here is one shot of all of the contents prior to kicking off. Quote Link to post Share on other sites
dnl42 Posted August 30, 2019 Share Posted August 30, 2019 2 minutes ago, Hammerhead11 said: Thank you, I'm still trying to figure out how to get images loaded on here properly, here is one shot of all of the contents prior to kicking off. That worked fine! Oh, and good choice on the Master barrels--they're amazing! Quote Link to post Share on other sites
Hammerhead11 Posted August 30, 2019 Author Share Posted August 30, 2019 (edited) Hopefully this shows up, I started by working on the engine. The kit components offer a nice place to start from, but in general are pretty simplified. I began by adding detail to the Distributor caps, Magneto and Reduction gear housing as well as added the ignition harness. Here is another shot: After that, I began adding detail to the cylinders, including completing the ignition harness, and magneto wires. I also build a new bolt ring connecting the reduction gear housing to the crank case. Finally, primed it all black in preparation for painting. Overall materials used were Evergreen Styrene, copper and steel floral wire and lead solder. Completed engine, painted and weathered. Sorry I didn't photograph this part. Paints used were Vallejo Model Air acrylics and oils for the weathering and washes. Edited August 30, 2019 by Hammerhead11 Added additional pictures Quote Link to post Share on other sites
Aigore Posted August 31, 2019 Share Posted August 31, 2019 Now that is a sweet engine! Quote Link to post Share on other sites
Hammerhead11 Posted September 1, 2019 Author Share Posted September 1, 2019 7 hours ago, Aigore said: Now that is a sweet engine! Thanks, I’m Pleased with how well it turned out, better than I expected. Quote Link to post Share on other sites
ViperZero Posted September 1, 2019 Share Posted September 1, 2019 (edited) Nice start on this Hellcat. The engine seems great! Edited September 1, 2019 by ViperZero Quote Link to post Share on other sites
Falconxlvi Posted September 1, 2019 Share Posted September 1, 2019 Great job on the engine! Wow! Steve Quote Link to post Share on other sites
Brett M Posted September 1, 2019 Share Posted September 1, 2019 Welcome to ARC and nice opening thread! Like others have said, that engine looks great. Looking forward to seeing more. Quote Link to post Share on other sites
Hammerhead11 Posted September 1, 2019 Author Share Posted September 1, 2019 9 hours ago, ViperZero said: Nice start on this Hellcat. The engine seems great! 7 hours ago, Falconxlvi said: Great job on the engine! Wow! Steve 5 hours ago, Brett M said: Welcome to ARC and nice opening thread! Like others have said, that engine looks great. Looking forward to seeing more. Thanks everyone, I appreciate very much your kind words. Continuing on, I started working on the engine cowl. I plan on displaying this Hellcat as though it just landed and so I decided to open up the cowl flaps a bit. I also decided to attempt to add some more detail into the inside as a good portion of it would be visible around the engine. I wasn’t going super accuracy, but at least give the impression that there is some structure in there. I also needed to partition off the lower ducting, this was done mainly to make sure you couldn’t see the engine through the lower grill, so again, not accurate at all. Paints used are Vallejo model air and weathering was done oils. Quote Link to post Share on other sites
dnl42 Posted September 1, 2019 Share Posted September 1, 2019 Nice work on this! Quote Link to post Share on other sites
Hammerhead11 Posted September 4, 2019 Author Share Posted September 4, 2019 Continuing on, I started working on the cockpit. What Eduard supplies for the cockpit leaves a little to be desired. The sidewalls, floor and rear bulkhead are VERY simplified. Somewhat ironically, the kit supplied instrument panel is quite detailed, but the Profipack comes with Eduards brilliant photoetch IP, which just takes things up a notch. Anyways, I decided to scrap most of the cockpit and build a new one. new floor and rear bulkhead, evergreen styrene. kit seat vs new seat, the kit seat was overly thick and too large. Photo etch piece is from the kit. building up the structure of the floor. test fitting into the fuselage. I decided I would use the kit control stick, rudder peddles, and parts of the right side console. Additional detail added to the seat to represent the support structure. In the back group you can see that I ended up using the kit part for the head rest on the bulkhead. here is the mostly rebuild right side detail. here is the left side detail. completed floor and rear bulkhead. It’s still very simplified compared to the actual aircraft, but I think it looks far superior to the kit supplied detail. and all of the cockpit components ready for some paint. and base coats laid down. Now to start on the instrument panel photoetch. so, the Eduard photoetch is amazing. So many tiny little pieces, but absolutely worth it. Unfortunately I didn’t take a lot of photos painting the detail and weathering in the cockpit, but you can see a bit of it in the following photos. All paints used are Vallejo acrylic, weathering was done with oils and enamel washes. I haven’t added the top portion of the harness as I plan on having these draped over the sides of the fuselage, so they will be added at the very end. At this point all that’s left is to glue it all together and glue the two fuselage halves together. Next I will be tackling the wings and landing gear. Quote Link to post Share on other sites
Kurt H. Posted September 4, 2019 Share Posted September 4, 2019 That is some really nice scratchbuilding. A whole cockpit. Can you answer something for me I have not been able to figure out ... how did you cut the curves on that bulk head? What kind of tool did you use? Quote Link to post Share on other sites
Hammerhead11 Posted September 4, 2019 Author Share Posted September 4, 2019 6 hours ago, Kurt H. said: That is some really nice scratchbuilding. A whole cockpit. Can you answer something for me I have not been able to figure out ... how did you cut the curves on that bulk head? What kind of tool did you use? Thank you Kurt, it was a little scary at first replacing almost the whole cockpit, but I rationalized it by thinking that if I totally butchered it, I could always resort back to the kit parts. So, that took some of the pressure off. As for your question, here is the process that I used. I traced the kit part onto the blank plastic stock I was using. Using very sharp long bladed scissors I roughly cut out the shape. I then used a combination of back scraping with my hobby knife and files/sandpapaer to refine the edges. I constantly test fitted it with the fuselage to see where I needed to remove more material until I was happy with the shape and fit. I think it took less than an hour to get it to where I was happy. I hope that answers your question. No special tool, just used the kit part as a template. Quote Link to post Share on other sites
dnl42 Posted September 4, 2019 Share Posted September 4, 2019 Nice work on that cockpit! Love the seat. The F4F has an oxygen bottle just aft and slight to starboard of the seat. Do you know if the F6F is similar? Quote Link to post Share on other sites
Hammerhead11 Posted September 4, 2019 Author Share Posted September 4, 2019 36 minutes ago, dnl42 said: Nice work on that cockpit! Love the seat. The F4F has an oxygen bottle just aft and slight to starboard of the seat. Do you know if the F6F is similar? Thanks, It does. See the image below. When building the cockpit, I decided that it wouldn't be visible and would push the seat forward too much for me to put it in (my scratchbuilding skills are still somewhat lacking still) so, I left it out. But yes, it does exist 🙂 Cheers Quote Link to post Share on other sites
dnl42 Posted September 4, 2019 Share Posted September 4, 2019 1 hour ago, Hammerhead11 said: my scratchbuilding skills are still somewhat lacking still Wait, what? Quote Link to post Share on other sites
Hammerhead11 Posted September 4, 2019 Author Share Posted September 4, 2019 40 minutes ago, dnl42 said: Wait, what? I wasn't confident enough to push the detail more. I need to work on that. But overall I'm happy with the results. Quote Link to post Share on other sites
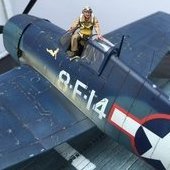
Hammerhead11 Posted September 5, 2019 Author Share Posted September 5, 2019 Got a little more work done. Got the fuselage all closed up and started working on the seams. the fuselage halves were a little warped so it took some clamping, but other than that it all lines up pretty well. got the control surfaces glued together and drying. a few detail pieces added to the wheel wells. I didn’t find any great references for this area, so I won’t be adding any additional detail. moved on to the landing gear and removed the mounded on break line and add new ones made from floral wire. more shaping of the break lines. the resin wheels included in the profipack are beautiful. The detail is so sharp and clean. These are a massive improvement over the kit wheels. Totally worth it. mostly completed landing gear. I will leave these off and paint them separately. I also painted up the pilot figure while I was waiting for glue to dry. This is a resin figure from Aero Bonus and is very high quality. I found not defects or issues with the casting and the detail is nice and sharp. Cheers! Quote Link to post Share on other sites
Brett M Posted September 5, 2019 Share Posted September 5, 2019 NICE work on the pilot figure! Quote Link to post Share on other sites
Hammerhead11 Posted September 6, 2019 Author Share Posted September 6, 2019 20 hours ago, Brett M said: NICE work on the pilot figure! Thank you! Quote Link to post Share on other sites
Hammerhead11 Posted September 8, 2019 Author Share Posted September 8, 2019 Quick update: managed to get all of the major sub assemblies put together and prepped for painting. I added one final detail to the cockpit, extended the lip of the hood over the instrument panel. Got all of the seam work done and cleaned up, re-scribed the lost detail and restored the rivets that were lost. Got the canopy masked and prepped for painting. Eduard's pre cut masks are amazing and I feel I have been spoiled now. Cheers! Quote Link to post Share on other sites
Hammerhead11 Posted September 9, 2019 Author Share Posted September 9, 2019 (edited) Well, everything is primed now. Tamiya fine primer straight from the can. I also started to lay down the zinc under layer that will be the base for my chipping. My research suggested that it would have been rare for a navy plane to be scratched down to bare metal as this would have resulted in corrosion, service crews would have been quick to repaint any exposed metal, but often the planes would be scratched down to the primer. That’s what I will attempt to replicate. propeller received a base of aluminum. I also prepped and primed the -5 fuselage to use as a test bed for the chipping process. It’s new to me and I don’t want to ruin lol the work I’ve done so far. Layers so far: tamyia fine primer tamiya mix of yellow and green for the zinc primer clear gloss hairspray intermediate blue down. dark blue down. The chipping is done with clear gloss and some panel liner added. Over all I’m pretty satisfied with the results. They look pretty convincing to me. I will test this process next on the propeller then if that goes well I will proceed to do the rest of the plane. if anyone who has experience with this process has any tips or critiques please share with me so I can make sure to incorporate them when I do this to the actual model. cheers. Edited September 11, 2019 by Hammerhead11 Fixing some auto corrected words Quote Link to post Share on other sites
Falconxlvi Posted September 10, 2019 Share Posted September 10, 2019 Wow! I am really glad you joined the forums and are sharing your work with us. That pilot figure is top notch as is the weathering you’ve started along the fuselage! Tremendous build! Steve Quote Link to post Share on other sites

Recommended Posts
Join the conversation
You can post now and register later. If you have an account, sign in now to post with your account.