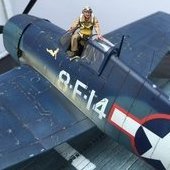
Hammerhead11 Posted December 27, 2019 Author Share Posted December 27, 2019 Well folks, she’s done. In a stroke of good fortune, the kids all wanted to go play with their cousins today so my better half drove them across town to her sisters and gave me the green light to stay home and finish up my P-38. (Seriously guys, I’m lucky to have a supportive wife.). So, White 147 is done now. I will put up a full album in the completed build section and link it here. But here is a glamour shot to wet your appetite. I can’t even begin to express how wonderful this kit was. It has most likely spoiled me. Just about everything fit together just as it was engineered. And despite the complicated design of this aircraft, Tamiya made it a joy to put together. I don’t think there was ever any one place where I got frustrated with the build. If I had to level any criticism toward this kit it would have to be the decals and the tires. Tamiya just hasn’t quite figured that part out yet. Whilst the color and registration of the decals was spot on, they are just way to thick. I struggled to get the stars to conform to the few panel lines that they covered, even with my super strong Walthers decal solution. As for the tires, come on Tamiya, separate hubs and weighted tires are a thing these days. I will definitely buy some resin replacements for my next build. I know that the gun barrels will be a problem for some people, but I was rather pleased with the decals used on the gun barrels to represent to cooling sleeves. I understand this won’t be appealing to everyone, and when I build this again, I will buy some AM barrels. But, this one was a blast and I appreciate everyone who followed along. I will be taking a break from aircraft for a little while. I will be working on a Takom full interior Panther as well as Masterpiece Models 1/77th scale Disney Nautilus for my father. But after that I will be back with a Tamiya P-47D. thanks! Brett Quote Link to post Share on other sites
Curt B Posted December 27, 2019 Share Posted December 27, 2019 Brett, Thanks for the pictures, and yes they DO help!! I'm really appreciative of you posting them. I see you finally finished your Miss Virginia! She looks great, really, and looking forward to more detailed pictures of the finished airplane! I just got the Eduard masks, the Look IP/seatbelts, and the Eduard Superchargers in the mail today. I must admit that I took a shot in the dark with the superchargers, and I really didn't know what to expect in terms of more/better detail compared to the kit parts. I have to say, though, now seeing the resin parts and comparing them to the styrene, there really IS no comparison. The Eduard parts are truly fantastic, mostly in the take and exhaust manifolds, where they have fully defined and split intakes, where the Tamiya parts, while nice, don't come close to this level. If you are going to do another one of these P-38s, PLEASE give consideration to these Eduard parts! And, based on your comments, I'm going to consider aftermarket wheels/tires. I don't know if there are any Miss Virginia Cartograph decals, but if so, that's the way I'd like to go. Or, and this is a big one, maybe I'll consider biting the bullet and trying to figure out how to use the brand new Silhouette Cameo 4 machine that I bought a month ago and haven't even opened yet, to make masks so I can paint on the markings. At least the stars and numbers, if not the 'Miss Viginia' script. We'll see how bold I am regarding that as an option! 😓 Lastly, though I'd noticed you had planned to use a 150 and a 300 external tank, I did ask for an extra confirmation on whether that was truly the case on the Yamamoto mission. I'd noticed that the Chris Wauchup 'Miss virginia' looks like it had two 150s, and I wanted to make sure whether that was correct or not. I started another thread, and got what I think is a pretty solid answer, and it looks like you went the route that was suggested, one each. Thanks for all your responses, and looking forward, again, to more photos!! Quote Link to post Share on other sites
Hammerhead11 Posted December 27, 2019 Author Share Posted December 27, 2019 Hey Curt, thanks for the heads up about the super chargers, I’ll for sure keep them in mind for the next build! As for the drop tanks, I was mainly just going off the instructions. Not that Wikipedia is the most reliable of sources, they do have this to say about Operation Vengeance: ”All of the P-38 fighters mounted their standard armament of one 20 mm cannon and four .50-caliber (12.7 mm) machine guns, and were equipped to carry two 165-US-gallon (620 L) drop tanks under their wings. A limited supply of 330-US-gallon (1,200 L) tanks was flown up from New Guinea, sufficient to provide each Lightning with one large tank to replace one of the small tanks. Despite the difference in size, the tanks were located close enough to the aircraft's center of gravity to avoid any performance problems.” I also recall reading an excerpt from one of the pilots who participated in the mission mentioning they used the ferry tanks as well, but I can’t seem to find where I saw that. For me though it was an easy decision, I’m a big fan of asymmetrical load outs, so, the chance to do the two different sized tanks and paint them differently was a no brainer. Also, I have nothing historical to back up that one is painted all Gray and the other painted OD/grey, again, asymmetrical and all that. Brett Quote Link to post Share on other sites
Hammerhead11 Posted December 27, 2019 Author Share Posted December 27, 2019 Here is the full album: Brett Quote Link to post Share on other sites
Curt B Posted December 29, 2019 Share Posted December 29, 2019 (edited) Brett, Sorry it took so long, but here, finally, are some Tempest photos of my completed one. Again, this is the Eduard 1/48 Tempest Mk. 5 Series 2. I made a few mistakes, and on the left hand canopy rim, I messed up the decal, and there is a gap in the yellow 'embroidery'. I have another of the same kit coming, and since I won't be repeating this particular scheme, I will take the decal from that kit and fix the gap. Also, I lost one of the landing gear indicators on the wing top (the one of the left), so it doesn't look very good. I only did a quick snapshot of the bottom of the plane, because the antenna on the plane's spine behind the cockpit is so delicate that I was afraid to even set in with proper support on its back to take proper pictures, but you'll get the idea. I have to tell you that while the delicate nature of the 'in scale' antenna looks great, it was THE biggest pain in the bottom to attach to the antenna base, due to its next to nonexistent area for the super glue to attach itself to. I think it took me over an hour of messing around to finally get it to hold, and I'm terrified that even a good breeze or breath could knock it into next Tuesday! Hope you like the plane, but feel free to tear it apart with critical comments...it's my third plane, and I should be far better than I am, but I'm still pretty awful in every aspect, perhaps most in basic construction, since I still have a fear of filling gaps which require filling, sanding and rescribing panel lines and recreating rivets and other surface panel details. Thus, the gaps and joints remain far more prevelant than they should be. Tear me apart with critique, truly....it's only way I'll get better is if others tell me how bad my work is. Really. I'm planning on doing a Series 1, with full invasion stripe livery, and another Series 2, but not sure which scheme I'll use, yet. Oops...somehow the uploaded pictures seem to have disappeared. Oh well...next post has bigger and better pictures, anyway... Edited December 30, 2019 by Curt B Noting lack of photos being present in post Quote Link to post Share on other sites
Curt B Posted December 29, 2019 Share Posted December 29, 2019 (edited) More photos.. Just figured out how to use Imgur...courtesy of Brett (Hammerhead11)! Edited December 29, 2019 by Curt B Quote Link to post Share on other sites
Hammerhead11 Posted December 29, 2019 Author Share Posted December 29, 2019 30 minutes ago, Curt B said: More photos.. Just figured out how to use Imgur...courtesy of Brett (Hammerhead11)! Curt, this is fantastic! I’ve never been much good with British camouflage, but to my eye you nailed it. The weathering is great and subtle and the construction seems top notch. Your photographs are even far more professional than mine, so really, I need to be following along with tour build log. I think I could learn a thing or two. Keep it up! Brett Quote Link to post Share on other sites
Curt B Posted December 29, 2019 Share Posted December 29, 2019 (edited) 21 hours ago, Hammerhead11 said: Curt, this is fantastic! I’ve never been much good with British camouflage, but to my eye you nailed it. The weathering is great and subtle and the construction seems top notch. Your photographs are even far more professional than mine, so really, I need to be following along with tour build log. I think I could learn a thing or two. Keep it up! Brett Brett, you are clearly far too kind! But your words are appreciated! The colors are good (I used MRP paints), though the colors on the underside image were shifted, not sure why, and I didn't have the energy to fix it. That one should be a lighter medium grey, not the bluish cast that the photo shows. Regarding paint, my problem is that this was the very first time I tried to do a slightly feathered transition between the colors. To do this, I painted the Ocean Grey first, then masked off the grey with card from a manila folder, and I used white poster tack rolled into very thin 'worms' that I used to try to hold the card about 1/8" off the plastic, then sprayed the Dark Green at a 90 degree angle to try to get a bit of feathering. It was not too hard to do on the wings, but on the curved fuselage, it was tough! You can see that some of the hard transition on the wings exists, and that was in spots where repairs were needed. Thus, I got a mixture of feathered and hard edged camo, which, though not intended, according to at least one other contributor was sometimes the case on these planes. The weathering is a bit more pronounced in person, but I did keep it relatively subtle (you'll note that in particular in the minimal exhaust stains on the sides behind the stacks; I way overdid it on my last plane, a 1/48 FW-190A-4). Thus far, on airplanes, I have not favored super-present panel line demarcations, would rather leave them a bit more subtle. Regarding photos, I used my Canon 5D Mark IV with a 24-70 f2.8 Series II zoom, on a tripod, using black velvet as a base/background, which I then cleaned up in Photoshop to get rid of most of hairs and white specs. Personally, I think the background goes a huge way toward making pictures look 'more pro'. Just go to any fabric store and get a yard of black (or white or any color you like) velvet (or velour) and try to spread it out as smoothly as possible. I used a simple fluorescent work light (an Ottlite) as the lighting source. These were really just snapshots. If I were going for 'good' images, I would have used the focus stacking method (designed to keep every part of the airplane in sharp focus), and I would have shot a lot more details, closer in. I kind of just wanted to give you a sense of the level of workmanship I'm at at this point in my airplane building journey. I'm somewhat better at tanks! I don't mean to demean your comments on the pictures, as I do agree that they seem to 'pop' off the background, but again, that's just the velvet background doing that. Maybe with the P-38, I'll try to do a better job, to satisfy my own minimum level of quality. I don't know that I have the patience to photograph a build log...it takes me too darn long to complete a build without taking time out to photograph most of the steps, plus, my building techniques need a whole lot to be desired! LOL Note, in particular, the panel lines under the radiator just behind the prop, on the underside photo. Enlarge it, and take a look at the panel lines. You'll see clearly that the panel lines from each half of the fuselage don't line up well, and there is a distinct remaining line defining the two halves running right down the middle, top to bottom. A good modeler would have filled that seam, sanded it smooth, so no gap between the halves would be visible at all, under paint, and the panel lines would be perfectly straight with no discontinuity being present where the fuselage halves were glued together. Just my $0.02. Edited December 30, 2019 by Curt B Quote Link to post Share on other sites
Hammerhead11 Posted December 29, 2019 Author Share Posted December 29, 2019 17 hours ago, Curt B said: Brett, you are clearly far too kind! But your words are appreciated! The colors are good (I used MRP paints), though the colors on the underside image was shifted, not sure why, and I didn't have the energy to fix it. That one should be a lighter medium grey, not the bluish cast that the photo shows. Regarding paint, my problem is that this was the very first time I tried to do a slightly feathered transition between the colors. To do this, I painted the Ocean Grey first, then masked off the grey with card from a manila folder, and I used white poster tack rolled into very thin 'worms' that I used to try to hold the card about 1/8" off the plastic, then sprayed the Dark Green at a 90 degree angle to try to get a bit of feathering. It was not too hard to do on the wings, but on the curved fuselage, it was tough! You can see that some of the hard transition on the wings exists, and that was in spots where repairs were needed. Thus, I got a mixture of feathered and hard edged camo, which, though not intended, according to at least one other contributor was sometimes the case on these planes. The weathering is a bit more pronounced in person, but I did keep it relatively subtle (you'll note that in particular in the minimal exhaust stains on the sides behind the stacks; I way overdid it on my last plane, a 1/48 FW-190A-4). Thus far, on airplanes, I have not favored super-present panel line demarcations, would rather leave them a bit more subtle. Regarding photos, I used my Canon 5D Mark IV with a 24-70 f2.8 Series II zoom, on a tripod, using black velvet as a base/background, which I then cleaned up in Photoshop to get rid of most of hairs and white specs. Personally, I think the background goes a huge way toward making pictures look 'more pro'. Just go to any fabric store and get a yard of black (or white or any color you like) velvet (or velour) and try to spread it out as smoothly as possible. I used a simple fluorescent work light (an Ottlite) as the lighting source. These were really just snapshots. If I were going for 'good' images, I would have used the focus stacking method (designed to keep every part of the airplane in sharp focus), and I would have shot a lot more details, closer in. I kind of just wanted to give you a sense of the level of workmanship I'm at at this point in my airplane building journey. I'm somewhat better at tanks! I don't mean to demean your comments on the pictures, as I do agree that they seem to 'pop' off the background, but again, that's just the velvet background doing that. Maybe with the P-38, I'll try to do a better job, to satisfy my own minimum level of quality. I don't know that I have the patience to photograph a build log...it takes me too darn long to complete a build without taking time out to photograph most of the steps, plus, my building techniques need a whole lot to be desired! LOL Note, in particular, the panel lines under the radiator just behind the prop, on the underside photo. Enlarge it, and take a look at the panel lines. You'll see clearly that the panel lines from each half of the fuselage don't line up well, and there is a distinct remaining line defining the two halves running right down the middle, top to bottom. A good modeler would have filled that seam, sanded it smooth, so no gap between the halves would be visible at all, under paint, and the panel lines would be perfectly straight with no discontinuity being present where the fuselage halves were glued together. Just my $0.02. Curt, I will certainly have to give those photography tips a try. You’re comments have been very inspirational over all so I look forward to more conversations. I’ll be working on some non-aircraft related builds next so I won’t be on ARC as much, but we can continue via email. Brett Quote Link to post Share on other sites
Falconxlvi Posted January 3, 2020 Share Posted January 3, 2020 On 12/28/2019 at 7:07 PM, Curt B said: More photos.. Just figured out how to use Imgur...courtesy of Brett (Hammerhead11)! Nice build Curt! I love it! You should post these over in the display case where more folks may see it 👍🏻 Steve Quote Link to post Share on other sites
Curt B Posted January 3, 2020 Share Posted January 3, 2020 4 minutes ago, Falconxlvi said: Nice build Curt! I love it! You should post these over in the display case where more folks may see it 👍🏻 Steve Thanks, Steve, I will! Quote Link to post Share on other sites

Recommended Posts
Join the conversation
You can post now and register later. If you have an account, sign in now to post with your account.