BastianD Posted May 3, 2022 Author Share Posted May 3, 2022 7 hours ago, Aigore said: Ah, soon done! On the final stretch! Lovely details on the struts too! 🙂 Thanks, rewarding result compared to the kits’ standard strut. Quote Link to post Share on other sites
HOLMES Posted May 3, 2022 Share Posted May 3, 2022 (edited) Bastian, Just read through your AMAZING build and WOW !! you have done a fantastic job on it. Looks AWESOME ... beautiful model so far. edit: Sorry I spelt your name wrong.corrected. Edited May 3, 2022 by HOLMES Quote Link to post Share on other sites
BastianD Posted May 3, 2022 Author Share Posted May 3, 2022 10 hours ago, HOLMES said: Bastian, Just read through your AMAZING build and WOW !! you have done a fantastic job on it. Looks AWESOME ... beautiful model so far. edit: Sorry I spelt your name wrong.corrected. Thanks Holmes, the result (still to finish) is very satisfactory so far Quote Link to post Share on other sites
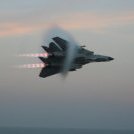
BastianD Posted May 4, 2022 Author Share Posted May 4, 2022 Getting some goose bumps here when cleaning the burners after the wash… 🤩 top one is cleaned, lower one about to clean. after this step some blacks powdering to make it complete. Quote Link to post Share on other sites
BastianD Posted May 4, 2022 Author Share Posted May 4, 2022 And after the touch up with my shades powdering set. These ResKit exhausts are awesome 🤩 Just a matte coat to seal everything now. Quote Link to post Share on other sites
crackerjazz Posted May 5, 2022 Share Posted May 5, 2022 Super-cool!!! : ) Quote Link to post Share on other sites
BastianD Posted May 7, 2022 Author Share Posted May 7, 2022 Just had slightly to finalise the end of the burner cans, which are usually looking burnt white or something: Quote Link to post Share on other sites
BastianD Posted May 7, 2022 Author Share Posted May 7, 2022 And making that end looking burnt and worn: Quote Link to post Share on other sites
BastianD Posted May 7, 2022 Author Share Posted May 7, 2022 And fitting those bastards in 🤩 Quote Link to post Share on other sites
Geoff M Posted May 7, 2022 Share Posted May 7, 2022 Looking good! Something for us all to aspire to. Geoff M Quote Link to post Share on other sites
BastianD Posted May 7, 2022 Author Share Posted May 7, 2022 1 hour ago, Geoff M said: Looking good! Something for us all to aspire to. Geoff M Thanks Geoff Quote Link to post Share on other sites
Da SWO Posted May 8, 2022 Share Posted May 8, 2022 Really nice Quote Link to post Share on other sites
BastianD Posted May 14, 2022 Author Share Posted May 14, 2022 Canopy reveal time! Let’s see how it comes out after masking and the Vallejo liquid mask… Quote Link to post Share on other sites
BastianD Posted May 14, 2022 Author Share Posted May 14, 2022 Great to see how the liquid mask and the tape work together, interior well succeeded too Quote Link to post Share on other sites
BastianD Posted May 14, 2022 Author Share Posted May 14, 2022 And glossy and clear! Quote Link to post Share on other sites
BastianD Posted May 14, 2022 Author Share Posted May 14, 2022 Quote Link to post Share on other sites
Geoff M Posted May 14, 2022 Share Posted May 14, 2022 Lookin good Geoff M Quote Link to post Share on other sites
BastianD Posted May 15, 2022 Author Share Posted May 15, 2022 17 hours ago, Geoff M said: Lookin good Geoff M Thank you sir Quote Link to post Share on other sites
BastianD Posted May 15, 2022 Author Share Posted May 15, 2022 Time to put the Master Model brass pitot tube on, unpainted but that will follow. Very nice fit. Quote Link to post Share on other sites
Aigore Posted May 15, 2022 Share Posted May 15, 2022 Sweet burners! A brass pitot tube is a must for any build! Quote Link to post Share on other sites
BastianD Posted May 16, 2022 Author Share Posted May 16, 2022 6 hours ago, Aigore said: Sweet burners! A brass pitot tube is a must for any build! Thanks! Now all those small details will come into next steps, getting there slowly Quote Link to post Share on other sites
BastianD Posted May 18, 2022 Author Share Posted May 18, 2022 On 5/2/2022 at 7:28 PM, A-10 LOADER said: These are called "dry rub transfers" and have to be rubbed or burnished down in order to get them to work. Google "How to work with dry transfers". Problem is, the older they are the more brittle they become and, are harder to get to work properly. Steve Received some nice new ones from a very kind person, so happy to proceed on the right jamming pod too! Quote Link to post Share on other sites
BastianD Posted May 18, 2022 Author Share Posted May 18, 2022 All said and done for the pitot tube, just going to spray the nose in a new black again, gloss it, decal it and then coat with a final glossy coating. Quote Link to post Share on other sites

Recommended Posts
Join the conversation
You can post now and register later. If you have an account, sign in now to post with your account.