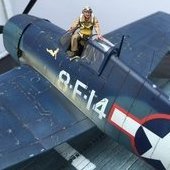
Hammerhead11 Posted July 2, 2020 Share Posted July 2, 2020 So, due to various life circumstances I had to take a few months off the hobby, but I have recently been able to get back into it, and so, to help ease back into my model making 'mojo" I decided to do a quick double build of a pair of Airfix Mustangs. I've built this kit before, and in spite of it's simplicity, I rather enjoy the kit, and in the end, it looks like a mustang to my eyes. I also wanted to use these models to test out some Alclad paint that I plan on using for another build. And I must say, I'm really disappointing with myself for not using this product earlier. It worked just as advertised and once it was cured it was incredibly durable. I'm very pleased with it. Because the Airfix kit has a few options, I decided to build up one in-flight, and one on it's wheels: For the first mustang, I choose to use a combination of the kit decals and decals from the spares bin to model a fictional plane from the 332nd fighter group. I'd never done a Red Tail Mustang before and it was quite fun with all of the different colors. The red is Vallejo, the Yellow is Tamiya, and the OD and interior colors are from MIG. One of the drawbacks to the Airfix kits, especially in 72nd scale, is the softness of the plastic. Both the control column and the antenna broke and flew off into oblivion, so I had to fashion new ones. I also added lead foil seat belts and added the actuator rod to the radiator outlet, not that you'll really see it. For Mustang number 2 I choose to use the kit markings and forgo weathering to give it an "airshow" appearance. The kit representations for the drop tanks were rather poor, so I added the raised rim that runs around the drop tank from stretched sprue and added the fuel lines that run into the wing from floral wire. I also had the same issues with the previous kit and had to replace the control stick and antenna. Also, the provided pilot figure didn't really fit in the cockpit so I had to do some trimming of the internal bits to make room for him to fit properly. Blue and red are both from Vallejo. Thanks for looking. -Brett Quote Link to post Share on other sites

Recommended Posts
Join the conversation
You can post now and register later. If you have an account, sign in now to post with your account.