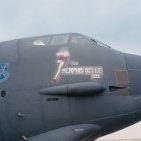
Trooper111 Posted December 12, 2021 Share Posted December 12, 2021 Hello everyone out there in model land. I've been here for years reading and learning about kits that you all have given tips on with ideas of one day doing the same. That day started a couple months ago when I asked if anyone had a particular decal, for a specific plane. Well it seems thru a couple E-mails from a very regular contributor on here and I was overjoyed to receive the whole sheet...Bonus for another day. So now here I am with what will be a running dialog of in-progress pictures of my AMT B-52g dressed as Memphis Belle III which was the first aircraft I was "Allowed" to fix at my first AF base... good old Eaker AFB, which has been closed for many years now. All the Buffs there having been transferred out to the 2nd BW at Barksdale in LA. I know there is a brand new tooling of a B-52g/h but I've had these in my stash since they first came out in 92-93ish. I am aware the kit has several flaws and I will correct those that are most noticeable. This model is not going to be in any contests ever so I wont need a magnifying glass to look into the cockpit. I'll dress it up accordingly and press on with the overall look of a buff built by a model company with known issues, so please take from this tips that you all can use and leave constructive criticism where needed. I have three more G's/H's behind this one that can incorporate things I have over looked. Thank you and onward to in progress pics. 1st known flaw are those hunks of plastic beneath the nose teardrops, those are AMT's attempt at the pitot tubes. I have sanded all of them away and will replace them with P.E. pieces at just about the last step from being completed. Next flaw is the wings over time have a tendency to droop because of the soft plastic AMT used in their molds. This was easily corrected by using three tongue depressors. Two of them flat against the wing with the 3rd overlapping those two for a strong joint. I had originally planned on making this model flying, so I wanted to make sure the wings wouldn't droop over time. I only have the late model G's & H's in my stash so I cant confirm this but when the tail was molded and they added on the ALQ-153 Tail warning "fairing" they raised the ILS/VOR (I maybe wrong in the actual name here) panel on each side. They are supposed to be skin flat on each side, so liberal sanding was needed to remove the un-needed flat panel(s). See Tail picture from Loring B-52g. Trying to make everything blend with each other and being ECM while in the Air Force, I have first hand knowledge on what certain antennas look like...I reshaped the nose teardrops so they were not so "pointy" and looked the part to me. (Bottom teardrop has been reshaped). Moving to the rear of the fuselage, AMT tried but didn't quite get them correct. There are three different facets or angles on each rear facing ALQ-172 antenna. A few quick swipes with a jewelers file and I had three different angles. (Left antenna has been reshaped for comparison to original). Somewhere in all this I began to assemble the engines and the tail gun assembly. More sanding and fitting later as progression happens on these pieces. If you don't know, you wouldn't realize that AMT forgot to mold in the duct openings in the shoulder areas. I used evergreen plastic (Item No. 252) Square tube to replicate this... I guesstimated on the location on one shoulder area, used a jewelers drill for the hole and then squared it out measuring many times so as to not make it too large of an opening. Once I was good with the fit, super glue to the rescue for a secure bond. Now I had to clone this opening on the other shoulder... Several measurements later I had a hole in the opposite wing... trim trim trim and the square tube fit just like the first. Again super glued in and after that dried for a day I sanded it flush with the leading edge of the shoulder and filled in any micro gaps. Luckily, both openings appear at the same locations on each wing. Now I was at one of the most daunting tasks that I'd have to overcome if I was to make this flawed model more realistic. Every B-52 has wrinkled skin! Here is one of my make it or break it moments...I took a sharpie marker, drew lines in the correct direction on just the nose halves at first seeing that's what draws your attention initially. Very lightly I etched the lines with a dremel tool with (I believe) a fingernail grinding stone making slight gouges into the soft plastic. After that was complete I took a jewelers round file and went over the just made gouges. Satisfied with what I had so far I took a 150 grit sanding pad and smoothed out the surfaces and blended in the skin with the gouges to make everything look better. Taking a break from sanding gouges and such I opened all the vents for cooling equipment and the fuel vents at the rear of the fuselage by the horizontal tail. The majority of my time so far has been marking, dremel tooling, filing and sanding the grooves into/onto the fuselage. I'm still sanding and filing the grooves even as I progress onto other parts of the build...hence the trepidation on my part to get the skin correct. Being an older model, not too many companies are/have made resin updates for the AMT kit. However I discovered Blackdog resin conversions almost by accident and they made stuff for AMT kits!!! I had to have some, So a particular hobby shop in Missouri with Brothers in its name got the flaps and raised nose radome to me quickly. I also have purchased the SAC metal landing gear and a cockpit set for the model collect B-52...I'll make do and piece together a cockpit that's presentable thru the small windows. Here are some pictures of the Blackdog resin pieces and I must say they are really really detailed. Because no one goes in order of assembly until things have to, I have skipped around on sub-assemblies and one of those were the horizontal tailplanes. I glued them together as normal, Let them dry and then removed the "Raised" panels on the bottom. Not the 6 flare can panels, those are correct but the other panels look like they could have been patch panels of some type, but they are symmetrical on both tails...so not repair patches...Oh well, they are sanded away now. The next flaw I noticed from AMT was how they molded the horizontal tail area. Those are huge gaps for the moving tail that just isn't present on the real aircraft. A bit of bondo, some smoothing with sandpaper and things looked and fit better in the rear end. Any bubbles I find later on from the bondo will be taken care of then...Just trying to get the major stuff out of the way before I put both fuselage halves together. More "this has to be done sooner than later" was to remove the resin pieces from their mold blocks, so time was spent doing that before really starting something else. I took a set of wings from another AMT B-52g and placed my (already glued up "ready for flight") wings into that model box for another day. Having a fresh set of wings to work with with I noticed the inner AMT flap detail had to go to make room for the replacement resin pieces. Just after removing the molded in flap details I decided to cut out the flaps on one wing... light repeated scoring of the panel lines with a brand new #11 blade until they each were through. Obvious more work is needed but I just wanted to create this "blog" for everyone who says that they cant make a good looking buff from an AMT kit. That's all for now, Stay tuned as I add updates and progress on Memphis Belle III Quote Link to post Share on other sites
ST0RM Posted December 13, 2021 Share Posted December 13, 2021 Fantastic work on recreating the skin wrinkles. Very convincing. Good luck on the rest of the build. Looks like you've got a solid plan and I'm looking forward to seeing it completed. Quote Link to post Share on other sites
A-10 LOADER Posted December 13, 2021 Share Posted December 13, 2021 The wrinkled skin does look good. Interested to see how it looks under a coat of primer. Steve Quote Link to post Share on other sites
Geoff M Posted December 13, 2021 Share Posted December 13, 2021 Wow! Your first kit and you dove in the deep end. Good work and keep it up! Geoff M Quote Link to post Share on other sites
Gator52 Posted December 14, 2021 Share Posted December 14, 2021 Terrific start on an ambitious project Trooper! Thanks for chronicling it for us so thoroughly. Chris Quote Link to post Share on other sites
Dutch Posted December 17, 2021 Share Posted December 17, 2021 (edited) Trooper, Wonderful start to a daunting project. I must say, you have thought it out pretty well, and are progressing at a good pace. I like your philosophy of only adding the obvious details, correcting what needs to be corrected and not worrying about the rest. I will use some of your techniques on mine when I build it. I am toying with the idea of a refueling scene with AMT/ERTL KC-135R & B-52G in a 30deg angle of bank standard rate turn. We will see. I have some of the old Buffmaster Design sets for the lumps & bumps and HSAB. I also highly recommend the Airwaves 1/72 B-52G/H wing tanks, as elsewhere on ARCForum (pg. 24-27) there is a long discussion about tank shape and size between AMT/ERTL, Modelcollect and various aftermarket vendors. I think that the consensus was that the Airwaves tanks have the best shape & size and Hannants reissued them in the summer of 2019. I am looking forward to seeing your progress in the future. Kind regards, Dutch Edited February 14, 2023 by Dutch Quote Link to post Share on other sites
Trooper111 Posted December 17, 2021 Author Share Posted December 17, 2021 Dutch Sir, Thank you For the kind words of encouragement. This model will be more of a "fix it if you can see it" type model that everyone will benefit from if they use some of my ideas...I have 1st hand affiliation with B-52's having worked on them for many years in the AF. I have held off building this one (again) just because I was scared I would mess up the wrinkled skin effect but I'm pushing thru it and I'll hope for the best when it's sitting on a shelf on the back end if this build. I think tonight I'm going to start on the cockpit area and see where that takes me using pieces and parts from Eduards detail set. (I say pieces and parts because it's for the model collect buff) So they all won't be used. I have a KC-135Q from Beale with a SR-71A that I still have monofilament around, just need to re-hang them together getting refueled. Also in "Monogram Models" on Facebook I have the NB-52 with X-15 mated together built up, so big models are no biggie just a bit slower than these people who crank out 1 model a week...not me I have heard mixed reviews of buffmaster design and I believe they are long out of business and having spent more time in sandland before I retired, I wasn't always able to pick-up extra detail sets for the future builds. How are the lumps and bumps set you speak of....worth cloning? What's all in that set?... I ask because the resin cheeks for the RC-135's that Mark S. Sold on Spectre resins/Wolfpack decals before he died came from me and another guy who spruced them up..then Mark cloned them. So, surely someone could clean thrm up and clone thrm for the betterment of everyone...just thinking outloud. Quote Link to post Share on other sites
Dutch Posted December 17, 2021 Share Posted December 17, 2021 (edited) On 12/17/2021 at 11:00 AM, Trooper111 said: I have heard mixed reviews of buffmaster design and I believe they are long out of business and having spent more time in sandland before I retired, I wasn't always able to pick-up extra detail sets for the future builds. How are the lumps and bumps set you speak of....worth cloning? What's all in that set?... I ask because the resin cheeks for the RC-135's that Mark S. Sold on Spectre resins/Wolfpack decals before he died came from me and another guy who spruced them up..then Mark cloned them. So, surely someone could clean them up and clone them for the betterment of everyone...just thinking outloud. I too have heard mixed reviews of the Buffmaster Design sets for the B-52. But the AMT & ModelCollect nose EVS shapes are not correct as released. I purchased these BM Antennae sets several years ago from fellow ARC Forum contributors. I felt that I needed something before MC issued their B-52G (late) nose correction set. Here is a clip from their larger B-52H conversion set that includes much of the lumps and bumps set. The HSAB set is self explanatory, as there was no other in 1/72 scale at the time. It was designed for the Monogram D wing. I do not know what MC has included in their latest releases of B-52 kits. It has been a long time since I looked in the box at these. I may dig them out over the holidays and take more detailed pics for you. It will be interesting to see if any 3D printer makes better moldings. HTH, Dutch Edited February 14, 2023 by Dutch Quote Link to post Share on other sites
Trooper111 Posted December 17, 2021 Author Share Posted December 17, 2021 On my AMT BUFF I have sanded/filed the EVS turrets so the fit really well within the groove provided by AMT. I will have to use a small amount of bondo but that's just and how I want the finished front end to look. If... when you build yours Dutch, you file a flat square on the planes left side and a oval with the bottom squared off...that would represent both of the turrets open. My buff will have its nose radome open, so I cant/shouldn't/won't do that because very slim chance those turrets were on/open while the radome was open...different systems being used and all. I have built this AMT B-52g back when they first came out and made some corrections then but more will be made to this one. Quote Link to post Share on other sites
Trooper111 Posted December 17, 2021 Author Share Posted December 17, 2021 *left side turret and oval with the squared off bottom edge on right side turret screens to "show" them open. Quote Link to post Share on other sites
Dutch Posted December 19, 2021 Share Posted December 19, 2021 Right! Thanks for that tip about the EVS turrets. Quote Link to post Share on other sites
Trojan Thunder Posted December 19, 2021 Share Posted December 19, 2021 Nice start, it is great to see someone with hands on knowledge of these beasts fixing the kit issues. I have one of the AMT kits in my stash and will take you mods on board when having a go at it. Thanks for sharing. 🏆 Just a nice to have in future posts, it would be easier to follow your work if you have the fix description with the image rahter than a slab of text and then a bunch of images tacked on the end. Quote Link to post Share on other sites
Trooper111 Posted December 19, 2021 Author Share Posted December 19, 2021 Right, On the picture/words next and that is how I was doing it but when it uploaded to the net, all the words clumped together and all the pictures clumped together as well. Mind you though that was about 40 pictures at once, so I'm just glad they up loaded. In my next updates I'll definitely be loading less pictures per update...that should make everything easier to follow. Quote Link to post Share on other sites
Trojan Thunder Posted December 19, 2021 Share Posted December 19, 2021 39 minutes ago, Trooper111 said: Right, On the picture/words next and that is how I was doing it but when it uploaded to the net, all the words clumped together and all the pictures clumped together as well. Mind you though that was about 40 pictures at once, so I'm just glad they up loaded. In my next updates I'll definitely be loading less pictures per update...that should make everything easier to follow. Thanks mate, a great thread to follow as I said. Quote Link to post Share on other sites
kurnass77 Posted December 20, 2021 Share Posted December 20, 2021 Love all the work done! I can't imagine were put in display such a beast, not in my home surely! Keep up the good work. Gianni Quote Link to post Share on other sites
Trooper111 Posted January 2, 2022 Author Share Posted January 2, 2022 A little bit more progress if you will on Memphis Belle III. I've painted and assembled the throttle quadrant and instrument panel. The 8 throttles are not there yet until I am ready to install it into the cockpit. Quote Link to post Share on other sites
Trooper111 Posted January 2, 2022 Author Share Posted January 2, 2022 In addition to those I have painted the front two seats... Pretty much all that will be seen anyway. Here's the front cockpit with things getting closer to being glued in place. Yes there are 8 throttle levers there, Yes It was a pain in the A** Quote Link to post Share on other sites
Trooper111 Posted January 2, 2022 Author Share Posted January 2, 2022 Hesitant about cutting off the nose to make way for the Blackdog Nose assembly but I did it and got it right... which makes me feel better that I didn't just waste this kit. Quote Link to post Share on other sites
Trooper111 Posted January 2, 2022 Author Share Posted January 2, 2022 While I was cutting... I cut out the crew entry hatch as well, just because there is one supplied in the Eduard Detail set I have. Quote Link to post Share on other sites
Trooper111 Posted January 2, 2022 Author Share Posted January 2, 2022 Lastly, I have cut off the tips of the EVS fairings because they are mounted to the bottom of the radome when it swings open. I have added some color to the flap wells in prep for closing up the wings too.... a slight wash of grime to make \things more realistic. Quote Link to post Share on other sites
Gator52 Posted January 2, 2022 Share Posted January 2, 2022 Looks great Trooper; I'll be curious to see how the Eduard instrument panel fits the kit cockpit. Good to see the P/CP side panels fit fairly well. Nice job folding up the IP seat & aisle stand! Chris Quote Link to post Share on other sites
Trooper111 Posted January 2, 2022 Author Share Posted January 2, 2022 I have a few more pictures that I guess I missed last night in the wee hours but they are of the initial fit of the radar/ECM boxes in front of the cutoff area but behind the radome. Pressing on with more assembly in a bit. Quote Link to post Share on other sites
A-10 LOADER Posted January 2, 2022 Share Posted January 2, 2022 Nice, she's looking great so far. Steve Quote Link to post Share on other sites
Da SWO Posted January 2, 2022 Share Posted January 2, 2022 Very nice Quote Link to post Share on other sites
Trooper111 Posted January 3, 2022 Author Share Posted January 3, 2022 I knew I had forgotten a couple pictures. Here is the nose after I cut off the kit nose and initially fit the Blackdog nose... Not too bad. I may add some filler around the outer edge to fair it into the kit edge...dunno yet. Quote Link to post Share on other sites

Recommended Posts
Join the conversation
You can post now and register later. If you have an account, sign in now to post with your account.