HAZER Posted February 21, 2006 Author Share Posted February 21, 2006 side view of the Cutting Edge cockpit set. I was impressed with the detail and the resin set is a task just in itself. Quote Link to post Share on other sites
HAZER Posted February 21, 2006 Author Share Posted February 21, 2006 Now it was time for the Black Box set. I have always liked the look of jets with their IFR out and this resin set allowed me to do this. Also note the refueling access door that comes with the BB set as well. Quote Link to post Share on other sites
HAZER Posted February 21, 2006 Author Share Posted February 21, 2006 time for the gear. THe CF-18 main strut is different than the U.S. variant so some surgery was done to make the strut look right. It is basically upside down to the U.S. strut but a little longer shaft. Scooby, why is the strut different? Painted flat white at this point. Later, clear coat with light weathering followed by another shot of clear then the decals. Hornet gear has a shine to it and they are not that dirty, I find that landing gear is sometimes over weathered with a flat finish. My opinion or observation. Quote Link to post Share on other sites
HAZER Posted February 21, 2006 Author Share Posted February 21, 2006 painted and a coat of future. Next came the weathering and decals. Quote Link to post Share on other sites
HAZER Posted February 21, 2006 Author Share Posted February 21, 2006 Detail of the weathering and wheel wells. This area on CF-18's does get pretty dirty (from the gear doors aft.) Quote Link to post Share on other sites
HAZER Posted February 21, 2006 Author Share Posted February 21, 2006 Detail of the weathering and wheel wells. This area on CF-18's does get pretty dirty (from the gear doors aft.) Quote Link to post Share on other sites
Ken Middleton Posted February 21, 2006 Share Posted February 21, 2006 Derek, nice to see the in-progress shots, shows really well how you progressed. I knew I had seen at least one B on your site! Quote Link to post Share on other sites
geedubelyer Posted February 21, 2006 Share Posted February 21, 2006 Great work on the cockpit HAZER, it's a gem You've done a terrific job on making it look suitably busy and the detail appears crisp and very well painted. Thanks for taking the time to post some in-progress pics. It'd be wonderful to see some more if you have them please. Quote Link to post Share on other sites
Tilt Posted February 21, 2006 Share Posted February 21, 2006 Fantastic work, as usual, Hazer!! Tilt Quote Link to post Share on other sites
Scooby Posted February 21, 2006 Share Posted February 21, 2006 939 from 2004 MF. This is a AETE jet, and the only reason it has upgrades as they need to be tested prior to being approved for use in Canada. So technically I was wrong about no B models being upgraded. The Test School has the only B model that will be upgraded. Quote Link to post Share on other sites
HAZER Posted February 21, 2006 Author Share Posted February 21, 2006 Hey, Scooby. This was the original CF-18BM photo that I was looking for, this one was shot June 1, 2005 at Cold Lake. 927 did not take part in MF but flew in between missions. HAZER Quote Link to post Share on other sites
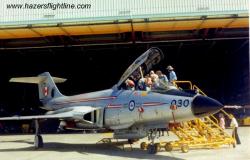
HAZER Posted February 21, 2006 Author Share Posted February 21, 2006 For those that do not know how to tell a CF-18M from a CF-18A/B, here is a good shot. Infront of the windscreen are the IFF blades or bird slicers, the two antenna (one on spine and one underneath near the front landing gear) are slanted at a 45 angle instead of 90 degrees and a GPS dome that may not be visible in this photo (aft of the spine 45 degree antenna). HAZER Quote Link to post Share on other sites
Ken Middleton Posted February 21, 2006 Share Posted February 21, 2006 and 933 at Cold Lake thanks for the photos and descriptions Derek Quote Link to post Share on other sites
HAZER Posted February 27, 2006 Author Share Posted February 27, 2006 Hi again! Thanks for all the nice comments, guys! Here are a few more pics of the build. HAZER Quote Link to post Share on other sites
HAZER Posted February 27, 2006 Author Share Posted February 27, 2006 Here I am making the tail "stiffners"? THese are not part of the kit. After drawing the shape on Scoth tape, I transfer the tape onto a sheet of styrene where I cut out the copy. Pretty simple! HAZER Quote Link to post Share on other sites
HAZER Posted February 27, 2006 Author Share Posted February 27, 2006 Here is the finished result. HAZER Quote Link to post Share on other sites
HAZER Posted February 27, 2006 Author Share Posted February 27, 2006 Now it is time to get everything ready for painting. I first did a shot of primer over the main assembly to make sure everythinh looked clean. Quote Link to post Share on other sites
HAZER Posted February 27, 2006 Author Share Posted February 27, 2006 Ooops! I got ahead of myself. Here are some of the problems that needed some filler and extra attention. LEX joint to wing, intakes (like most models) and rear area near the formation lights. Quote Link to post Share on other sites
HAZER Posted February 27, 2006 Author Share Posted February 27, 2006 Also not that some of the F/A-18C bumps have been removed as the CF-18M does not have these antenna (bumps) on the spine. Quote Link to post Share on other sites
HAZER Posted February 27, 2006 Author Share Posted February 27, 2006 near center line. Another problem area. Quote Link to post Share on other sites
HAZER Posted February 27, 2006 Author Share Posted February 27, 2006 IFF blades now installed. These are not parallel. They do point inward toward the nose on a slight angle. HAZER Quote Link to post Share on other sites
HAZER Posted February 27, 2006 Author Share Posted February 27, 2006 Now the Black Box GPS dome is in place as well as the LEX fence. Quote Link to post Share on other sites
HAZER Posted February 27, 2006 Author Share Posted February 27, 2006 stiffner. One on each tail. Port side located on the outside and Starboard on the inside.....make sense? HAZER Quote Link to post Share on other sites
HAZER Posted February 27, 2006 Author Share Posted February 27, 2006 bottom colour FS36375 Light Ghost Grey has already been applied. Photo shows bottom masked with the top colour FS 35237 Medium Grey now applied. All airbrushed using my Paasche VL. I now have a beautiful Iwata Eclipse that I wish I had during the build of this kit...... HAZER Quote Link to post Share on other sites
Pete "Pig" Fleischmann Posted February 27, 2006 Share Posted February 27, 2006 Congratulations Derek on a superb job! Nicely done! Regards, Pig Quote Link to post Share on other sites

Recommended Posts
Join the conversation
You can post now and register later. If you have an account, sign in now to post with your account.