Jay Chladek Posted September 21, 2006 Share Posted September 21, 2006 (edited) Roger approach, 76 has the ball. Well, after probably way too much time and a couple aborted attempts to add nav lights (and removing the very bad results), I am declaring my VF-124 build finished. The canopy windscreen is tinted (maybe a little too dark), the canopy frame is finished, the gear doors are all on, the exhausts have been added and I even managed to find time to make a an intake walk decal and add a yaw string just in front of the cockpit (maybe overkill, but it is easy to see on a dark anti-glare shield like this. I wish I could have added a couple navigation lights to her, but I guess I will save that for my next build. Win she win anything?...doubtful. Does she look good?...yes. Will I be sad to part with her?...most certainly. I learned a lot during this build though and just for the record, this is the first factual aircraft I've finished after many years of doing SF and real space subjects. So, here for your enjoyment is Gunslinger 76, the VF-124 Airshow Display bird from 1976 Bicentennial. Edited September 21, 2006 by Jay Chladek Quote Link to post Share on other sites
Jay Chladek Posted September 21, 2006 Author Share Posted September 21, 2006 Here's another pic for you. Quote Link to post Share on other sites
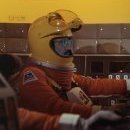
Jay Chladek Posted September 21, 2006 Author Share Posted September 21, 2006 And the last one shows her from the rear quarter. I hit the road bright and early tomorrow, so I am hitting the sack. Hopefully, 20 hours on the road won't go too slowly. :) Quote Link to post Share on other sites
Andrew D. the Jolly Rogers guy Posted September 21, 2006 Share Posted September 21, 2006 You're a dedicated man with a lot to be proud of in that bird! Don't undersell it. Great job, and even greater dedication and loyalty to purpose! :) Quote Link to post Share on other sites
Jay Chladek Posted September 21, 2006 Author Share Posted September 21, 2006 Oh BTW Andrew, thanks for the exhaust nozzle color recommendation. A combo of jet exhaust and aircraft interior black I think nailed the shade perfectly. I added a wash to my nozzles to pick out the recesses, but I chickened out at airbrushing on some black burn marks to the outer petals since I was strapped for time. Thanks again! Quote Link to post Share on other sites
GreyGhost Posted September 21, 2006 Share Posted September 21, 2006 She looks terrific Jay, I'm real happy you were able to finish her in this historic scheme afterall ... Have a safe journey to the Sunset and your trip home after ... Gregg Quote Link to post Share on other sites
tomcatter727 Posted September 21, 2006 Share Posted September 21, 2006 Looks exelent! Miles ahead of what I submited. Quote Link to post Share on other sites
Jay Chladek Posted September 21, 2006 Author Share Posted September 21, 2006 Well, it is time to kick the tires and light the fires. I am hitting the road in less then 30. BTW, I did shoot a pic of the Tomcat box I am taking this thing in, complete with a set of skivvies next to it. But, the camera is packed in the car and I don't feel like digging it out right now. So, you'll have to take my word for it. Adios Baby! Quote Link to post Share on other sites
Andrew D. the Jolly Rogers guy Posted September 21, 2006 Share Posted September 21, 2006 Oh BTW Andrew, thanks for the exhaust nozzle color recommendation. A combo of jet exhaust and aircraft interior black I think nailed the shade perfectly. I added a wash to my nozzles to pick out the recesses, but I chickened out at airbrushing on some black burn marks to the outer petals since I was strapped for time. Thanks again! I'm honored! Glad it worked out well! Quote Link to post Share on other sites
StevenJ Posted September 21, 2006 Share Posted September 21, 2006 Wow, that looks really great! My Tomcat had a similar scheme in that it was the gray over white. Oh the joys of painting white...white, white, white. LOL Did it go well for you? Looks great! Quote Link to post Share on other sites
Liberator24 Posted September 21, 2006 Share Posted September 21, 2006 oh......yeah!!! Thats nice!!! -Jim Quote Link to post Share on other sites
devil505 Posted September 21, 2006 Share Posted September 21, 2006 I love the older Hi-Vis schemes! Fantastic job! Quote Link to post Share on other sites
Jay Chladek Posted September 25, 2006 Author Share Posted September 25, 2006 Well, the white bit went pretty well. I used Tamiya spray can TS-16 gloss white lacquer over Tamiya white sandable primer. Touchups were done in spots with airbrushed X-2 Acrylic white. At one point, I almost overdid the white and had to sand down a run, but it went okay. The gray actually produced more headaches. Since I was in a time crunch (at least at the time I thought I was) I opted to airbrush the Gloss Gull Gray with Testors Acryl shot through my Aztec. I chose acrylic instead of enamel since it dries quicker and doesn't stay tacky like gloss enamel can. On my first attempt on the wings and tail fins, it covered fine, but it almost became a disaster when my attempted masking for the silver leading edges started pulling off the Gray paint!!! :D The problem I pinned down to a combination of layering the paint on too fast, resulting in it drying into a thick skin and painting it over a polished glossy primer. So, I had to sand a little bit on the wings and tails to key the surface for the gray paint to stick better. But, if I want to simulate chipped paint, I now know how to do it. With the learning curve out of the way, the body painting went better. The biggest challenge I had was trying to feather edge the gray to white borders. I sort of succeeded although the Aztec with a fine tip doesn't do this task on models as well as a more traditional double action brush (such as an Iwata). Next time I try a scheme like this, I'll try the poster putty masking. BTW, Tamiya acrylic thinner also works well with Model Master Acryl paints. I had much better coverage when thinning it with Tamiya then I did with the Acryl thinner as it had a tendancy to over thin (resulting in my overspraying it to get the coverage). As for the final glossy appearance, that was achieved with Tamiya Clear Gloss spray. The other guys thought I had Futured my model when they saw it and remarked at how even the coverage was. Knowing how good the gloss was from just the can, I'll certainly be using it more often from now on as opposed to using an airbrushed clear or Model Master gloss lacquer (I don't airbrush Future as my bottle of classic formula Future is earmarked just for canopy dipping). Thanks for the encouragement guys. It was most appreciated. Quote Link to post Share on other sites

Recommended Posts
Join the conversation
You can post now and register later. If you have an account, sign in now to post with your account.