

spaceman
-
Content Count
2,876 -
Joined
-
Last visited
1 Follower

About spaceman
-
Rank
Life Member (Mon-Key Handler)

Recent Profile Visitors


-

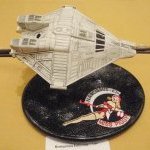
Construction of the Space probe for NASA's Psyche Mission
spaceman replied to spaceman's topic in Real Space Modeling
Hello everybody, I still found a better material for the dark covering of the probe sides and rod systems. I had an appetite for After Eight once again, and when I unpacked it I had the little wrappers between my fingers and immediately thought Eureka - I have it! The outside of the cases is matt black and the inside is glossy. And after I've crumpled up and then unfolded it again I think that this variant is the best solution. Then I thought about how best to scratch the foot of the X-Band High Gain Antenna, but so far I haven -
Construction of the Space probe for NASA's Psyche Mission
spaceman replied to spaceman's topic in Real Space Modeling
Hello everybody, and since I've just gotten my head around my approved scaling procedure again, I want to continue straight away and have done the same on the opposite side with the narrower rod, which is also covered with foil. It is always important to define a reference dimension for scaling all other dimensions, in this case the height of my model probe body. In addition to the dimensions of the rod systems, I also have the dimensions of the Deep Space Optical Communications (DSOC) System and the two probe engines (Hall-effect Thrusters) d -
Construction of the Space probe for NASA's Psyche Mission
spaceman replied to spaceman's topic in Real Space Modeling
Hello friends, the longer I look at the greatly simplified Solar probe body from the Paper Kit and compare it with NASA photos and videos, the more things I notice that I don't like yet, which is why I decided to scratch several details that were only printed and thereby refine the probe's outfit a little. The X-Band High Gain Antenna shown in the kit as a flat cone actually has, like all space probe antennas, an inwardly curved, concave shape and is covered by a foil, whereby it because of the three struts underneath just appears as a flat cone, which I have already -
Construction of the Space probe for NASA's Psyche Mission
spaceman replied to spaceman's topic in Real Space Modeling
Hello everybody, today I dared to the cross struts (brass wire Ø 0,5 mm), but gluing them in turned out to be extremely difficult, which required a lot of sensitivity. The top priority when gluing was a secure bearing and locking of the probe and panels so that nothing could slip. Since the gluing had to be done with UHU CA, the strut could initially only be glued on the rear side. So that after the strut moistened with CA had been positioned accurately, it could be carefully placed on the front side after a short time to set, I glued a tape -
Construction of the Space probe for NASA's Psyche Mission
spaceman replied to spaceman's topic in Real Space Modeling
Hello everybody, today was the day, and when I've turned the probe around full of curiosity I was pleasantly surprised that both Solar panels remained almost horizontal, especially since both were only glued on one brass strut, wherewith my idea actually proved to be a viable solution. In Step 6 the side wall could now be glued, and then also the top finish (Step 7). However, I don't like the blue X-Band High Gain Antenna yet, and since it is covered with foil in the original probe anyway, I tr -
Construction of the Space probe for NASA's Psyche Mission
spaceman replied to spaceman's topic in Real Space Modeling
Hello everybody, let's continue with the Solar panel on the other side, whereby I changed the assembly sequence a little bit. First I glued the longer leg of the brass strut up to the bend onto the underside of the panel. And then it went to the Styrofoam platform, in order to thread the strut, hoping that everything would work. To ensure the panel had a sure laying, I had to put another block of Styrofoam underneath. I then carefully threaded the front end of the brass strut with tweezers a few millimeter -
Construction of the Space probe for NASA's Psyche Mission
spaceman replied to spaceman's topic in Real Space Modeling
Hello everybody, and now to the assembly order, which I thought carefully about. Since my two Z-shaped brass struts are supposed to go through the probe cube, it quickly became clear that I wasn't allowed to glue the cube together on all sides yet otherwise it would not be possible to thread the struts through. That's why in the following picture I tried to mark the individual steps in order with arrows, which may not be understandable straight away, which is why I would like to briefly explain the steps. In order to still ha -
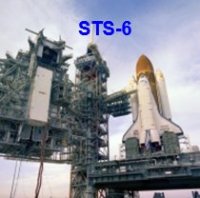
Space Shuttle Launch Pad 39A with Challenger STS-6 (1:144)
spaceman replied to spaceman's topic in Real Space Modeling
Hello everybody, today is again a day of joyful remembrance of Challenger's maiden flight STS-6 41 years ago, Source: retrospaceimages.com (STS-6) L-R: Donald Peterson †, Paul Weitz †, Story Musgrave, Karol Bobko † Source: wikipedia.org to which I have dedicated my long-term project, with which I'm going already into the 13th year, hard to believe, but true. BTW 13 is my lucky number, also because my son Andreas was born on a Friday, April 13, 1979. With this in mind, I hope to make a lot of progress with my -
Hello everybody, first of all, I still wish everyone a Happy Easter. During my trip to Florida, I witnessed the launch of a Falcon 9 Heavy for NASA's Psyche mission from Launch Pad 39A live from the Viewing point of the Apollo Saturn V Center on October 13, 2023, which was an unforgettable experience that I reported on in my German Travel report. This Official NASA Trailer gives a very good overview of the Psyche spacecraft and its mission. http://www.raumfahrer.net/forum/yabbfiles/Attachments/up045518.gif Source: NASA, JPL-Caltech, ASU
-
You seem to be deaf in this ear. Have you ever heard something of Copyright?
-
It's nice that you're using photos from my STS-6 construction report, but then you should cite the source too, that's just part of the game.
-
Great to see you back on track, Mike. Hang in there!
-
Space Shuttle Launch Pad 39A with Challenger STS-6 (1:144)
spaceman replied to spaceman's topic in Real Space Modeling
Hello friends, and sorry guys, I'm still too busy with my travel report at the moment, which is quite time-consuming. To bridge the gap, I can offer the Raumcon link for anyone interested, but unfortunately only in German. But maybe you can have it translated or just look at the images and videos, that will be enough entertainment, I think, until I'll continue with the Payload Canister. http://www.raumfahrer.net/forum/yabbfiles/Attachments/up050224.gif Trip to Florida and visit to the KSC 2023 Enjoy all and have a little bit fun. -
Space Shuttle Launch Pad 39A with Challenger STS-6 (1:144)
spaceman replied to spaceman's topic in Real Space Modeling
Thanks Mike, I hope you'll stay tuned. -
Space Shuttle Launch Pad 39A with Challenger STS-6 (1:144)
spaceman replied to spaceman's topic in Real Space Modeling
Hello my friends, I hope you all had a Merry Christmas and are doing well. I have just started my German travel report, so my construction report with the Payload Canister will continue soon too. Best wishes and a Happy New Year.