

f5guy
-
Content Count
1,970 -
Joined
-
Last visited
2 Followers

About f5guy
-
Rank
Full Blown Model Geek

Recent Profile Visitors
13,873 profile views
.thumb.jpg.2ee415cfc0e513722117dbaa7f808542.jpg)


-
Good news Dutch! Fred.
-
Hi everyone, Another update. Before I attached the wings I used some sheet plastic to reinforce the flimsy joint under the engine pylons. On my Eastern -800 build, I had the nearly finished model slip off of my bench and into a five gallon waste bucket nose first. It blew the right wing completely off. See pic. The wing fractured right along the pylon joint on the bottom, which prompted me to decided to reinforce it on this build. The process was pretty straight forward, and resulted in a much stronger joint. If you're planning on building any of the BPK 737 kits, I would strongly re
-
Thanks for the intel Tracy! Your method will come in real handy when it comes time for me to make the wing root lights for my Titan 72nd 757-200 build. Regards, Fred.
-
Hi everyone, First of all, Dutch, sorry to hear about the issues that you've been having. I had the same thing happen with a pair of 48th Tamiya F-14A kits that I ordered from Japan. Interestingly enough, they came from the same ebay seller who shipped them seprately. The first one arrived fine, but the second one was sent back because of a supposed bad address. Go figure! Here's a little insight for everyone. My wife is a window clerk for the USPS, and has been for 30 years. I know most of her co-workers, the Postmaster, and even a few regional managers. In the 10 years si
-
Hi Tracy, Thanks for the advice! I've toyed around with the idea of trying the UV resin out, but just hadn't gotten that far yet. I will check out the brand you mention, as it certainly has tons of potential uses. Have you ever tried it for fuselage windows? I have several business jet types to build, and the thing that always holds me back from starting a kit is having to insert those small windows singly, and strongly enough that they don't pop out and into the sealed fuselage during handling. When I first saw this UV resin, I thought that it might be a good solution for
-
Hi again folks, I got the glass on as well as the nose cone. There's about 2 or 3 ounces of weight in the nose. As with my Eastern 737 build, I had to do a bit shimming with plastic card to fill in some of the gaps. One of the shims fell inside and I couldn't get it out. At one point it came to rest against one of the existing shims that I had already put in, so I quickly hit it with liquid glue, and glued it in place. Well at least it won't be rattling around in the fuselage now. It's the white rectangle just behind the rear pilot's window. Once the model is painted, you'll never kn
-
Hi everyone, I got the lower wing fuselage section and wings on a few weeks back, and just like my Eastern -800, fit was not too great. It might have actually been worse on this kit. I had to add a length of Evergreen strip plastic at either end of the wing box section to help deal with a decent step(pic 1). Much filling, grinding, and sanding ensued. The cockpit was finished off and glued into the fuselage (pic 2). I didn't spend much time on the cockpit, as very little is visible once the canopy is on. Next up is getting the engines going. Stand by... Fred.
-
What is the F-5E/F Aux Engine Inlet color and How do you Paint it?
f5guy replied to Drifterdon's topic in Jet Modeling
Thanks for the kind comments Don! Being an 80's Monogram kit, it was definitely a bit of a fit pig, but with a lot of sanding, re-scribing, and a Black Box cockpit set, it came out pretty good. Thankfully we have the MUCH better AFV kit now. Take care, Fred. -
Hi Dutch, I saw Kursad's announcement regarding decals, but will likely just finish mine off with the kit decals, as they're in good shape, and I want to keep this build moving forward. Thanks! Fred.
-
Very much so Dutch! Progress is being made. I just haven't had time to take a few pics yet, but will post soon. Thanks, Fred.
-
Well..... I started the XB-70 kit about 4 years ago, but hit the wall with it with all of the endless grinding and sanding involved. I also knew that my gloss white painting skills were not up to such a challenge, so it got set aside as painting approached. Now that I've tackled the "Rat 55" 737-200 and Eastern 737-800 builds, I feel that my gloss white skills are now up to the task of finishing off the XB-70. So I suppose both 737 kits were guinea pigs of sorts 🤣 Fred.
-
Thanks everyone for your very kind comments! Once I get the AMT XB-70 kit that I'm currently working on finished, I'll get going on either the Titan Models 757-200 or BPK 737-900 projects that I've already started build threads on. Look in on those if its anything that interests you. Thanks for your support 👍 Fred.
-
What is the F-5E/F Aux Engine Inlet color and How do you Paint it?
f5guy replied to Drifterdon's topic in Jet Modeling
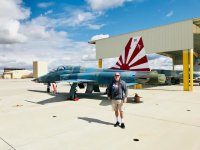
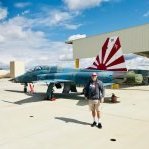
Here's another pic from one of my Fallon photo shoots. I think you'd be good with any similar grey. Fred. -
What is the F-5E/F Aux Engine Inlet color and How do you Paint it?
f5guy replied to Drifterdon's topic in Jet Modeling
Hi Don, Here's a pic of the inlet. It looks like maybe light gull grey, or similar? As for painting it.... if you're using the AFV kit part, all I can suggest is painting it very carefully 😂 If you're using the Quickboost set, it will likely be easier. As for colors of the jet that you posted a pic of in Dave Roofs VMFT-401 decals thread... I built an E in that same scheme a number of years ago using the info from a Twobobs sheet, and the colors were dead on. The colors I used were FS36495 for the light grey, FS36375 for the medium grey, and FS35237 for the darker gr -
Thanks everyone for your very kind comments everyone, and for tagging along on this extended build! Next up for me is to finish off a 72nd AMT XB-70 that I started awhile back. Then I'll get going on either the Titan 757-200 or BPK 737-900 conversion that I'm doing progress builds on. Thanks for tuning in, Fred.