haneto Posted November 17, 2009 Share Posted November 17, 2009 It’s been a long time since my last 1/48 jet built which was a Matchbox F/A-18 at least 15 years ago. The quality of the kit is the typical Trumpeter style:big rivets,wide panel lines but the fitting is not bad.What’s most important is that it is the most accurate J-10 kit on the market as they developed the kit by official references from Chengdu Aircraft Corporation(CAC). I wish one day they will scale down it to 1/72…… The accessories I used are the only ones released by a Chinese brand called Dream Model,including one PE set and a resin PLAAF pilot figure. The injection pins are filled by putty although they are mostly invisible after assembling. Gunze white surfacer was hand brushed as putty. After drying,remove the putty by a Q-tip with thinner. You can use this method if the assembling area is difficult to sand. Metal J-10 pitot tube from another Chinese original new brand “Eldelwissâ€. The section of nosecone is a little too big,so 0.5mm plastic card is need to fit the pitot tube. Quote Link to post Share on other sites
haneto Posted November 17, 2009 Author Share Posted November 17, 2009 Then let’s move to windshield/canopy. Sand the harding line of the canopy and polish the area. Front inner frame was applied at first. Side inner frame was assembled and dry fitted. Dry-fitting is very important as the canopy side has some curve! External masking. Then inner masking. Finally apply the side inner frame,avoid the clear area polluted. This time I do not want to glue the canopy so some tricks are needed. Cut the black marked area as shown. Then locate the canopy by masking type from outside. So that you can find the inner location of the canopy frame locks. Use plastic card to replicate the lock room.. Finish. Quote Link to post Share on other sites
haneto Posted November 17, 2009 Author Share Posted November 17, 2009 Put on the canopy. Another inner part of canopy,hydratic arm was made movably. Quote Link to post Share on other sites
haneto Posted November 17, 2009 Author Share Posted November 17, 2009 Dream Model PE set offers dashboard and upper covers to replace the original plastic part. But after dry-fitting,two problems found. The lowe side of dashboard is too wide to allow pilot’s legs in. Also the upper covers are so wide that windshield cannot be appied directly. So I had to resize the parts according to the original plastic parts. The three plazma screens are separated parts,so painted them sepereately. Then apply the film sheet from behind. Next apply the cut screen area from the kit decal. All hand painted. 1/48 scale is just such a piece a cake compared with the master scale 1/72! Quote Link to post Share on other sites
haneto Posted November 17, 2009 Author Share Posted November 17, 2009 I don’t have detailed pictures of this area,so just imagine! After painting. The original plastic HUD light is very hard to assemble so I replace it with a MV Production’s lens. Also,the original HUD glass is too narrow to fit into the blanket,so I cut some new one from 0.2mm clear plastic card. Quote Link to post Share on other sites
haneto Posted November 17, 2009 Author Share Posted November 17, 2009 PLAAF pilot Original mastered by Dream Model,this is the original pose: But “he†cannot be put into the cockpit! So his back and hump has to been cut……a lot. Then I change pilot’s pose by separate his arms,in order to avoid disturbance when canopy is closed. Quote Link to post Share on other sites
haneto Posted November 17, 2009 Author Share Posted November 17, 2009 After all painted,the dark parts are washed with Tamiya XF-53 neutural grey enamel colour. Parts assembled into fuselage. The holes on the rear fuselage are opened buy a plastic sheet can avoid them from seeing another side. Cockpit painted. The inner frame colour of windshield is the same as cockpit colour GSI C306. While the inner frame of canopy is flat black. Pilot salutes with his right hand while left hand on the throttler lever. Quote Link to post Share on other sites
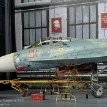
haneto Posted November 17, 2009 Author Share Posted November 17, 2009 The upper parts of wings are glued firstly to avoid unnecessary sanding work. Wheel bays are hardened by black super glue. Then lower part glued. The fitting is very good! Fuselage glued.All other parts are dry fitted. To be continued…… Quote Link to post Share on other sites
GreyGhost Posted November 17, 2009 Share Posted November 17, 2009 Nice work ! B) That pit looks awesome ! :) It's nice seeing one of these J-10s going together ... Gregg Quote Link to post Share on other sites
AnthonyWan Posted November 17, 2009 Share Posted November 17, 2009 Looks awesome Yufei! I'm curious where you obtained the PE and the figure..I'll send you a PM sometime soon :) Can't wait to see more progress on your build. Have you decided what paintscheme you will do? B) -Anthony Quote Link to post Share on other sites
haneto Posted November 17, 2009 Author Share Posted November 17, 2009 Thanks for the encouragement,guys! Anthony: I will make it in the ordinary PLAAF schem with air superoir 2 tones grey. Cheers, Yufei Quote Link to post Share on other sites
klay Posted November 17, 2009 Share Posted November 17, 2009 Wow.. another very inspiring work from you! Just too bad that the instrument dashboard is a bit too wide to be fitted under the windscreen.. I see some of the details on the left side has to be cut away.. a bit wasted... Quote Link to post Share on other sites
Stephen Posted November 17, 2009 Share Posted November 17, 2009 A superb build! Stephen Quote Link to post Share on other sites
Qian Posted November 17, 2009 Share Posted November 17, 2009 Nice progress so far Yufei! I really like that metal pitot tube. If I were you, I would actually heat up the metal pitot to give it a burnt look as can be seen on real jets. But nonetheless, given your superb scratch-building and modelling skills, I believe this J-10 will turn out just as great as your other builds! :) 坚持下去! Quote Link to post Share on other sites
rom Posted November 17, 2009 Share Posted November 17, 2009 nice start!!! i really enjoy to follow your works!! :) bye Quote Link to post Share on other sites
Kasatka Posted November 17, 2009 Share Posted November 17, 2009 Hi, Yufei! Very nice build of a model of a very interesting plane! Keep it this way! =) Quote Link to post Share on other sites
Isaac Posted November 17, 2009 Share Posted November 17, 2009 Great work! Thanks for taking the time to take all these pictures to share with us. Quote Link to post Share on other sites
Aigore Posted November 17, 2009 Share Posted November 17, 2009 Awesome detailing!! Really great that this model is available in 1/48th scale...think I might have to get one...... Quote Link to post Share on other sites
Hawkins Posted November 17, 2009 Share Posted November 17, 2009 Beautiful work, Yufei! I'll turn into a beauty, no doubt about it... Cheers! Emil Quote Link to post Share on other sites
dragan_mig31 Posted November 18, 2009 Share Posted November 18, 2009 wow wonderfull looking j-10 i wonder how this will turn out at the end.now doubt it will be great as all your models are.. Quote Link to post Share on other sites
Eastern Posted November 18, 2009 Share Posted November 18, 2009 Hi Yufei! Nice progress by far! And I can say that you eventually are approaching to the only true scale - 1/32! ;) Keep your ever great work up, mate! Cheers! Alexander. Quote Link to post Share on other sites
Deino Posted November 19, 2009 Share Posted November 19, 2009 Take a look here: http://www.top81.cn/top81bbs/uploads/2009/...25219_20279.jpg Deino Quote Link to post Share on other sites
Firecaptain Posted November 19, 2009 Share Posted November 19, 2009 "Black" superglue?.......never have seen the stuff before or is it a "home" brew? Quote Link to post Share on other sites
AnthonyWan Posted November 19, 2009 Share Posted November 19, 2009 "Black" superglue?.......never have seen the stuff before or is it a "home" brew? There's a brand out there that has a black-colored superglue (I think its rubber-strengthened or something like that). Haneto will have to enlighten us as to the brand though Quote Link to post Share on other sites
haneto Posted November 20, 2009 Author Share Posted November 20, 2009 Thanks for the info,guys! About the black super glue,it's sold by a Japanese brand WAVE. Maybe you can find it on Hobby Link Japan? Here're some new updates. I missed 2 parts of cockpit,so paint first then install by black glue(really suitable for such usage. ) Put on the windshield. The "rivets" around it do not exist on realy things,so putty'em. Fitting is quite nice,and parts are seperated in a very clever way to reduce the sanding work. But still some place need putty. The intake parts fit very bad with fuselage. Heavy sanding here! Some modification work need to make flaps down. The rear part of fairing should be cut seperately and sand into proper size to fit the frong faring. Quote Link to post Share on other sites

Recommended Posts
Join the conversation
You can post now and register later. If you have an account, sign in now to post with your account.