


Aurora Mark
-
Content Count
483 -
Joined
-
Last visited
Content Type
Profiles
Forums
Calendar
Posts posted by Aurora Mark
-
-
AWESOME!!!!!
-
Absolutely.
ASW has been a neglected art these last several years too, 6 years in P-3s and all of my time is flying over sand or looking at dhows off the east African coast. Anyone who has ever tracked an actual sub (no, not one of ours coming out of Kings Bay at a known point and time...) is now USN Retired. And I'll say it, practically every time we flew an ASW ex, it would be us knuckle draggin' flt engineers sitting up front eating Cheetos who'd spot the subs periscope trailing in the water long before "Contact!" was called from the tube rats. Oh well.
I take offense to that! I'll have you know... ...hahahaha.
Whitey, you know me. I'll just shaddup and go back to my tube.
-
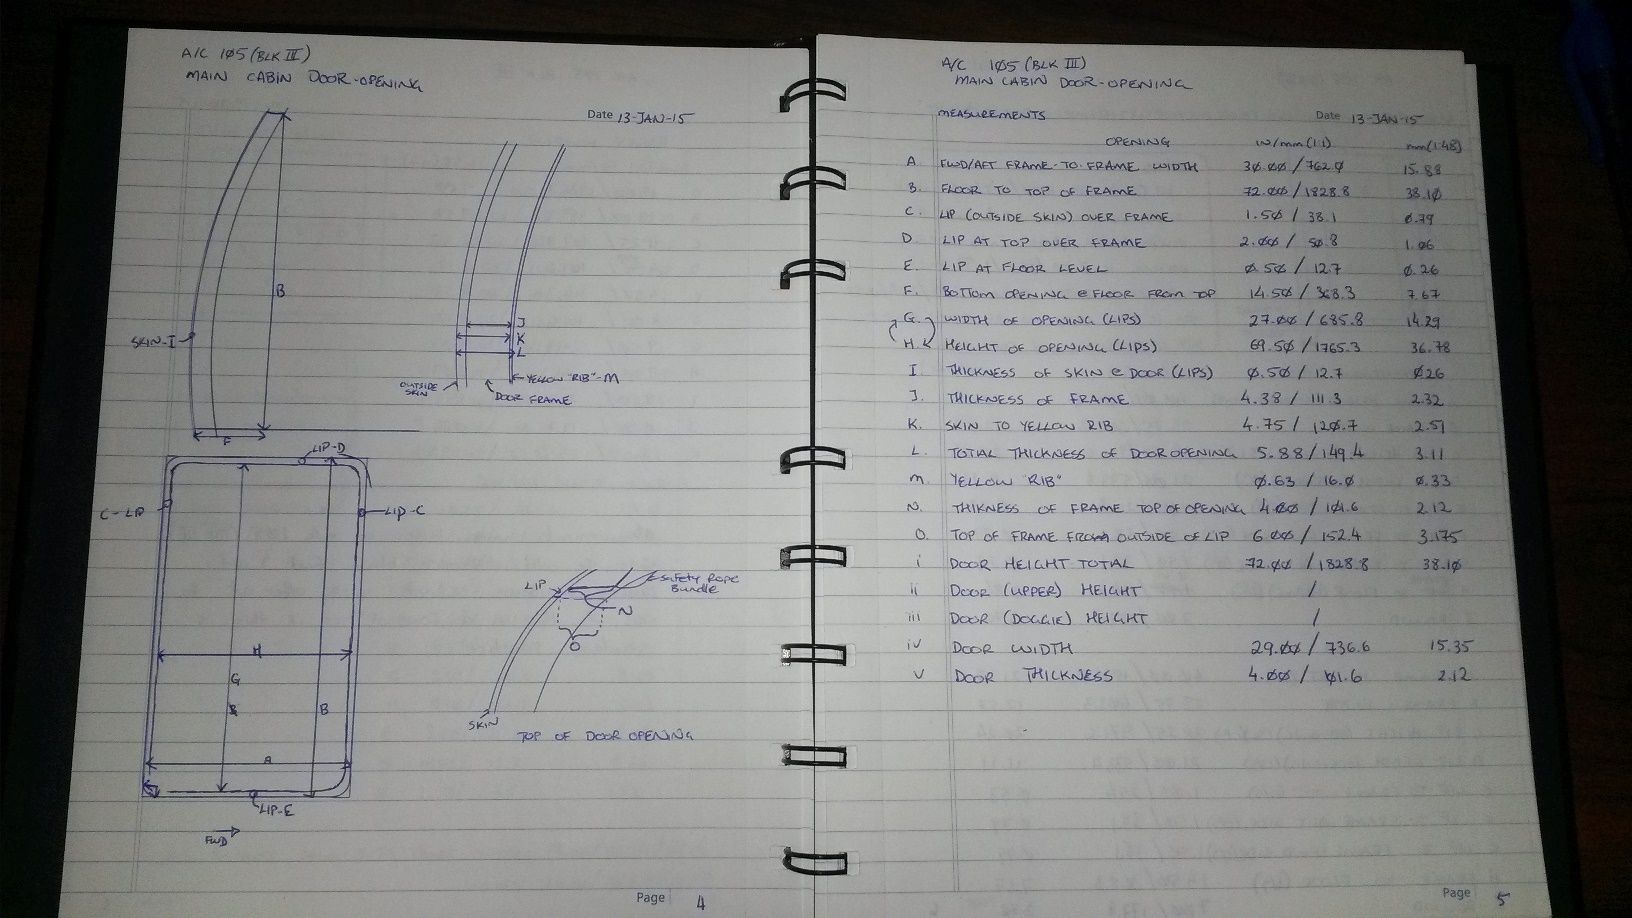
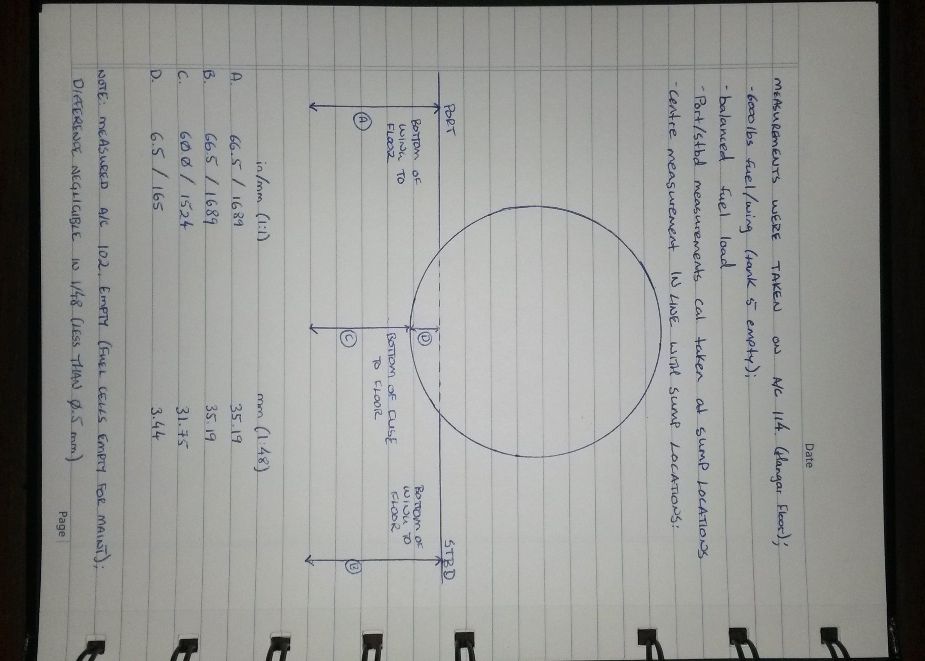
...the going might be slow, and part of that may fall to how I go about with the measurements and design. The images of the prints I post up are simply "paintbrush" images, to share with you guys what goes on with work on paper. I like going back to the ways I did things long ago. A simple ruler, string, calculator, and a journal. All the designing of this kit is done on paper this way. It's not that I'm not a fan of CAD, but as everything is getting referenced to the actual aircraft, and the measurements are down-scaled (where any angles or curves would still be the same in scale), it's both straight forward, and pretty therapeutic. Ratios after all, are still just ratios.
Whitey, vote number 650 today! Revell Share Your Dream - 1/48 P-3
Cheers,
Mark.
-
Joel, I certainly hope it's a sound plan, hahaha! I hope to be able to keep it simple.
Colin, Thanks my friend! Slow, but I'm going to have fun. But really, I'm no expert or fantastic builder of vac forms. This is the debut of my vacforming, so please cross your fingers for me!
Alright, so a little more of the planning/designing is complete.
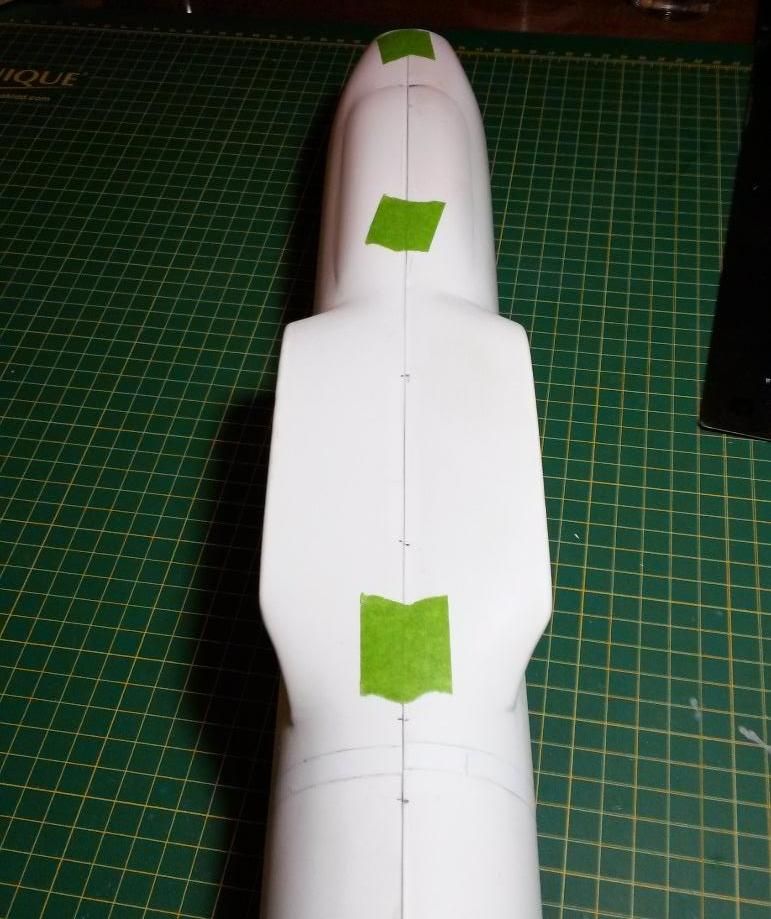
The idea of a 3 piece spar section will also help me deal with something missed in the vac form. The bottom of the vac form at the wings has the bottom of the wing flush with the fuselage:
However, this is certainly not the case. Here's an old CP-140 picture, using the old paint scheme and the better contrast to show the wings being mounted slightly higher up on the fuselage, and a very visible lower portion:
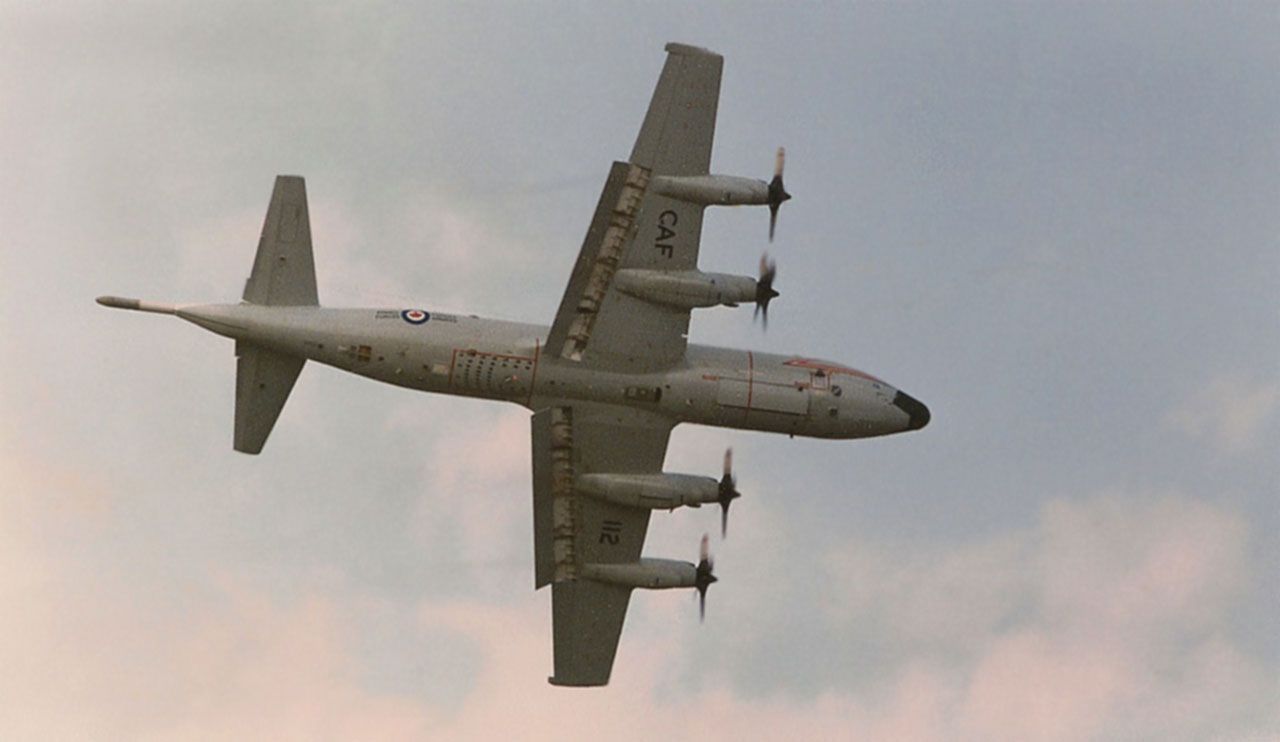
This is fantastic from a building point of view as well, because with a real lack of fairings around the wing (it is very sharp below, and fairly sharp between the wing and the curve of the fuselage on the upper parts), there's going to be very little fairing construction required. Great! Life made easy!
Anyway, going over the plans of the CP-140, here's the cross section at the wing with the spar. Honestly, I'm just going to follow the plans, and there's going to be more than enough room for the spar, wing, and bottom of the fuselage:
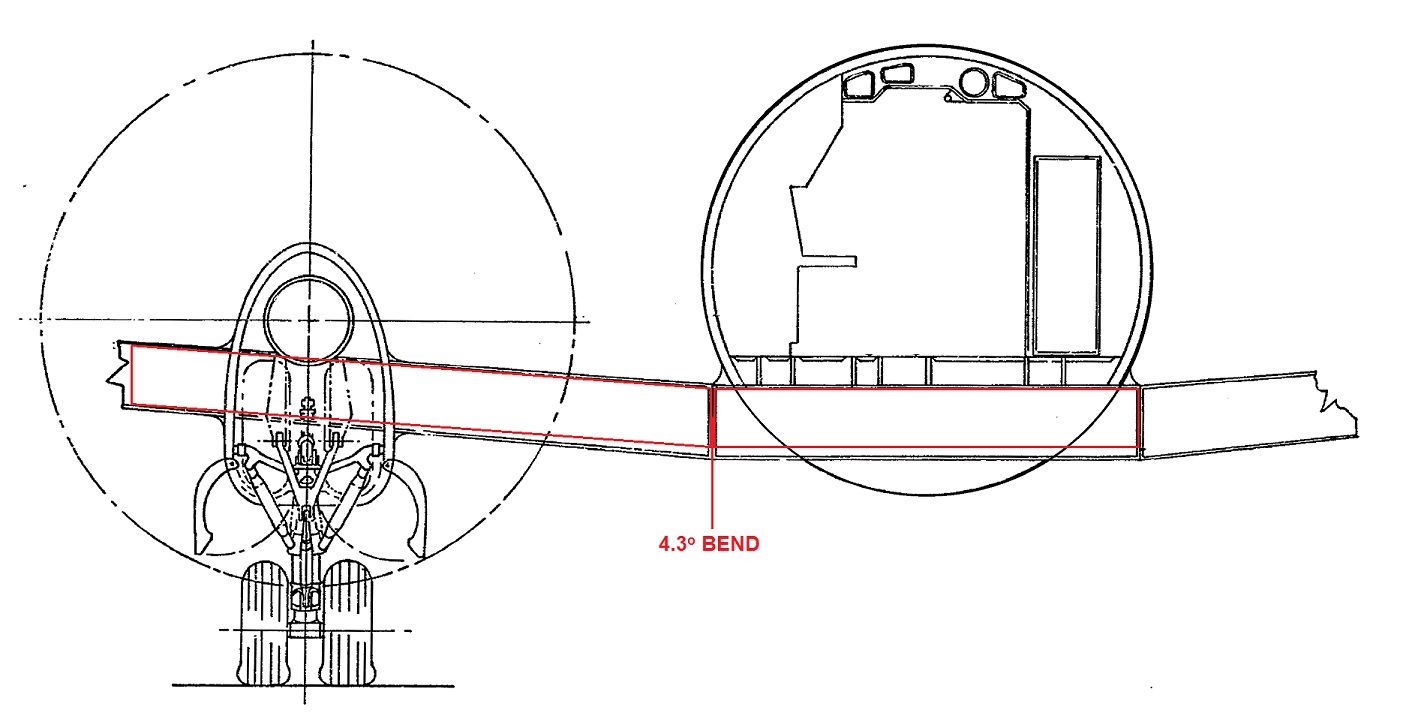
The weight of the fuselage will rest on the top of the centre section of the spar, with the landing gear pushing up on the bottom of the spar in the wings. The bend of 4.3 degrees matches the dihedral of the upper surface of the wing. So, it's combining how the spar in the Aurora is constructed, with the same weight distribution of the first 2-piece spar made.
I will also experiment to see if I can get a single long rectangular box piece of brass bent nicely, rather than connecting 3 individual pieces. This will definitely make constructing the spar box MUCH easier, and will then just need the wings slipped on (think Monograms 1/48 B-29 Superfortress construction method). If I can nail this down to working with a single piece, then heck, that's what I'll be doing for sure!
Cheers,
Mark.
-
All part of the design process and approach for this build...
...going through the previous suggestions, there is a lot of great news. I went through the books once more, and through all the notes previously made on the build so far. Even though the fuselage will still be split along the traditional way (left half, right half), a nice "tube" insert that goes completely up the side of the fuselage along the wing route lends itself nicely. Rather though than ending this up just pat the wing, it will continue right up to the front of the bomb bay.
As the bulge where the bomb bay is on this vac kit is right out, and the bomb bay doors will be cut open, it works nicely for two reasons. First, it gets rid of the bulge, along with the wing roots. But further to that, the bottom of the fuselage below the wings (just by the nature of how the vac parts were made and no fault of anyone) are paper thin. This leaves a huge risk of the fuselage splitting in the middle. By using a nice 1.5 mm thick tube glued inside the fuselage, this will strengthen and stiffen that area.
There will therefore also be a substantial amount of stiff plastic to glue and secure the bomb bay walls to as well. The downside/upside will be that there will need to be a new brass spar box made. One that matches the actual one closely (flat section in the middle, with angled pieces outside the fuselage "tube"). This tube approach will also allow for an easier way of showing the rounded fuselage section inside the flap wells too! So, it all starts coming together.
I'm just drawing up the last of the first stages of the fuselage (for myself more than anything). I do apologize for the lack of photographs, but really, there is little to picture and show. But, here is the first phase:
1. Start by creating the 1.5 mm tube. I may do this by vac forming, or I may do it by forming them using the hot/cold water approach. The tube will then be glued inside the fuselage.
2. The wing-roots will then be shaved off, and pieces of plastic will be glued back in to fill the gaps created by the missing wing-roots. From here, the fuselage halves will be sanded smooth with superglue and/or filler.
3. With the fuselage completely stripped of anything sticking out, effectively making it just the outer skin, all the windows/doors, hatches will be marked off based on drawings provided for the CP-140 Aurora by Lockheed. This will also include an overlap of the wings and more specifically, the spars.
4. Once the markings have been created, a new spar-box will be fabricated to match the correct dimensions of the wings (chord, dihedral, etc.,).
5. Once the spar box has been fabricated and measured up to the fuselage, the wing areas inside of the fuselage will be stiffened with further layers of plastic.
6. All the appropriate hatches, doors, windows (except for the flight deck) will be cut out to the appropriate sizes.
Sounds simple enough. The down side is that I wont be able to get back at the actual cutting of plastic until about the beginning of November. Talk about a long drawn out process eh?
Well, that's about it for now.
Cheers,
Mark.
-
If you can't mask and repaint the whole panel, make it look like they belong there. Specifically, paint a "patch panel" on the NMF skin. Maybe this will help?
-
Hello,
I am looking to try and find a nice mini lathe that would lend itself nicely for the making of landing gear legs, brass barrels, and other smaller items like that. Looking online has really given me little help with which one to pick. So, I'm wondering if anyone here has one, uses one, or has used one that they feel would be a worthwhile purchase.
Thank you kindly for all your help in advance,
Mark.
-
Any updates?
-
I don't think there's any probably about that 11Bee.
I still can't get over the hand painted straps! Absolutely amazing! It was after seeing this that I went back to the books to start planning out how I'd be making the seats for the CP-140... not to often one can say the get excited about aircraft seats!
Mark.
-
True! But hey, I was all of 6 then. Saw it on the shelf, and my dad knew by my reaction that we're going to be building this one, no argument.
Mind you, given that I ended her shelf-life with a good ole firecracker behind the engine, perhaps the box art isn't completely wrong afterall...
-
Fantastic read! Thank you for sharing this one!
Mark.
-
Heh, little update... amazing work! Those details all add up in the end!
-
Brilliant point. Now, not to ride in on your coat tails here, but I do agree to a point. Take this hobby like Hockey up here. Some play to simply play for fun. Others are destined for the NHL. In the middle you have all calibres of play. Some are competitive, others are not. And this is much like model building.
There are those that build just for fun, and do what they can. Follow the instructions, put it together, and at the end of it, call it a day until the next time. Just as you would with pick-up league play.
Then there are those of us who want to build something that is as close a representation to the real thing as possible. And just like in competitive hockey, we study reference material, practice, and often leave our comfort zone in the hopes to get better.
This topic of preshading or not and how to paint a model just right to get that finish, well, it's another example of a tool or an approach to achieve that.
I'll take my approach to markings as an example. I don't like decals. For anything. I don't like the carrier film, and I also don't like how they react differently to weathering techniques. So I opt to use paint masks and paint the larger markings on while using dry transfer stecils for everything else. To me, this allows more for a representative look of my subjects. Now, can the same be achieved with decals? Most of the time, sure. But with a lot more work to "hide" the carrier film. And I am not going to say that decals are horrible to use, they just don't give me the satisfaction of that 'end state' look that I want.
Where am I going with this? Just like preshading panel lines or painting things black first, there are methods of pushing a build to get that look.
Building models and the existance of online communities go hand in hand. Constantly evolving. At one point in time model building evolved to accentuate panel lines and rivets. In many examples this new technique helped to add to the finished look. It created something else; artistically motivated schemes that brought life and colour to the models (whether the actual aircraft had that or not). Has this method been identified as falling short when it comes to representing what the actual subject looks like? As we've seen, in many cases yes. Is the blog entry written (and the subject of this thread) done anything to help? YES!
Here we have a new method and technique shown to us as a way of bridging the gap between models and actual subjects a little further.
In no way did I take that article as the end all, be all. Rather, I found that just like weathering, or highlighting details with dry brushing silver, there is a time and place for preshading. Further, here is a fantastic method to achieve depth and tone in an overall paint scheme that better represents the subject.
I also took something else away. If I want to achieve something specific in a kit, I need to do my homework. The real thing isn't stained or weathered uniformally because of the same reason. So if I want to show hydraulic stains, oil streaks, gun dust, fading from the sun, wear and tear from daily use, etc., no single approach will achieve this. Instead, a variety of techniques need to be used, and I thank you Doogs, for showing us all another tool to use.
Mark.
-
Loving the progress!
-
Finally found it! Built this one as a kid...
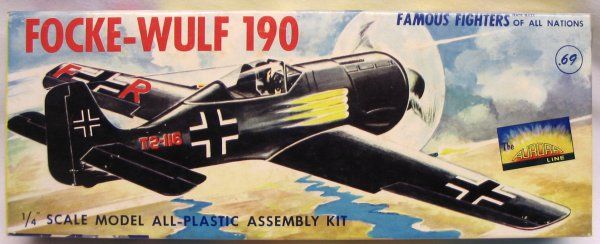
I remember something odd... mind you, the FW 190 was mean enough as it was, with that massive radial power plant. Then they took it too far with the introduction of afterburners, as seen in the box art photo. So much power that the wings wouldn't stay on! Mind you, after building that kit, I remember that the left wing on the box art did closely represent the warp of the kit parts.
Cheers,
Mark.
-
Brilliant!
-
...wow! At first I thought the second picture was a reference photo!
-
I don't mean to start this comment with the intent of stirring the pot. Not at all. I will also not wash things down by going the "artistic is artistic" route. I will just give my two cents, a bit of an opinion, and very little fact to this.
First, if someone is going to build and weather a model, a fantastic way of showing a paint scheme, panel lines, rivets, and dirt/grime as being accurate, is to have photographs of the subject. So this narrows it down to a rough (or exact) date, with photo reference that can be used, and compared. This way, if someone mentions about dirty or not dirty enough, etc., there is something that cannot be argued, ready at hand, to show that the builder did their best to represent a specific subject, on a specific date, in a specific way. There are some subjects that I have done this with, and I've seen a few here, including Thommos Malta Spitfire (Brilliant work good Sir!).
Now, if someone wants to use their talents and artistic ability to show a model in a particular way, who are we to stand in anyone persons way?
There are so many truly incredible fantastic models that look VERY realistic, models that look absolutely amazing and very nicely finished with the builders unique touch, and models that are both. Do I think that judging at a national or local level should be able to distinguish between realistic finish and artistic finish? Absolutely.
The argument of panel lines from a distance, what stains will be seen, and will not be seen, shading, etc., that all comes down to what the builder wants. If we as viewers don't like it, we can certainly say so, but I don't think we should hold things against the builder.
So, to sum myself up - if you want to build a model and have fun in any way to shade, preshade, not shade, go for it. BUT, if you're going to claim that a model is finished in a realistic manner, be able to show it, that's all. There can be a difference.
Just my two cents. Thanks for reading.
Mark.
-
You both! You both rock!
So, there is a down side to the cutting of the nose and tail and putting them onto a tube. The tail not so much, but the nose. With the size and weight of the model, and the force on the nose, rejoining the nose section to the fuselage will be very difficult to do right. This is primarily due to the very close proximity of the rear of the nose gear well and the front of the bomb bay. Without being able to reinforce it properly, there's a good chance that it may crack. At the very least, a thin nose section, with a thicker center fuselage section may show a bit of an unwanted oil-can look over time.
BUT! BUT! Here's the great thing! So, rather than cutting the nose sections off, or messing around with reinforcing the joints... you guys! Thank you. Reading your posts, this 2W lightbulb just went off above my head. Same idea - a tube, but having that run a few inches forward and a few inches behind the wing roots. Make a nice tube that matches the internal diameter of the kit fuselage halves. Have those overlap the wing roots and circle the fuselage. Once that nice tube shape is put into play, then the wing roots can be shaved off and filled in exactly as I did with the elevators/horizontal stab roots.
Thank you! This will definitely be the way to go ahead here. It lends itself nicely as the scale thickness of the fuselage does leave a lot of room to play for a thick (even 1.5mm) tube of white plastic to be mounted in.
Okay, we're in business! Definitely!
Thanks guys!
Mark.
-
Right on! Wow!! You don't waste time.
-
Up here we call 'em bouys as in "boys".
-
The gal in the background isn't too hard on the eyes either. Cheers.
-
Fantastic!! Thanks guys.
-
As mentioned, managed to thin things down. Of the original vac kit, the last two parts that will be kept and used are the fuselage halves... maybe.
The vertical and horizontal stabs along with their respective feathers will be vac formed with the correct shapes, as will the wings. But the question of the fuselage halves comes down to these points:
-removal of the wing roots to correct the errors may warp/weaken the fuselage halves;
-the fuselage is in itself just a long tube, which is easily replicated with a vac form;
-cost/time/effort to create a new fuselage vs. using the halves I already worked on.
I have no doubt that making new fuselage halves with thicker plastic will help with strength, and make attaching the correct wings easier, but is the juice worth the squeeze?
Making a master that has the tube shape is easy. The contours of the nose and tail are not that easy (due to overall size). Alreay having corrected the length of the fuselage halves lends itself nicely, but is the amount of plastic surgery needed at the wings and risking the fuselage bowing aft of the wings better than making them from scratch.
As well, the engine plugs are going to be chucked as well. There's just too much to fix, and so although a pretty penny was paid for them, just not worth the effort to rework them. Spinners and props as well.
Not at all a bad thing though, just a matter of accepting where the start point is.
Tamiya 1/48th Avro Lancaster Bomber Lovely Lou
in The Display Case
Posted
Stunning work!