


geedubelyer
-
Content Count
4,122 -
Joined
-
Last visited
Content Type
Profiles
Forums
Calendar
Posts posted by geedubelyer
-
-
In even worse shape. I took a few pics of it in late 2011. By this time they had it placed on stands, but parts were still missing. At least you could walk under it now, so I took a few pics of the underside. Not a lot though, as it was getting quite late in the day and already getting dark.
I have a few not so bad pics of the main landing gear, if you need it.
Hi Pete, yes please, that would be very nice thank you.
Another piece of the jigsaw puzzle arrived in the post this morning:

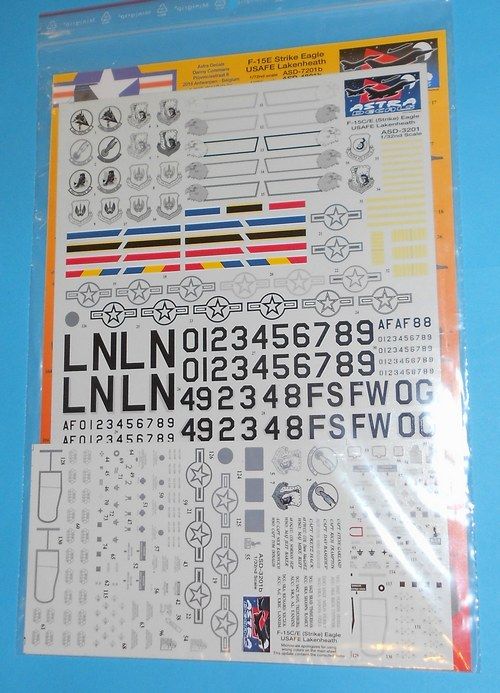
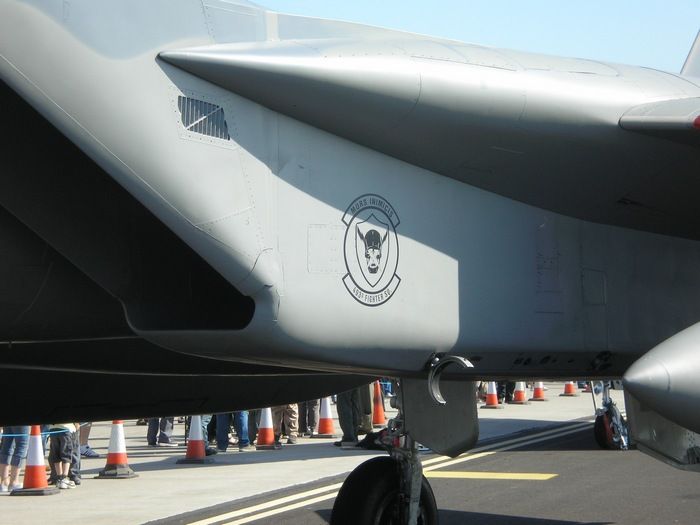
These are from DACO productions and include enough serial numbers to create the jet I'd like. One thing more that I'll need to source is the newer style of squadron badge for the left hand intake side.
I suspect that I might need to make my own. Anyone have a source for some quality waterslide decal paper.....?
Cheers.

-
Superb photos Mark, thanks for sharing them. Please add as many as you'd like. The image of the Bolers FOD guard is great. I will attempt to re-create that and make a pair with the band across the middle.
Hi Qian and Ken, thanks for stopping by and for your generous words of encouragement, much appreciated. I'm glad you're enjoying things thus far.
Look what arrived in the post today, a taste of things to come......
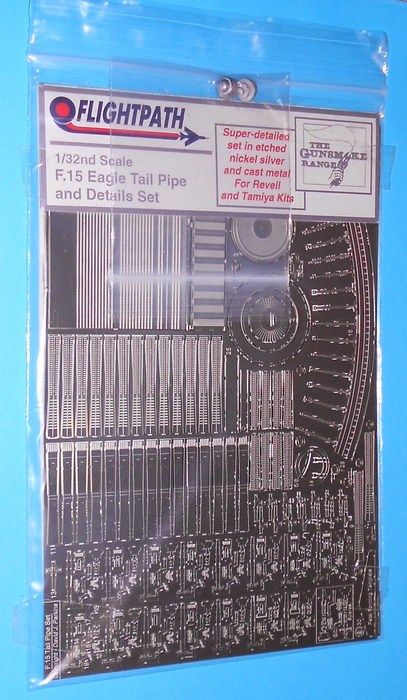
This set is a new design and now features the turkey feather attachment points at the tip of each petal. They look good and will save alot of work later. Thank you Mr.Parkins.

Cheers.
-
Hi Mark, thanks for the kind words.
Super photos of the F-15A but wow! she's seen better days huh? :blink:/> Replicating that faded paintwork would represent a challenge. :wacko:/>
Where is this airframe based? Do you have any more images of her that you could share please?
What your photos illustrate is that there are panel lines and rivets galore when seen under such conditions. These pics will be a good reference for anyone re-scribing or re-rivetting an Eagle.
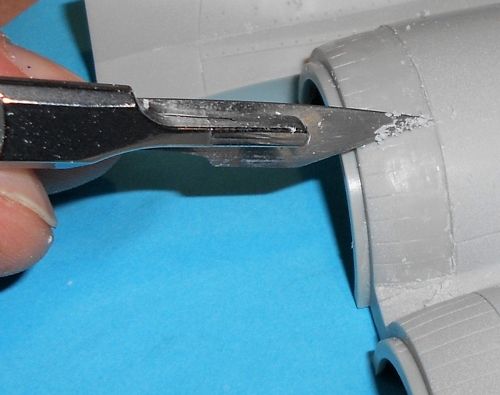
I have n't made any progress on the Eagle but I did take a couple of snaps of how I removed the plastic where the feathers where so I thought I'd share the technique.
I started with a flat chisel. This is part of a five piece set designed for wood or leather carving that I bought some time ago.
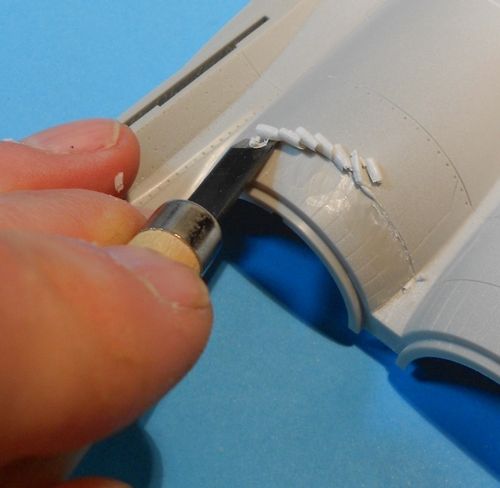
There are one or two things to remember when you start.
Firstly, don't try to take the whole lot off in one go. By being patient and removing a little material at a time you have more control and are less likely to slip. It's not a race so take your time and you'll benefit in the long run.
Also, be very careful when using sharp blades. Never hold the piece with your hand in front of the blade. Always hold the piece behind the blade so that if you do slip, you don't bury the steel upto it's hilt in the softest part of your other hand.... :gr_barf:/>
Brace your fingers aganst the work where possible and start with a firm base. Push with just your fingers rather than your whole hand to keep better control and if necessary use many short stroke rather than attempt one long one. (Sound advice for other aspects of life too.... :whistle:/> )
The next most important thing is putting your tongue in the correct place. I've found that if I poke the tip of my tongue just outside my mouth I get a much better control of the blade. Experimentation is the key here. See what's comfortable for you. Try each corner or even in the middle. Poke it out more or less and even waggle in time with the blade as you remove the plastic. Whatever works for you.
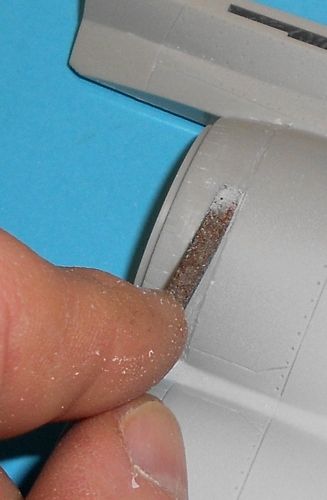
Next up, tidying the curls of plastic. I found that by tilting the blade vertically I could keep the edge tight to the mold line and gently draw it along removing the curls as I went.
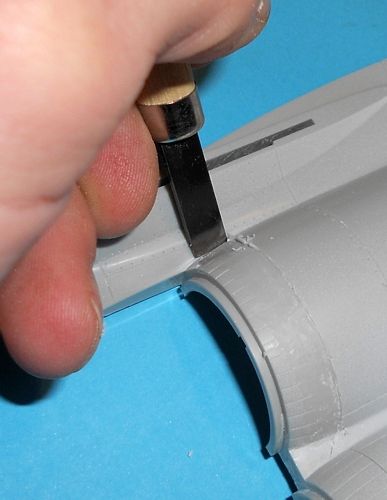
To give me a nice, neat edge I finished up with a scalpel blade and worked slowly and carefully. For this step I made sure to angle the blade away from the direction of travel so that I got a smooth action without it digging in.
The last step was to clean up the surface and smooth it out with a fine file.
I hope these quick tips help.
Cheers.
-
Hi Chuck, thanks for stopping by and many thanks for the words of support, much appreciated. I'm glad you enjoy the threads and hope that we get to see an Eagle "kicked up a notch" soon.
Hi Marcel, I think you've hit the nail on the head. The gaps on the "-C" are even more obvious than the "-E" so I may well do exactly as you did. Thankfully, adding the raised detail did n't take too much time or effort.On my Strike Eagle, I pretty much just superglued all the intake gaps, including those around the lower lip rotation point, and rescribed.
Unfortunately, you may lose the raised detail you painstakingly added
Marcel
Hi Jesse, good to see you, thanks for your kinds words. To answer your question I used a chisel first, then scraping, then filing. I've still got the upper fuselage feathers to finish so I'll try to get some photos of the process and post the up.I do have a question on how the heck you remove the plastic for the metal engine feathers??? Careful scraping with a sharp blade, followed by filing and sanding? I always want to remove plastic in this type of situation, but I get overwhelmed and simply move on with the build!
/Jesse
Hello Richard, glad you stopped by, thanks for taking the time to add a comment. There's nothing like the impact of a big 1/32nd jet on your display shelves. I look forward to seeing what you build.
Hi Mike, I do feel pretty jazzed about this build at the moment but it's still in it's infancy and I do have the exhausts to tackle at some point......Btw, what decal are you going to use?
Mike

I'm hoping to use a set of the USAFE Lakenheath Eagles by DACO. I ordered a set at the end of January but have n't heard anything since. I dropped Danny a line over the weekend to ask on the status of my order but have n't heard anything back yet.
Here's a bit of an update.
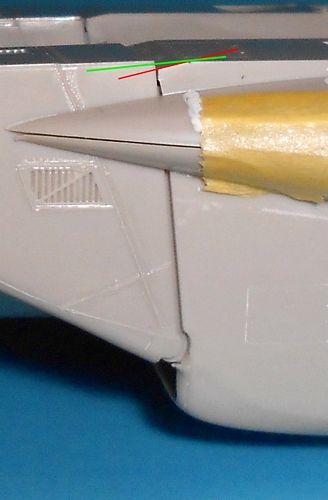
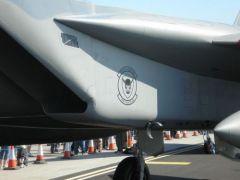
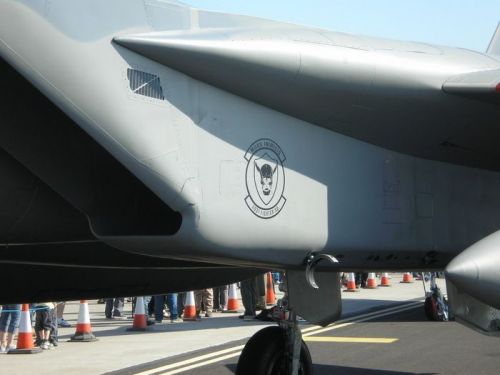
I've been looking at the intakes some more and considering how to get a more authentic
profile along the edge of the fuselage to the area aft of the nodding intake mouth
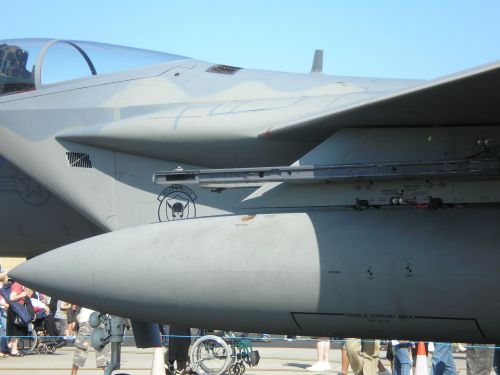
You might see in the above image that the line is smooth and flowing. This bit on the kit drops at quite an angle.
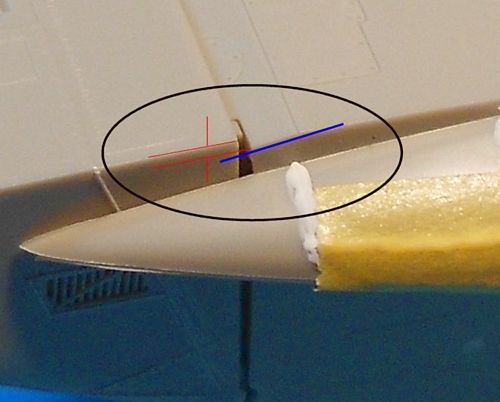
Also, to my eyes, the depth at the rear of the intake is a shade too deep by comparison to the actual airframe. I added some sacrificial plastic extrusion so that I could sand it back and approximate what the real deal looks like.
I also had a chance to rectify the exhausts and access panels that are molded on the upper rear fuselage and a leftover from the F-15E kit.
Whilst I was at it, I opened up the grille at the wing root over the gun barrels. If I can
find any mesh fine enough I'll replace that detail before I close it up.
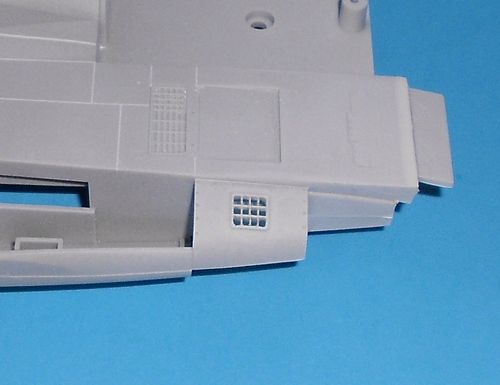
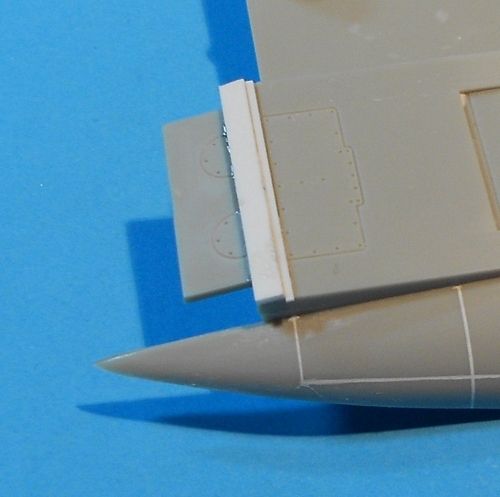
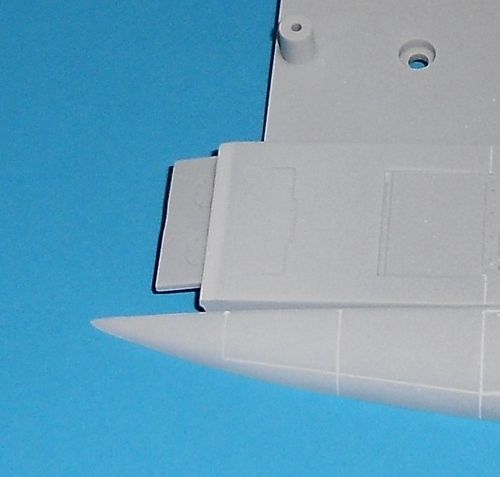
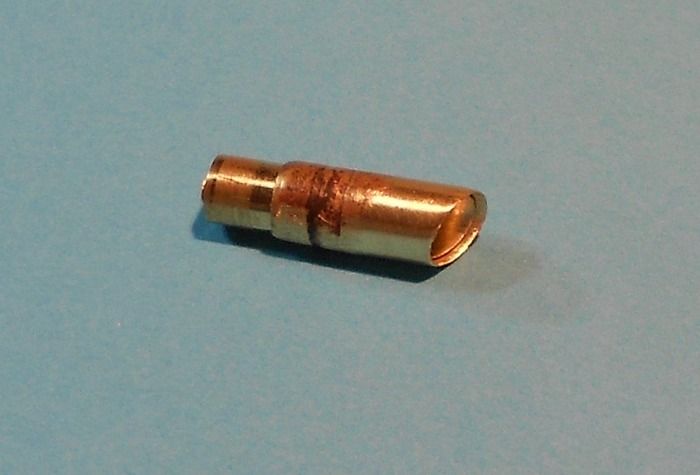
One last thing to show before I close. I have scratched some FOD guards for the intake mouths.
I made a template from plasticard and added a couple of short lengths to the back of it as a handle.
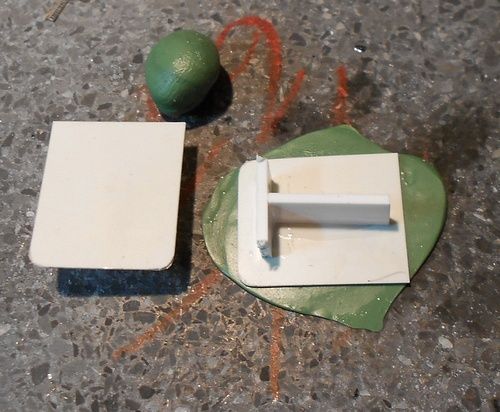
I used Citadel "Green stuff" to form the vinyl covered foam intake plugs, sculpting the folds with various tools before adding metal foil handles.
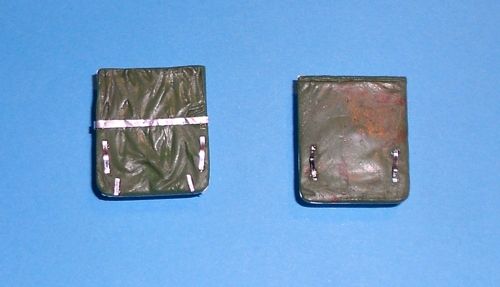
After a coat of Chaos black primer we get a glimpse at how these will look when finished.
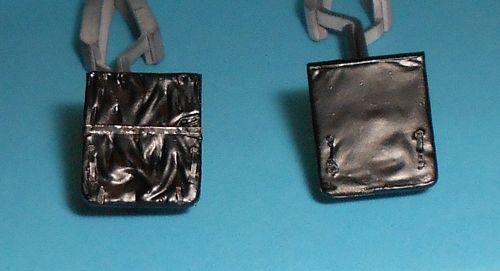
By coincidence the ones I've seen used by the 493rd are also black.
There are two styles, one with a band and one without. Does anyone think there is a market for these? If so I'll ask Chris if he'd like to cast them.....

Thanks for having a look. Back before long with more.
Cheers.
-
Very neat detailling Marcel, good job.
That image showing the upper surfaces shows just how sharp your Typhoon is looking.

-
Nice work Patrick. Your Beagle is looking mighty fine.
Can you remember what shade of Alclad II you used as a base for the bare metal portions please?
-
-
Hello Alexander and Marcel, thanks for the support and kind words guys, much appreciated. I suspect that this kind of in-depth build thread only appeals to a minority of modellers as I'm guessing most folk like to see alot of progress or else they get bored. I do hope however that those who choose to endure the updates manage to glean the odd useful bit of information. ^_^
I've been having a closer look at the intakes lately so here are a few observations.
Tamiya break each intake mouth down into three components, two walls and the varable ramp.
There is a little tidying up to do but nothing too challenging, just some mold mark removal.
The tiny holes that cover areas of the variable ramps are molded in relief on the kit parts whereas they should be hollow. Eduard offer replacements in their Strike Eagle exterior etch set. It's simply a matter of removing the raised detail and glueing on the etch.
Checking out the exterior detail reveals neat and sharp recessed panel lines
which look,.......umm,.......well,..... :unsure: wrong :blink:
If we have a look at the real deal these lines appear to be raised caulking or sealant

The only solution is to add raised panel lines.....(I can hear a collective gasp from all those who fastidiously re-scribe their kits :lol: )using stretched sprue and extra thin cement.
A quick swipe with a sanding stick should make the raised detail less obvious
BTW, Tamiya sprue stretches really well.
Next up, the intake trunking. Just a couple of notes for anyone building this kit. There is a supplementary wall to add within the main gear well which gives interior detailling. None of the detail is visible with the main gear doors closed but on my kit, this supplementary bulkhead caused some fitment problems. Easily remedied with a trusty sanding stick (is n't everything?)
Another element that affects the sit of the trunking is a little nub and pin for aligning the upper and lower intake trunking components.
I was forced to remove it to allow the trunking to sit correctly in the fuselage.
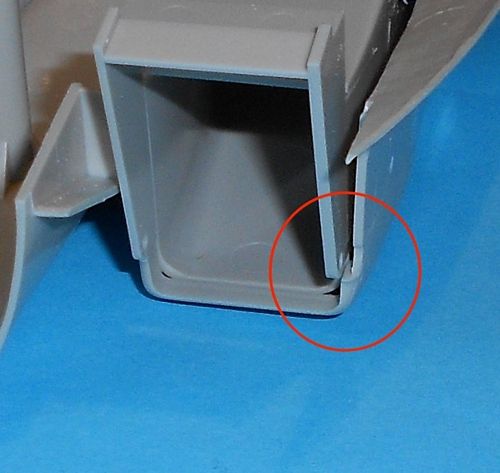
With everything dry-fitted in place I'm getting other issues and I'd be interested to hear from anyone who has built this kit to compare their experiences. Firstly, the intake mouth parts don't sit all the way back against the fuselage which leaves quite a gap.
Also, there are large holes in the interior walls of the intakes... :blink:
and lastly, the top edge of the fuselage appears to be mdelled at too steep an angle.
I'm sure the last item is down to Tamiya wishing to allow movement of the nodding intake mouths but have any of you guys had the other issues?
Time to put on my thinking cap and work out how I'm going to make this look more like the image of the real deal I posted further up the page....
cheers.
-
Hello zackattack, this is an ambitious project. I look forward to seeing how it develops. Good luck finding your etch set.
-
Interesting to hear your comment about Micro Sol eating the Alclad II. That is definitely something to watch out for, thanks for the heads-up.
FWIW, I think the attention that you are lavishing on this model is paying off in spades. She's looking superb.
-
Nice work Molecular and welcome aboard. I would n't know a BF-109E if it ran over my foot so I can't comment on colours or accuracy but you have created a "well lived-in" look to your cockpit which I like.
I look forward to seeing how the engine turns out.
Most important of all,.......have fun doing it and build what makes you happy.
Cheers.
-
Hi Sarge, I can vouch for Citadel acrylics too. I've had good results with their range of paints in the past.
If you want to use acrylic, try Citadel. Although I have not yet tried their new paint formula, so not sure how they compare against the old formulation. The old formula, I think, used water as solvent, while the new formula may be using some kind of alcohol as solvent. Not so far as I'm aware. I'm still using water HTH
GSI Mr Metal Color is also VERY NICE. It's lacquer-based, very similar to (in fact, may be compatible with) MM Buffable Metalizer. For all-over natural metal finish using either GSI Mr Metal Color or MM Buffable Metalizer, the easiest way is using brush (weird, I know!). Check out this link: http://www.essmc.org.au/Natural_Metal_Finish.html
Mr Metal Color also gives a great representation of weathered metal if left un-buffed.
HTH.
Here's a 32nd scale P-51D finished in Citadel acrylics
Hi Mike, does the sealer affect the look of the metalliser?Same with Mr Metal Color. Once sealed in, it's good. I usually use Tamiya gloss clear to "seal" it in.
Cheers.
:cheers:/>
-
Hi Ken, good to see you. I know you are very knowledgable on the Eagle so please feel free to contribute with anything you like as we go along.
Hello Brewer, yes, I tried that. :lol: Last year I built a number of smaller scale aircraft straight out of the box. It was fun but this kit has been on my wishlist for quite a while. Hopefully this is similar enough to my stalled Tomcat to get me back into adding detail and from there, back into the F-14.......
Time will tell. Hi Marcel, thanks for stopping by my friend and thank you too for your generous comments.
The stressed skin is an experiment that I've wanted to try for a while. I'm quite keen to see how it looks once it's painted. My hope is that it will be virtually invisible except from certain angles. My ideal build would feature a real metal skin with individual rivets. That ought to give a realistic look I'd think. Not altogether suitable for a modern jet but something like a dH Chipmunk might benefit from such a technique. Pity there is n't an injection molded 1/32nd scale offering.
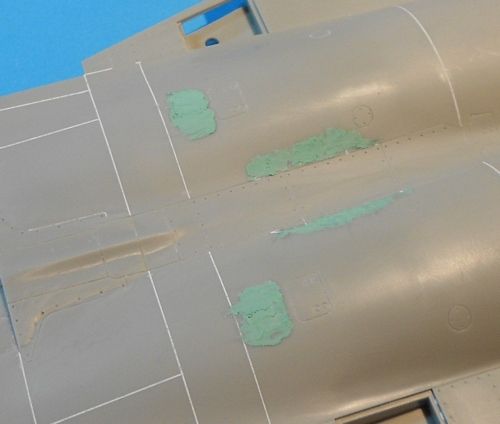
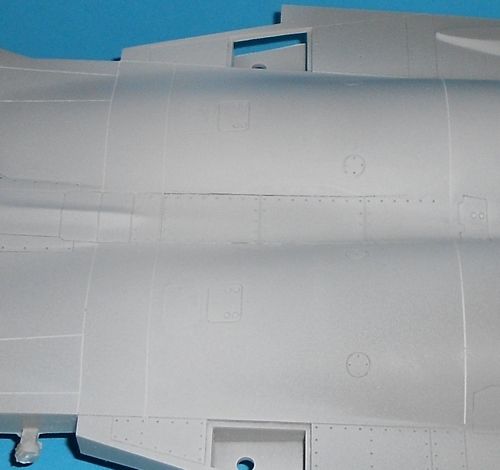
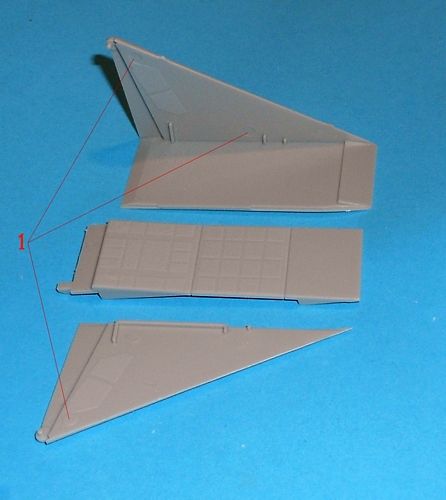
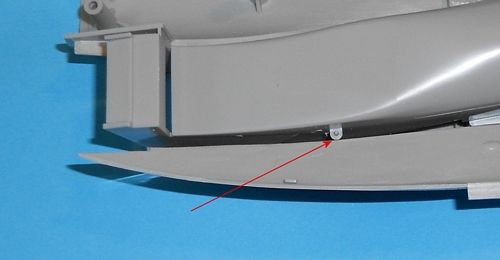
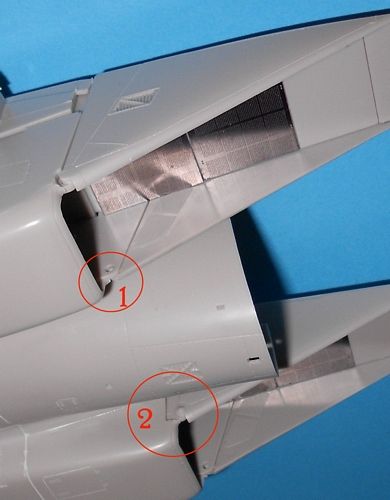
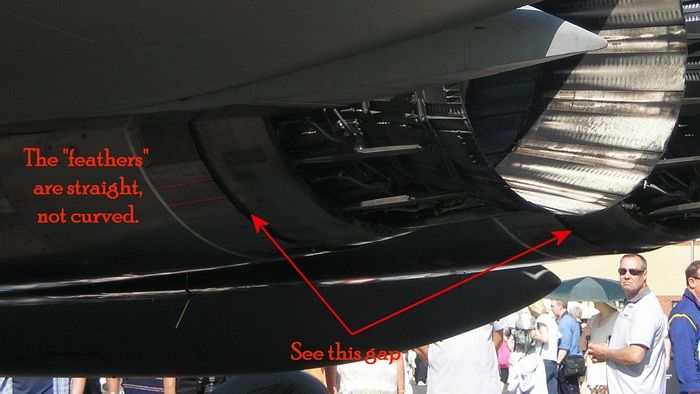
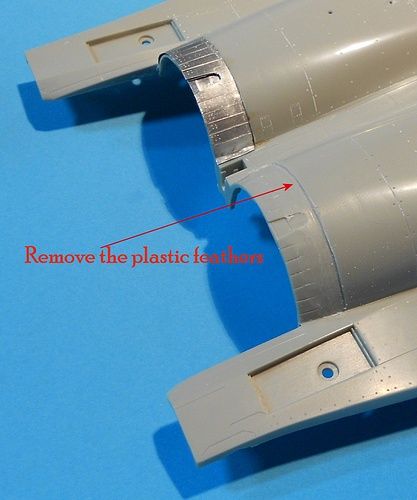
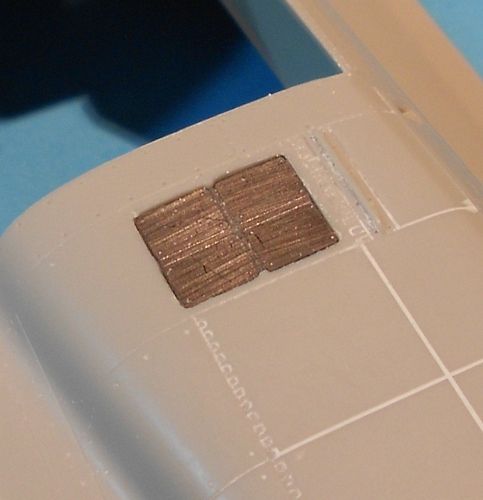
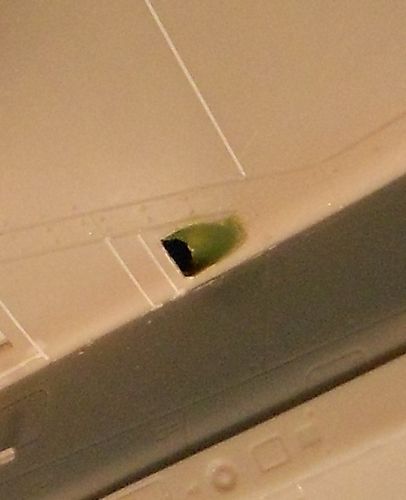
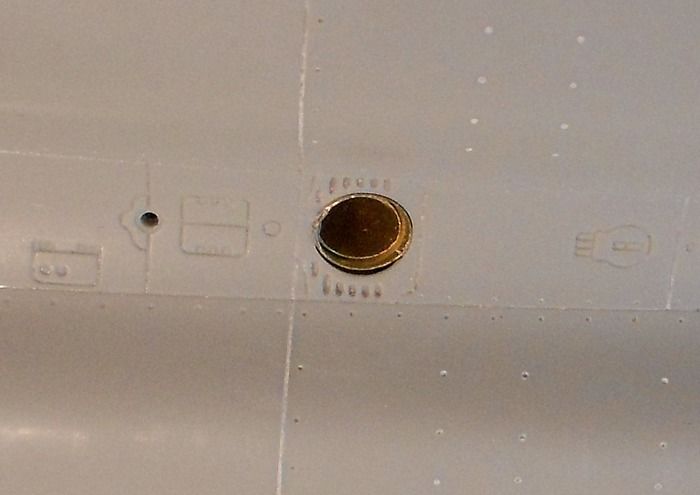
More metalwork for this update. I'm attempting to replicate a modification I incorporated into my last Eagle build. Whilst tinkering with the underbody I was reminded of the feathers that can be seen just forward of the engine "doughnuts". Tamiya have given them a slightly curved, rounded look so that they join smoothly with the doughnuts.
On the full sized article these feathers are straight which results in a slight gap.
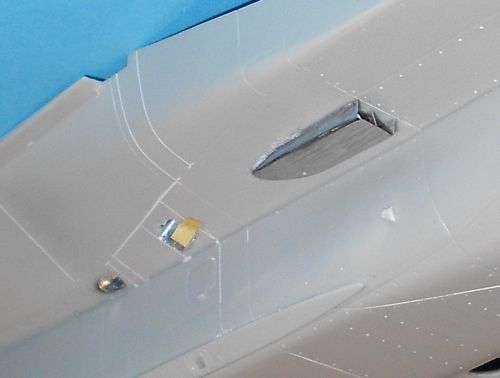
My method is to replace the molded plastic parts with shaped metal parts.
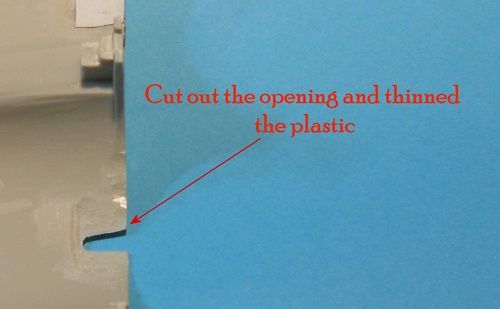
Making room for the metal replacement involves removing some plastic close to the engine panels.
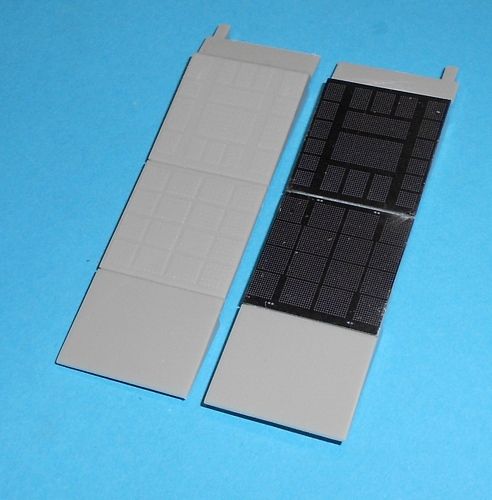
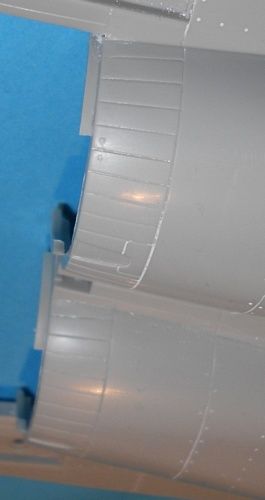
At the same time I thinned the area around the shaped opening and glued a piece of foil inside to represent the engine casing.
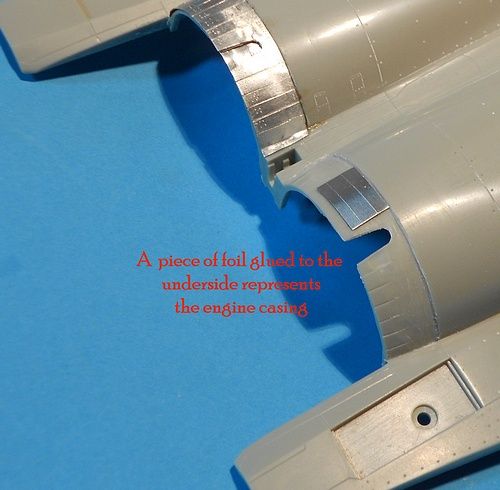
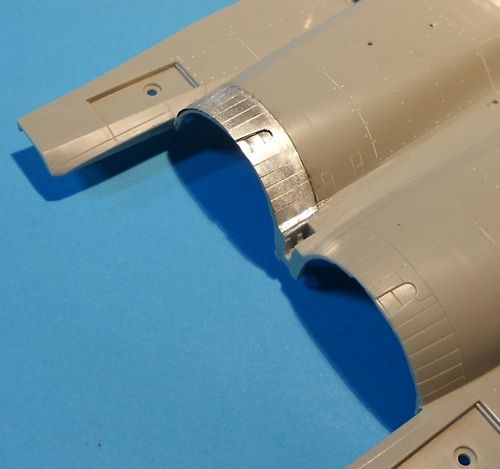
Lastly, I made a template then traced the outline of the ARC onto a piece of metal foil. With this cut to shape I scribed the feather detail onto the surface and cut part way through the feathers with scissors.
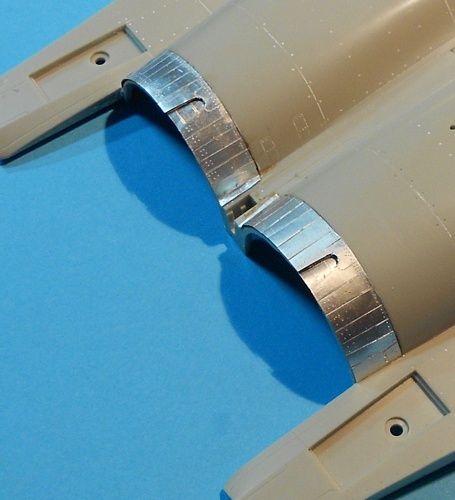
Last time I did this it was an afterthought and performed late in the build after I'd already painted the BMF. On that occasion I left the new feathers in the raw aluminium which was a bit bright compared to the paint.

By doing the modification at an early stage I should be able to tie the feathers into the paint scheme more satisfactorily this time around. I'll have to be careful though. The wine bottle foil is delicate. :unsure:
Intakes next?
Cheers.
-
Hi guys, thanks for all of the positive waves...gives me plenty of enthusiasm.
Hi Jake, wow! you mean there's more to go in there? Ok, I'll keep checking your Modern Eagle guide for the bits I need to add. Interestingly, another modeller posted photos of his set showing the same issue that you found, namely the resin being way too short. If I find the same thing with my set, this model will have it's canopy closed...... :mellow:The Aires set is wonderfully crisp. Bay 5 is somewhat simplified, though,
Jake
:D Yep, it does sound peculiar does n't it? Leave one in-depth large scale build for a similar offering. There is method in my madness though. For one, this model will have intake blanks fitted. I'm planning on fashioning a pair of foam style FOD plugs so no need to worry about intake trunking. Secondly, the F-15 has most of it's gear doors closed whilst on the ground so very little plumbing can be seen which saves a heap of effort in that department. Lastly, the cockpit and this has already been taken care of by those good people at Aires. With a closed canopy, I'm good to go. Who knows, I might just have this finished by the summer..... :lol:Agree with Alexander and John here. A 1/32 F-15C as a mojo kickstart? You are insane man! . Nevertheless, anticipation is high and respect for your start so far even higher. Can't wait to see more progress.
Hi Wolfgun33, thanks for the kind words man. It's easy to be excited when you like the aircraft that you're modelling.You've just started and I don't think you've lost any mojo whatsoever. Very nice work. Can't wait to see more.
Hi Chuck, great to see you. How's the vacation going? I hope your better half is ok.One warning that I might offer if you ever plan on entering this model in a future model contest
Good Luck Guy!
Thanks for the advice bro but there's no fear of that happening. I'm not one to enter contests, I know my limitations. There are too many flaws in my models when scrutinised closely which is why I admire guys like you who go the extra mile to get every detail perfect. For me, life's too short! ^_^
Many thanks for the link to your walkaround buddy. There are plenty of superb shots there. I've bookmarked it for future reference. You say you plan on building an Eagle one day? Oh boy....is that ever something to look forward to. Can't wait to see you "kick it up a notch". Hurry back, we're all missing updates on your 'Stang.
Hi Timmy!, it's great to see you stop by, thanks.GW,
Can I humbly suggest pencil, or more accurately a Pencil Lead Holder , to make panel lines. I also humbly submit this Example of the technique. You can get a much more realistic line width and by extension depth. For example, you can more easily establish a panel seam from a door.
Timmy!
Using the pencil lead holder seems like a neat technique in the right hands as that Kfir looks marvellous. I appreciate the input buddy so I'll give it a go when I get nearer the finishing line.
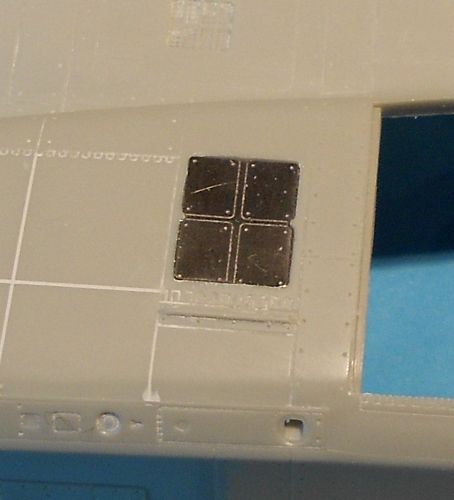
With a bit of time on my hands I found myself considering the underside of the main fuselage. There are one or two things that the determined modeller can find to tinker with. Firstly, the machine that I am modelling has blanking panels fitted in the chaff and flare buckets but the kit parts show the dispensers installed. Luckily, Uncle Eduard gives a pair of blanked off chaff and flare buckets in their F-15E exterior set. I did n't use them on my last build so I can fit them here.
The instructions suggest mounting them onto the surface of the model.

This looks quite neat but it is n't wholly accurate. I decided to cut away the hinge portion of the etch (the Tamiya hinge detail looks pretty good) and fit the blanking plate portion fractionally below the surface of the fuselage skin.
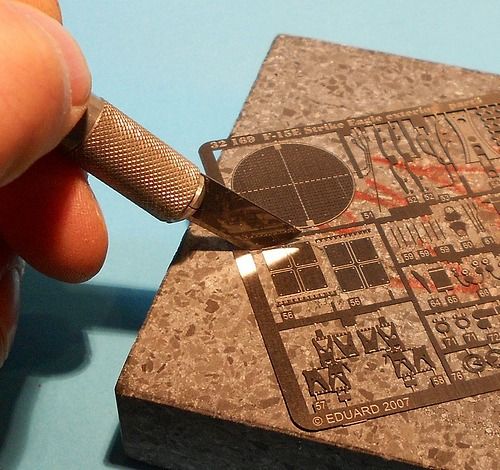
Here's a tip for seperating etched parts from the fret. Use a curved blade and a rolling movement on a hard surface. This leaves very little clean-up to do.
Next up was a ram air intake and the Primary Heat exchanger inlet and exhaust.
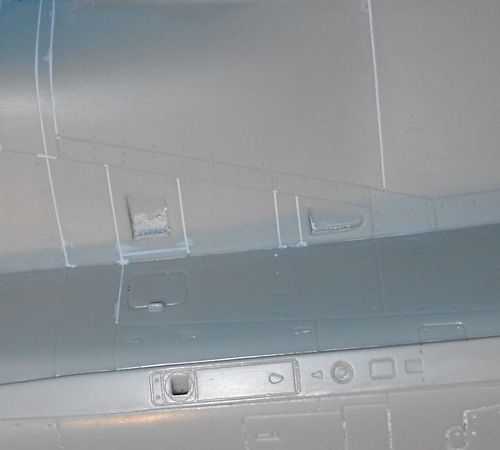
These parts are all a little simplified on the kit due to the limitations of injection molding. I opened out the ram air intake hole then re-shaped it with "green stuff" twin pack modelling putty.
This first attempt was too large and round so I filled the opening with a shaped sliver of aluminium foil from a pie tin.
I used the same metal sheet to fabricate the PHE inlet and to form the PHE exhaust.
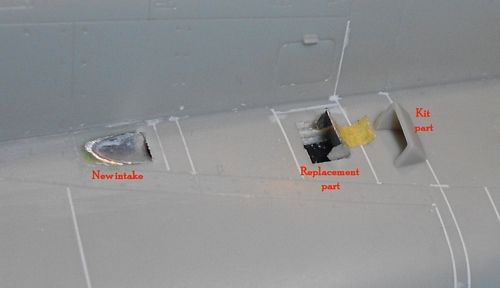
Using the thin metal sheet gives a more scale thickness when compared to the kit plastic.
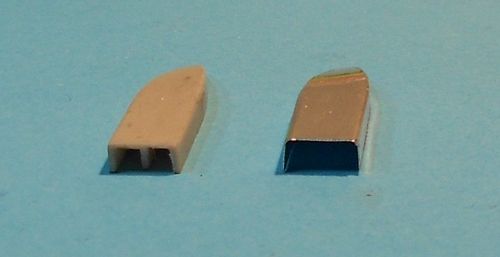
I used the plastic part as a template and formed the replacement part by burnishing the sheet metal over and around the kit exhaust. By gradually using sharper tools I encouraged the metal to take the shape I needed.
There are a few more things I can attend to on the underside before I move on so I'll be back with more soon.
Cheers.
-
Hi guys, many thanks for the warm words and kind comments. I hope you continue to enjoy the thread as it progresses although much of it will be familiar from other builds.
I do plan on detailling each step with the aim of saving members from having to search through the previous threads. Hopefully it won't be too boring for anyone who has already seen the other builds.
Hi galfa, I used tube filler by Vallejo. I think it's mica based but I'm not sure.What did you use to fill the panels?
 It does shrink so a number of layers are necessary to completely fill the panel lines. It sands very easily with wet and dry though.
I'll prime the parts and see how they look then decide whether to do another round of filling.
I have n't had a chance to do any modelling over the last couple of days but, I've been wielding my credit card instead.
The reason for this update is t share a couple of images of the Aires resin cockpit set that arrived in the post.
Terry )loftycomfort) was kind enough to supply a few images in response to a thread I started and they convinced me to try this set even though I've heard that it is too short.
On openign the box I was struck by two thoughts.......1/ That detail is unbelievable and ....2/That pour stub is huge! It'll take some determination to remove it is all I can say.
Anyhoo, back to thought #1. Take a look at these snaps and you'll see what i mean.
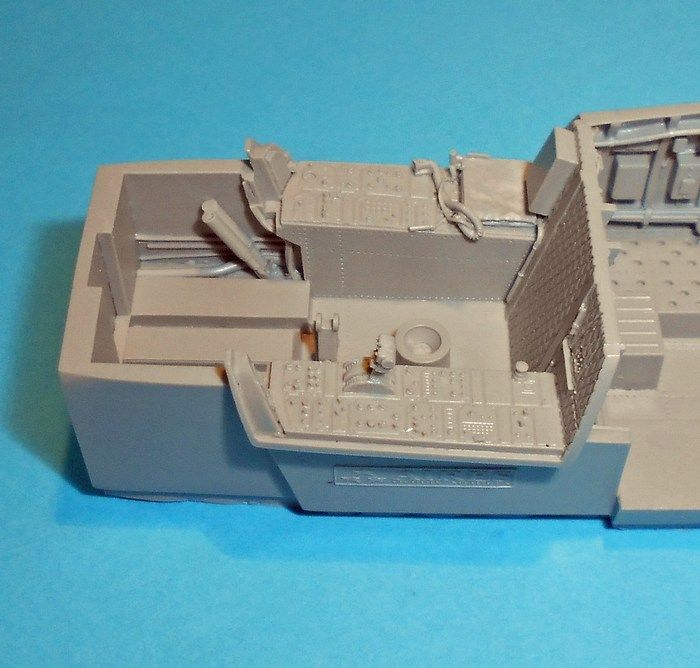
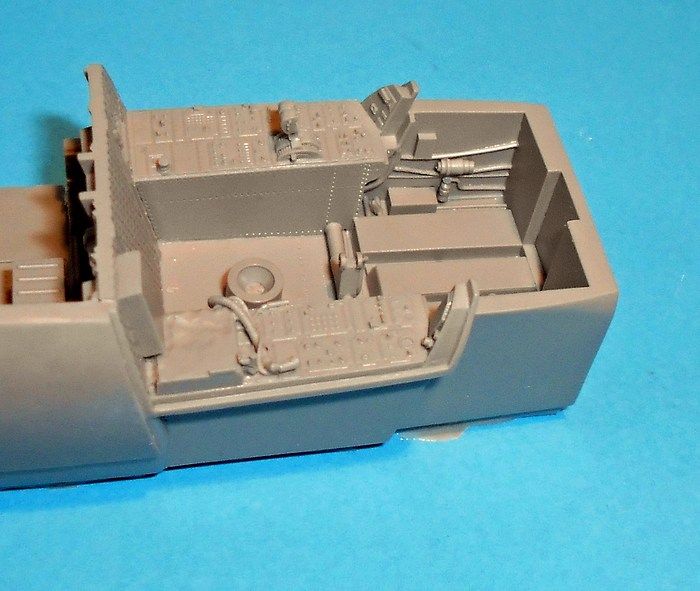
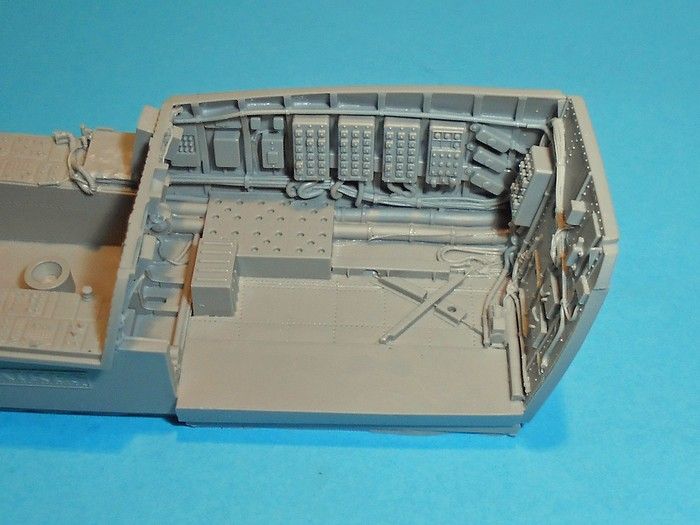
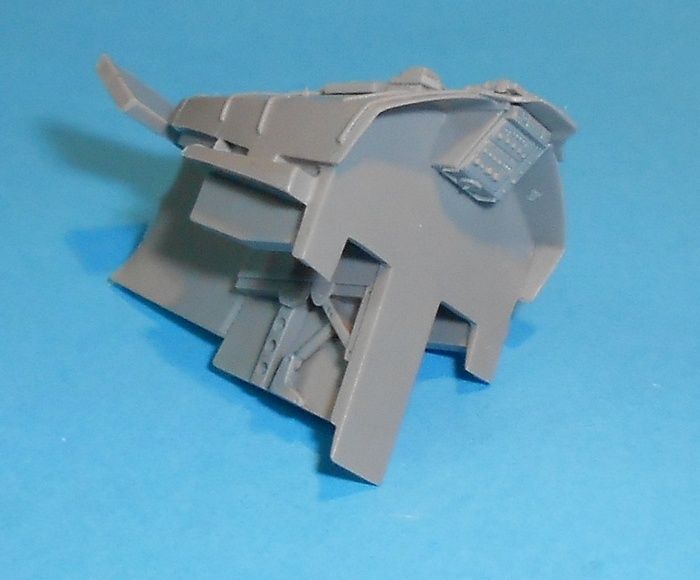
I've taken more of the other parts including the etch fret but I'll add them when I get to that stage. For now, I'm drooling with anticipation.
Cheers.
-
Index:
p1Intro and rear fuselage mods. JFS exhaust. Aires resin cockpit preview. Etched chaff and flare dispensers. Primary heat exchanger exhausts in metal.
p2 Fuselage to engine feathers replaced with metal including short "how to". Air intake improvements. Scratch-built FOD guards.
Hello all,
With my Tomcat languishing and gathering dust quickly I need to find something to kickstart my mojo and regain some passion.
For a long time I've wanted to complete my triumvirate of 48th FW jets based at RAF Lakenheath in the UK so I'm hoping that by tackling the big Tamiya Eagle some of the enthusiasm will rub off on the big kitty.
Never fear F-14 fans, Nickel 103 lives and will return....!
With this build I'm hoping to attempt one or two things that I have n't tried before to broaden my modelling experience. Building the two Strike Eagles has allowed me to formulate a number of ideas along the way and set certain goals.
For this model I'd like to achieve a realistic appearance and will be concentrating on techniques that follow that direction.
With that in mind, the task I began with might raise a few eyebrows. Although some modellers meticulously re-scribe their kits I went in the opposite direction and started to fill panel lines.
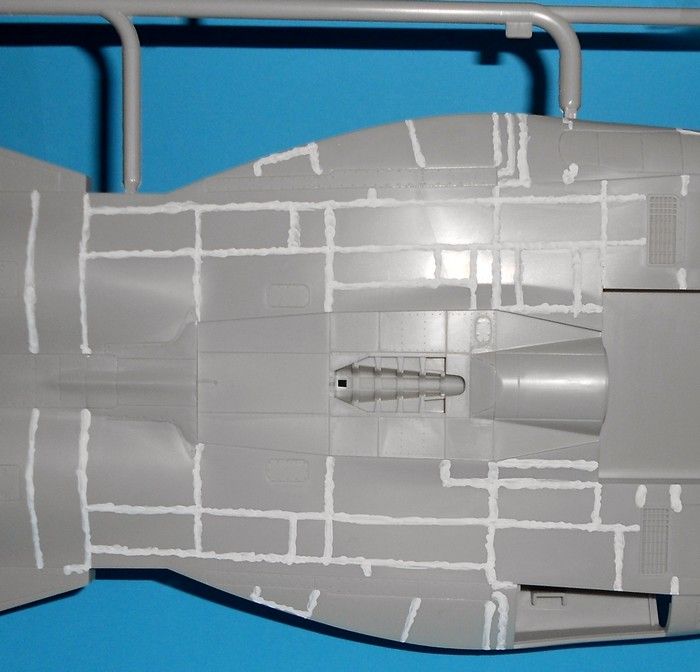
This may seem perverse but the reasoning behind such a decision is that although the Tamiya panel lines are beautifully crisp and uniform for the mostpart, even in this large scale they would still scale up to nearly a centimetre. Modern aircraft are by no means perfect but even a cursory glance reveals that the panel fit is pretty tight. When seen from a distance, the panel lines all but disappear. This does not mean that the finished model will be entirely devoid of surface detail. Access and maintenance panels will retain their lines and weathering may give a suggestion of additional lines once I've had a chance to play around with things.
This experiment may be a dismal failure so we'll have to see how things turn out in the end.
Another area where a model will differ from it's full sized counterpart is the texture of the "skin" of the airframe. Model manufacturers (with occasional exceptions) aim for a smooth, flat surface but aircraft show signs of distress to the skin of the airframe almost immeadiately. After a few high G manoeuvres and some maintenance the metal begins to midly deform creating ripples and undulations to various panels. To try to replicate the effect I've scratched the surface of the kit gently with a curved blade and then buffed out the resultant graze. It's surprising just how shallow the scratch needs to be before a ripple appears. Less is most definitely more in this case.
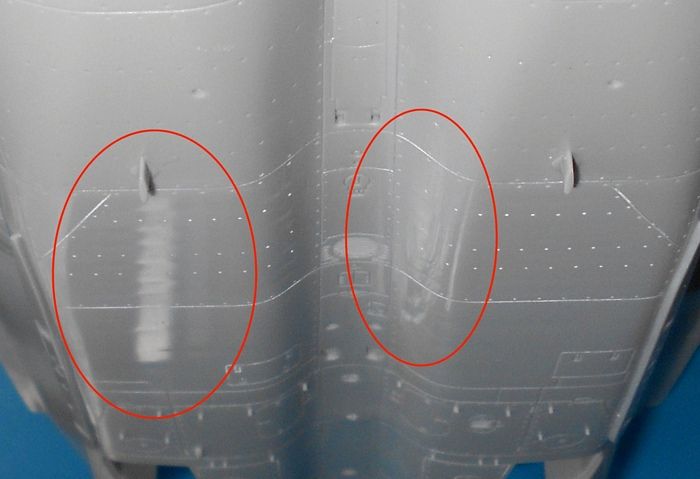
When caught in the right lighting conditions, the ripples become visible.
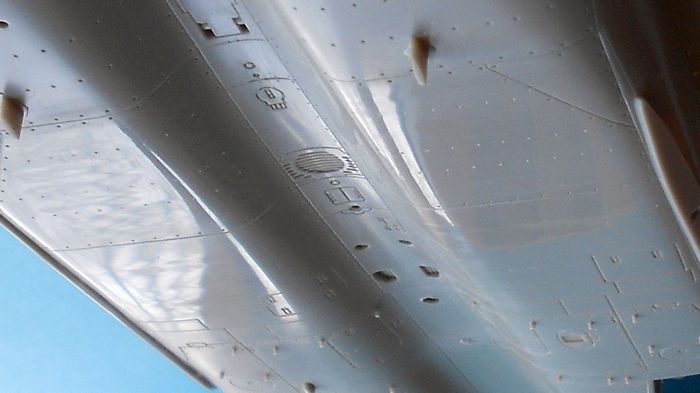
It is also important to remember that some areas seem to be more affected than others. I'm hoping that these ripples might be visible occasionally depending on how the light catches the model.
I've read every build thread I could find on the Tamiya Eagles and a number of issues have been noted over time. This model is intended to depict a modern "-C" so I'll need to be on my toes to include many of the subtle details. If anyone sees an error or can suggest any mods then please feel free to pass the info along. Any and all comments are welcome and encouraged so don't be shy.
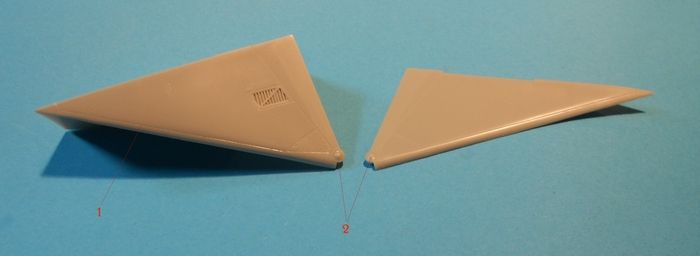
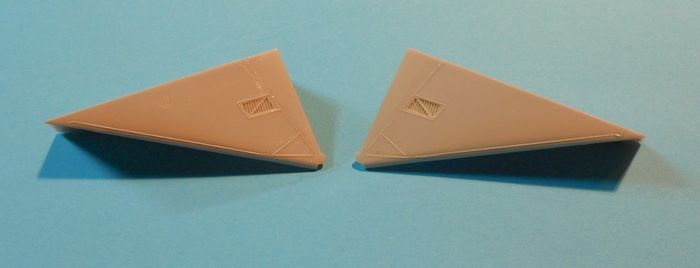
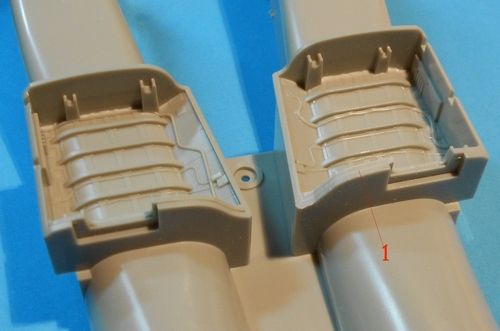
One such area is the JFS (Jet Fuel Starter)exhaust outlet (3) and blade style drain holes (1). This kit dates back to 1994 and shows the earliest styles.
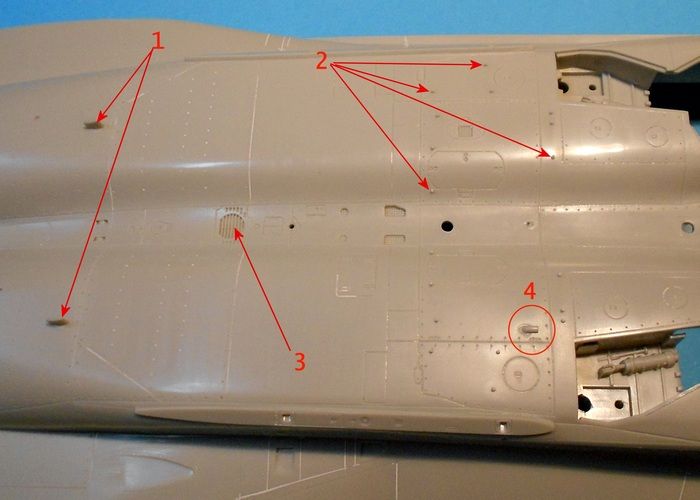
I snipped the small blades off and drilled a hole instead. For the JFS exhaust, something more radical is needed. Firstly, some internal strengthening rib will need to be removed to allow access to the exhaust vent hole.
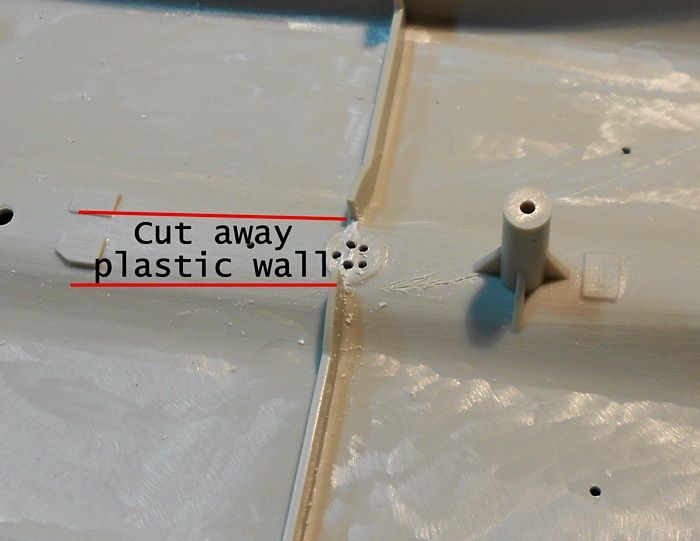
"Chain drilling" followed by a few swift cuts with a sharp blade make short work of the molded in vent panel. I filed the hole to shape making sure to bevel the edge to give a thinner visible profile.
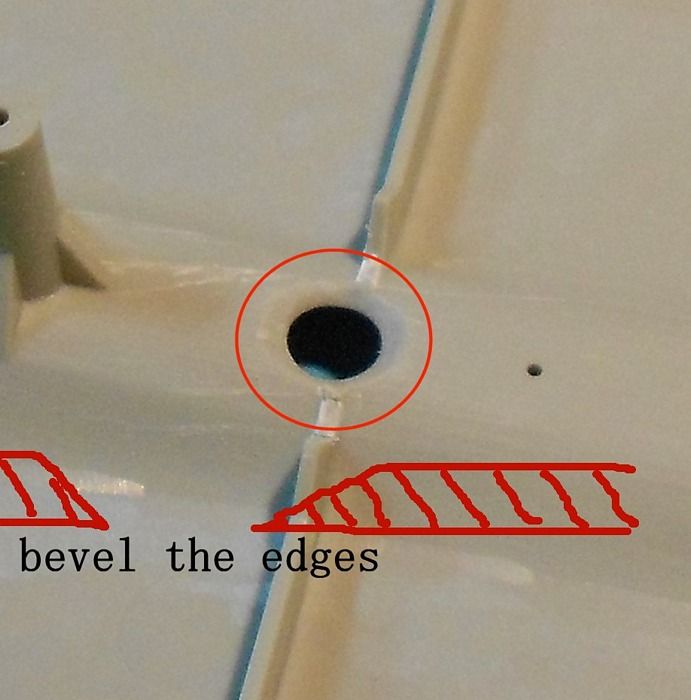
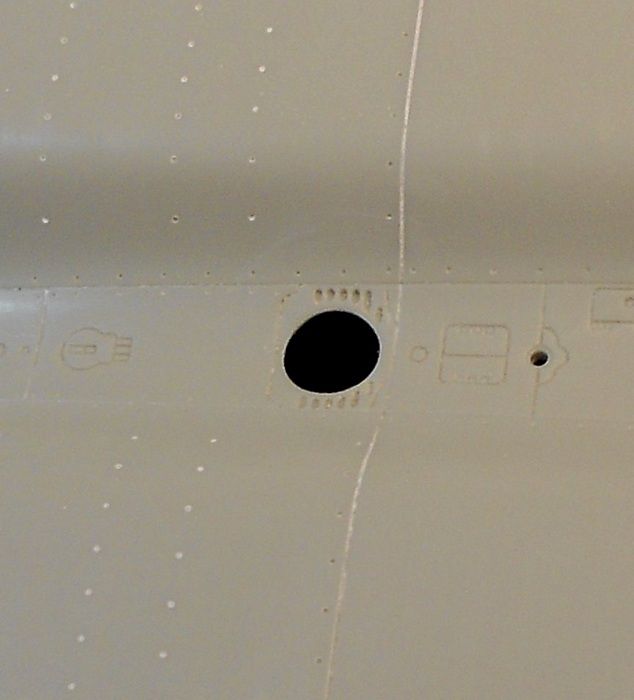
This leaves a neat opening for the exhaust.
For the exhaust proper I turned to two sections of brass tube that telescoped together.
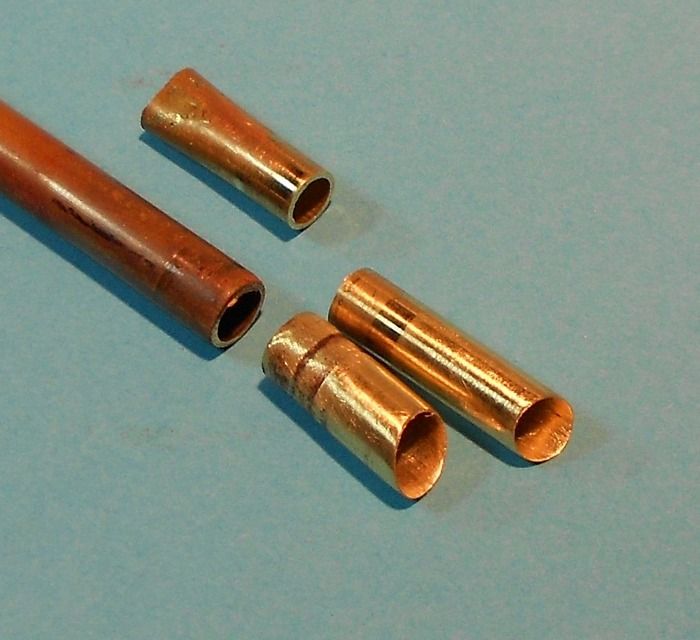
The larger diameter fits snugly in the opening so I filed the outer edge of this tube to create a slight gap. On the smaller diameter tube I filed both inner and outer edges of the metal to create another gap. Both pieces were slash cut as the exhaust exits the fuselage at an angle.
Nestled into the hole the results are passable.
So, it's begun. Plenty more sanding, scraping, filing and buffing to do now so I'll be back in due course. I have to confess that it's a nice feeling to be wandering around all day thinking about models again.
Until next time, cheers for now.
:cheers:/>/>
-
Hi guys,
Does anyone have this sheet? I've been looking for a reasonable resolution image so that I can tell what the 493rd FS badge looks like.
Can anyone post an image please?
Cheers.
Edit* Oops!, I found the images on the DACO webpage. :wacko:

-
Your Eagle is looking smart Patrick. Good job on the paintwork.
-
Hi Dave,
I atempted to drop you a line. Is your inbox full?
Cheers.
-
Hi Andrew, they are all superb builds, well done. I'm glad to hear that you've regained your mojo too. Nothing like an enjoyable build to re-kindle the fire.
The Aegean Ghost is possibly my favourite Viper scheme and you've nailed, not just once, but twice.
I keep hoping that Tamiya will grace us with a two seat F-16 in 1/32nd scale one day. If they ever do I'd like to attempt an F-16D similar to the one you've built. Big spine and conformal tanks transform the Viper from a lithe lightweight into a hefty brute. :wub:
Good job all round. I hope you continue in the same vein mate. Enjoy your modelling again.
Cheers.
-
Cracking build David, well done.
I love the comparison shot with all of the other 1/144th scale heavies. I can't believe how "small" the Globemaster III and Statofortress are in this company :lol:
The first time I attended the RIAT the organisers parked the An-124 and C-5 together just like your photo. Seeing those two giant aircraft gleaming in the sunshine side by side was a truly amazing sight.
Thanks for posting these photos for us to enjoy.
Cheers.
-
Hi Jeffrey,
I've done some rooting around and got just what you need. Drop me a PM with your e-mail addy and I'll send them over.
HTH
-
Great photos Terry, thanks for taking the time to share them. I can see what everyone means about the resin, it's very detailled and crisp looking. That will take a steady hand to pick out all of the buttons, knobs, wires, pipes and switches. I like that the etch is double layered in places. I guess the insruments and HUD repeater glass parts are acetate? Plus,.....they've modelled the McDD logo on the pedals. Very cool. Ok, I think my mind is made up. Just hope I get one of the good ones and it fits.
Hi Dave, thanks for the info, much appreciated. I think I may have seen your list either on here or LSP?
I'll have to try to find it again as it'll be very useful.Mind if I drop you a line with a couple of quick questions please?
Thanks for all of the help guys, it's been invaluable in helping me make up my mind.
Now, to raid the piggy bank. :lol:
Cheers.
-
And the most important thing I've learned to improve how my projects turn out is to use a crappy camera with next to no skill at photography.
Hi JC,
I use that technique too. Works wonders for my builds.... :lol:
They are not just plain flat black...they are sort of a darkish blackish brownish metallicish color...if anyone has any ideas on that, I'm all ears!
I'd go with gloss or maybe satin black.
Click this link to Airliners dot net pic: HereThe blackish brownish metallic sheen that you've noticed may be brake dust
The IPs look great mate. Keep it up.

phantoms, 1/32 Hasegawa CF-104
in Yes, size DOES matter (Ended)
Posted
Darn!......too late :blush:
Nice work phantom. The Zipper looks good in all green (it looks good in any colour TBH but the green is cool).