


Downen Scaled Replicas
-
Content Count
28 -
Joined
-
Last visited
Content Type
Profiles
Forums
Calendar
Posts posted by Downen Scaled Replicas
-
-
Droopy McCool... LOL

-
Models of UAVs are few and far between. The number of options in 1/48 scale can just about be counted on one hand. As they become more prevalent in both military and civilian service hopefully we’ll see more kits become available.
I’m glad to finally get started on the 1/48 Northrop Grumman RQ-4B Global Hawk from Skunk Models Workshop. There were a few pre-production “A” vehicles with shorter wingspans and fuselages, and the Navy has contracted for a “C” version with a strengthened wing. This “B” version is the most widely operated today.

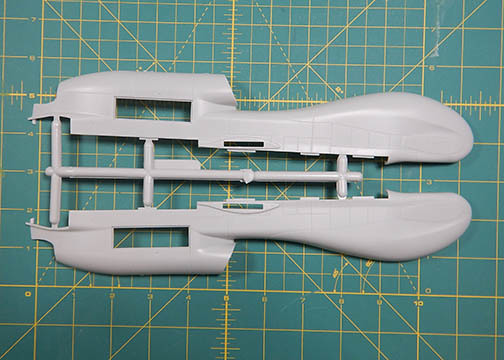
The kit comes with four sprues covering the fuselage and two very long wings (this is going to be a BIG kit in 1/48 scale).


Instructions are contained in a small pamphlet (it’s not a complex build) and the decal sheet includes options for German Luftwaffe and USAF vehicles.

The Allison Rolls-Royce AE3007H turbofan engine is adequately represented with the fan face visible through the inlet duct and the mixer in the nozzle.

Construction starts with the cockpit and the ejection seat is… oops… no cockpit on this one! It’s actually a quick build to get something that begins looking like an air vehicle, which is refreshing. The fuselage comes in two halves plus the bottom which will trap the wing halves a bit later.
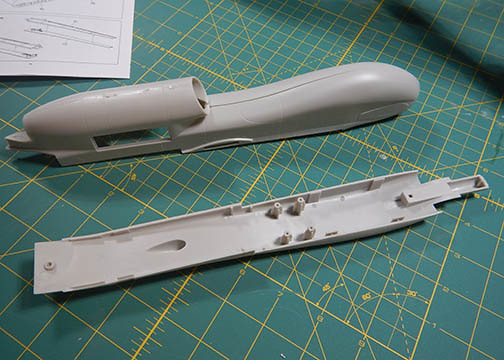
You can see here that there will be a gap between the aft fuselage right/left halves and the bottom fuselage. Placing a support tab inside the fuselage in this area will really help with alignment later.

Access panels for the engine are separate, but unfortunately there is no engine to display! Too bad… this would make a terrific diorama.

Installing the bottom wing parts into the top wings reveals gaps at the roots and a bit of overhang at the tips. No big deal. I’m also going to display my model in flight, so the landing gear doors will be closed. There’s not much detail inside those gear bays anyway, so plan to do a bit of scratch-building if you want to display the gear down.

I really do prefer to display aircraft models doing what they were designed to do: fly. One of my approaches is to drill a hole in the bottom of the fuselage to accept a 5/32” diameter brass rod.

Here you can see a short length of 7/32” diameter plastic tube cemented into the fuselage and fixed in with a blob of Milliput epoxy putty. The wing will sit directly above this area and act as the stop when I insert the brass rod. Also note that I’ve backed the main gear doors with Milliput to make the doors a bit more robust; I’m going to need to sand the outside of the doors to get them to fit smoothly and that process can be rough if they don’t have a good, solid attachment to the wing.

So far it’s a quick build. The wings in my kit are warped / drooped which I don’t believe is intentional and which won’t look right in flight. I’ve got to think a bit about how to fix that and perhaps give them some upward flex. More later…
1/48 Northrop Grumman RQ-4B Global Hawk
in In-Progress Pics
Posted
Hey dnl42 and skyhawk174, thanks for the alerts on the main gear wheels. I'll do this one gear up, hence the preoccupation with the wing droop. I'll take a look at those wing walk decals... mirror image text, eh? Great!
I worked a bit last night on the wing droop. I anchored the wings to a slightly curved surface (curved them up) and hit them (gently) with a heat gun. SOME improvement from that effort. I also worked inside the fuselage to ensure that the wing root attach point did not permit any droop. I actually gave them just a teensy bit of dihedral. Together, both of those efforts appear to have given me wings that are level. I agree that a spar of some sort - even just a brass rod - would not be a bad idea. These wings are light, so it does not have to be very beefy.