


chuck540z3
-
Content Count
4,193 -
Joined
Content Type
Profiles
Forums
Calendar
Posts posted by chuck540z3
-
-
Excellent job on a "Weird" kit as you mentioned. I spent over a year on the same kit, so I know all the flaws and your final product is exceptional. Congrat's!
Cheers,
Chuck
-
As a 1/32 guy, I rarely look at 1/48 models and never 1/72. I'm, glad I did this time. This Tomcat is fantastic at any scale, but at 1/72 even more so. Big time "Wow! -and Congrat's for the close up pics to reveal any flaws, which are minimal. You should be very proud of this F-14 and you should be.
Cheers,
Chuck
-
9 hours ago, The Underdog said:
Not bad, actually I'm being a bit snobby... just kidding. I don't know what others think,
but when I see a model like that its difficult for me to "wrap my head around it." Its so
well executed, it could easily pass for photos of the real thing. How much experience
or how long have you been modeling? Obviously your skills are exceptional, beautiful
looking Spitfire and on the cover of Fine Scale Modeler... very well done indeed.
Thank you sir. I started modeling about 13 years ago and like everybody else, was not very good to start, but I still enjoyed the hobby immensely. Over time and practice- again like everybody else- I got better and better as I made every mistake possible. I still strive to make each model better than my last, but I'm starting to hit a bit of a wall now that I'm 65 years old and my sight and dexterity are not what they used to be. Here is my first model posted here at ARC in 2007 or so. Orange peel paint, silvered decals and likely crooked landing gear, but I was very proud of it. We all have to start somewhere!
Cheers,
Chuck
-
7 hours ago, Snowbird3a said:
could you not get an Alley Cat corrected canopy instead of using the kit T-6 canopy
edit; just read in your WIP about your canopy woes, that's too bad as I have the Alley Cat canopy but no KH kit. 🙂
Tony
Curiously, the Alley Cat canopy is not corrected for width and from what I've seen, is thicker and not as clear as the kit parts, so I have no idea why one would buy it.
Cheers,
Chuck
-
5 minutes ago, The Underdog said:
So, did you also build the Spitfire?
Yup. More pics here:
Cheers,
Chuck
-
Thanks Guys!
4 hours ago, The Underdog said:Chuck,
I'm a huge fan of realistic looking models, in other words... aircraft normally are dirty
and show signs of normal wear & tear. That being said, I can also rightly appreciate
one that has been well maintained and taken care of. Your representation of the T-6
Harvard is absolutely exquisite. Really enjoy everything about it, extremely well done!
Me too. This Hanger Queen is pretty clean these days.
I also like dirty, when the subject should be dirty.
Cheers,
Chuck
-
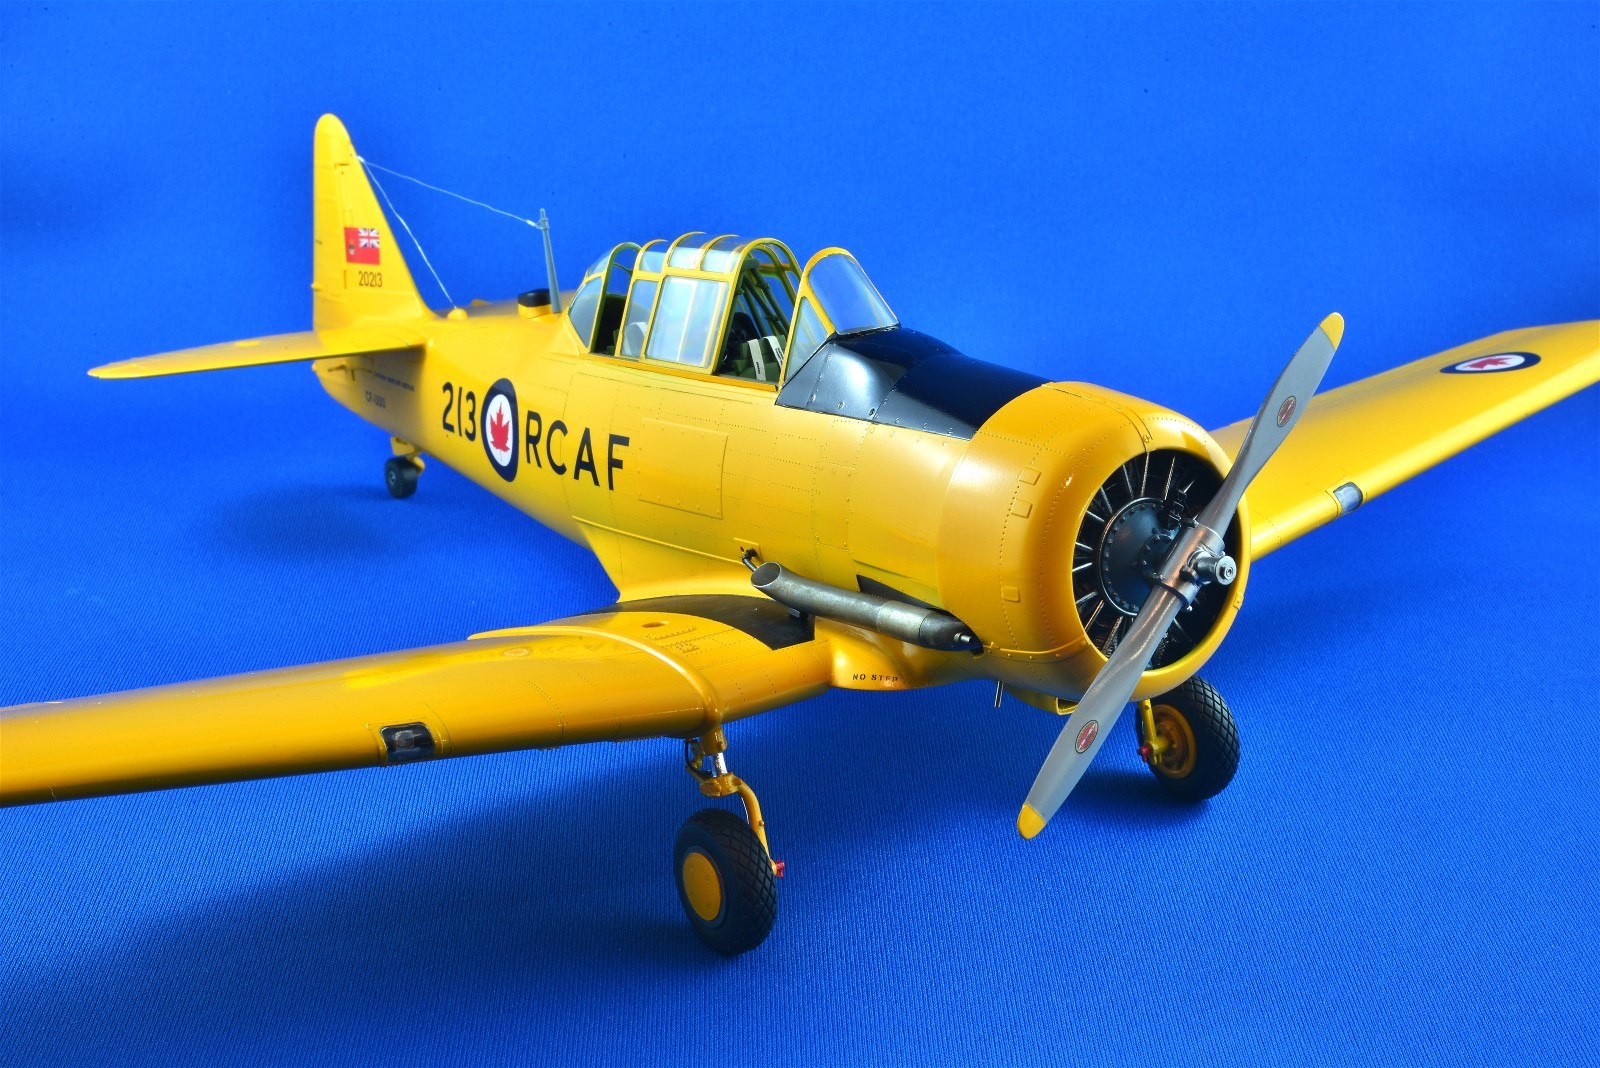
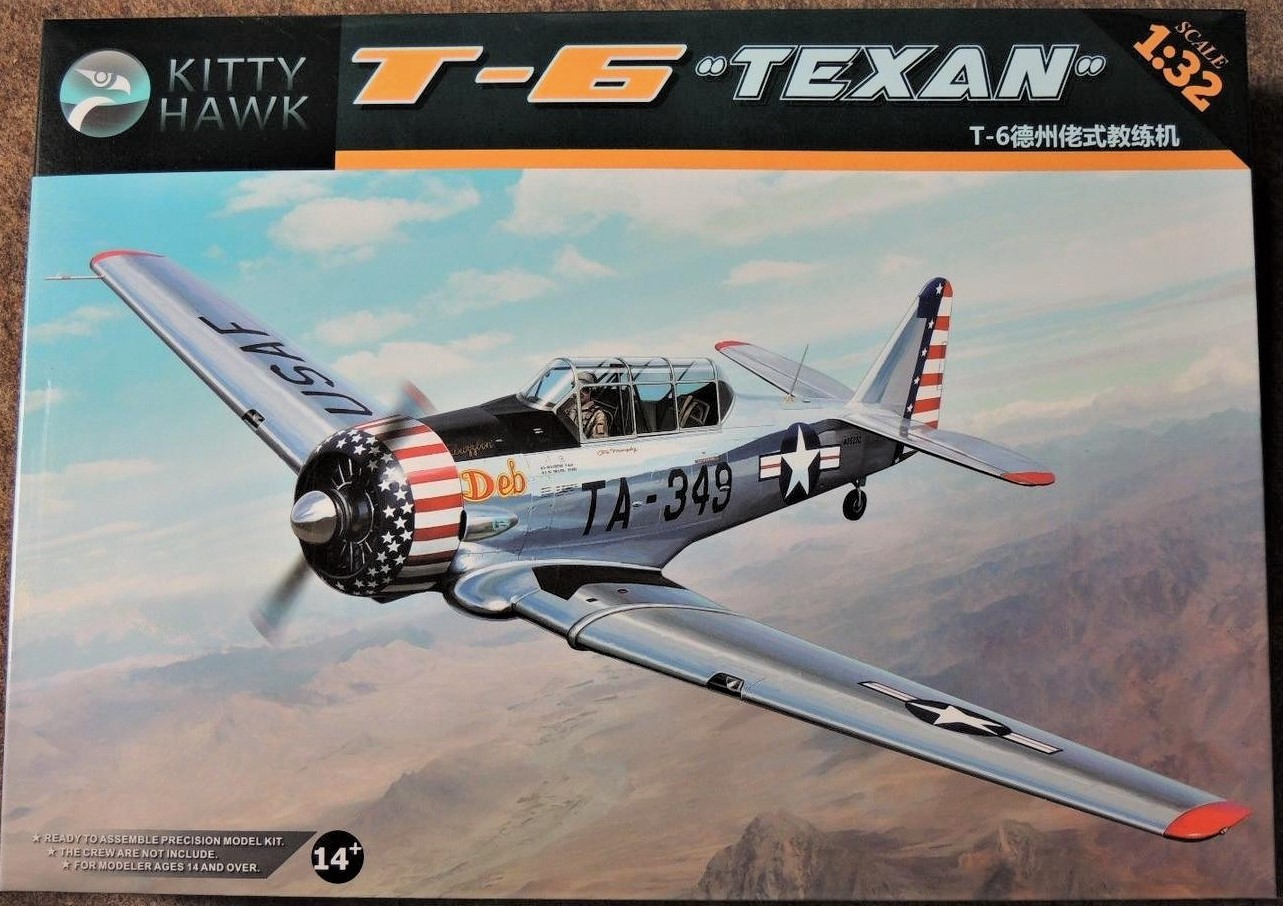
April 15/20
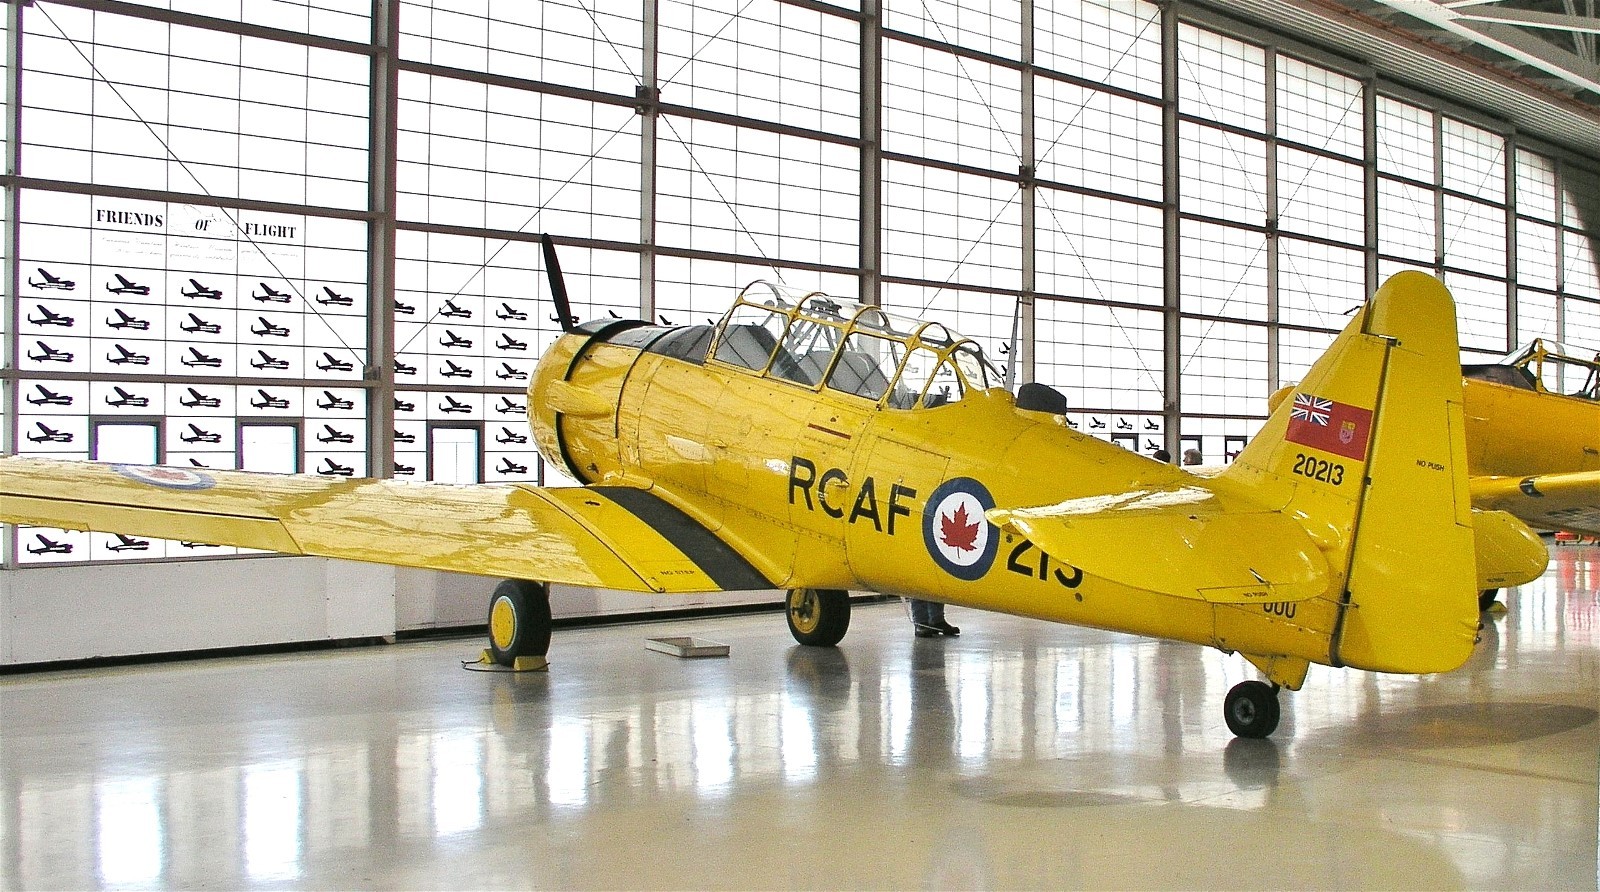
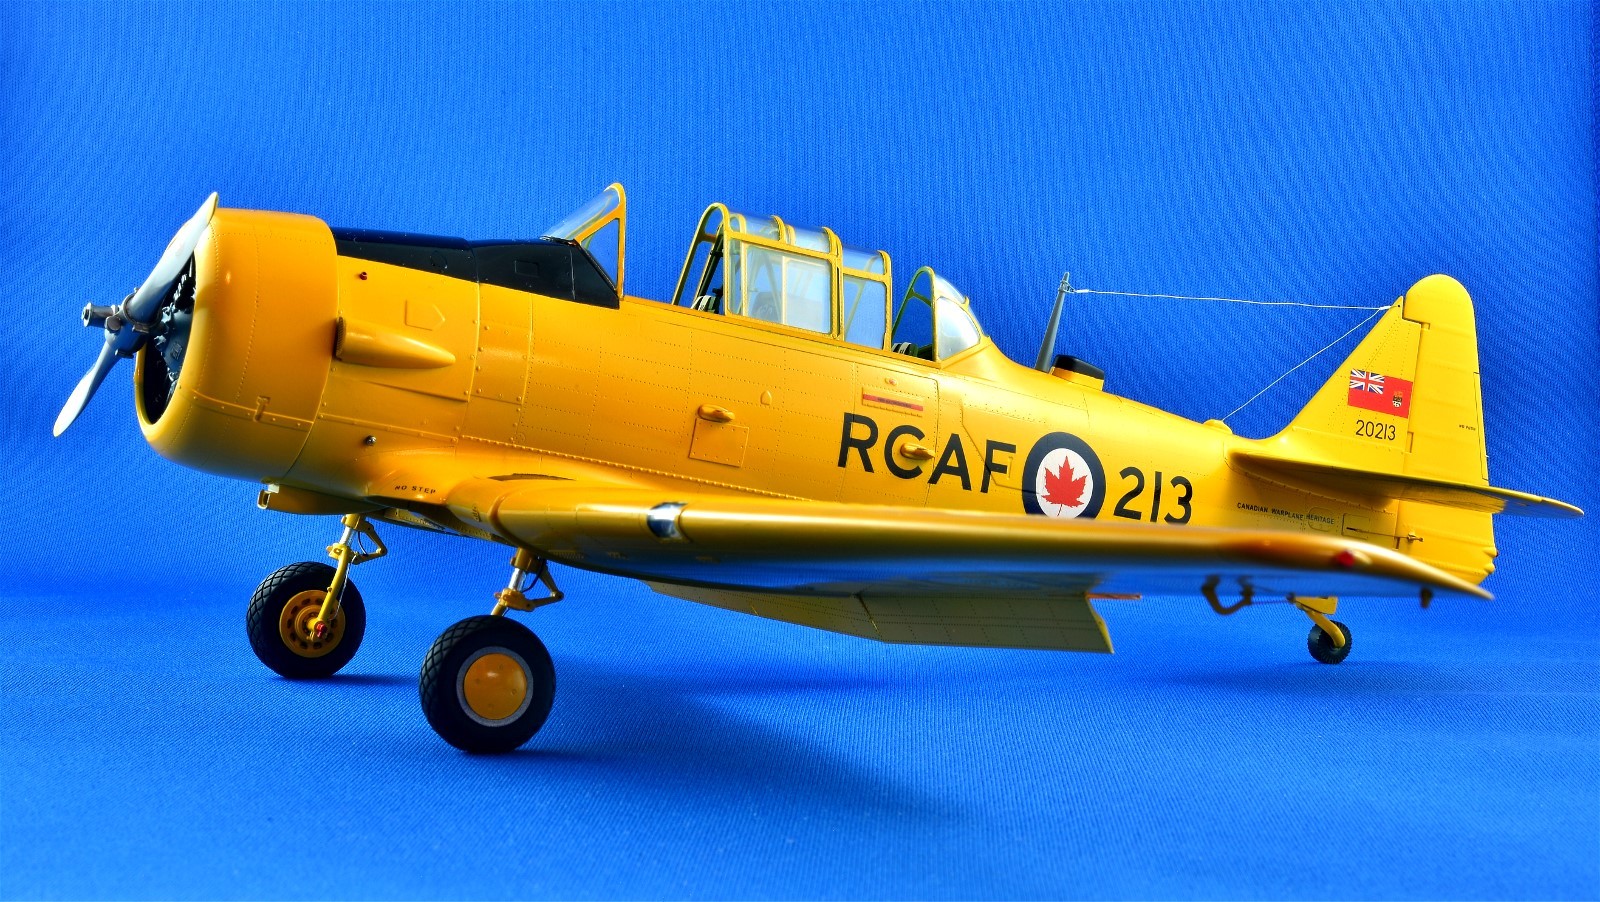
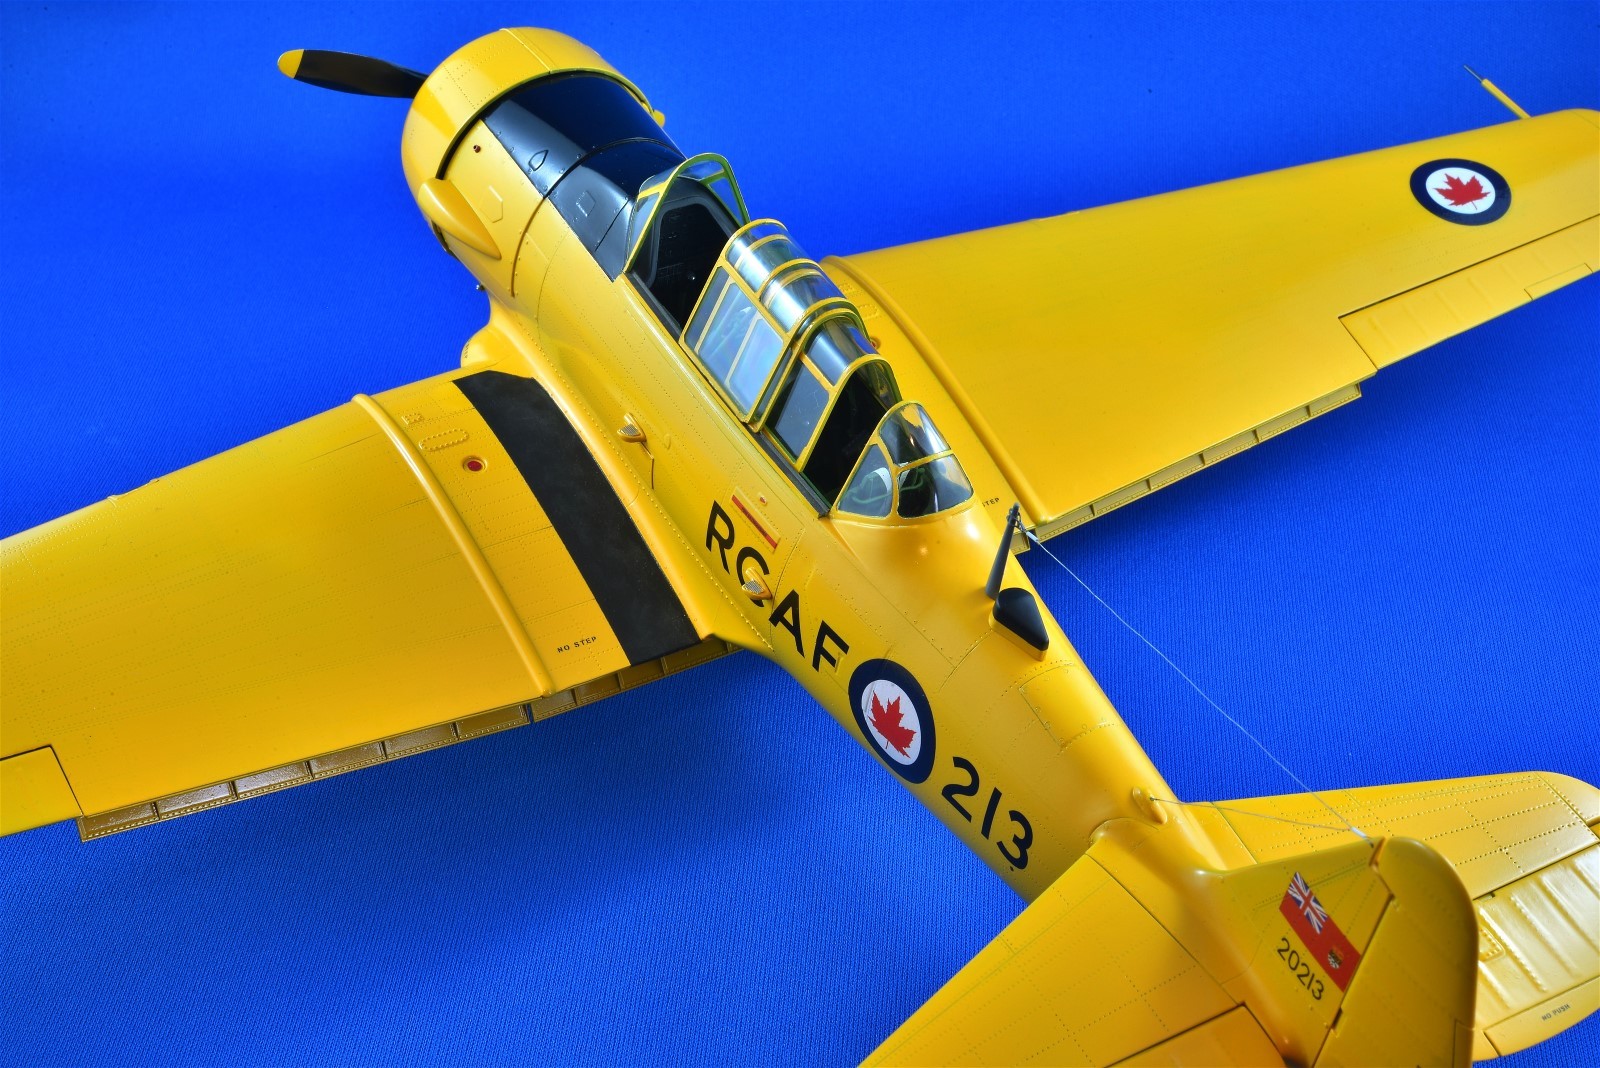
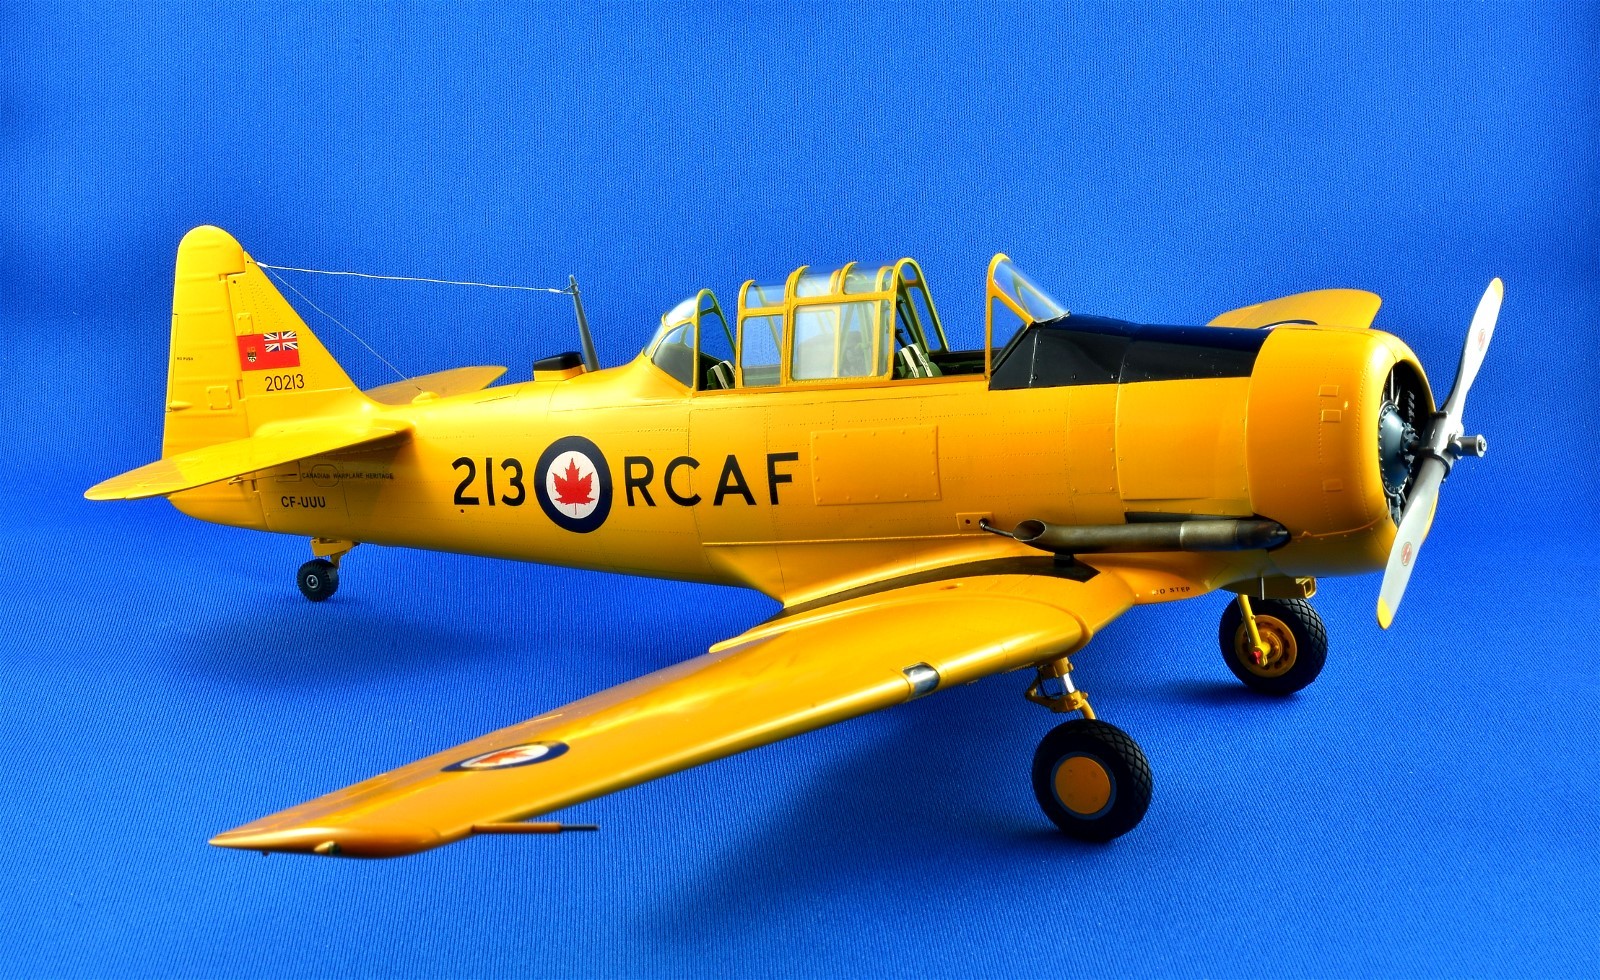
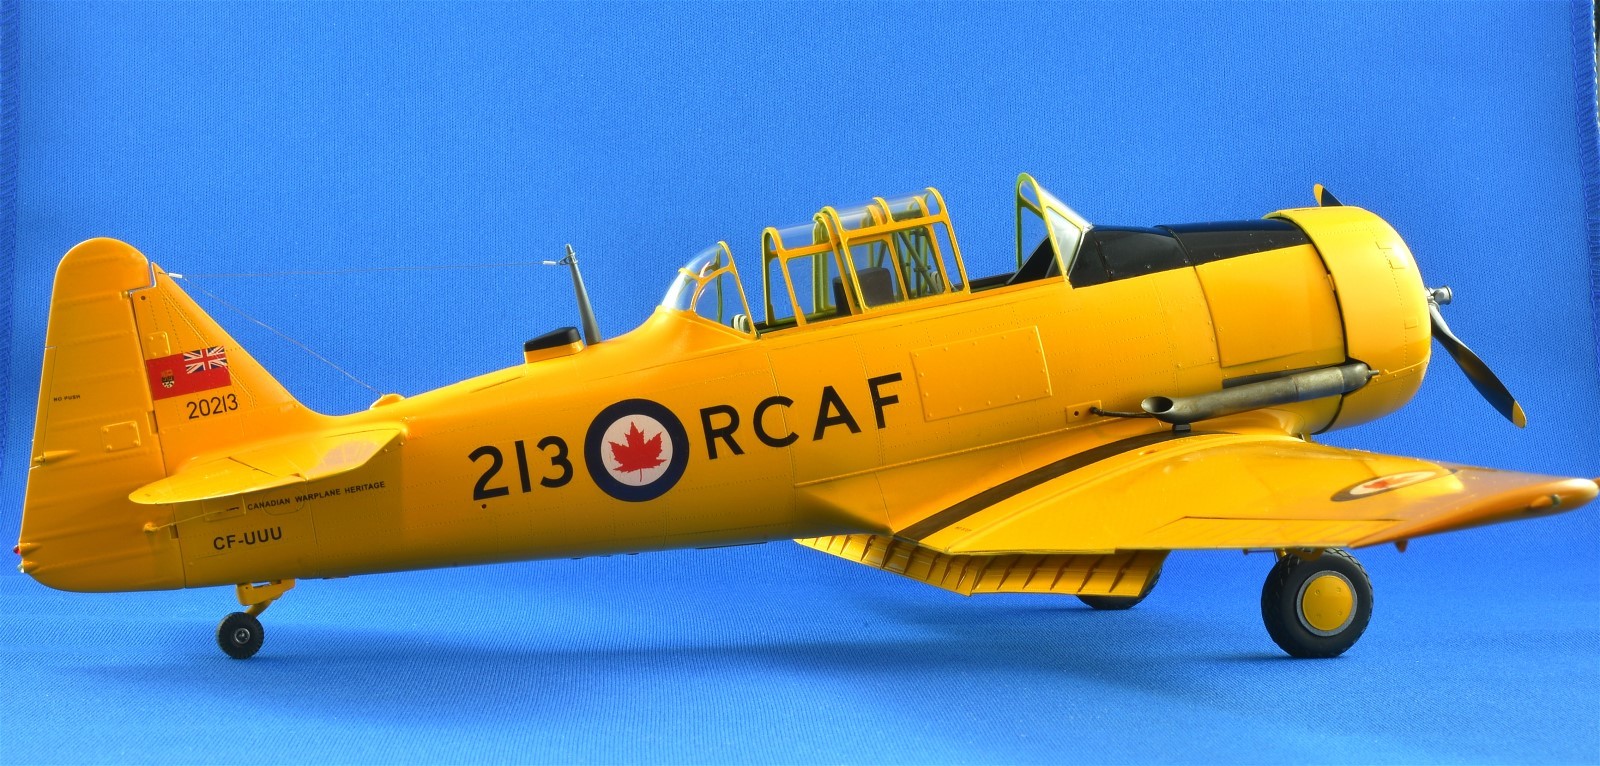
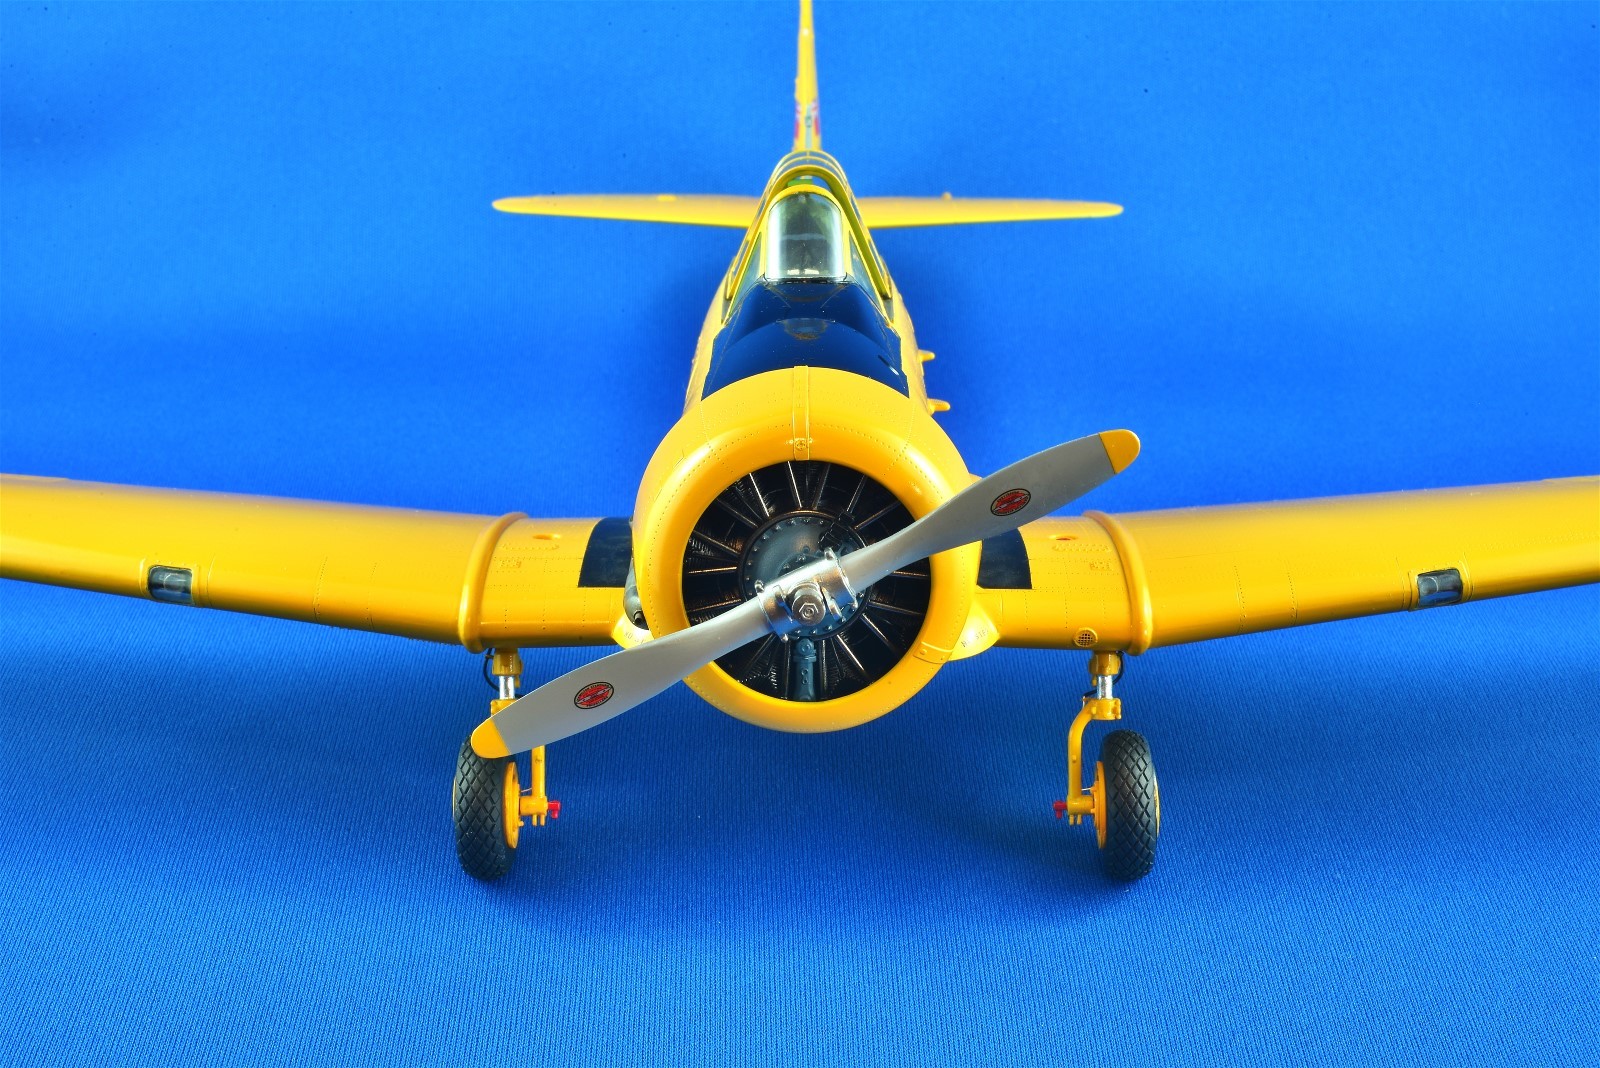
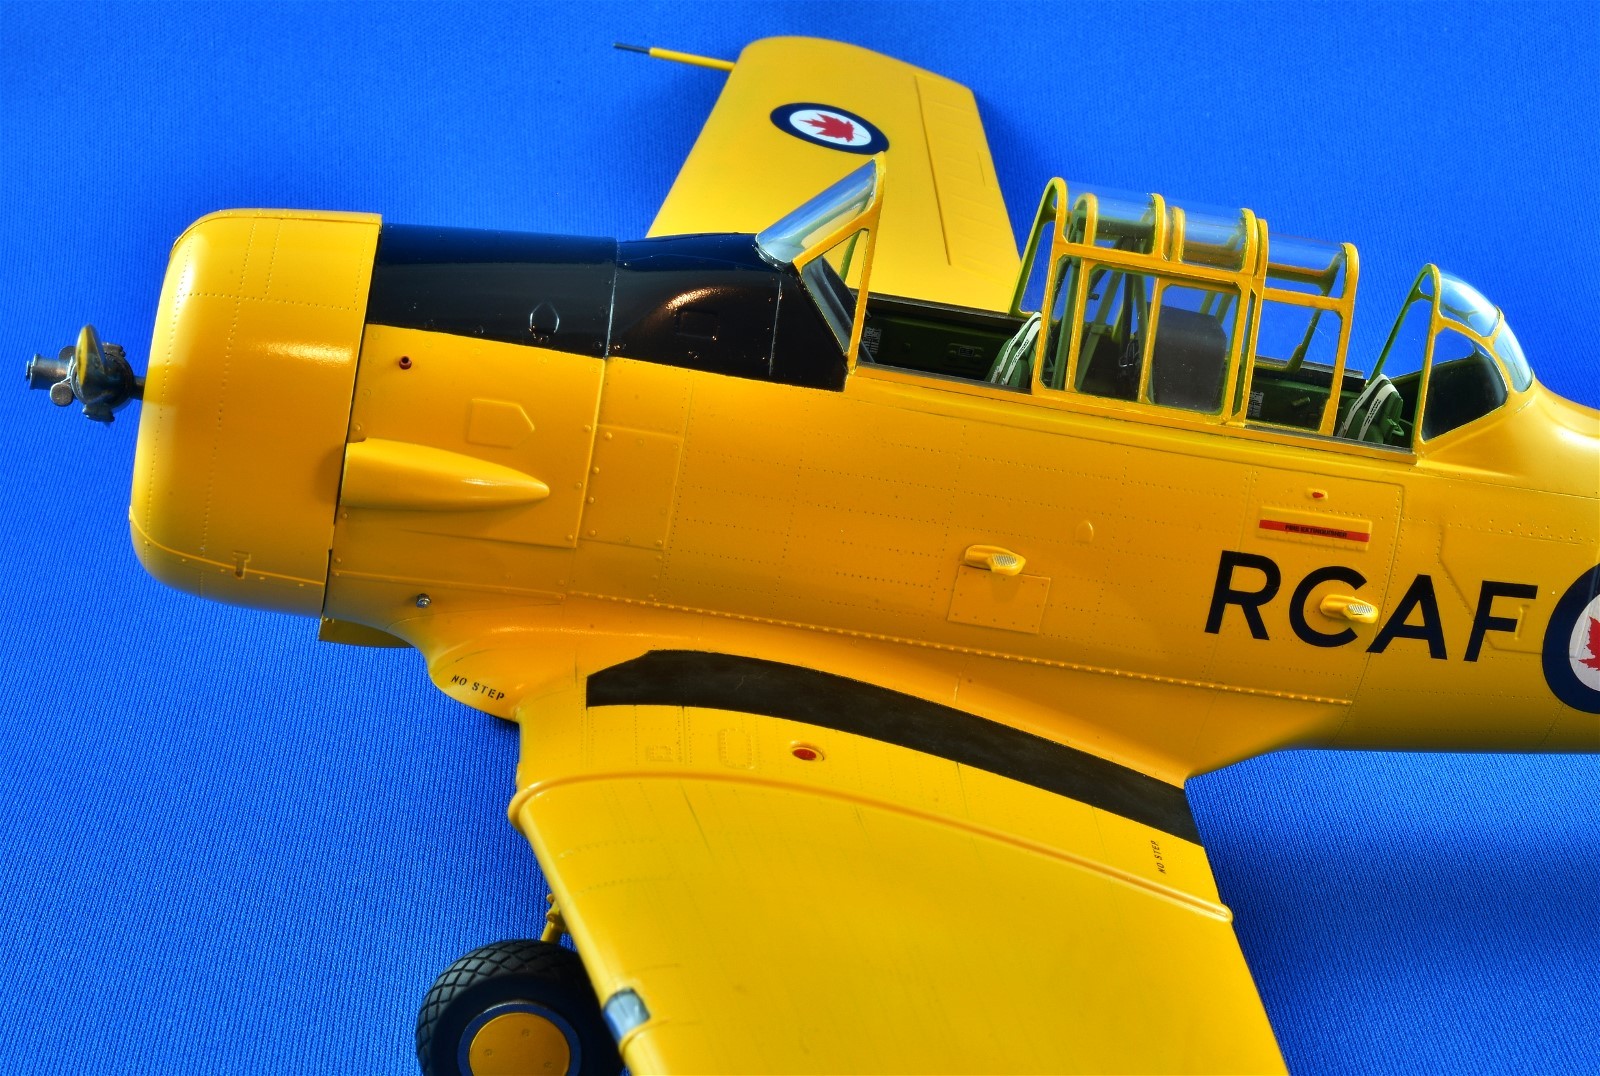
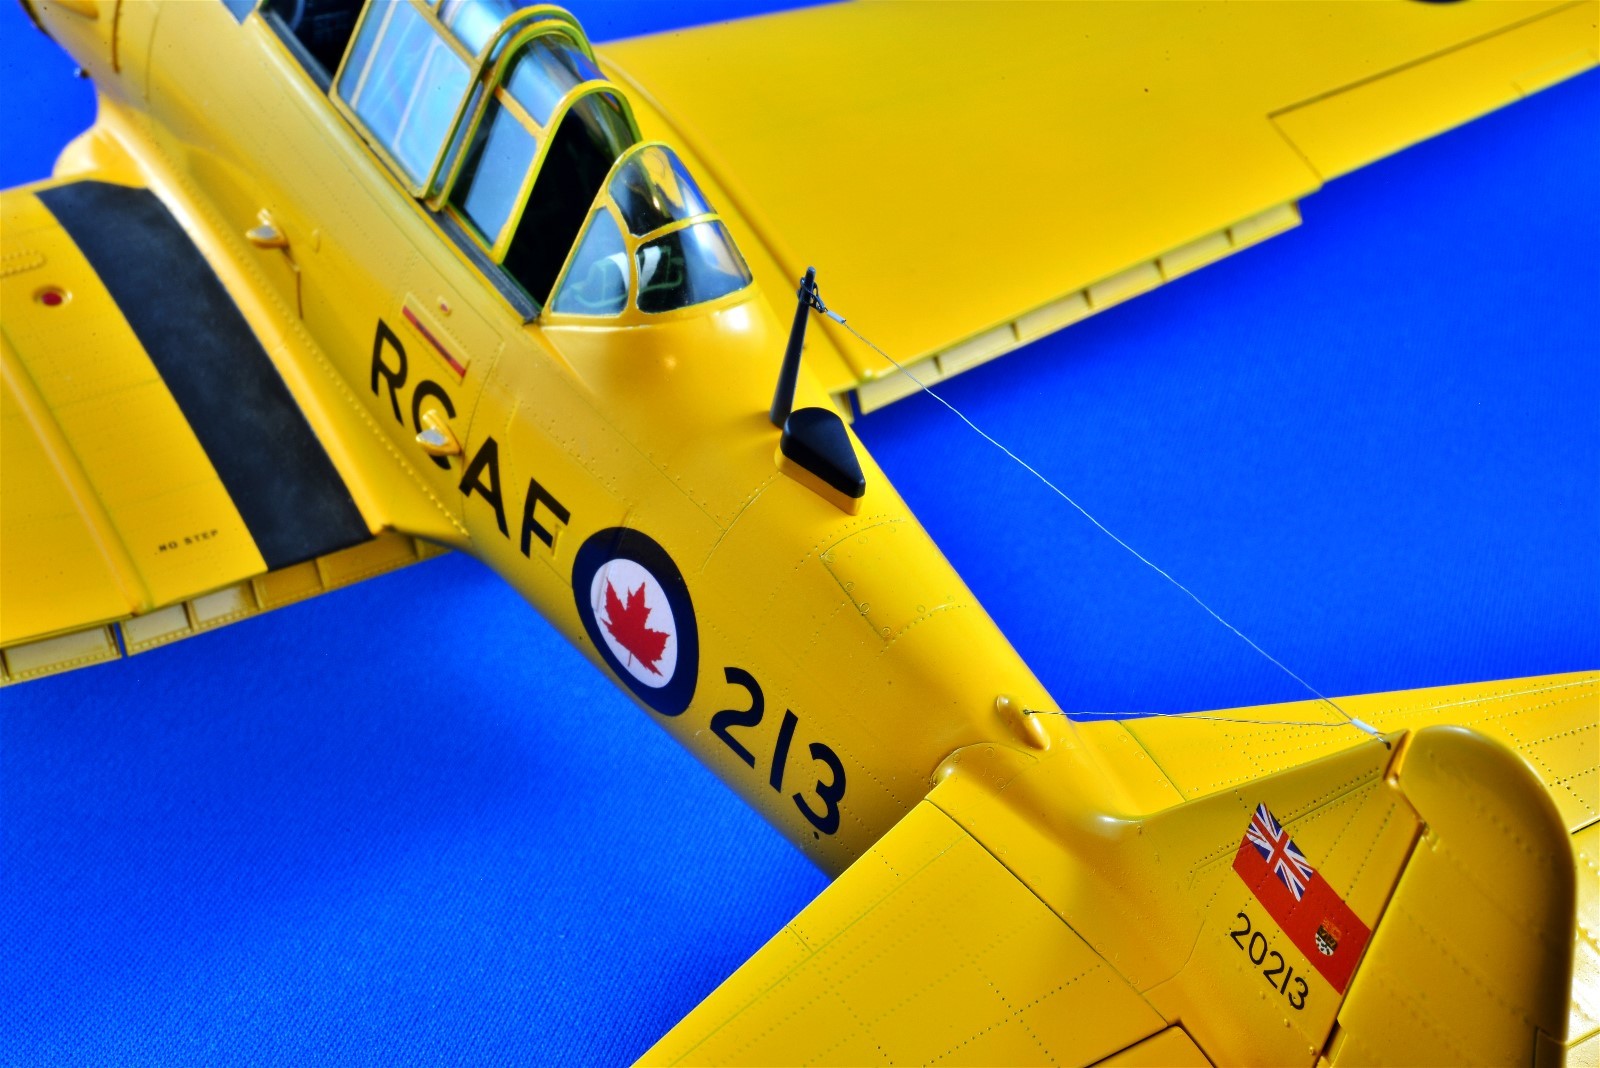
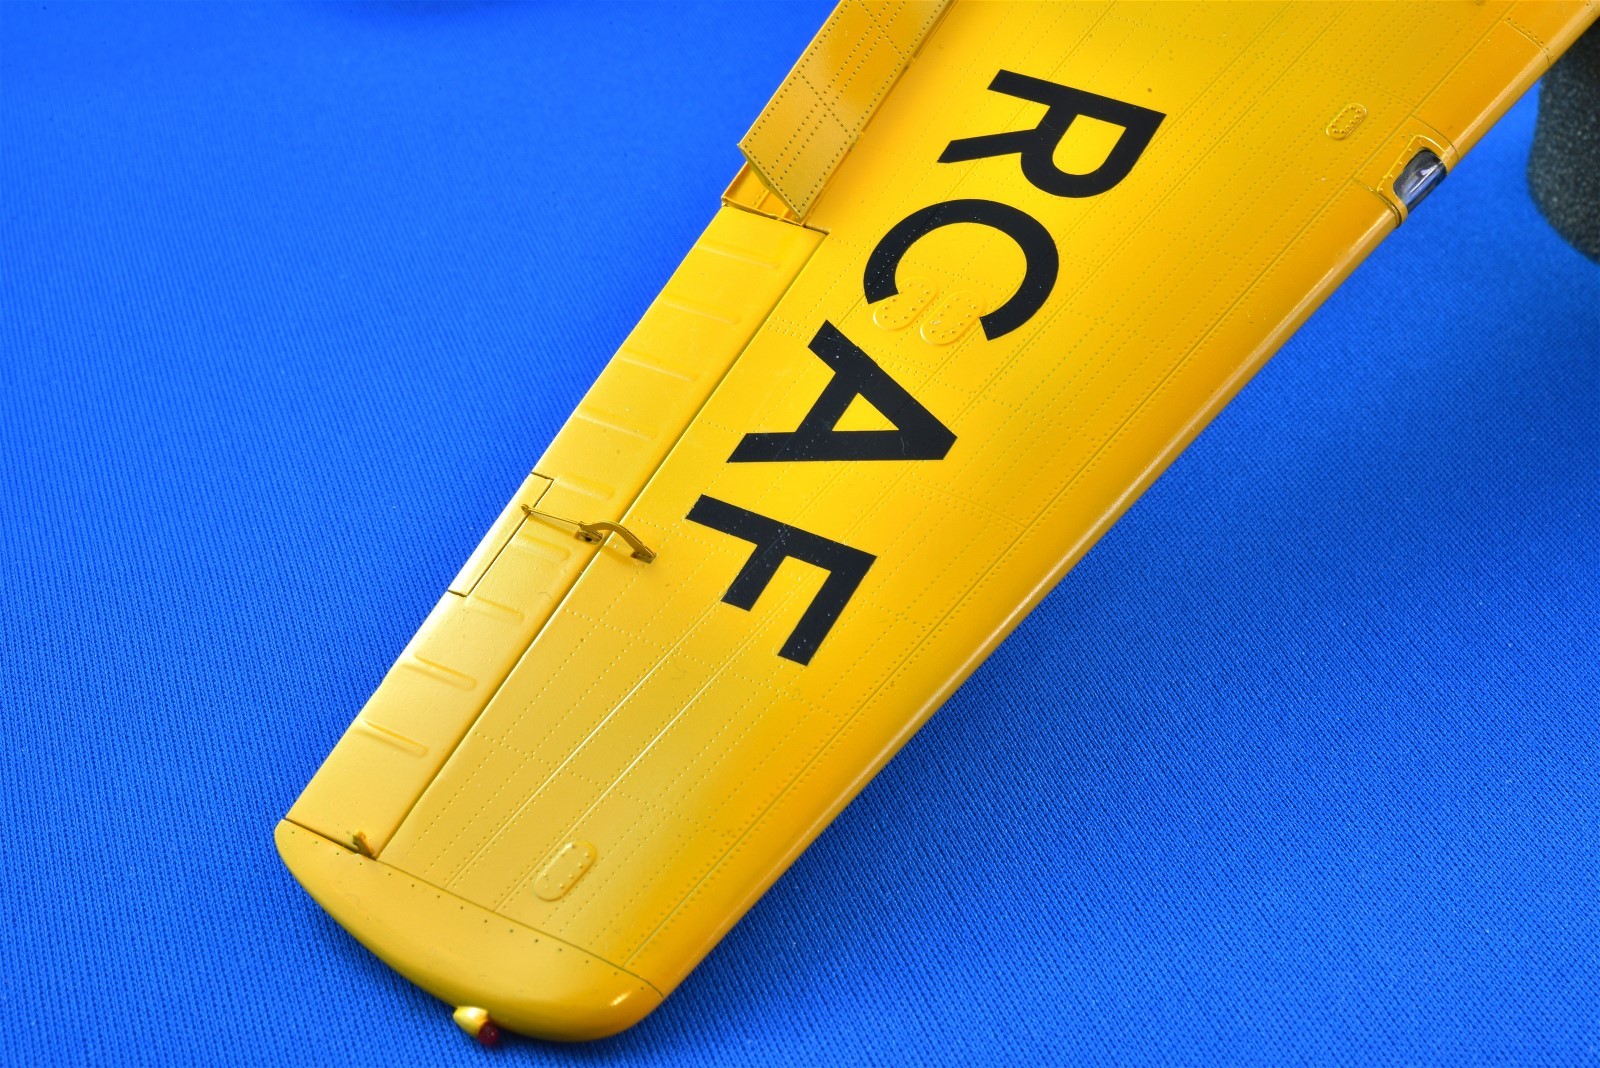
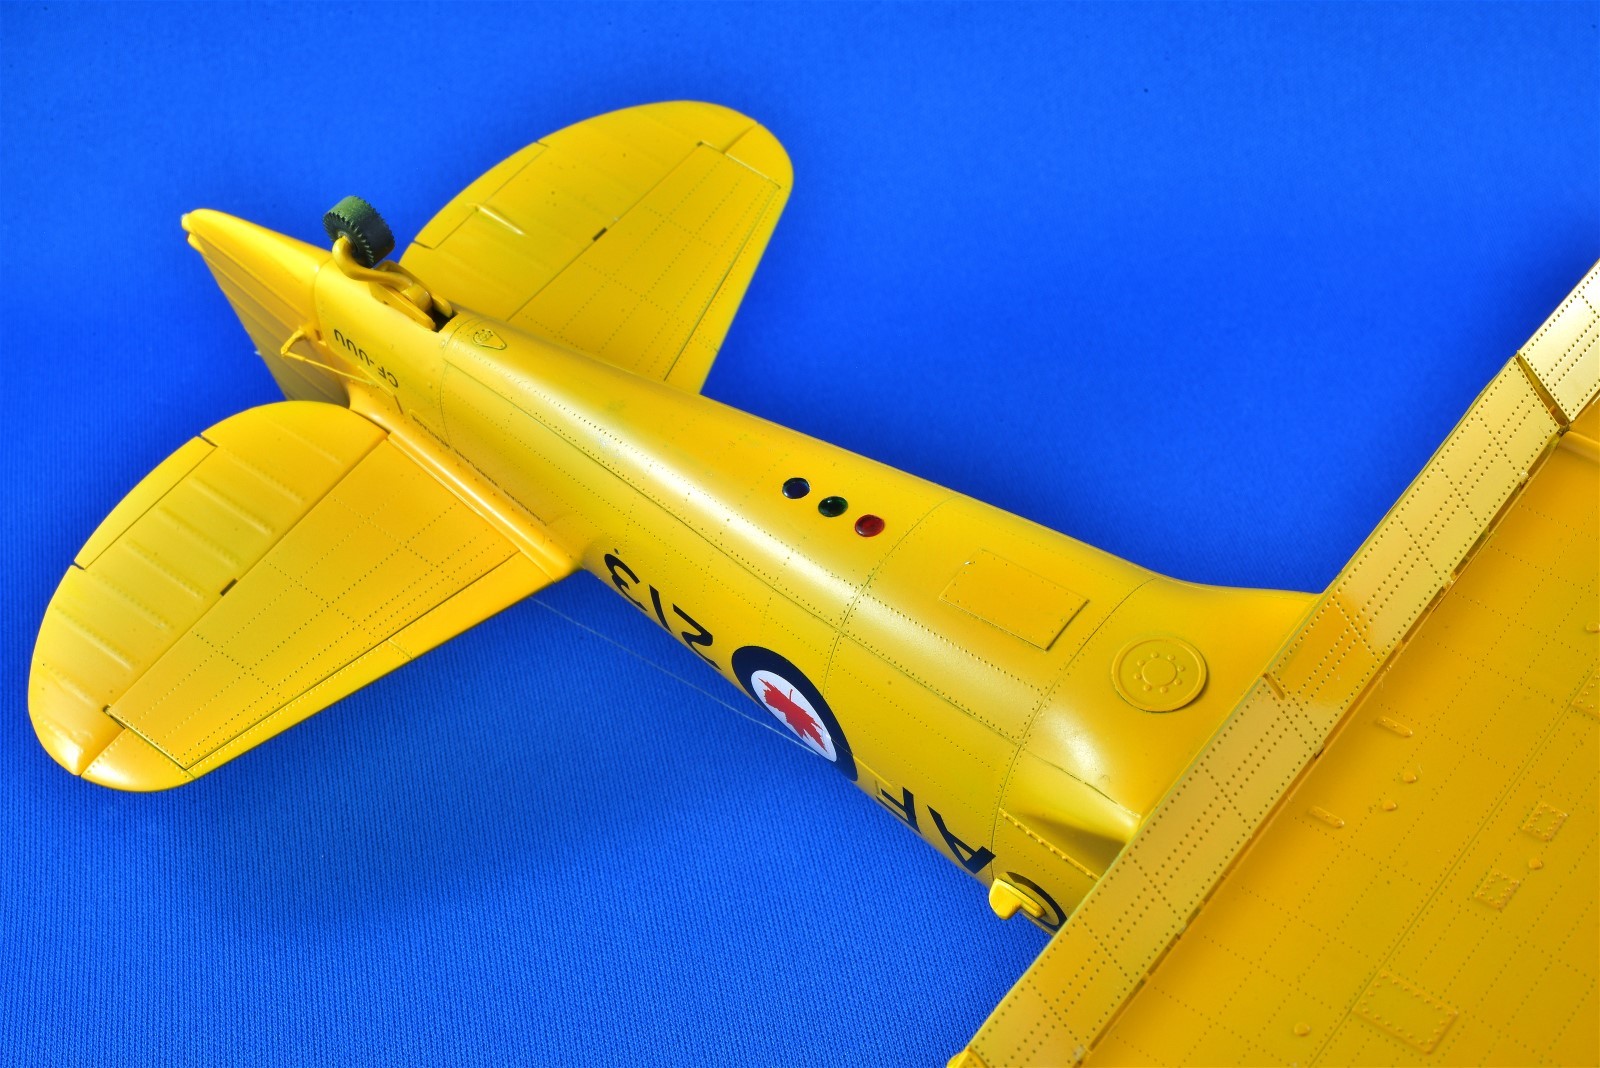
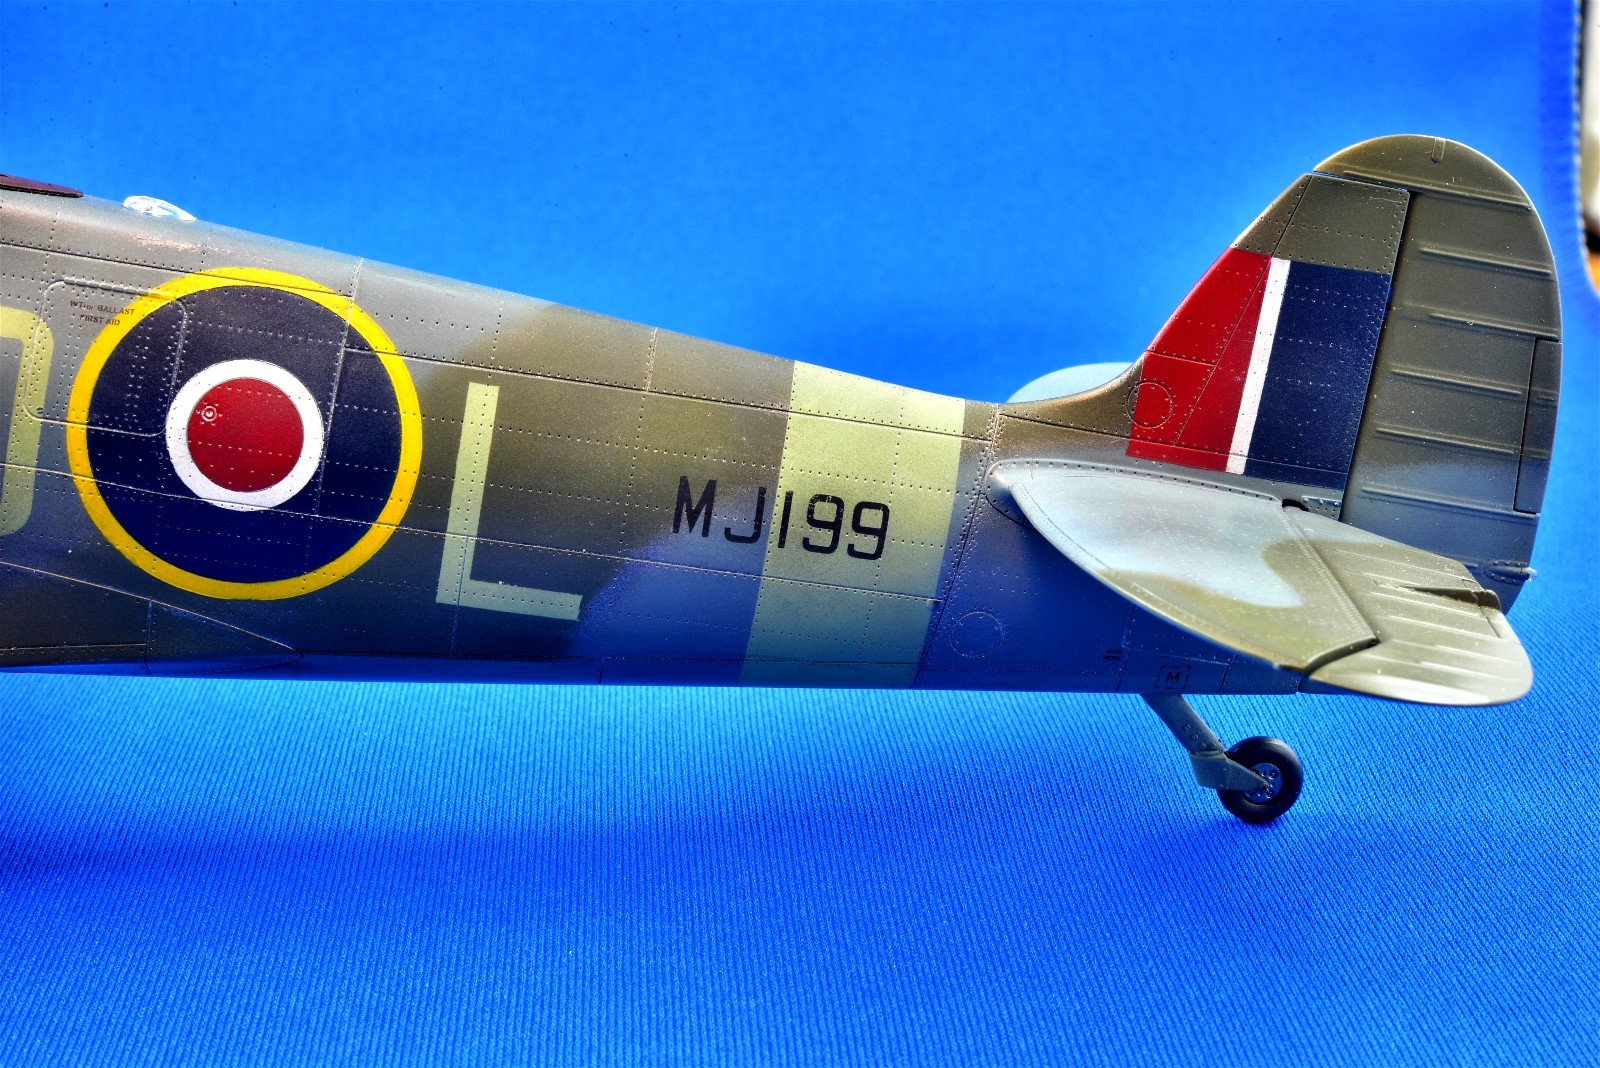
After about 4 ½ months of work, which is an a record short time for me, I’ve finished the Kitty Hawk T-6 Texan kit into a Canadian Harvard. This pandemic we find ourselves in provides plenty of motivation to model, especially when the weather is crappy outside, so I got a lot done the past 2 weeks. This Harvard Mk 4 is a museum bird that lives at the Canadian Warplane Heritage Museum near Hamilton, Ontario and as far as I know, it stills flies now and then. It was built at Canadian Car and Foundry in 1951 and served RCAF flying schools until it was purchased by a private owner in 1965 and later donated to the museum in 1972.
I have many pics of this aircraft and all of them show it to be super clean, especially those in the museum hanger. Other than dirtied up walkways and the characteristically weathered exhaust pipe, it still looks brand new today. I have always loved the look of these yellow birds and chose this aircraft since the kit decals are the only ones available in 1/32 that I know of. This kit presented many, many challenges too numerous to mention, but I have a build log from start to finish here for those who might be interested:
Key aftermarket items include:
- #32354 Eduard Exterior and Landing Flaps
- #32810 Eduard Interior Set
- #32100 AMS Resin Corrected Prop Blades
- #BR32380 Barracuda Resin Tires and Wheels
- #132004 HGW Late Spitfire Fabric Seat Belts
- AR88015 Archer Decal Rivets (various)
- And lots of scratch made enhancements
Now the pics with a few explanations.
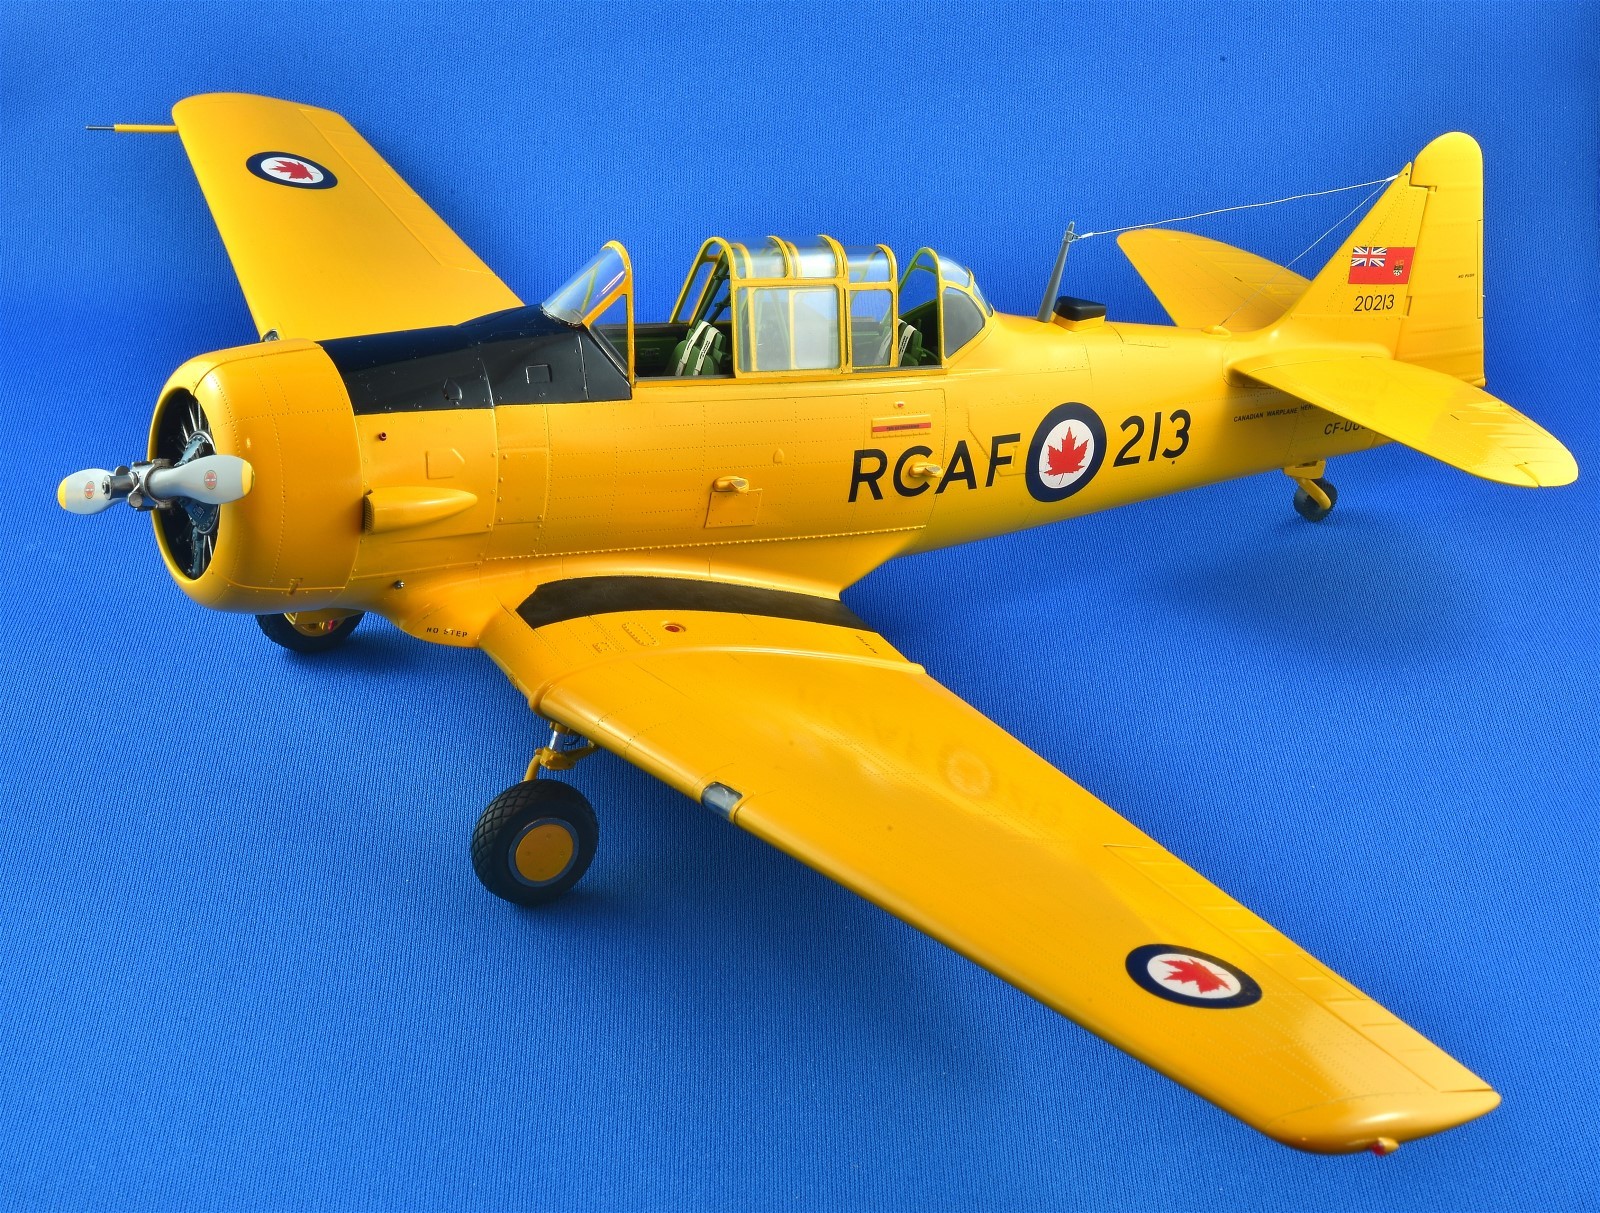
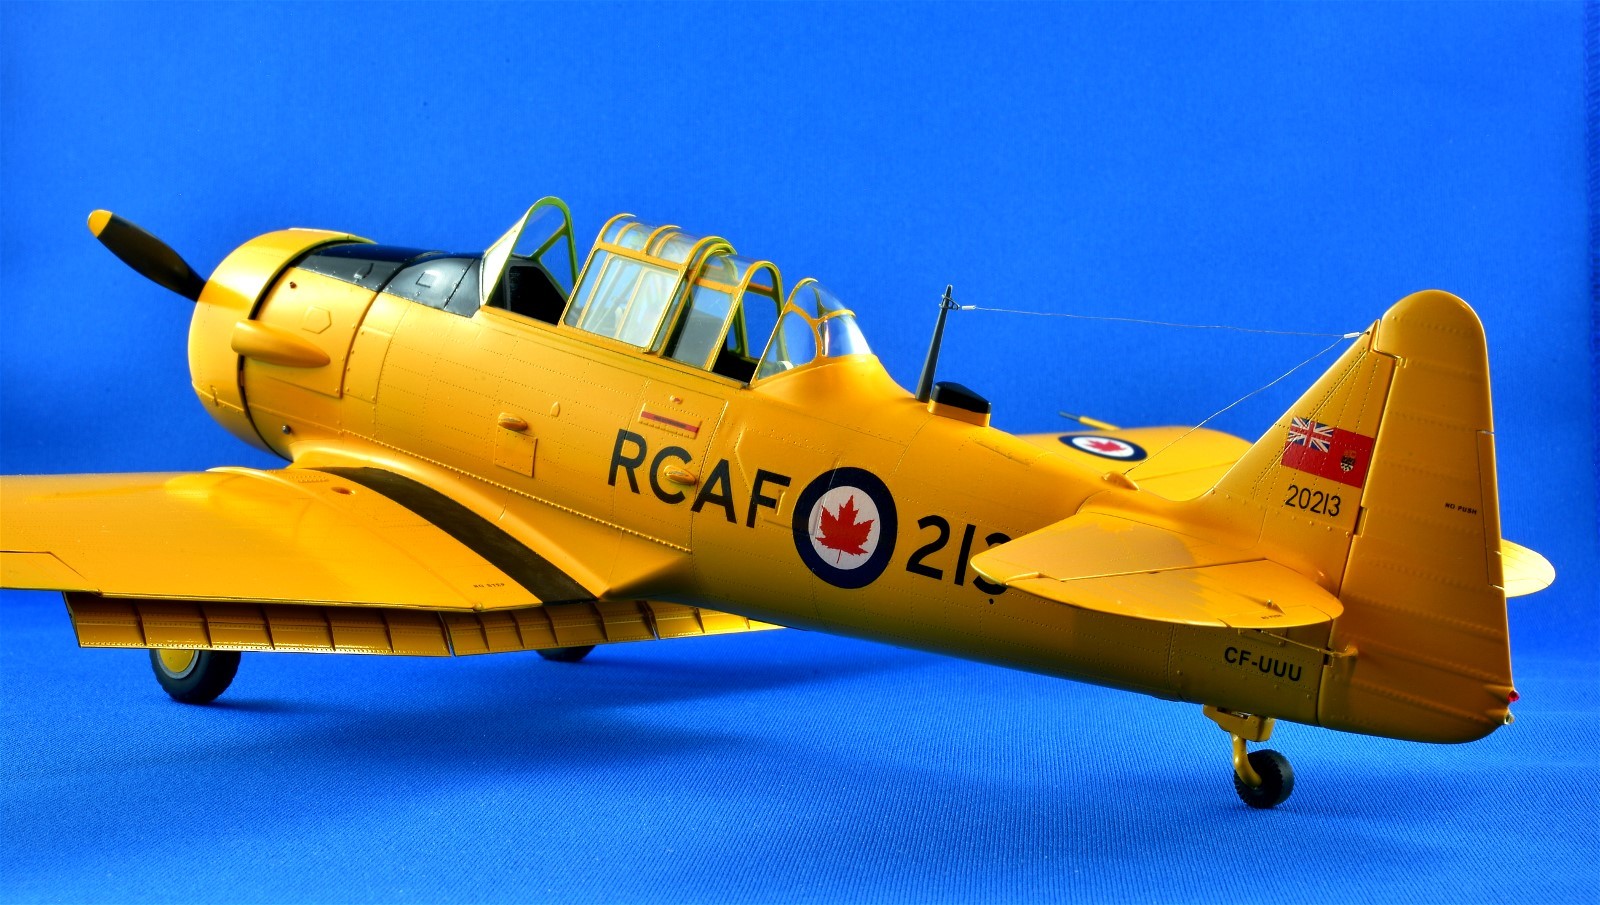
The antenna wires look just like this. Tight, but also kind of sloppy.
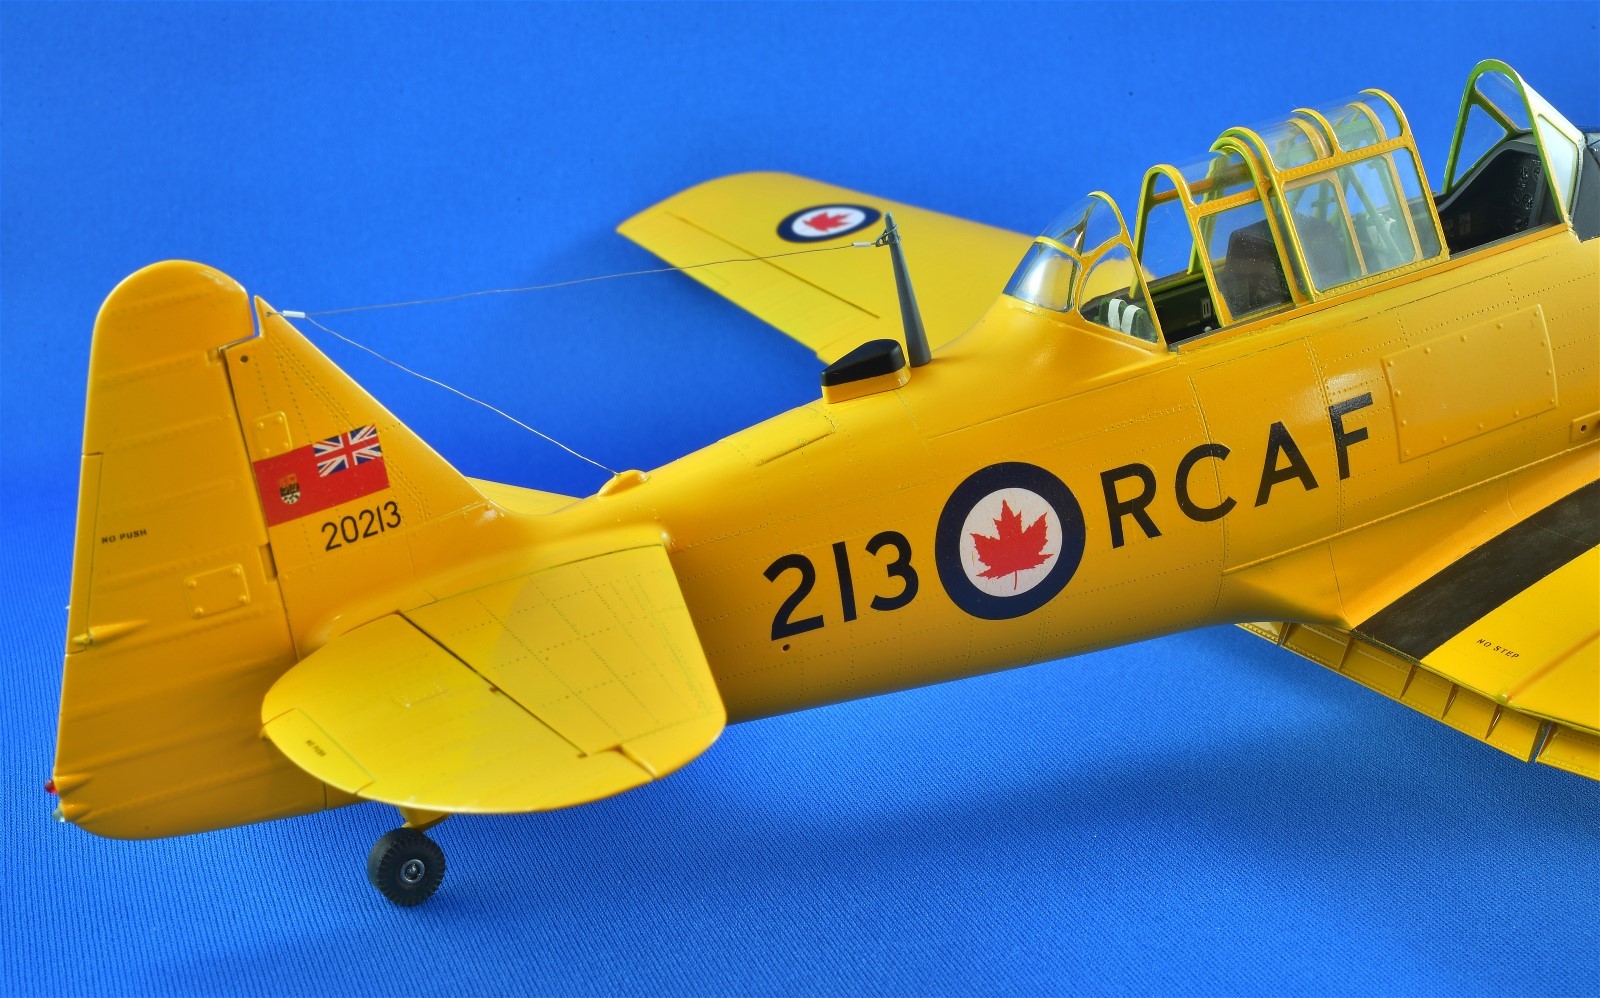
Landing gear was corrected outwards from the kit anchor points.
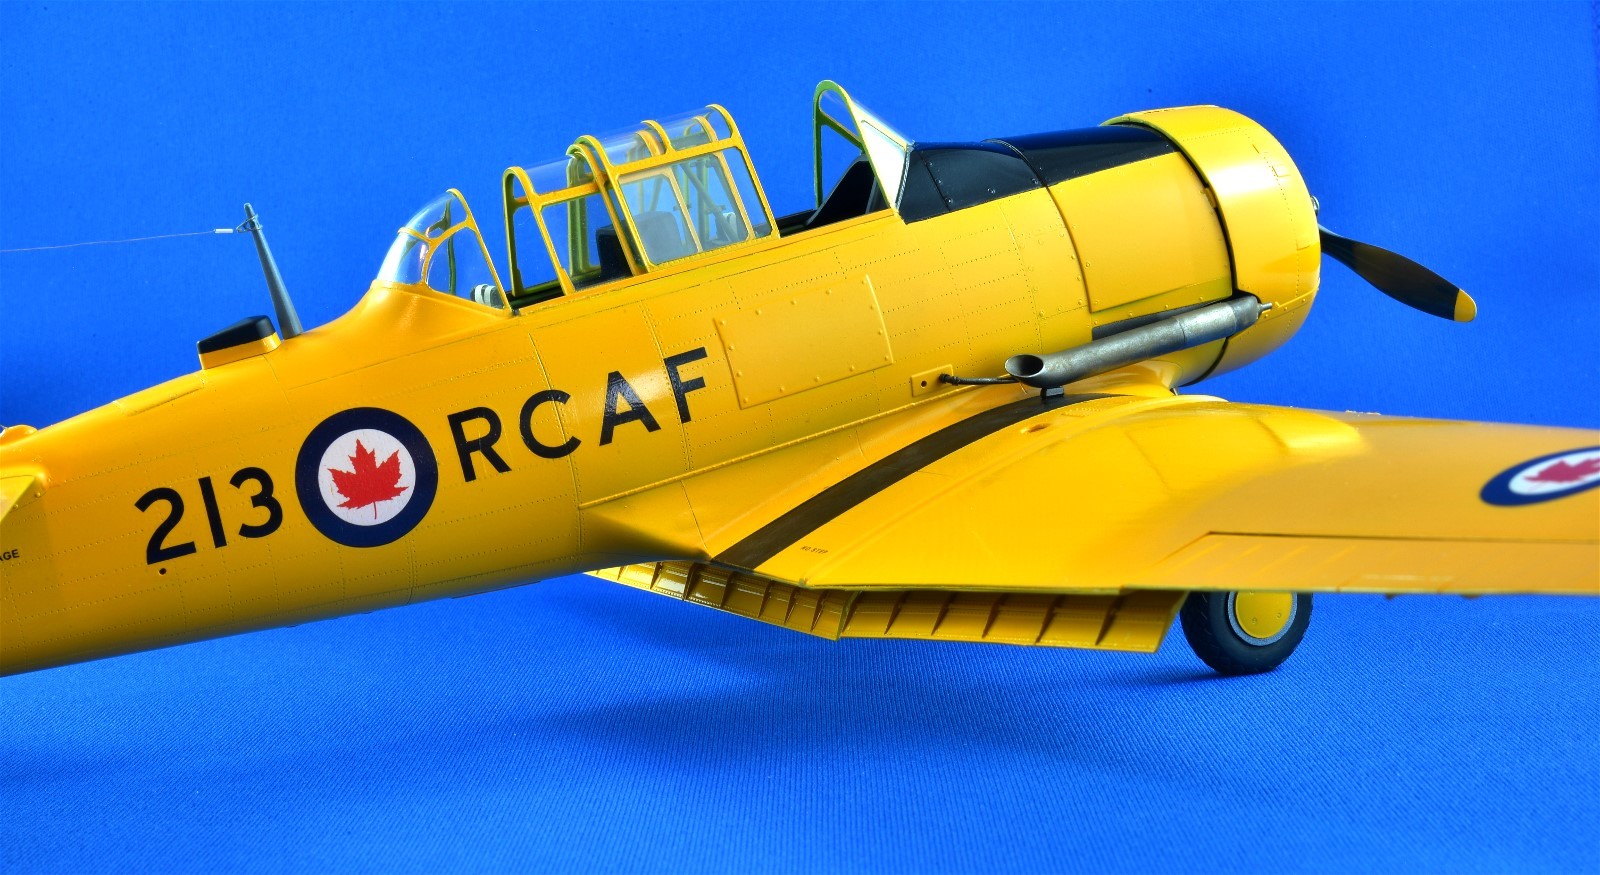
To replicate a drain tube of some kind found at the bottom of the engine, I used a steel pin.
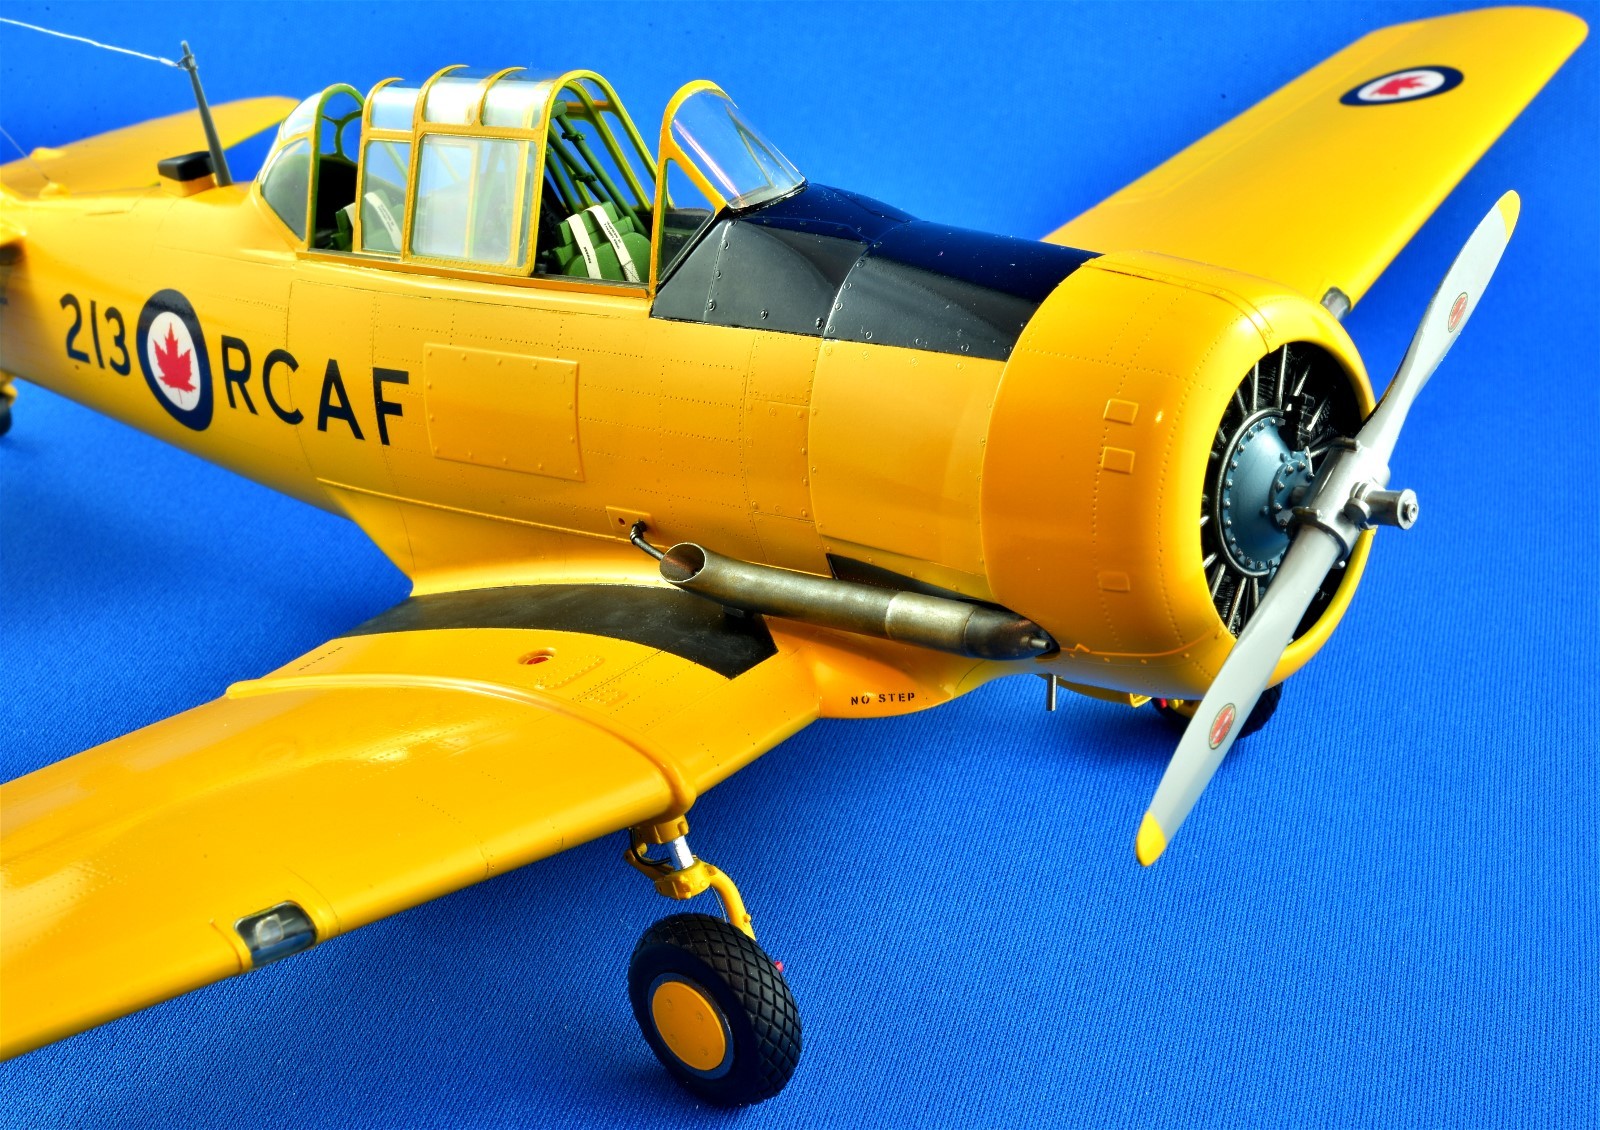
I am most proud of the exhaust, which was modified with the addition of a cockpit heater pipe, then painted with Alclad Steel and Stainless Steel, followed by Tamiya pastels in rust. Fuel tank caps on the wings were also recessed as per references.
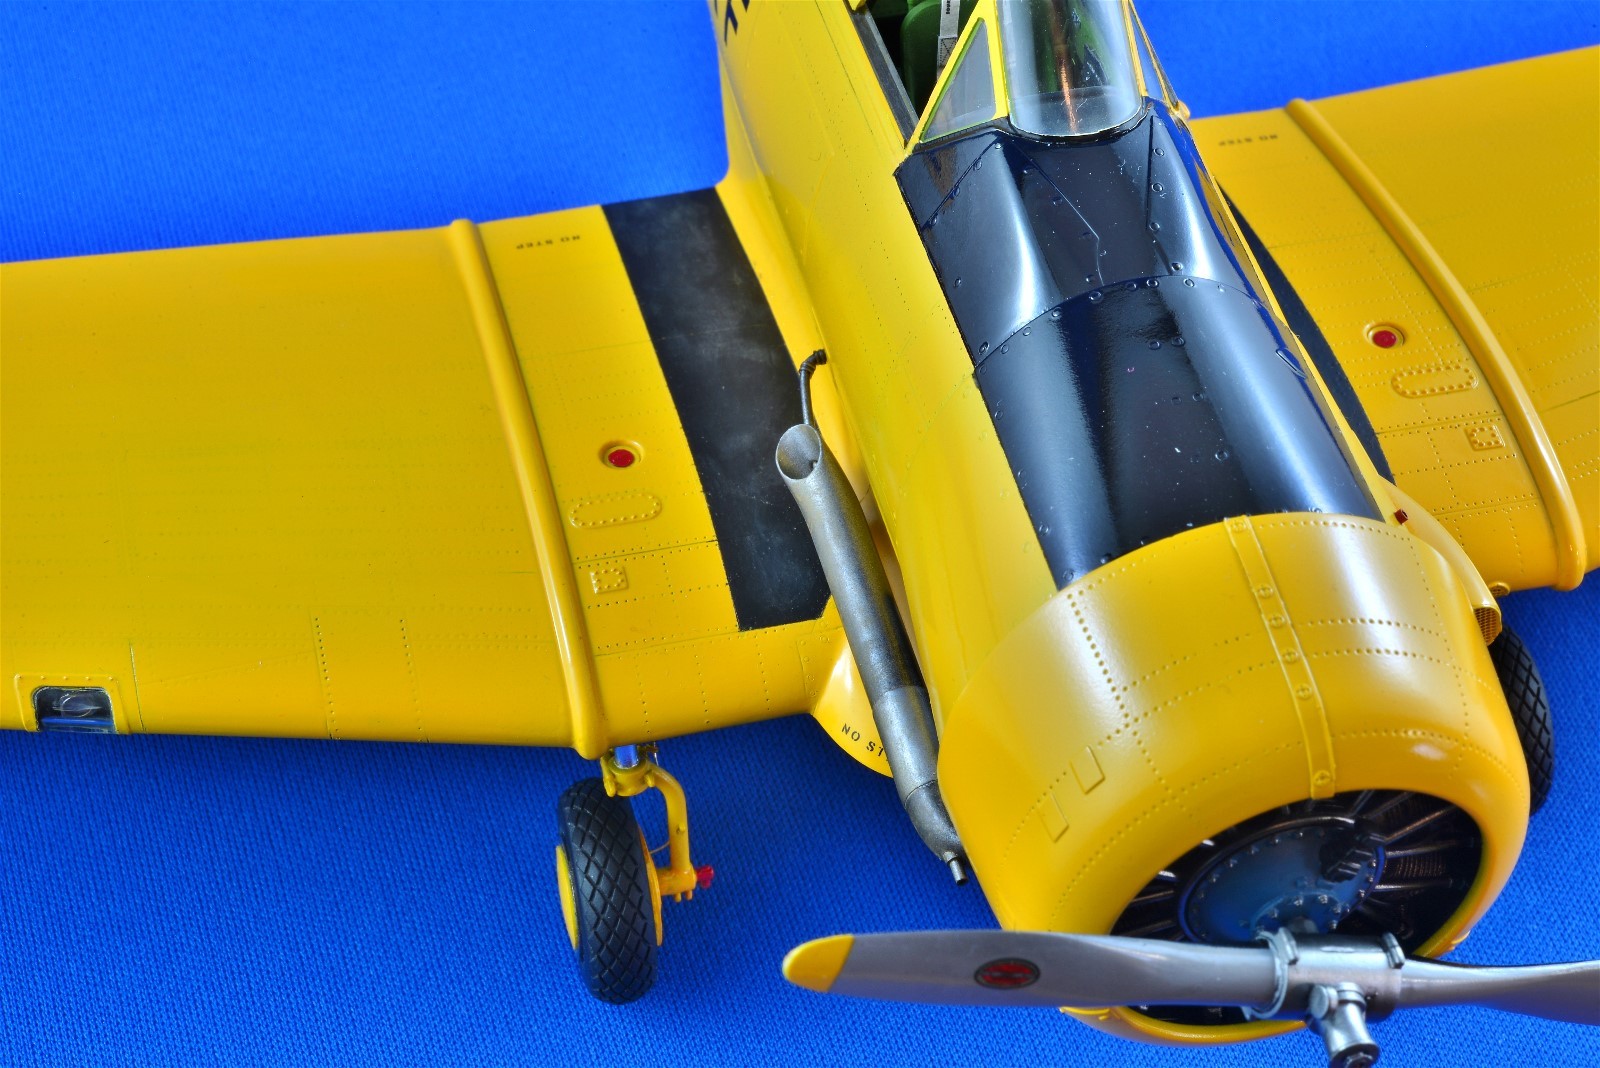
A red vent tube was added to the top behind the engine cowling and a steel colored dipstick looking assembly at the bottom.
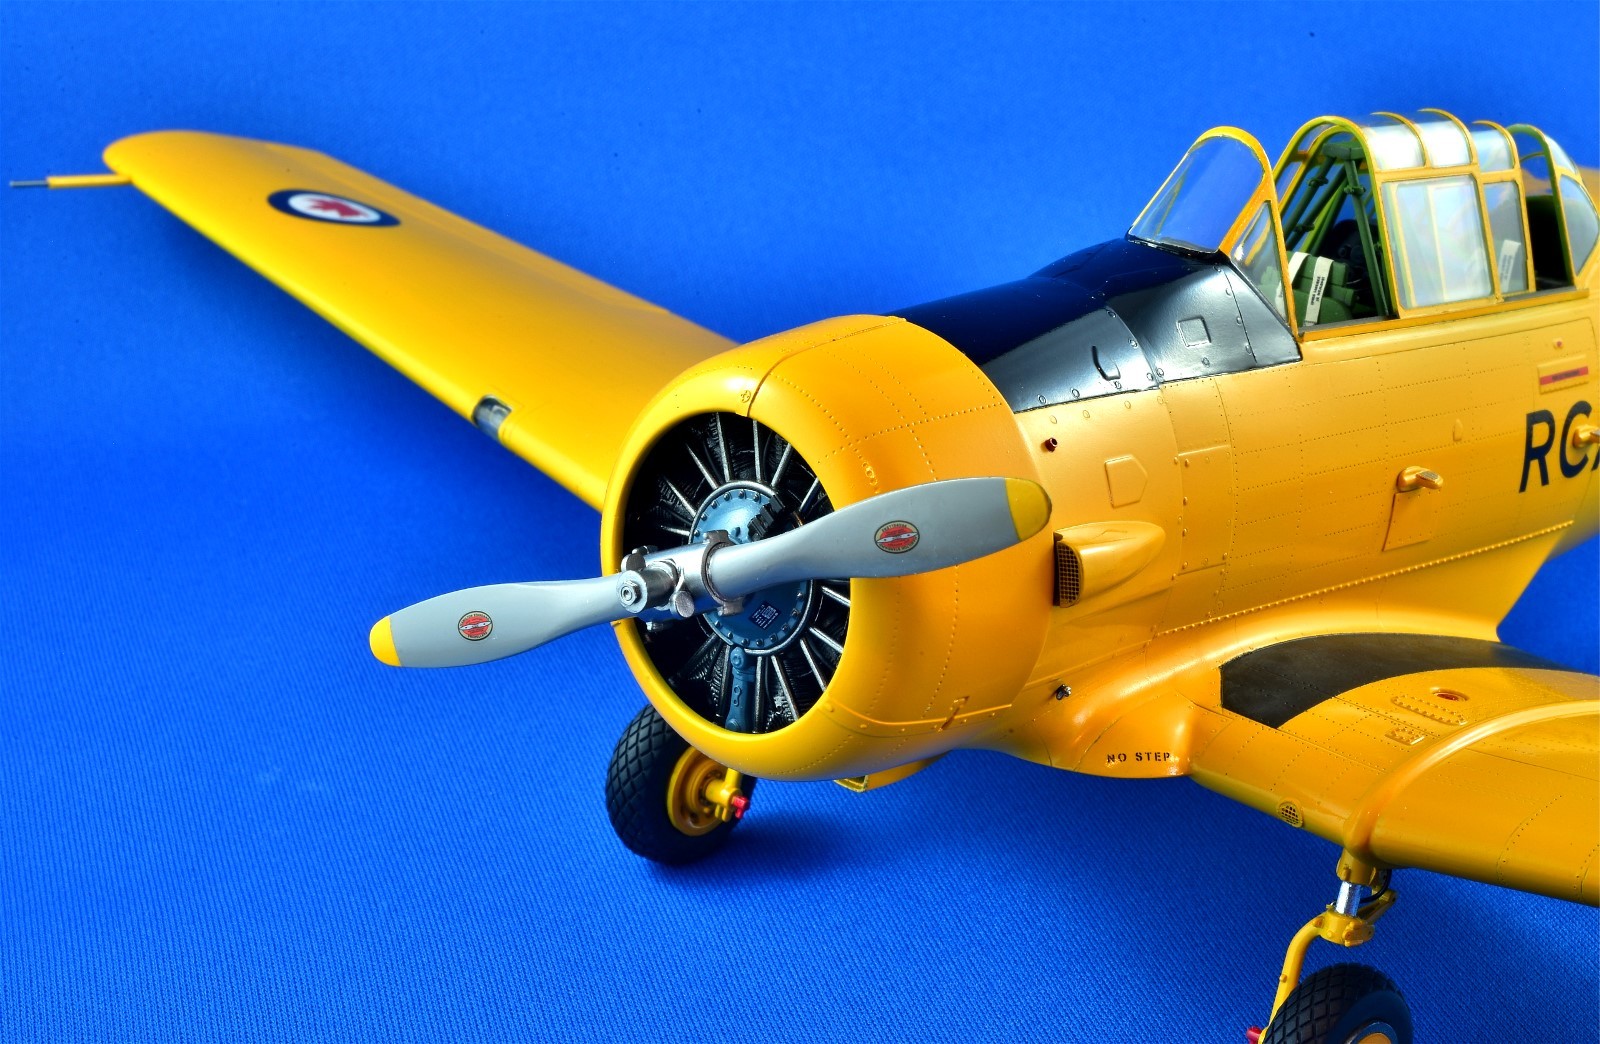
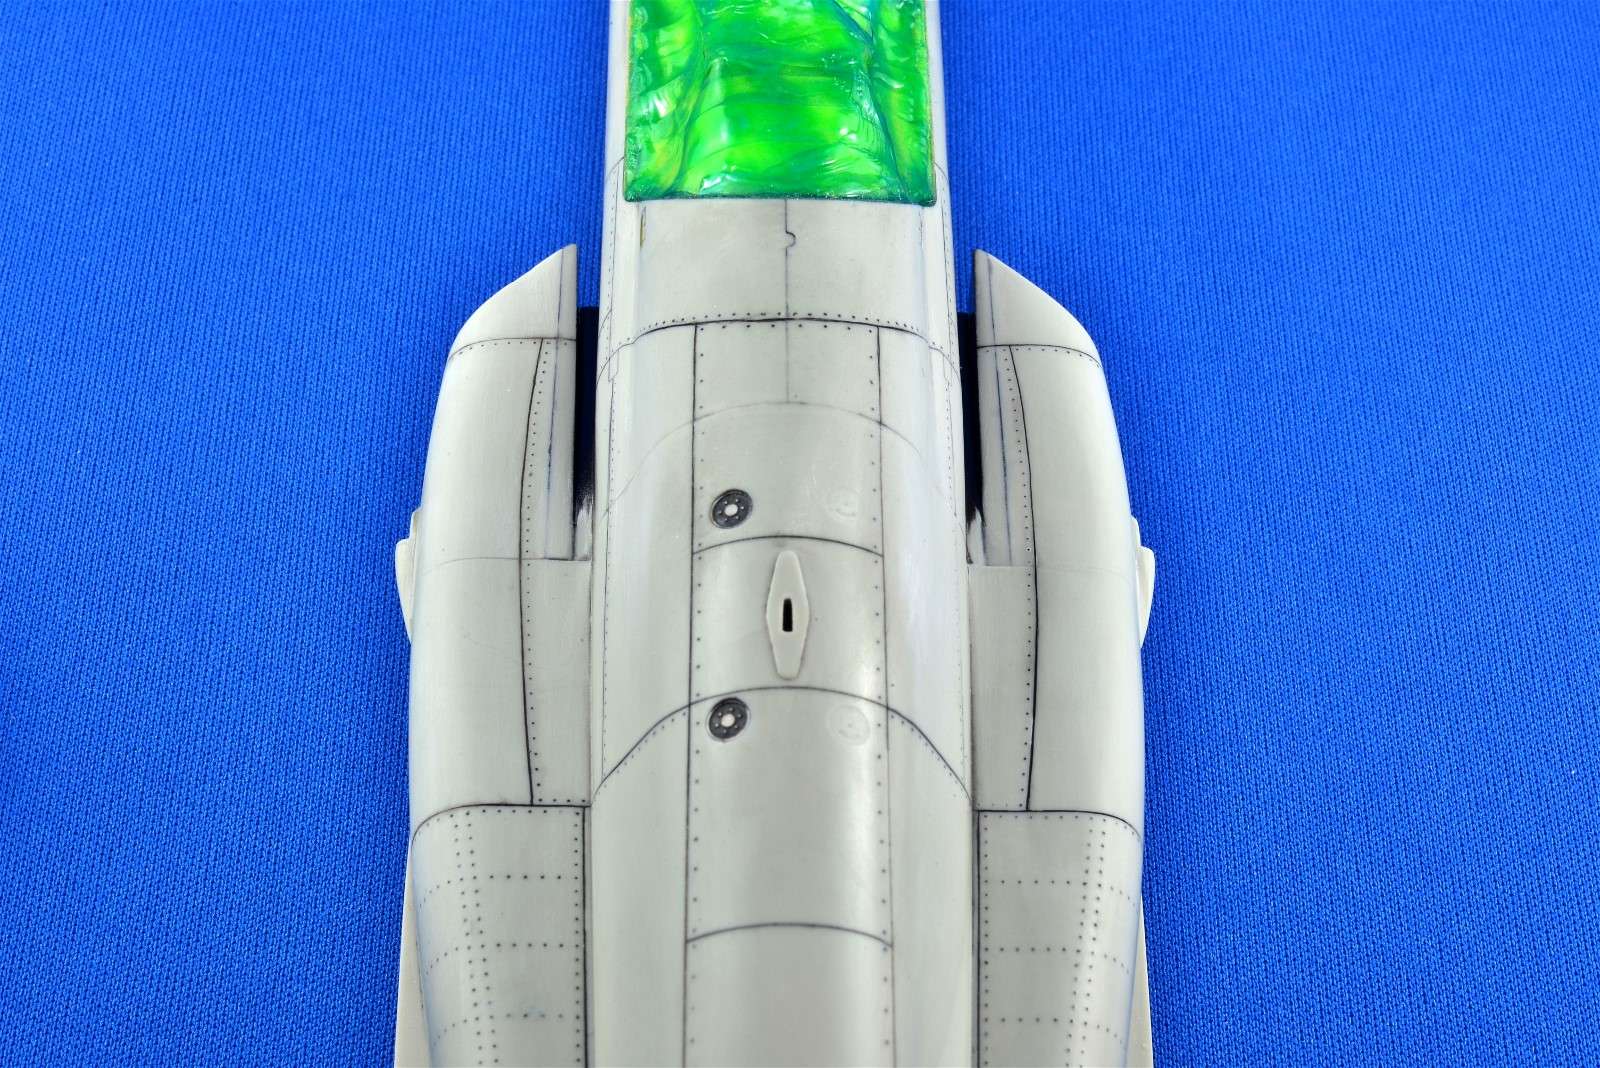
The kit canopy is the weakest part of this kit and doesn’t fit at all, so I modified it with a channel slider at the bottom to hold everything together.

All of the ribbing on the rudder and elevators was sanded down and modified with Archer decal rivets to create a subtle, but lumpy look of fasteners behind fabric.

Aileron control arms were replaced with Eduard PE replacements, which include an arm to the small trim tabs.
The Eduard landing flaps were a ton of work, but very satisfying to see them completed.
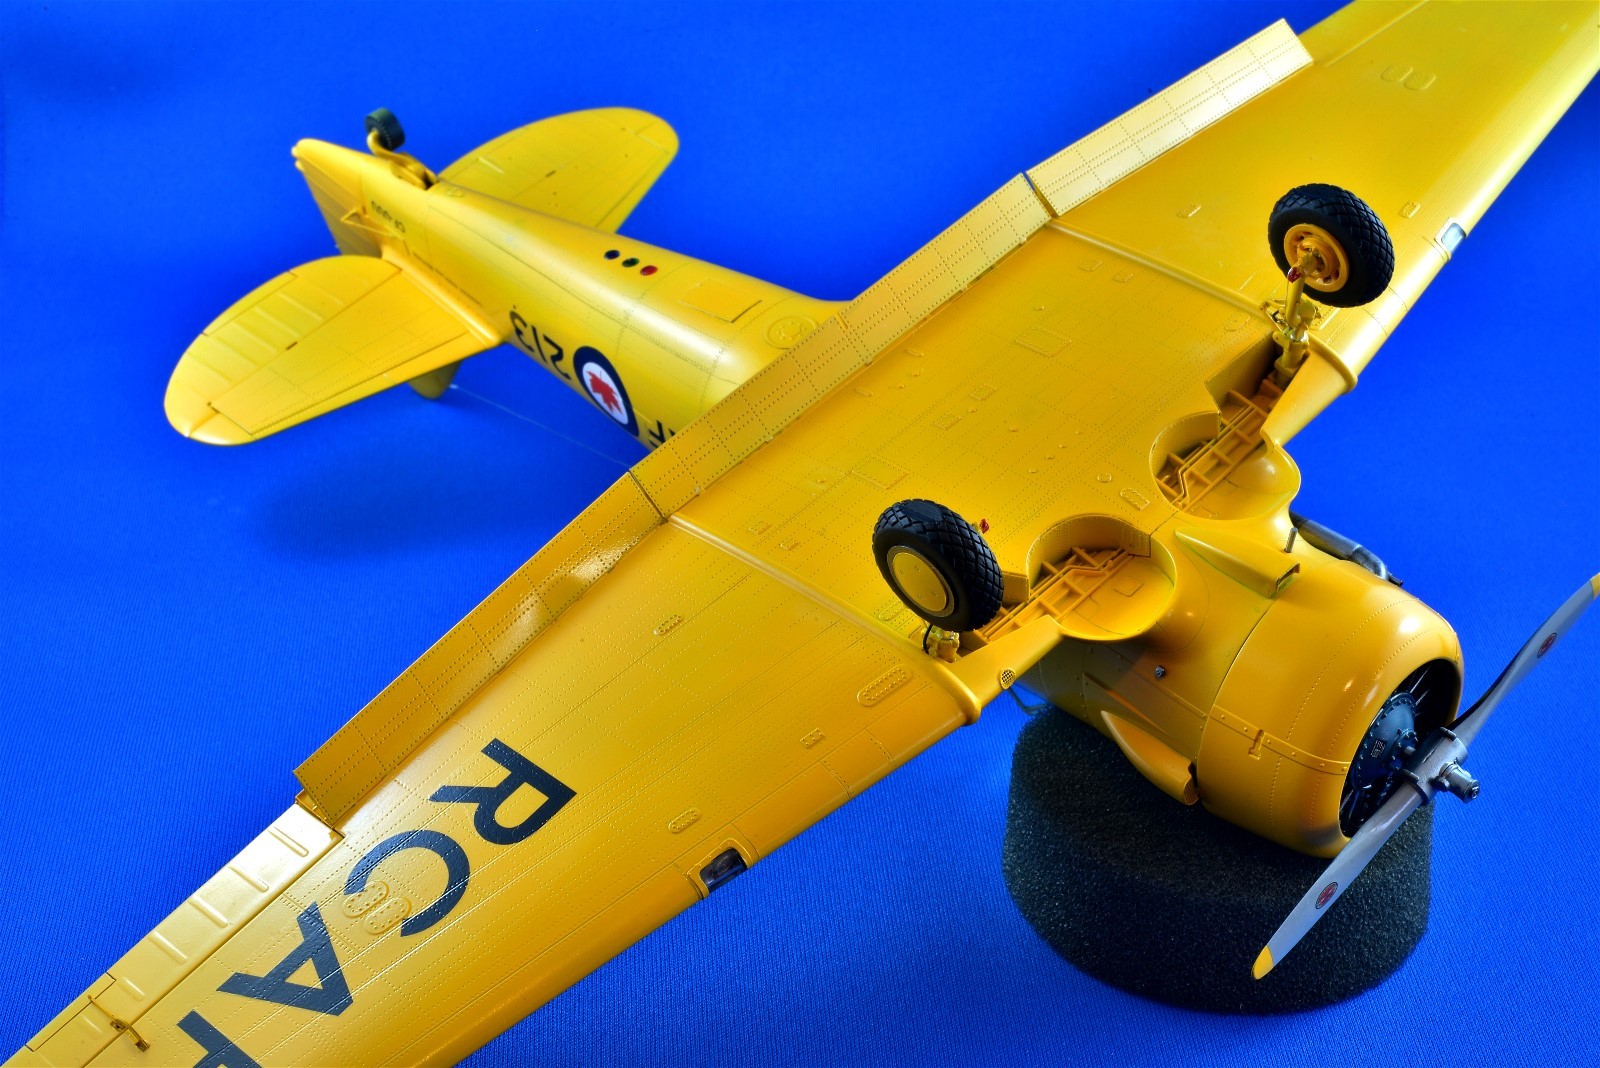
For those who might want to see the upper portion of the landing flaps, they look like this.
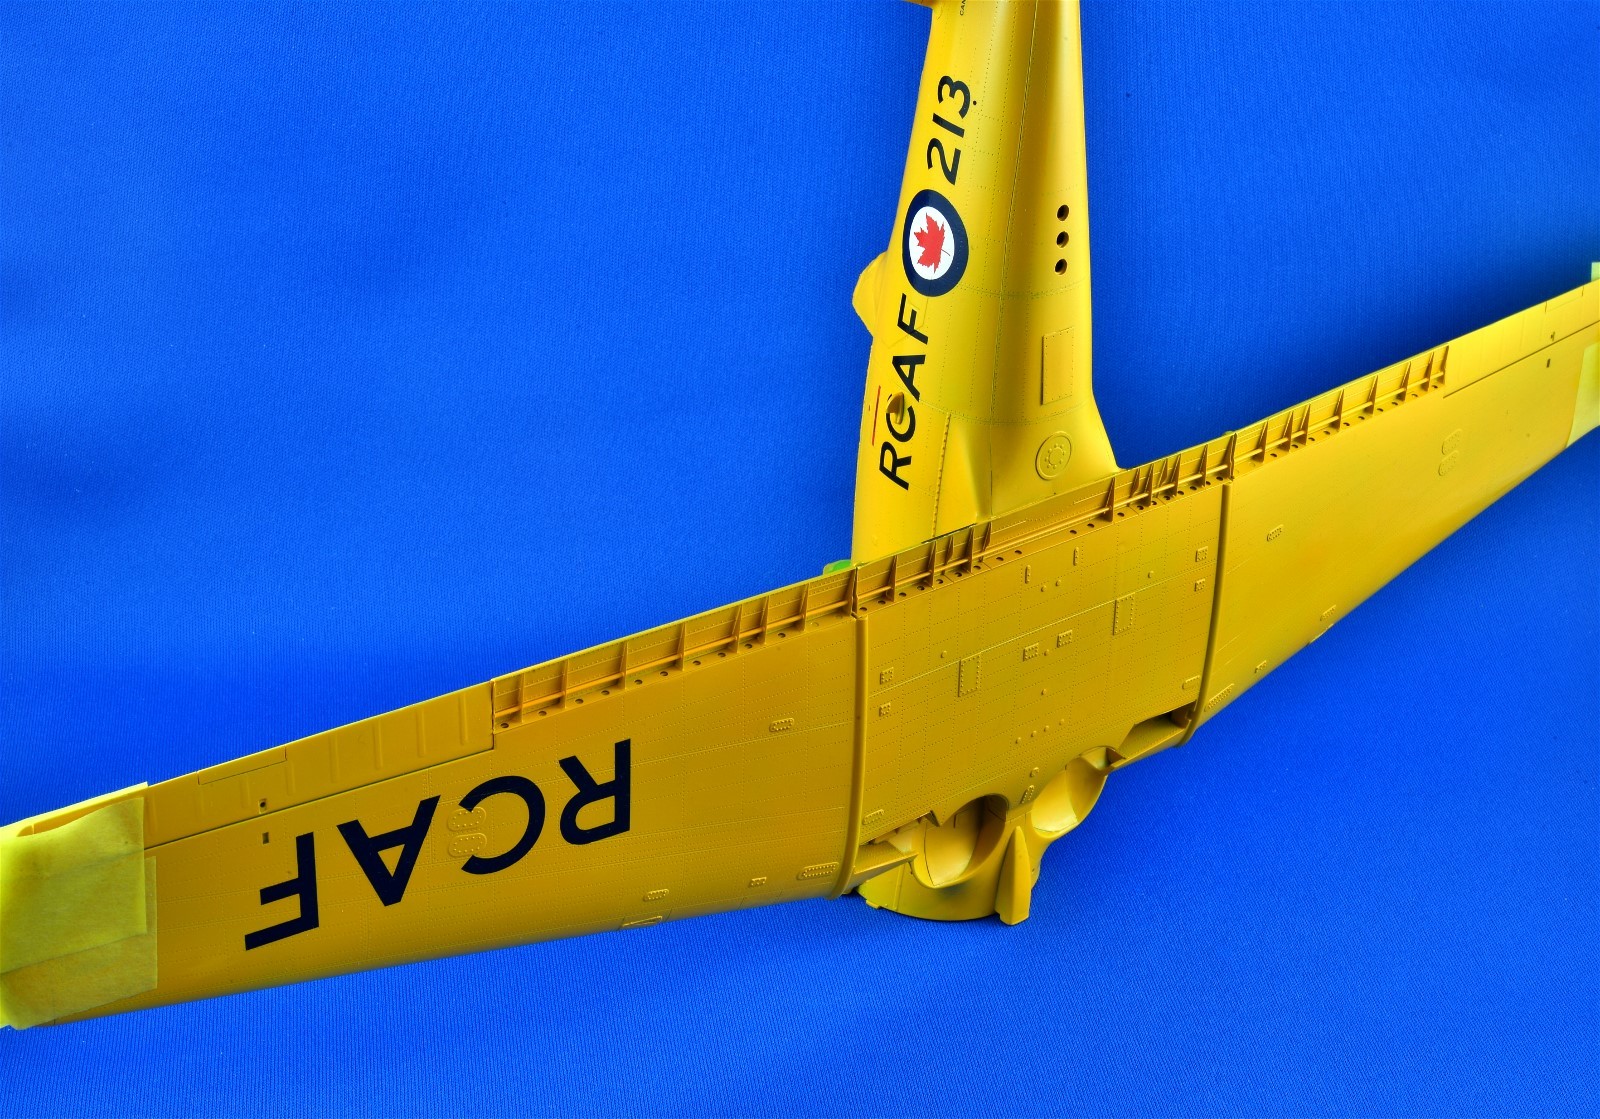
The Eduard set also has control arms for the rudder missing from the kit. The formation lights were added which should be red, amber and blue in a variety of positions according to references. Since the amber color would be lost against the yellow fuselage, I added a green one instead, just ‘cause.
If you have any questions, fire away.
Cheers,
Chuck
-
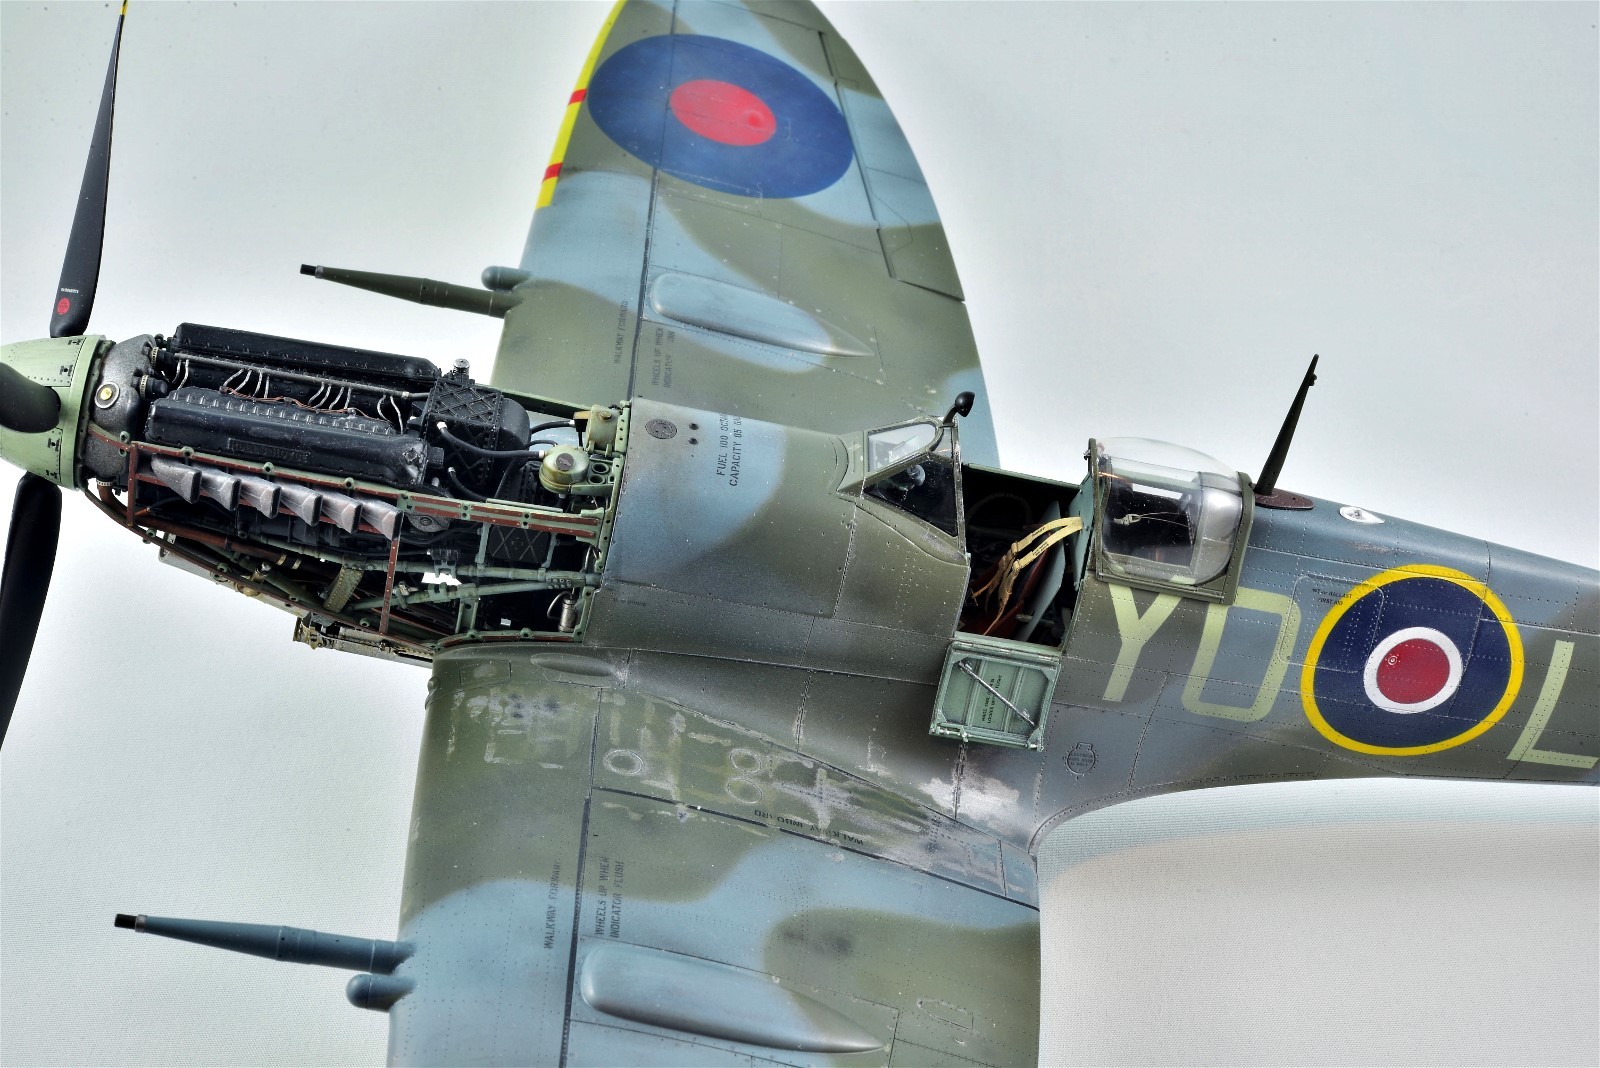
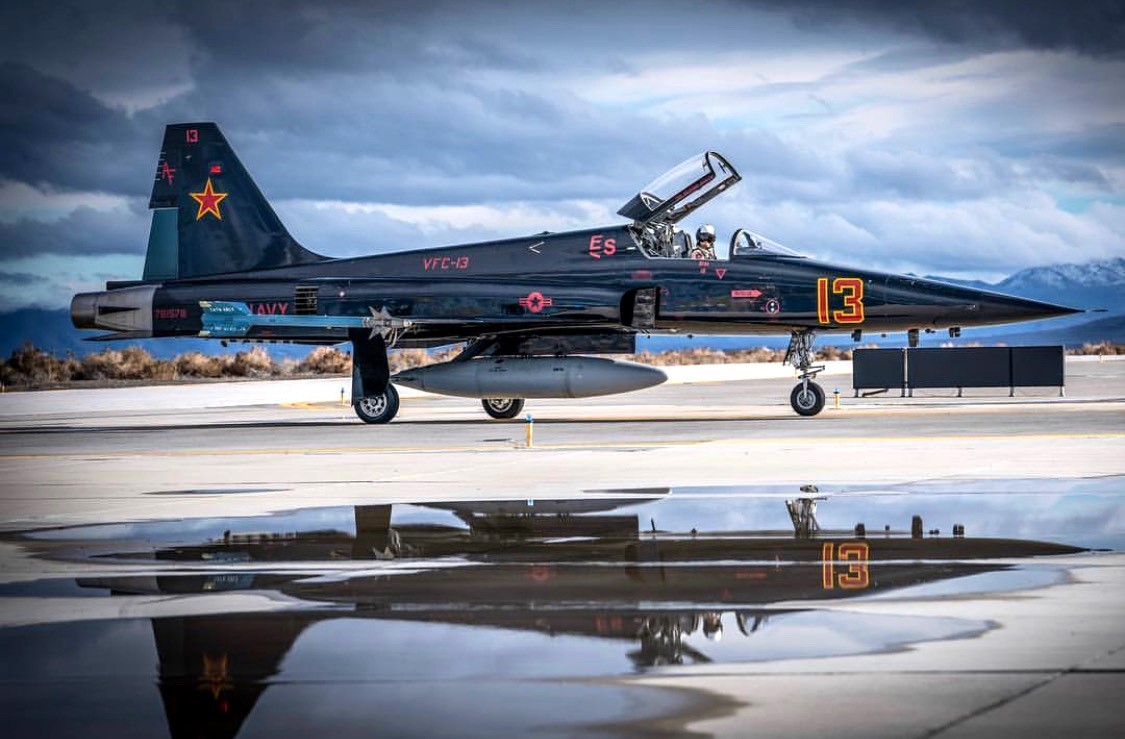
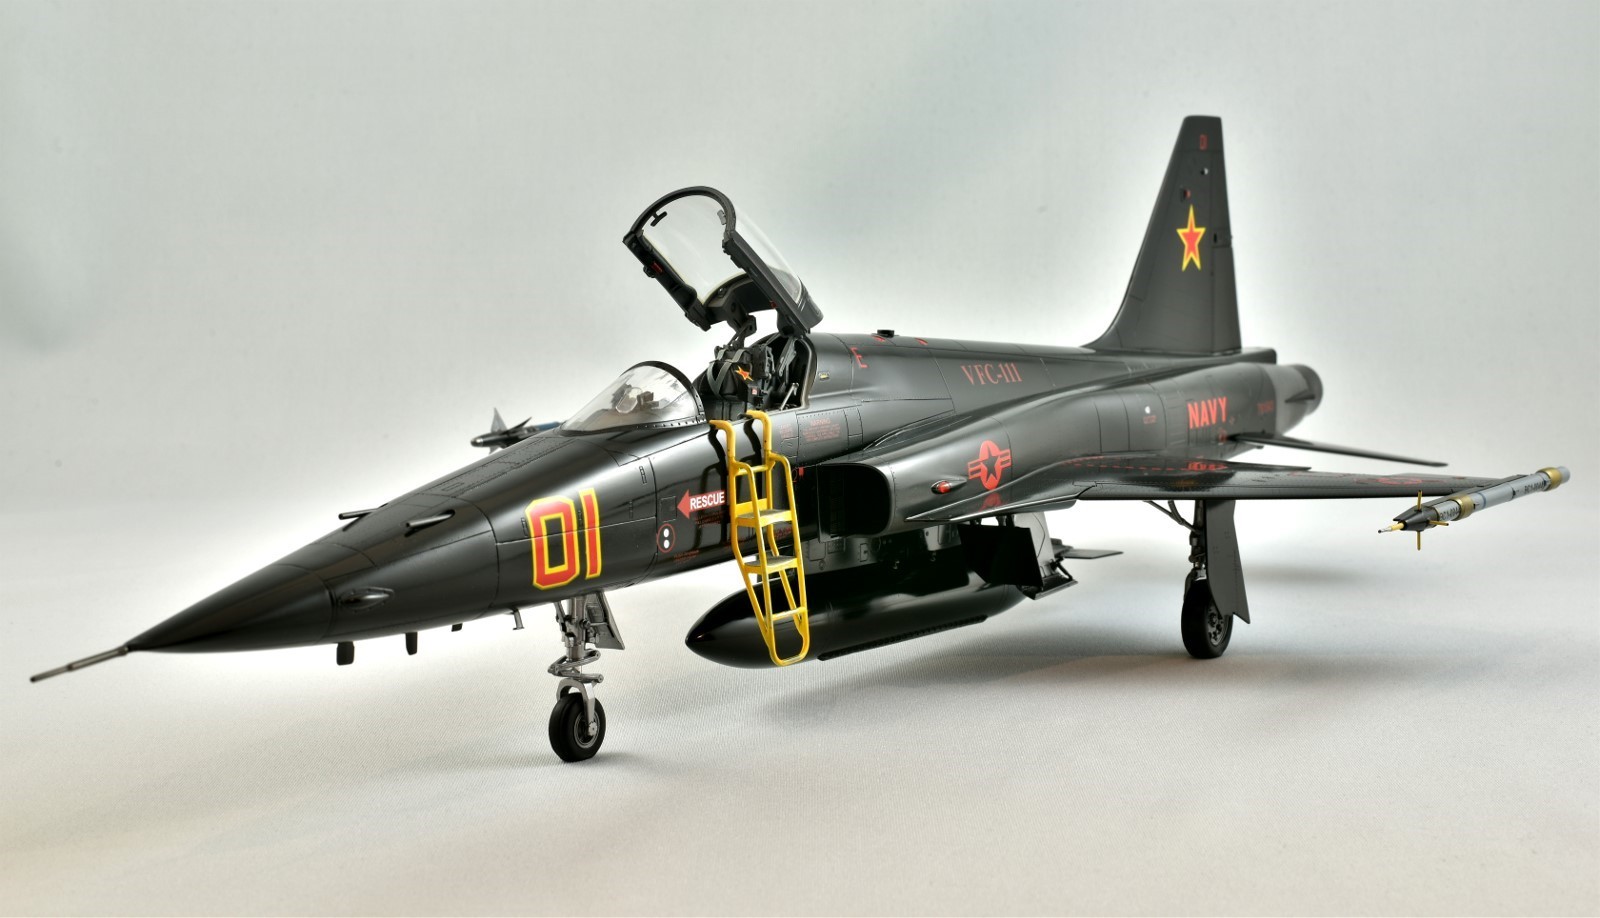
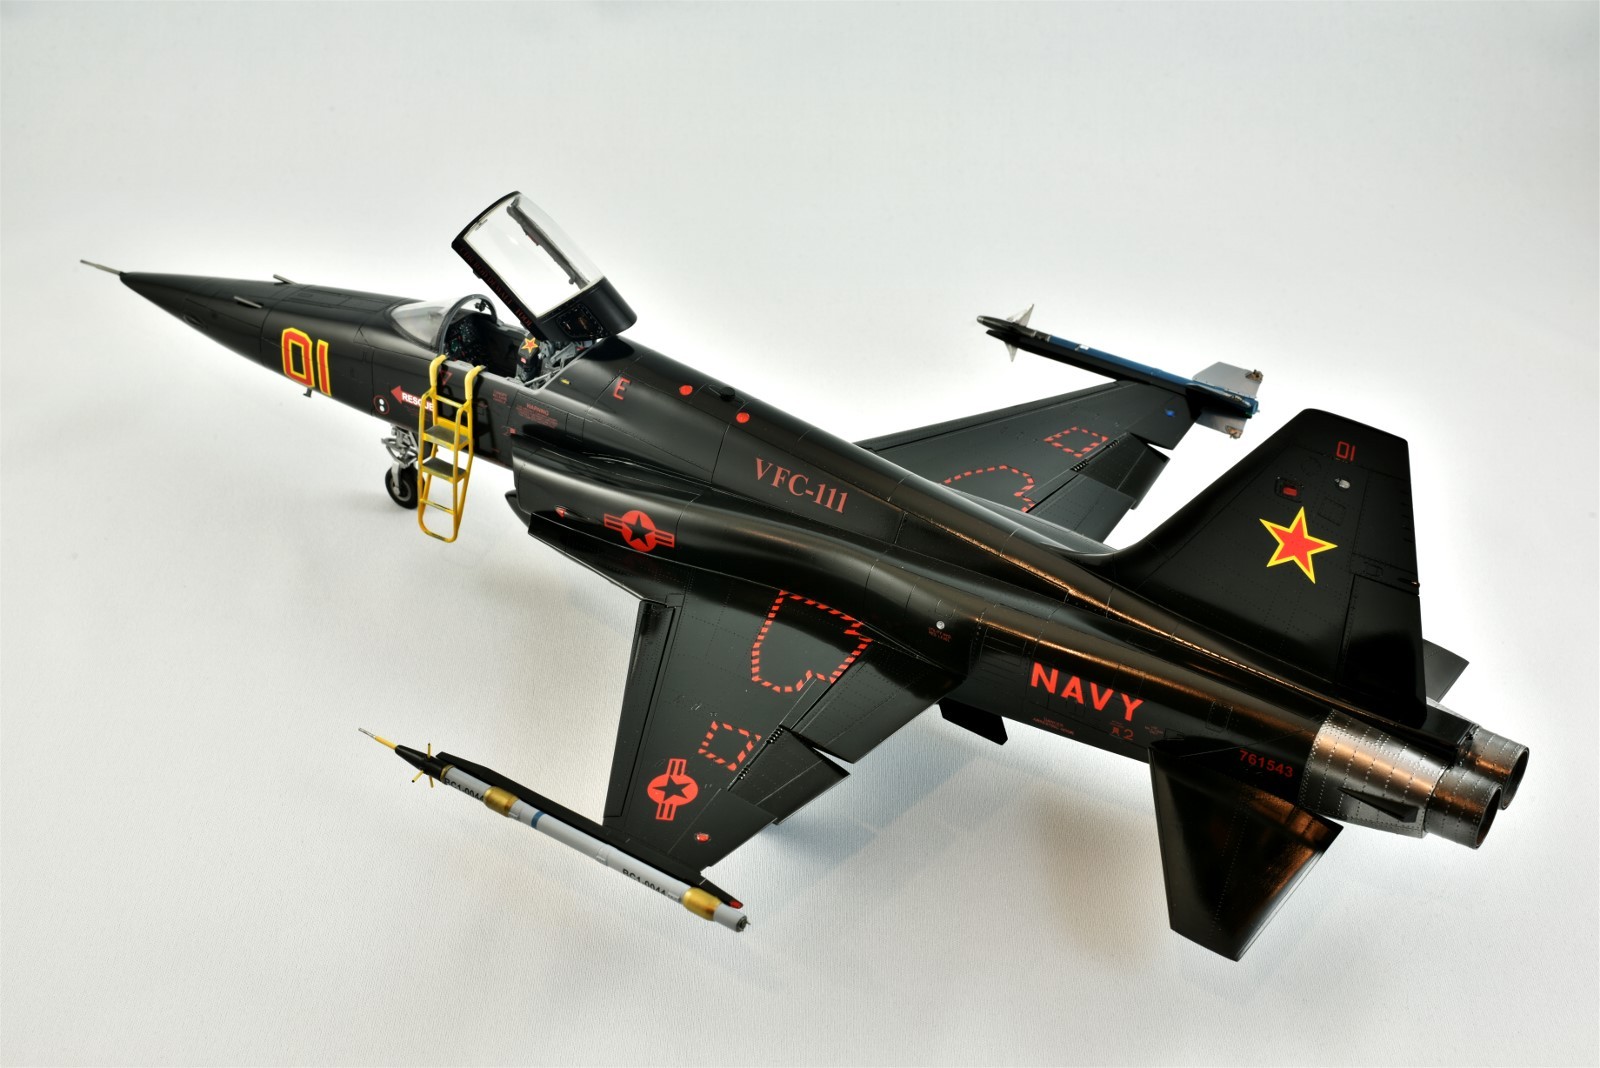
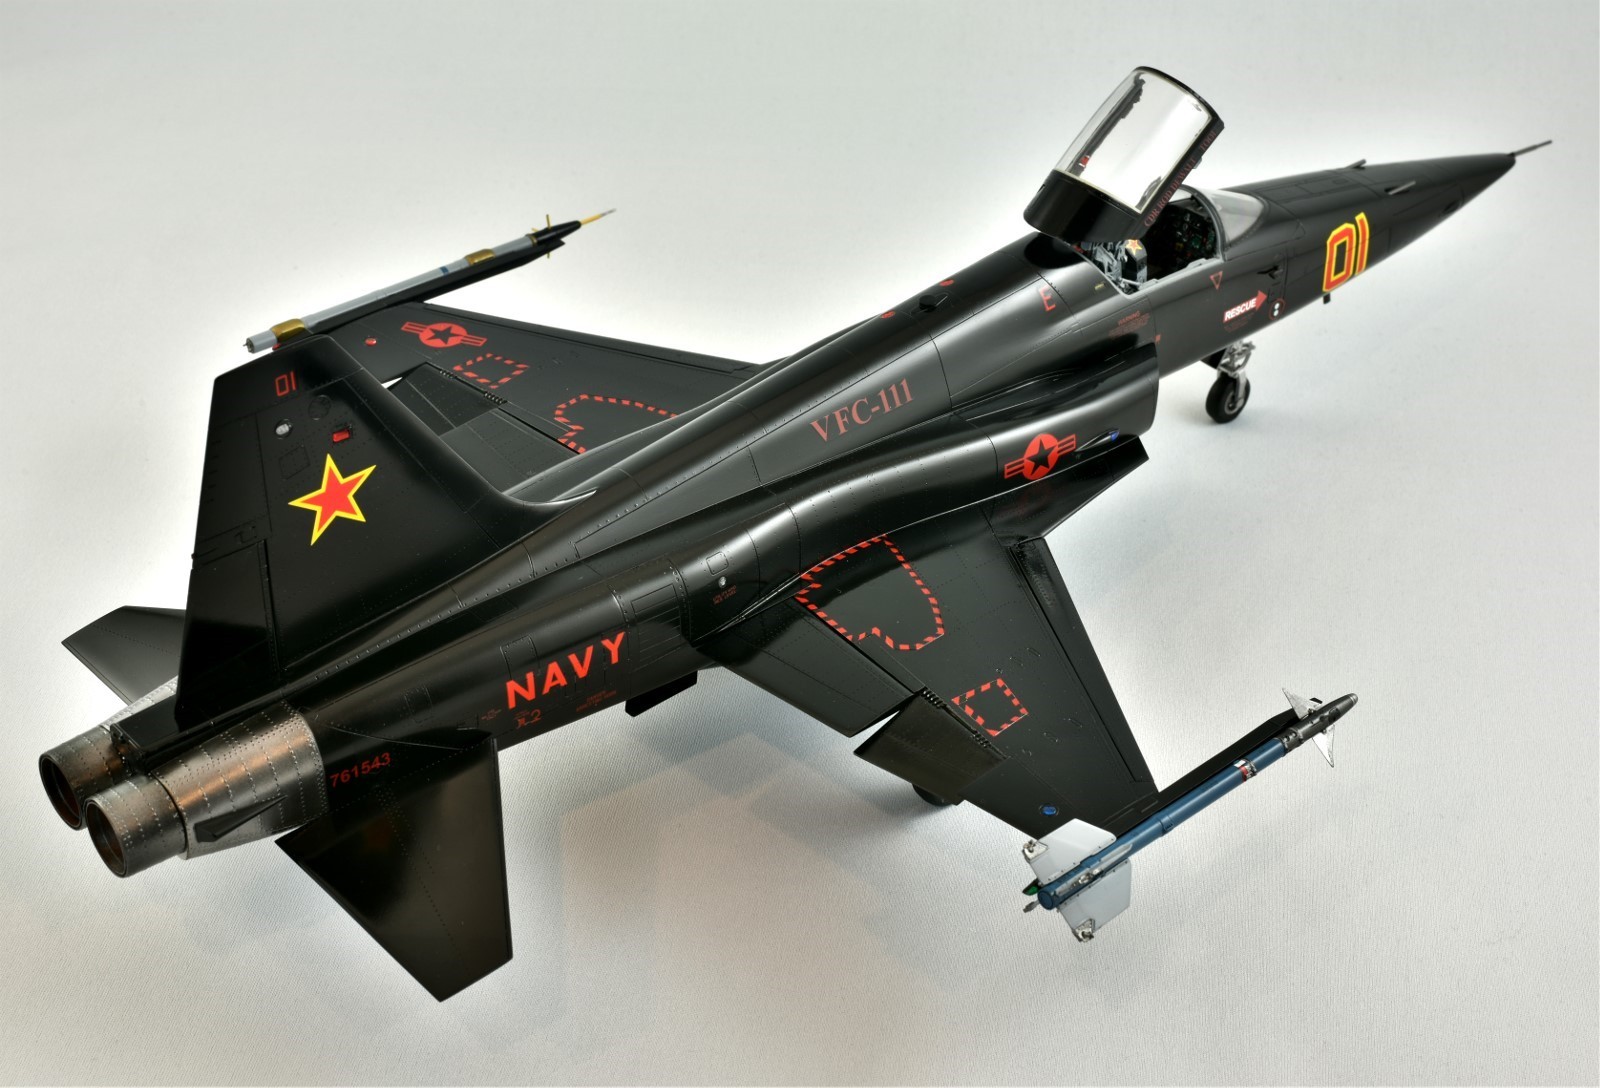
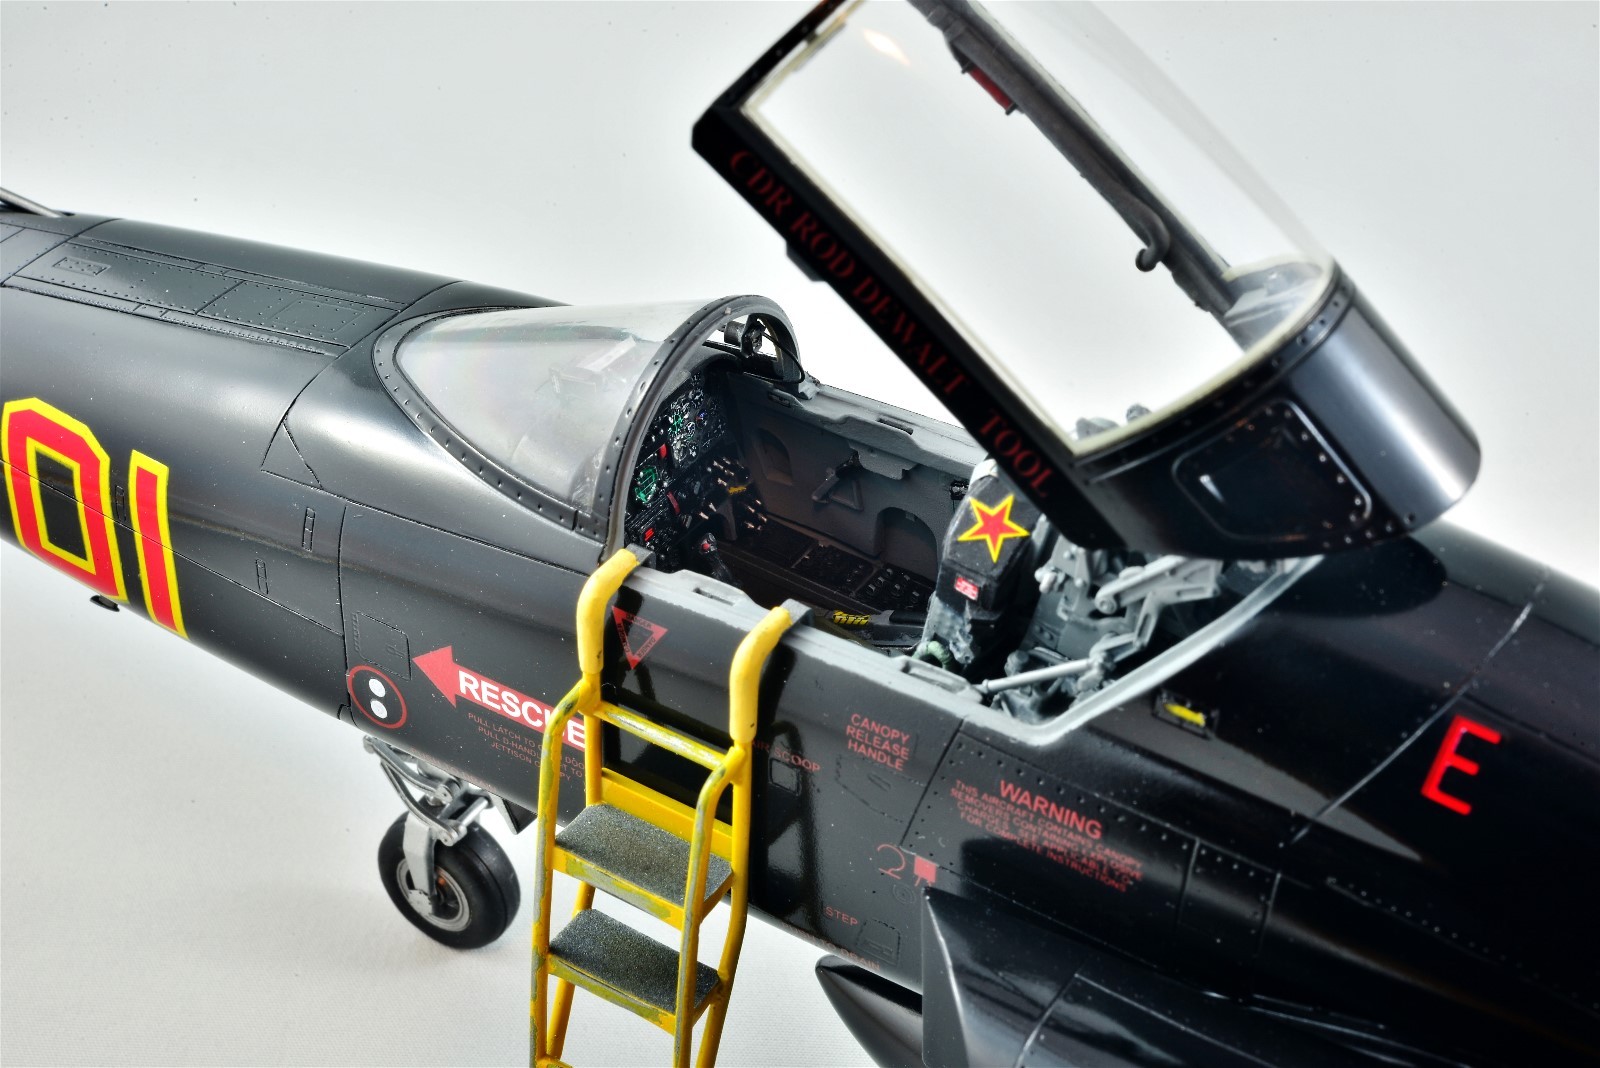
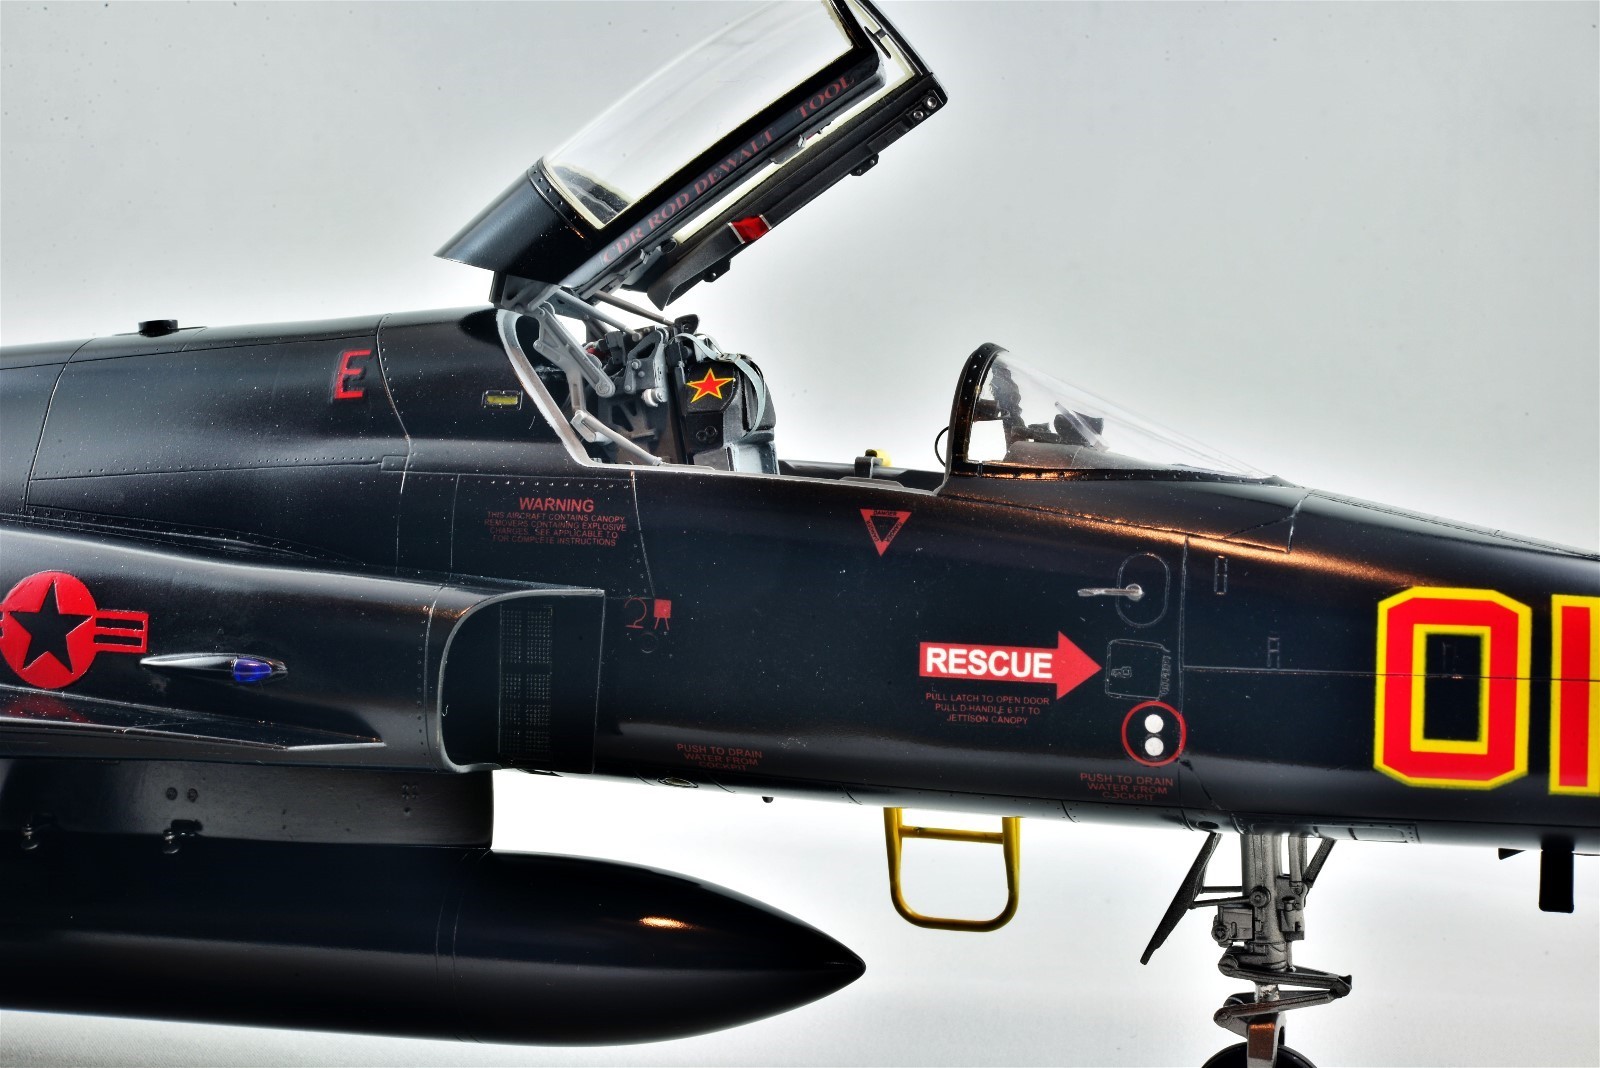
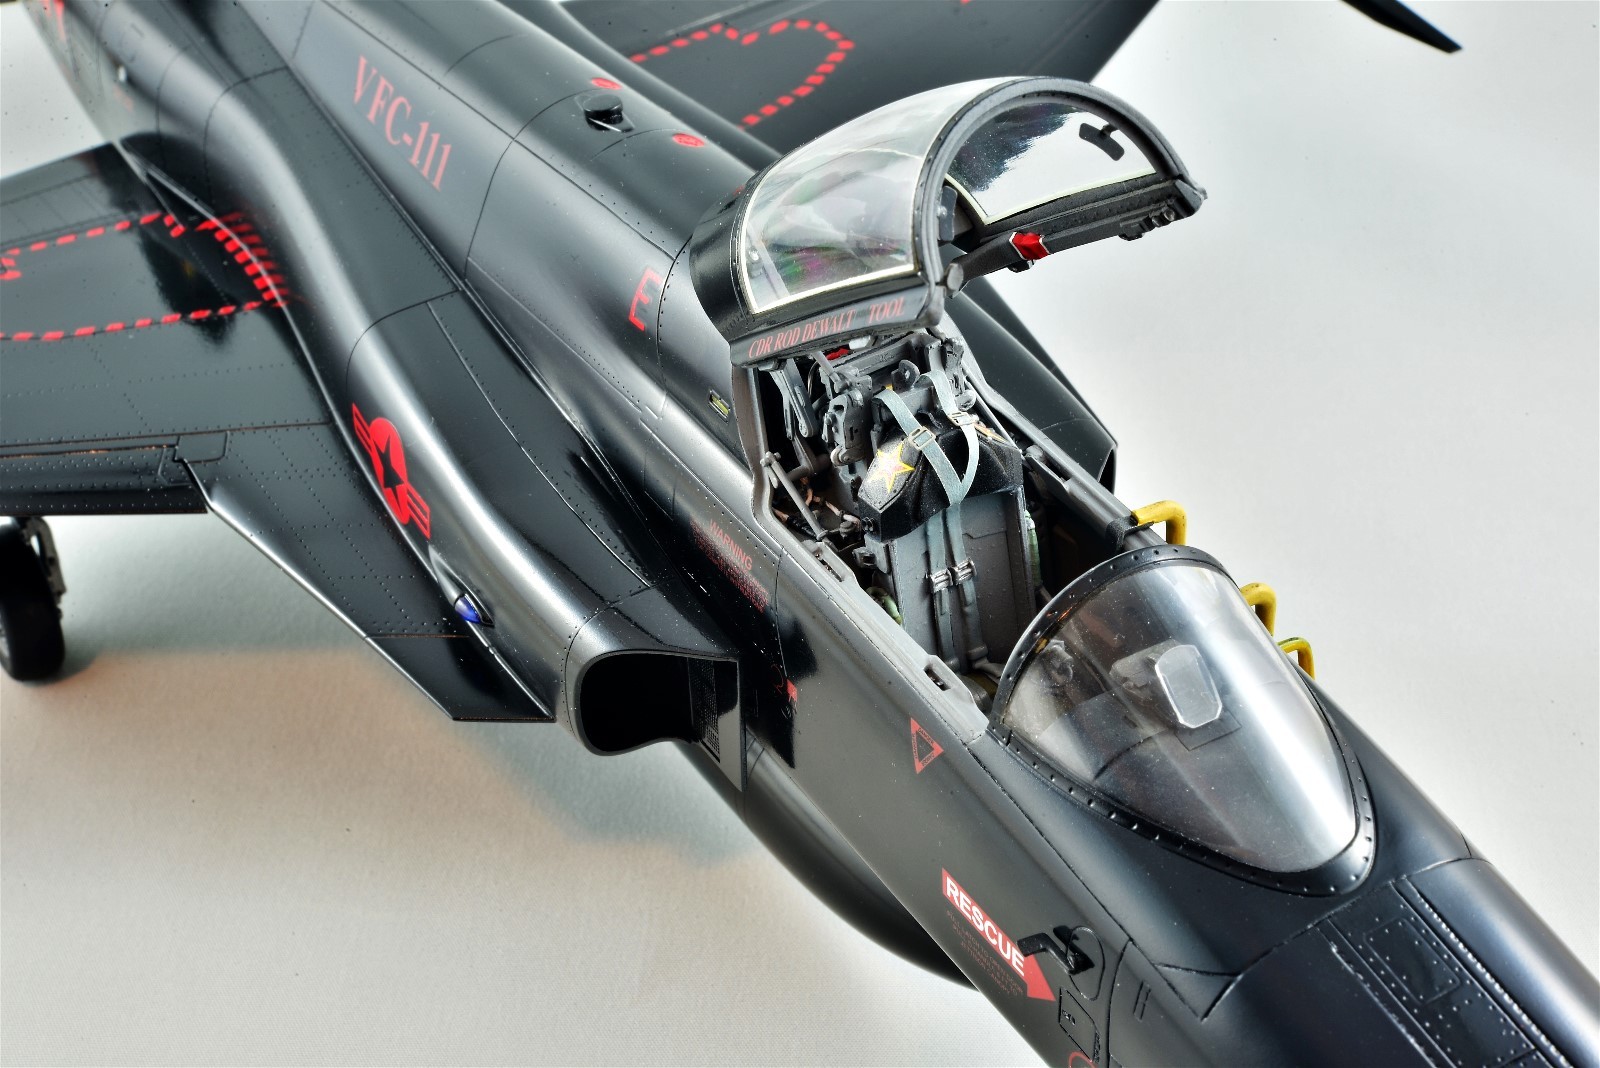
Thank you everyone for your kind and encouraging responses. As I do at the end of every build, I write a magazine article on what I’d did directly from my WIP thread, which is one of the major reasons I do them in the first place. Reviewing this build from start to finish confirms that this kit is a real challenge to just put together and even more so to correct many panel lines and other details. Still, I’m pretty happy with the end result, which could never have been done with the old Hasegawa kit, so we modellers should be happy that this kit exists at all as a good platform to create a decent 1/32 F-5E. What we now need is a good resin cockpit, because the Black Box one that I used is super rare and almost impossible to find.
The gloss black finish is another big challenge and although I’m also happy with how it turned out, I’ll never do another one. As expected, the glossy finish picks up any crap that might be in the air due to static electricity, which forced me to sand down and repaint several areas many, many times. Even after dusting off the model the best I could, you can still see bits of dust everywhere in my close-up pics above, so that will never go away. The other major shortcoming of this color on this model is the total lack of available red decals, as I described above. Even after making do with an assortment of decals and painting some with masks, I’m missing a few that should be there, like the big “AF” at the top of the tail. I suppose I could have found a way to paint those too, but there comes a time when you just don’t care anymore and need to move on to another project. As mentioned in my WIP thread, my next challenge will be another Kitty Hawk kit, in this case the T-6 Texan that I will modify slightly to a Canadian Harvard. After building nothing but iconic fighters for so many years (F-4, F-14 and F-18 twice), I need a new challenge with glossy yellow wings, where the dust should be less noticeable.
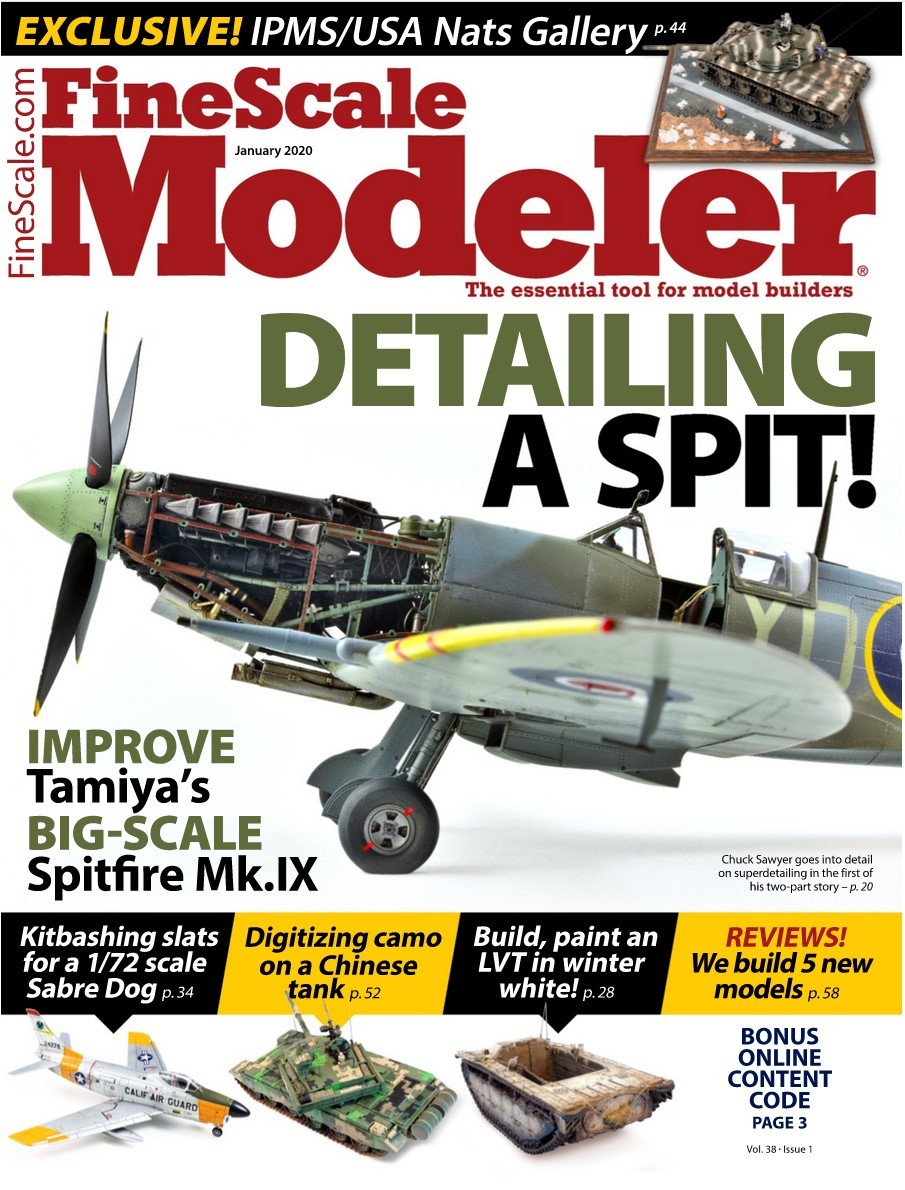
BTW, my Spitfire will be featured in the January and February Fine Scale Modeller magazine (2 parter), while my Eagle will be on the cover of a new FSM book on Modeling Aircraft, also in February. I’m really looking forward to see how these articles turned out!
Cheers,
Chuck
-
Thanks Guys!
32 minutes ago, dsahling said:Beautiful plane Chuck, very nicely done. Now apologies if this has been asked already, but what are you thinking of doing for your next project?
Dan
Thanks Dan,
Although a struggle at times, the models I am most proud of are the difficult ones, like my Trumpeter A-10, P38, and now this Kitty Hawk kit. That’s also why you don’t see them very often!
Since I always alternate between jets and props, my next challenge will be this one, slightly modified into a Canadian Harvard in yellow. This will be my first non-combat model ever, although it is obviously associated with same in its training role. I have already ordered a few after market kits and it’s my plan to super detail it.
Cheers,
Chuck
-
Thank you everyone!
18 minutes ago, Bravosierra001 said:I am not really into clean builds... But that is an awesome build. That has to be one of the smoothest finishes I have seen. Great job all the way around.
Brandon
Generally speaking me neither. Having said that, this bird needed to be kept clean, as shown below.

Thanks,
Chuck
-
DONE!
I have posted pics of the finished model in the Display Case Forum here:
1/32 Kitty Hawk F-5E/N: "Kicked Up a Notch"
Thank you everyone for your continued interest in this build. I really appreciate your comments and feedback over the past 9 months.
Cheers,
Chuck
-
-
-
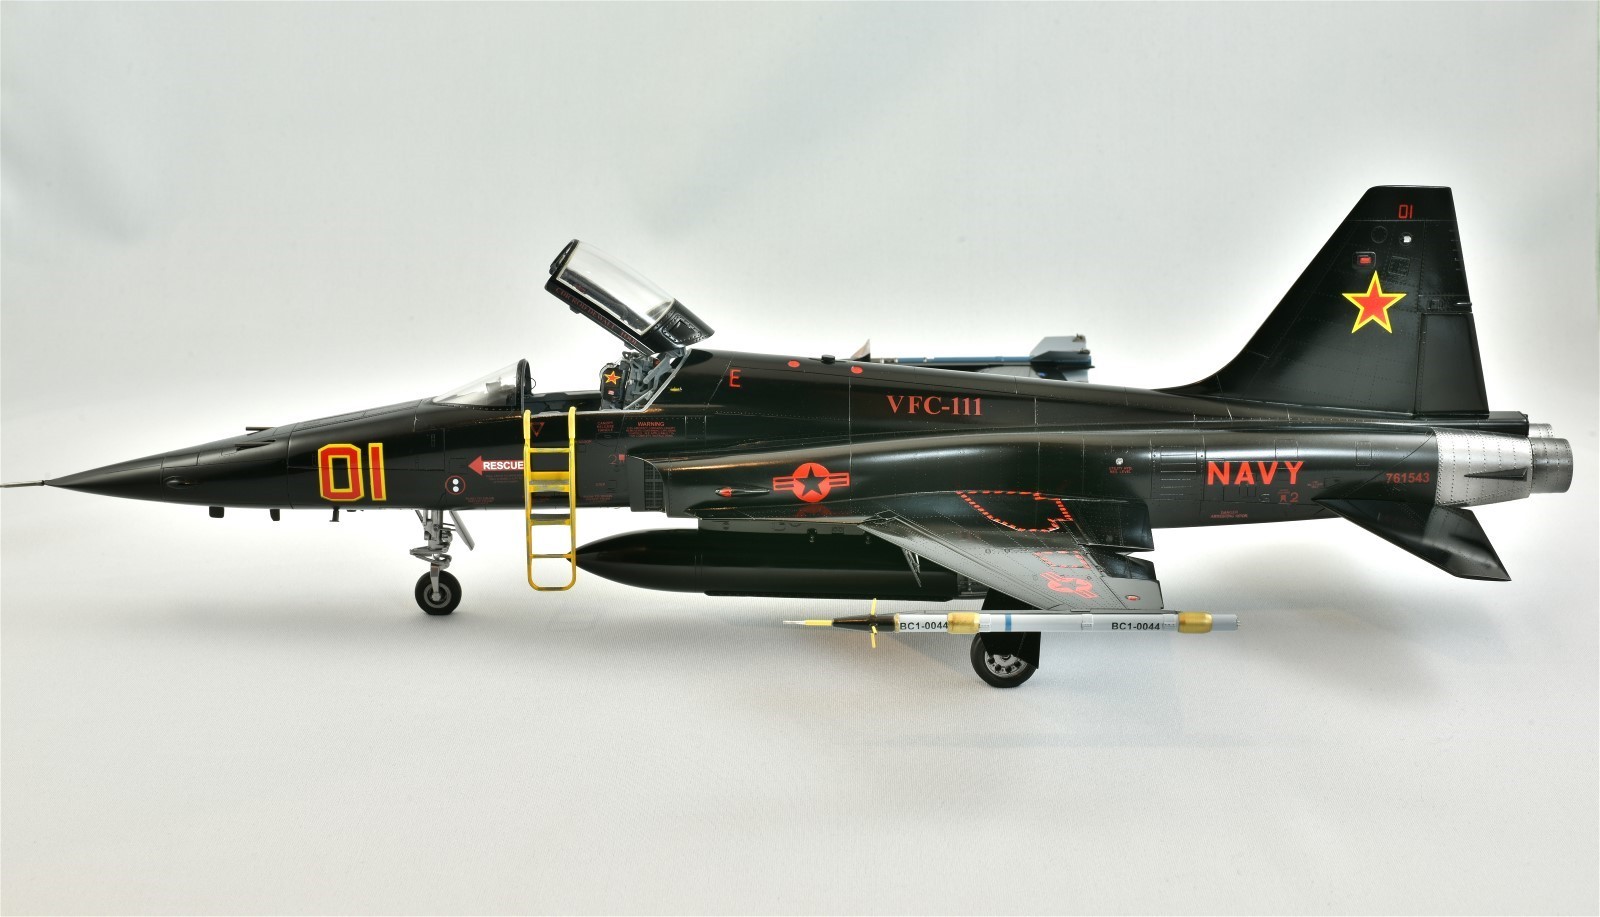
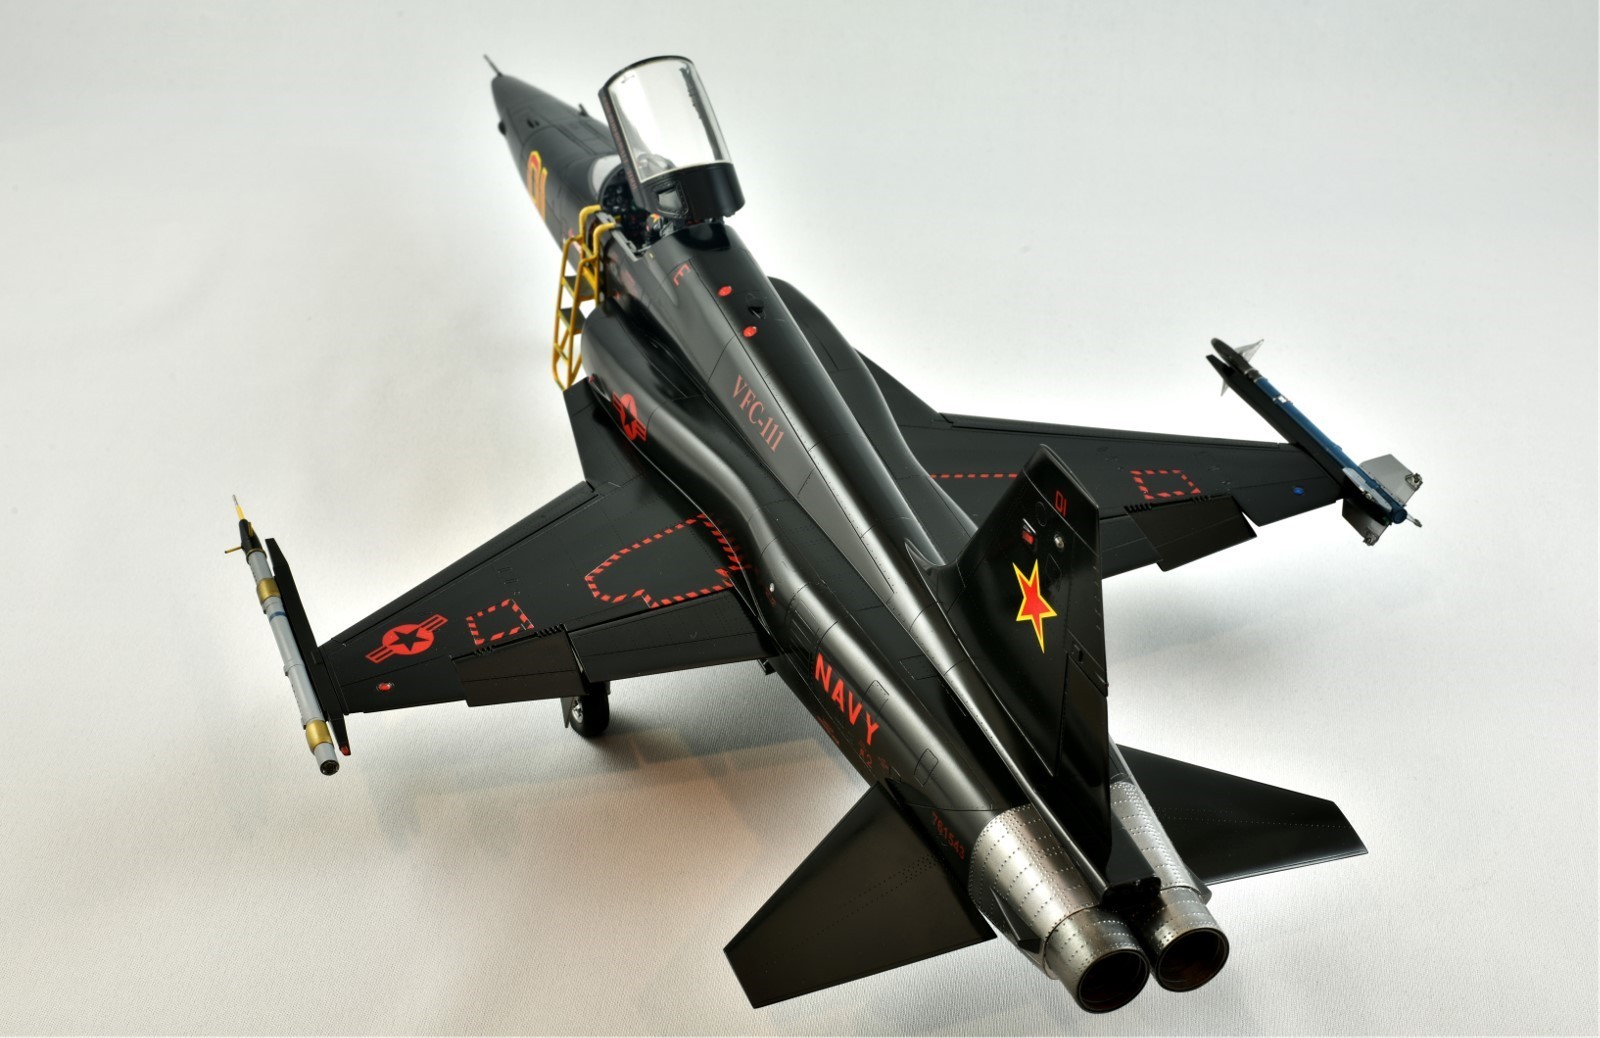
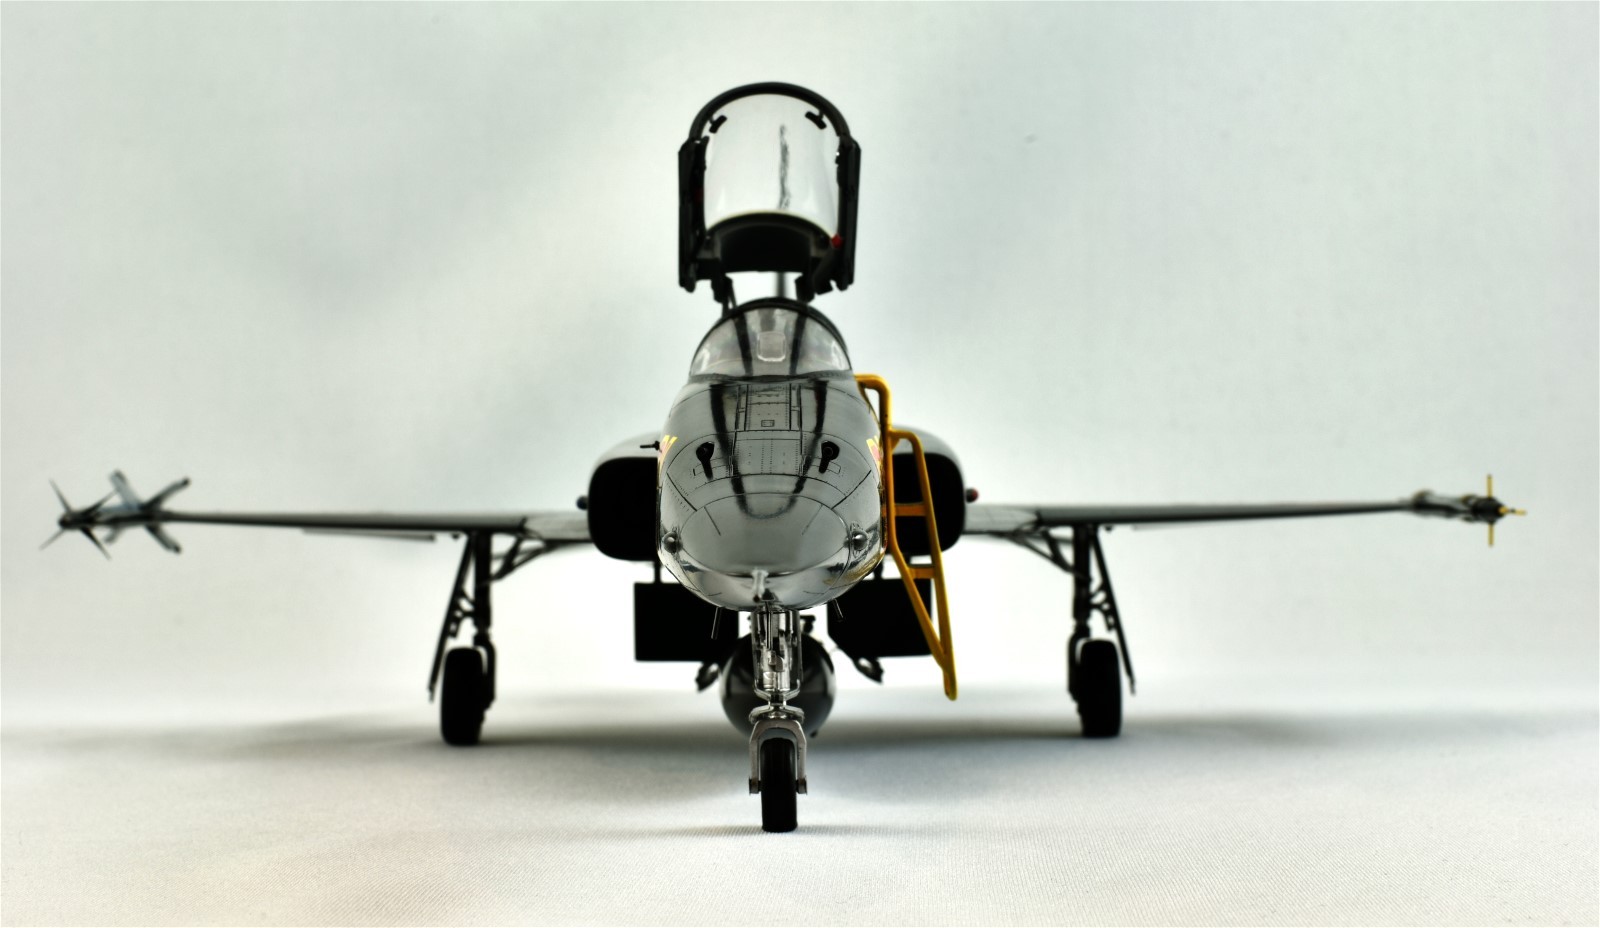
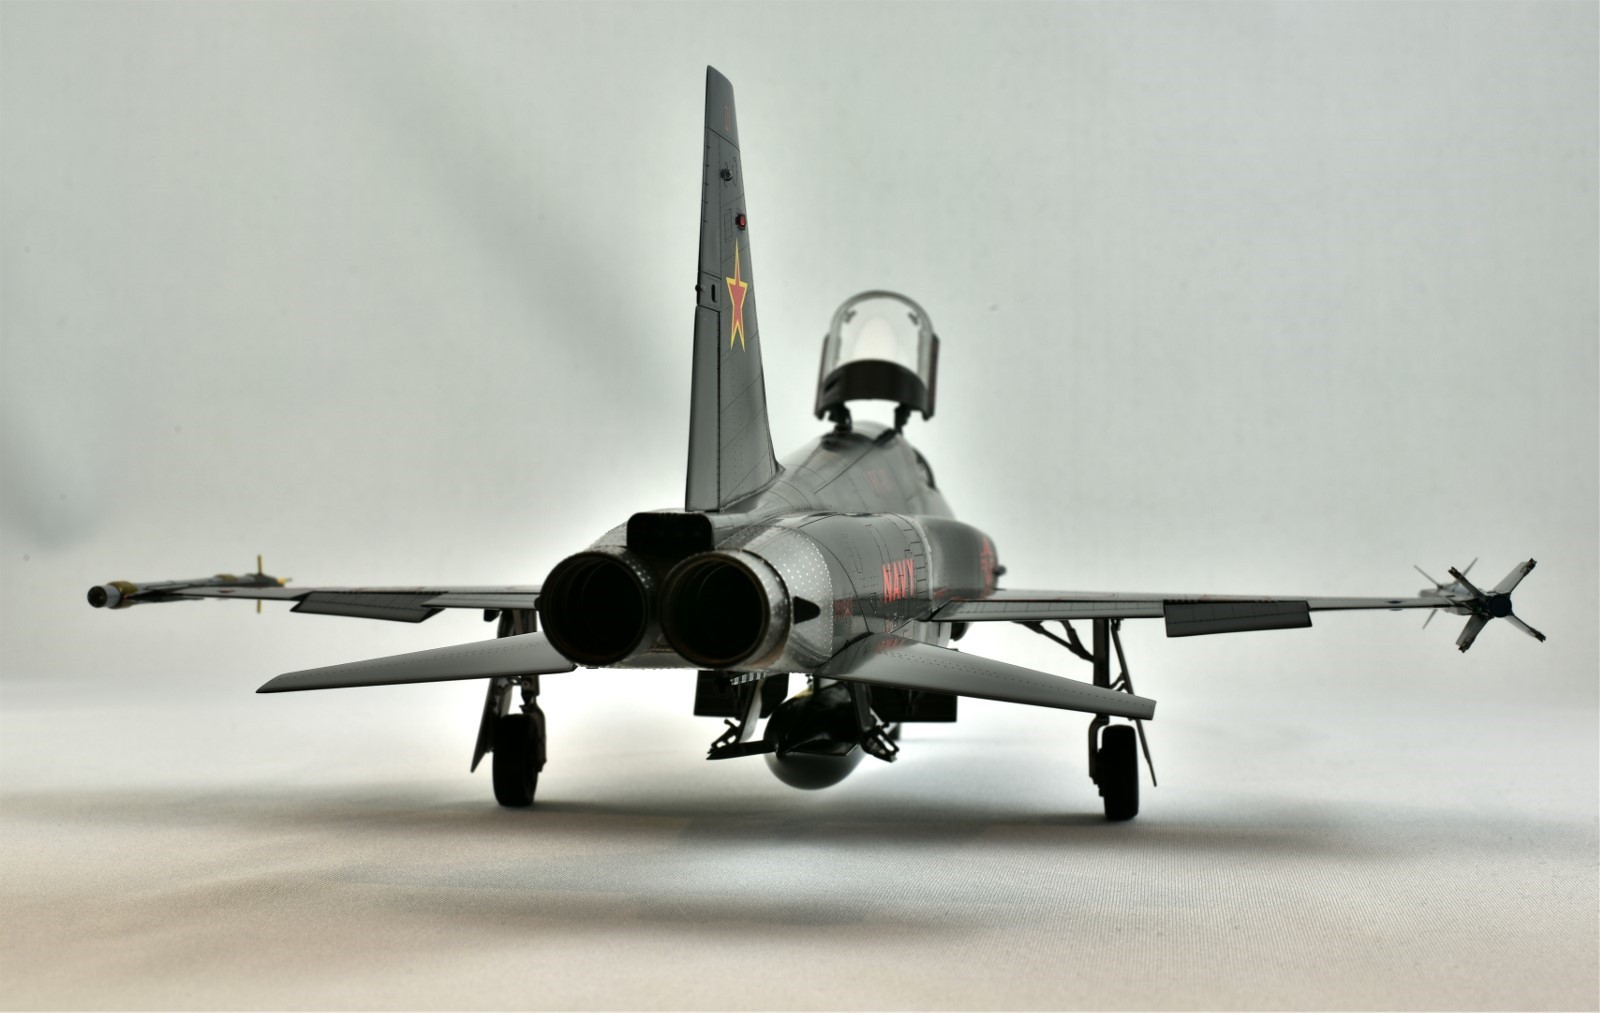
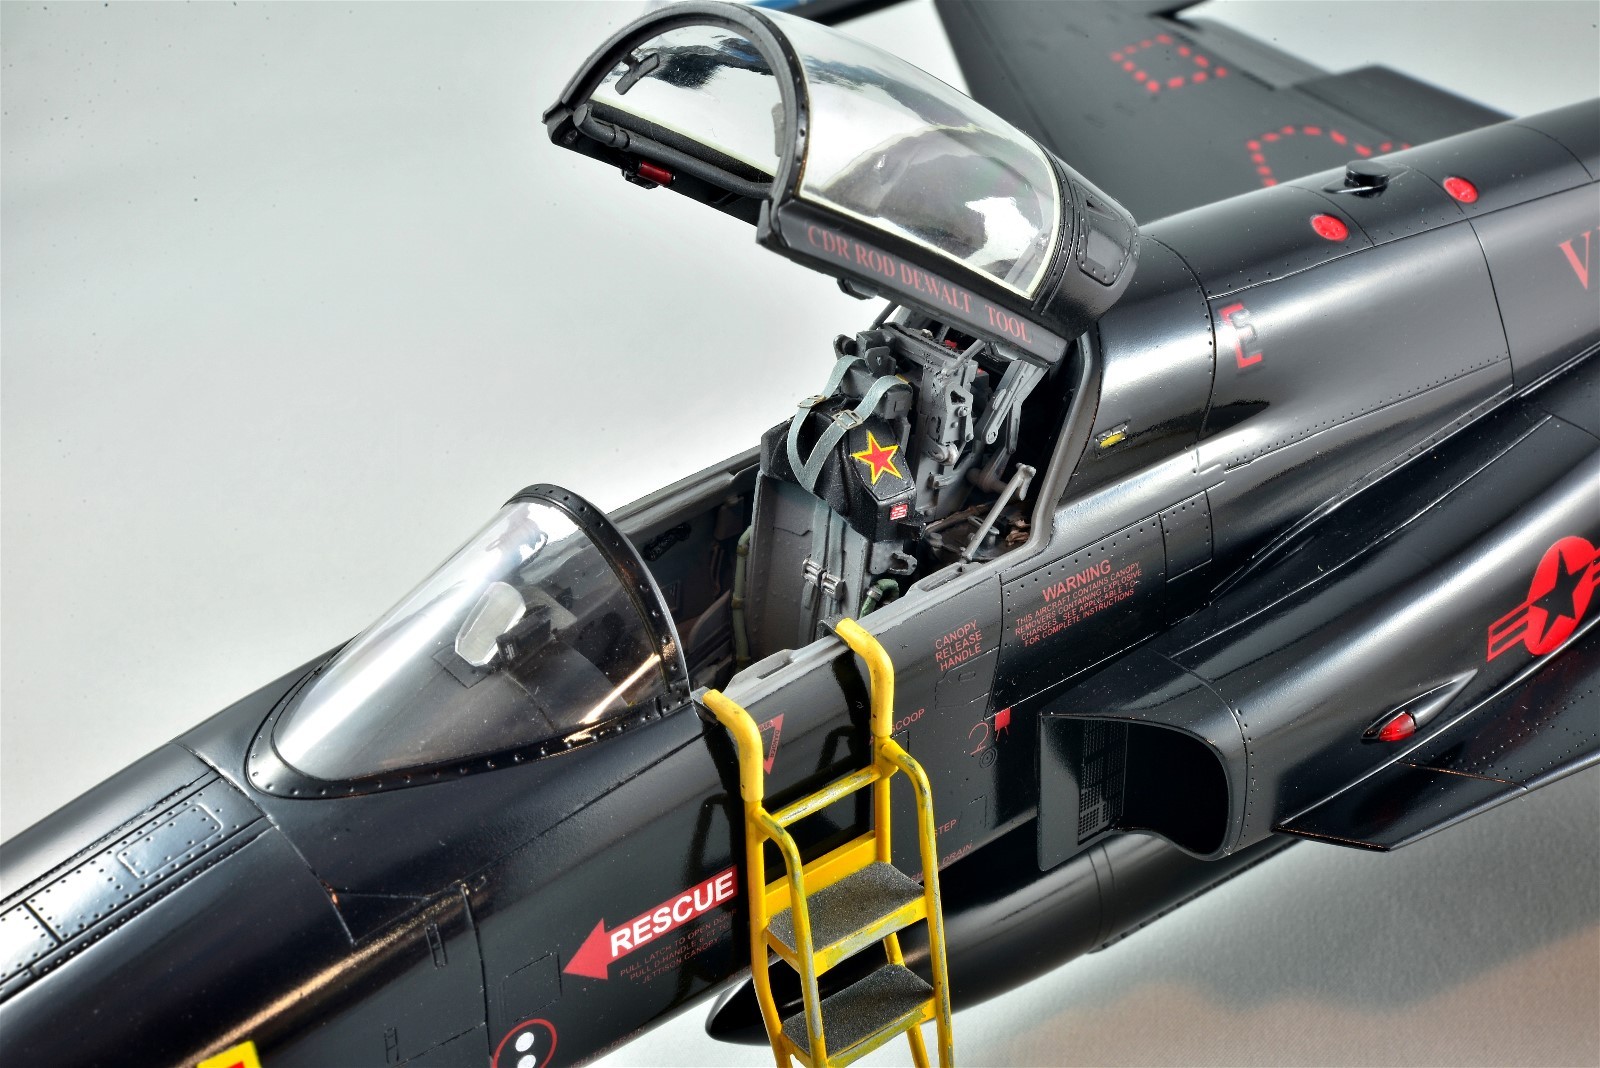
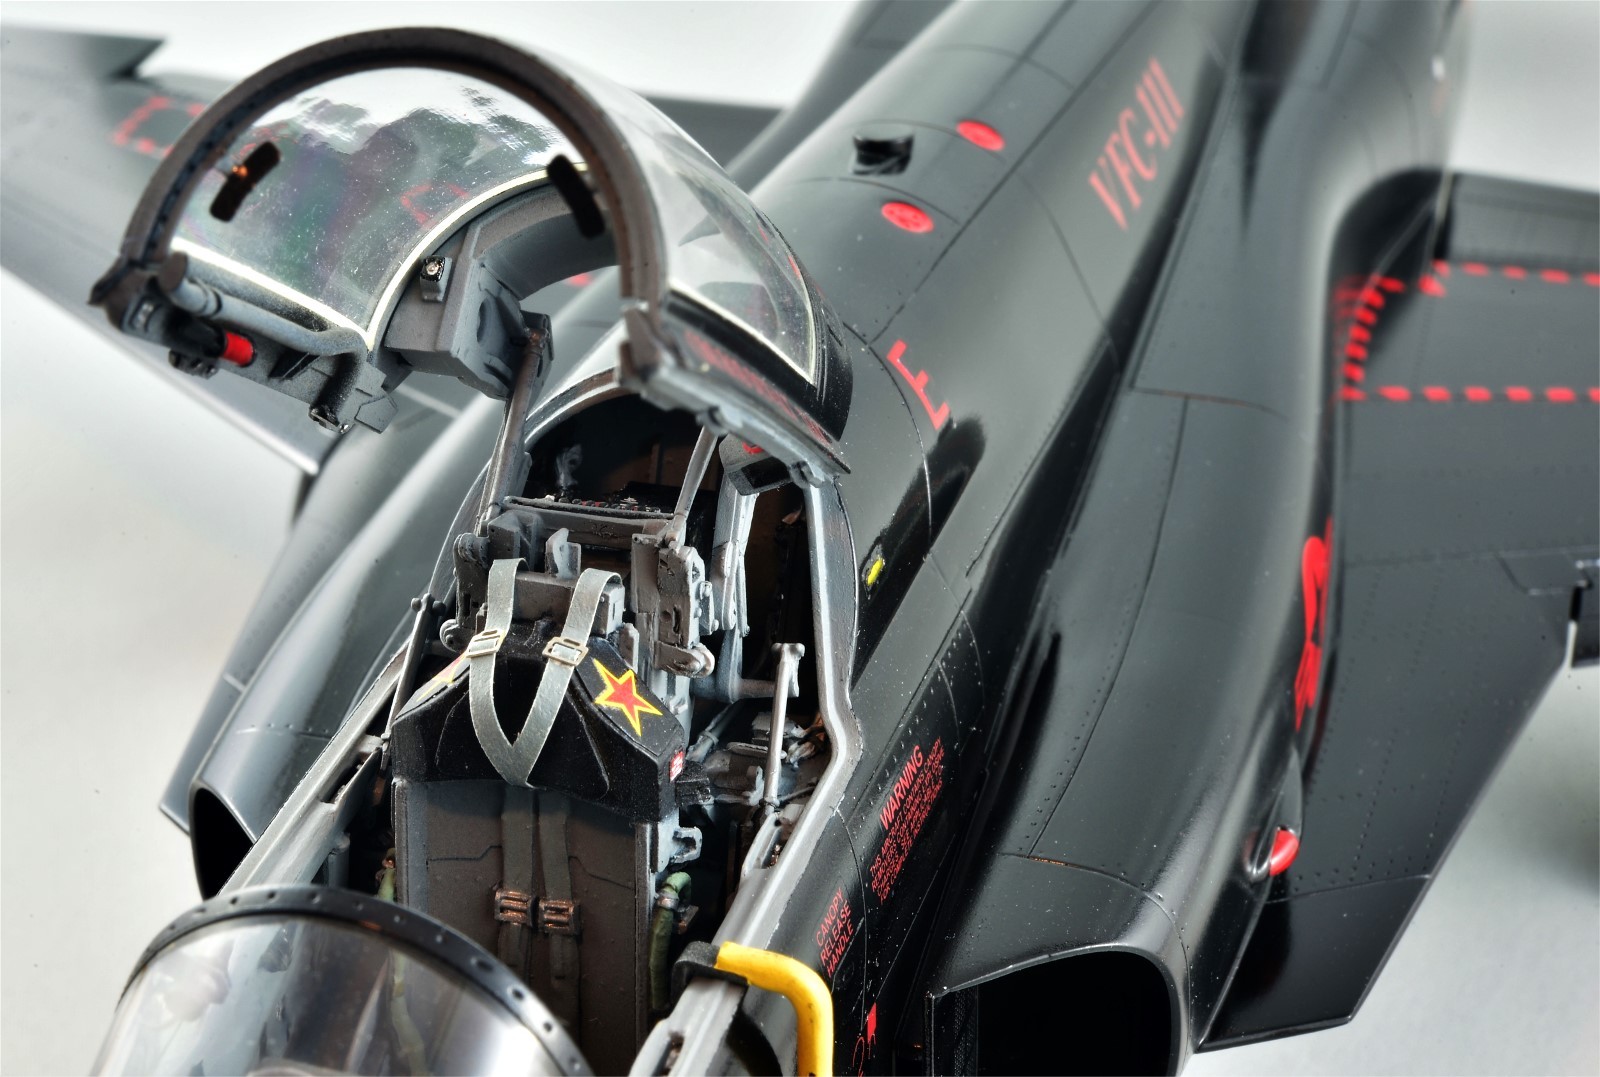
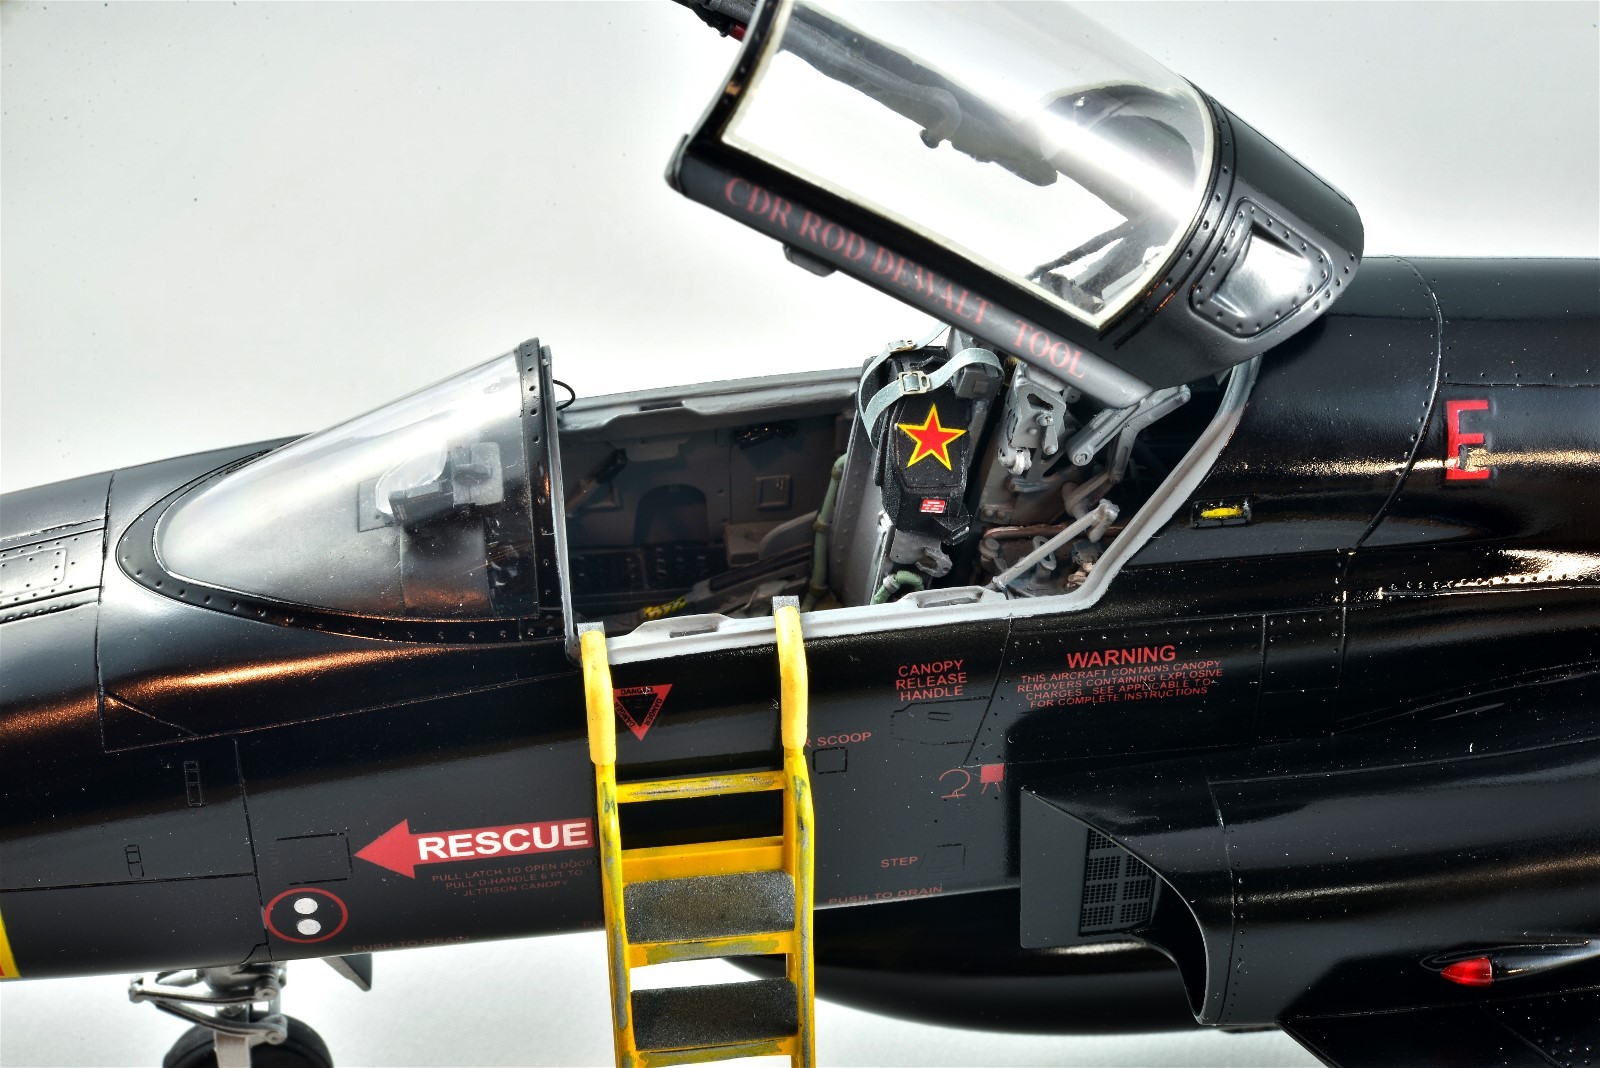
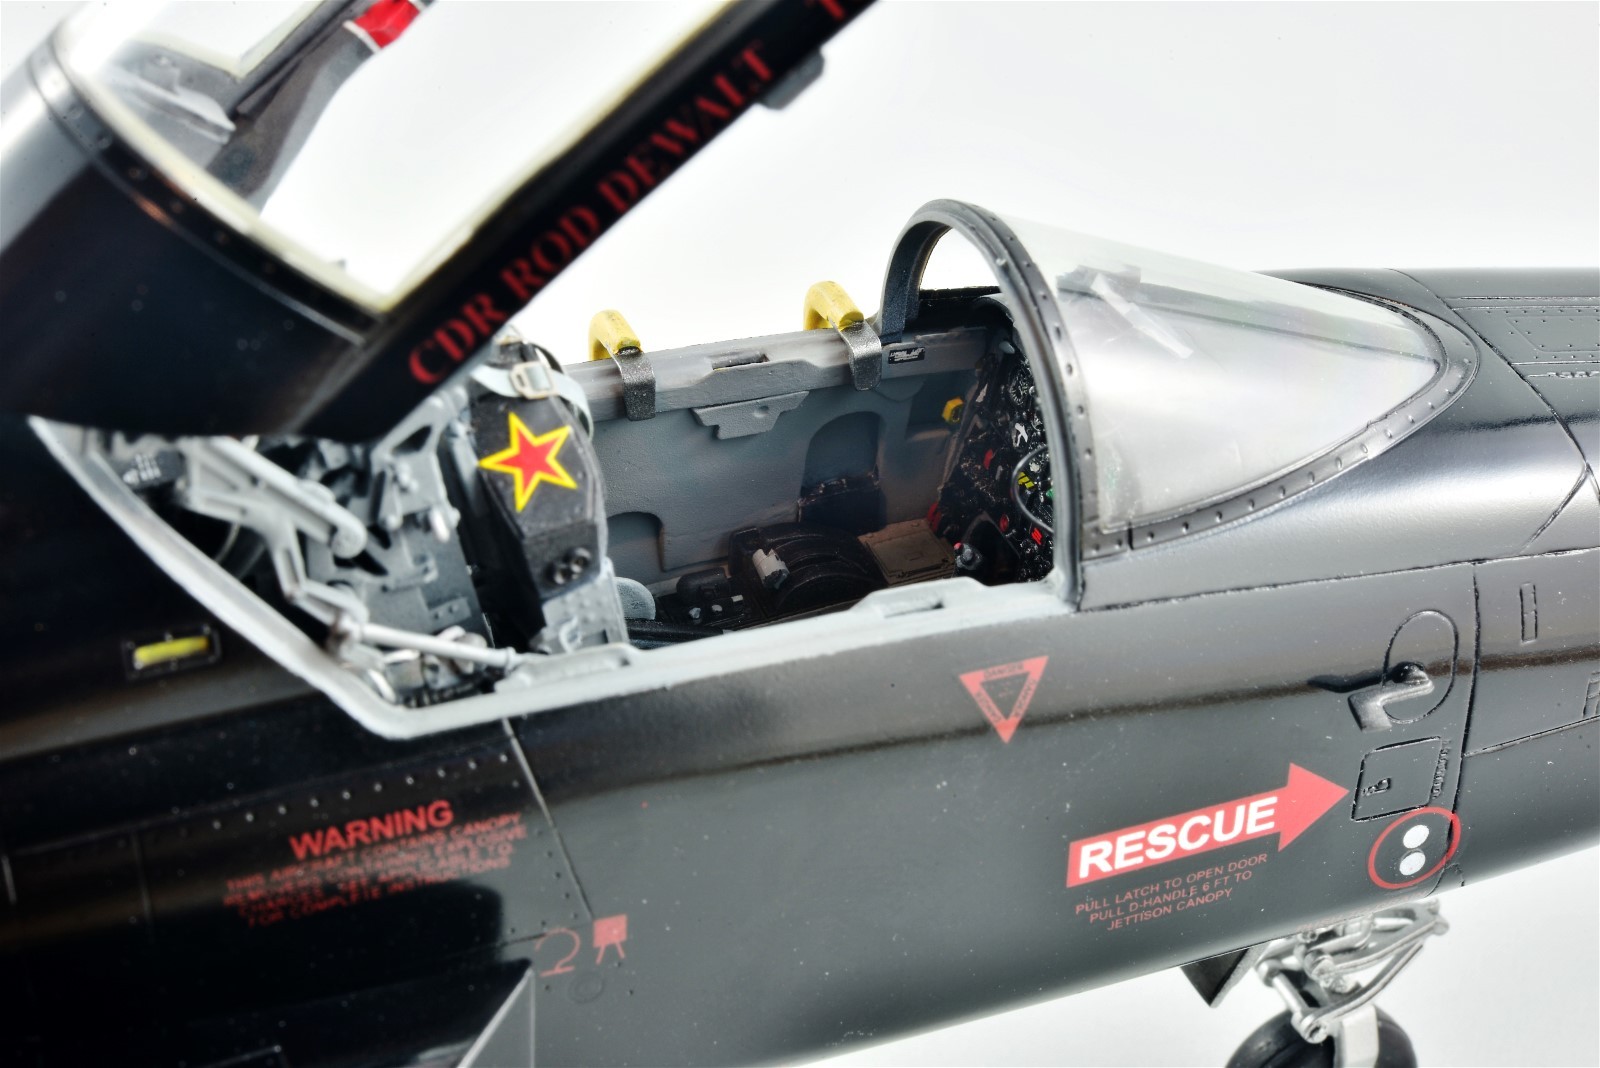
October 3/19
After “only” 9 months, which is a record for me, I have finally finished this model. For step by step details on how I did it, I have a fairly long build thread here:
This kit is a real challenge if you want to make it as accurate as possible, with a random mix of highly detailed parts and parts that don’t fit at all. There are inaccuracies all over the place which I tried to fix, with some panel lines deleted, others added, and every single panel line and rivet was rescribed and re-punched. After market kits used were mostly made for the Hasegawa kit as follows:
- Black Box Resin Cockpit Set (32010) for Hasegawa
- Eduard PE Exterior Set (32426) for Kitty Hawk
- ProfiModeler Brass Pitot Tube (32266) for Hasegawa
- ProfiModeler Resin Wheel Set (320273) for Hasegawa
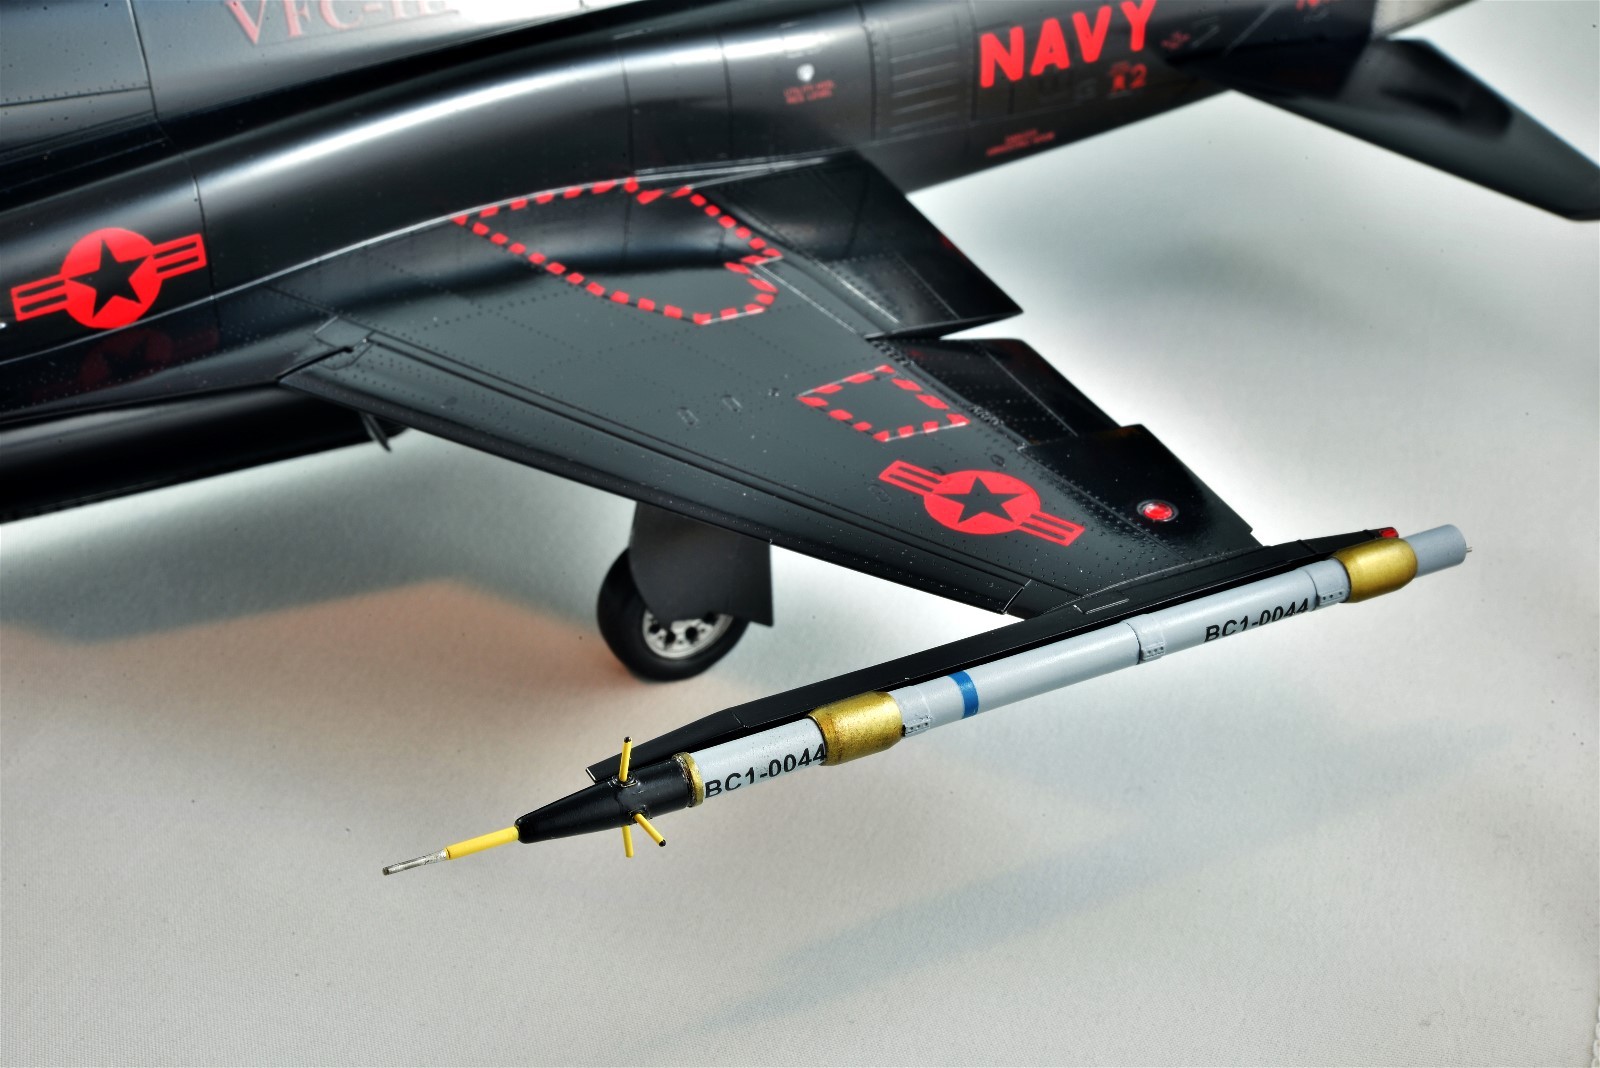
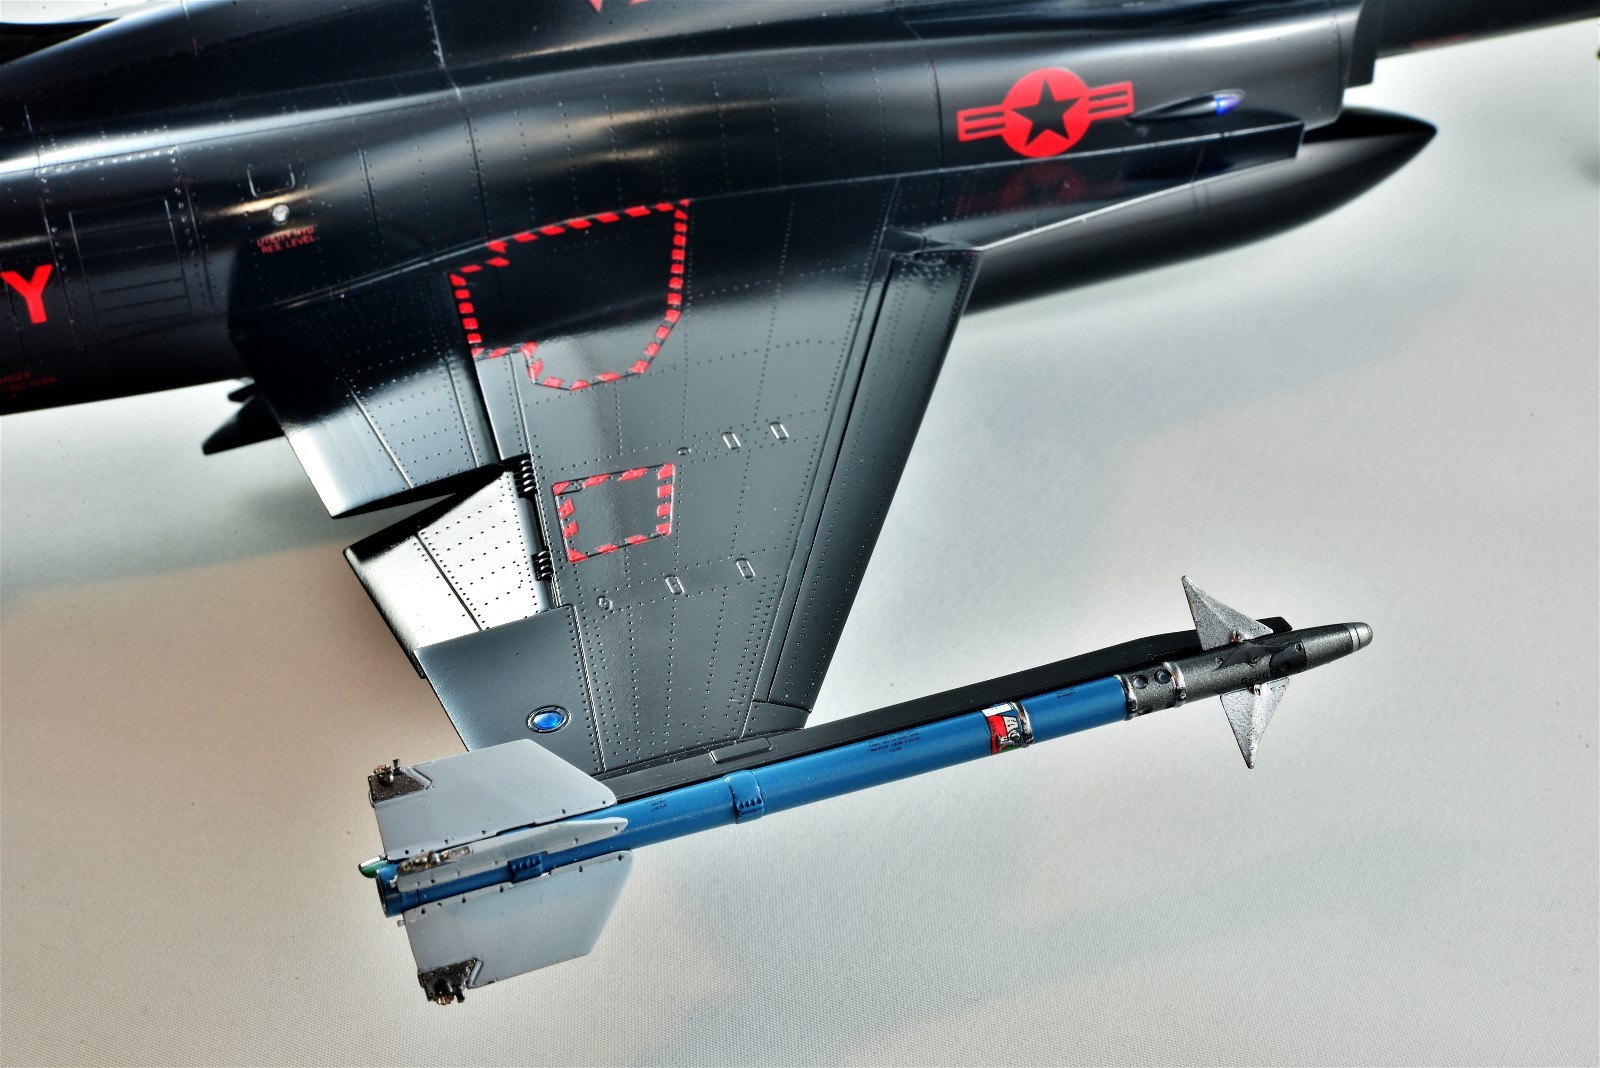
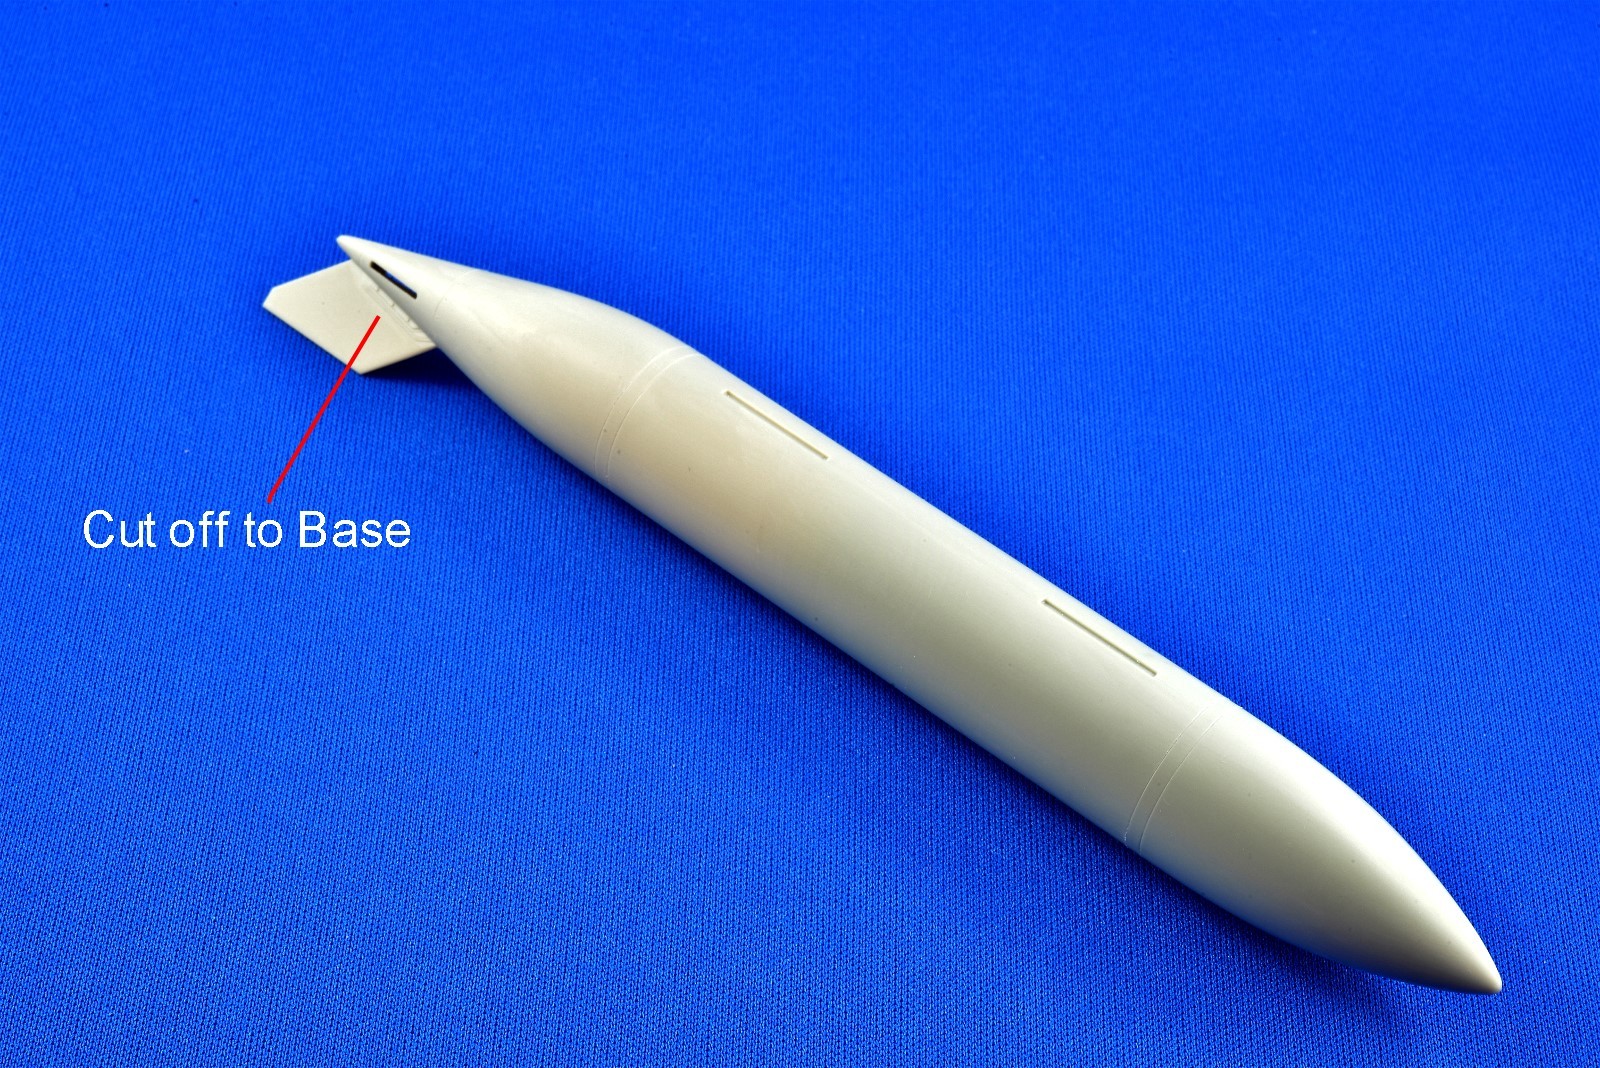
- Zactomodels AIM-9L/M Resin Missile
- Hasegawa Kit Boarding Ladder and AOA Vane (both missing in KH kit)
- Archer Resin Decal Rivets, which were used extensively on the rear engine area
- Airscale Instrument Brass Bezels and Decals
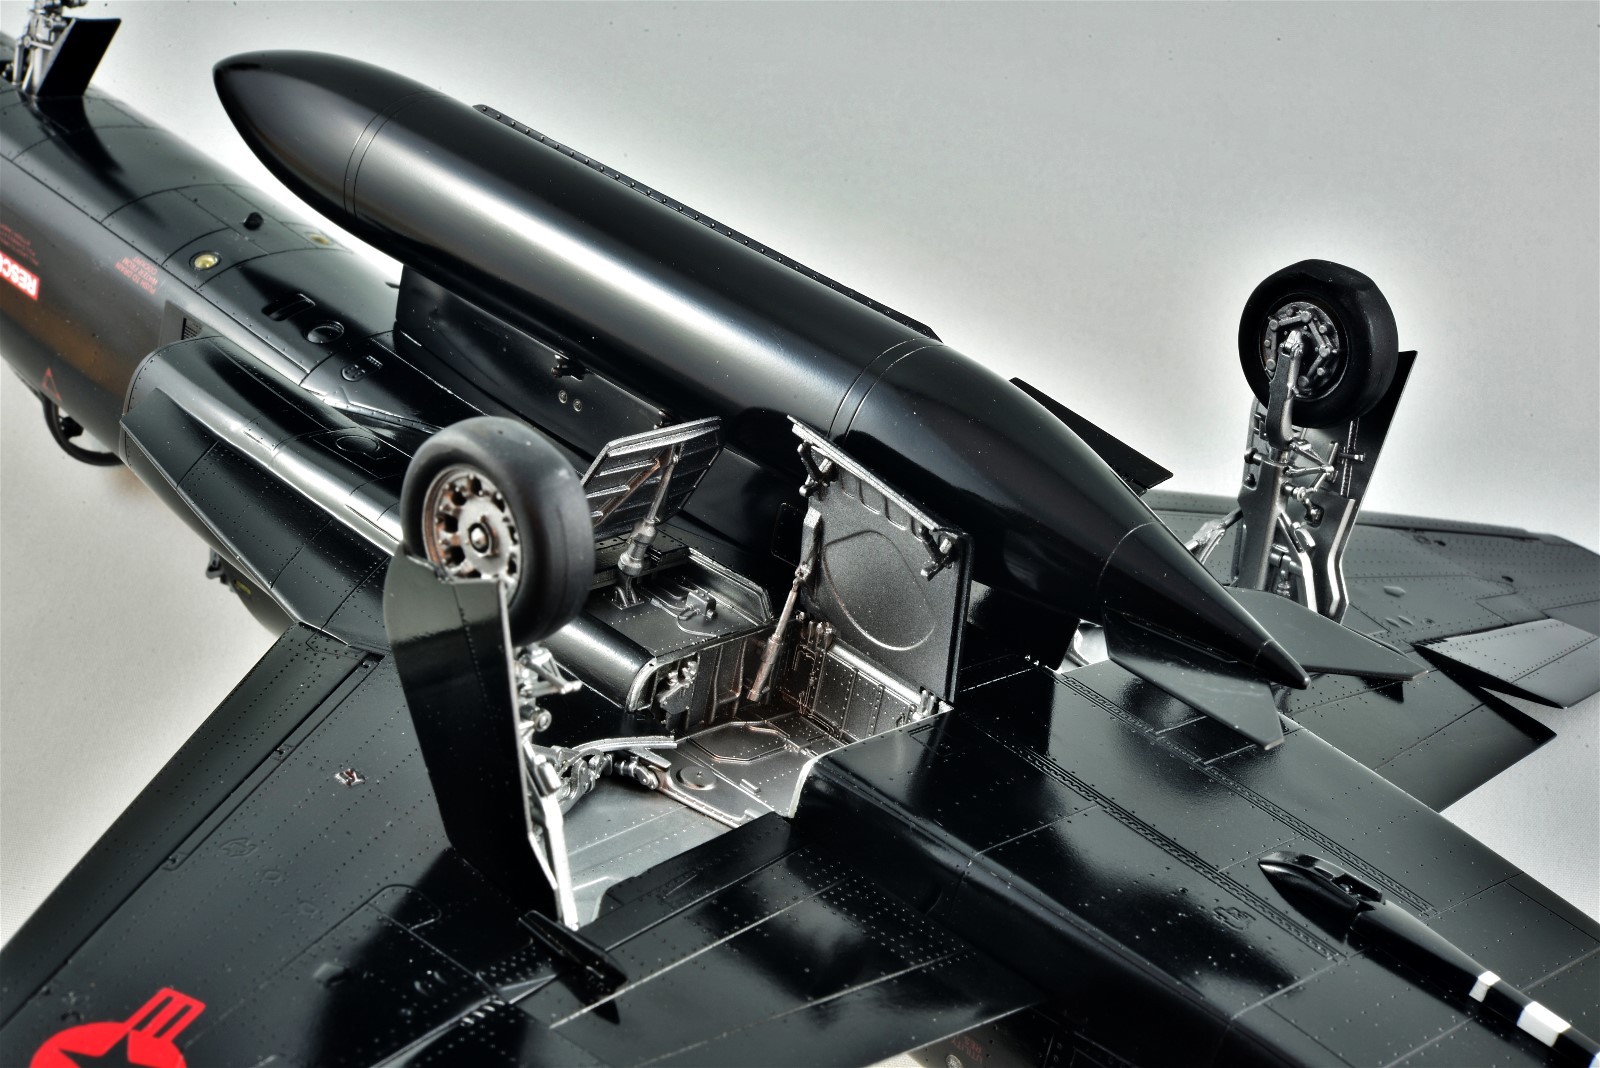
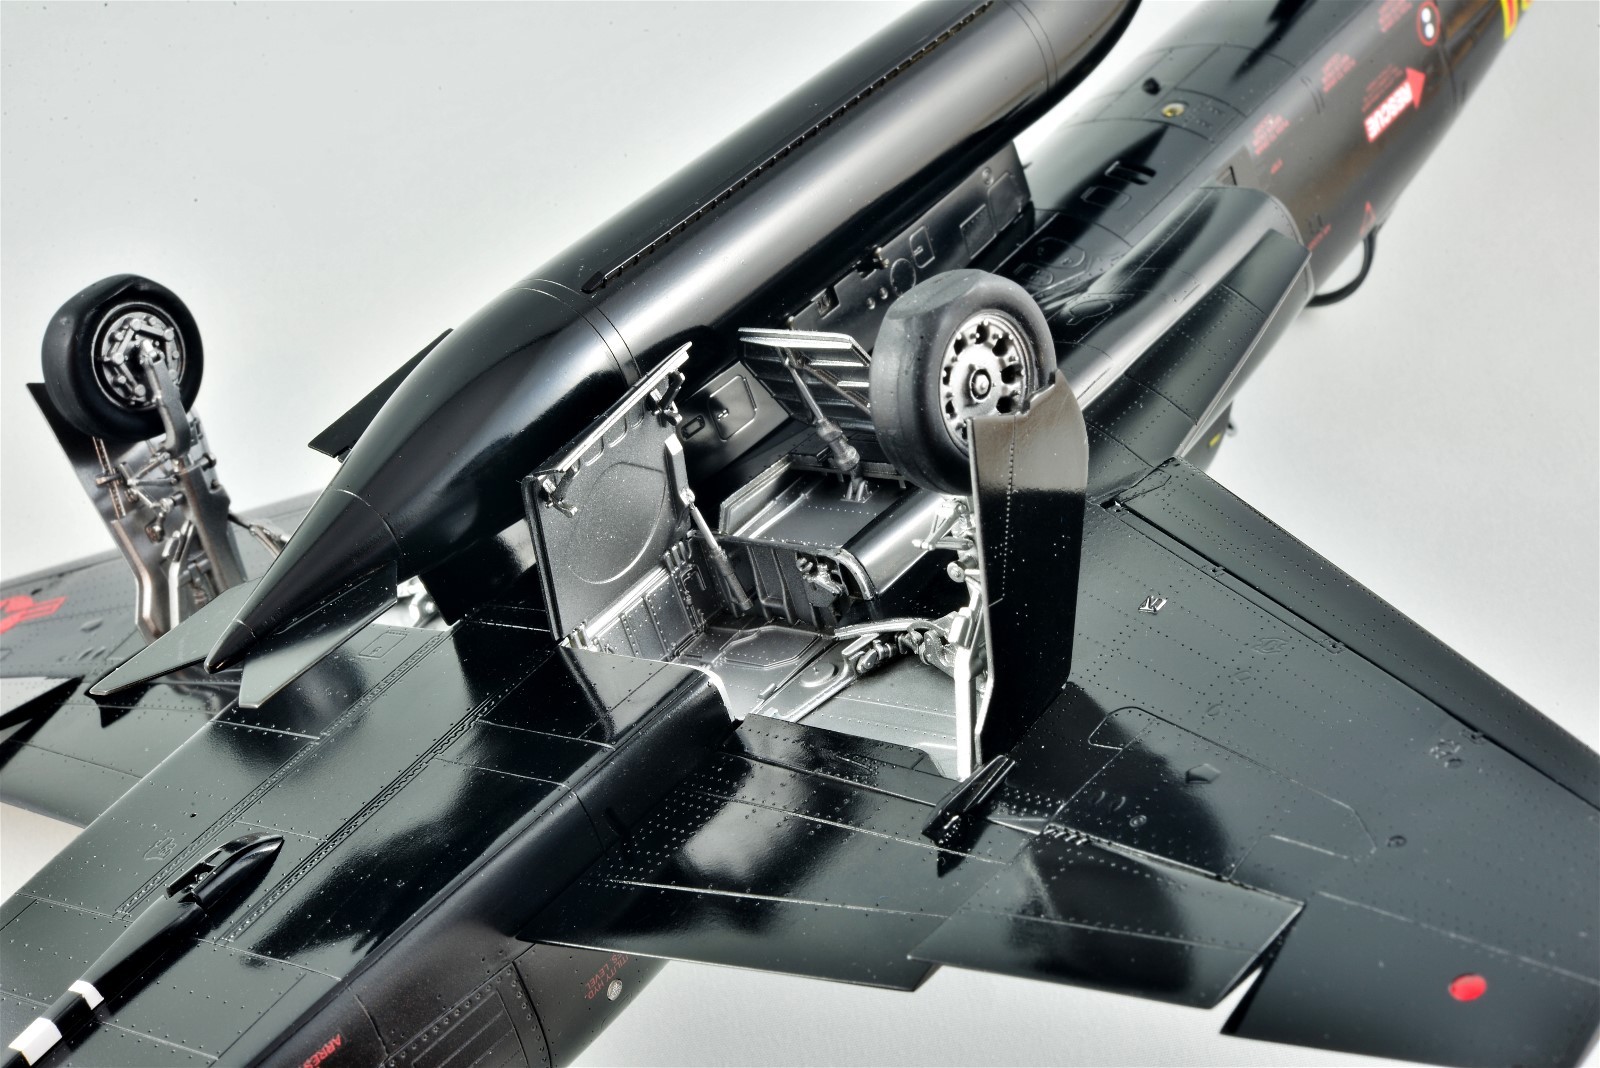
The BB cockpit fit surprisingly well with a number of modifications, while the ProfiModeler wheels required spacers to fit the kit landing gear and the pitot tube had to be ground down at the rear to fit flush.
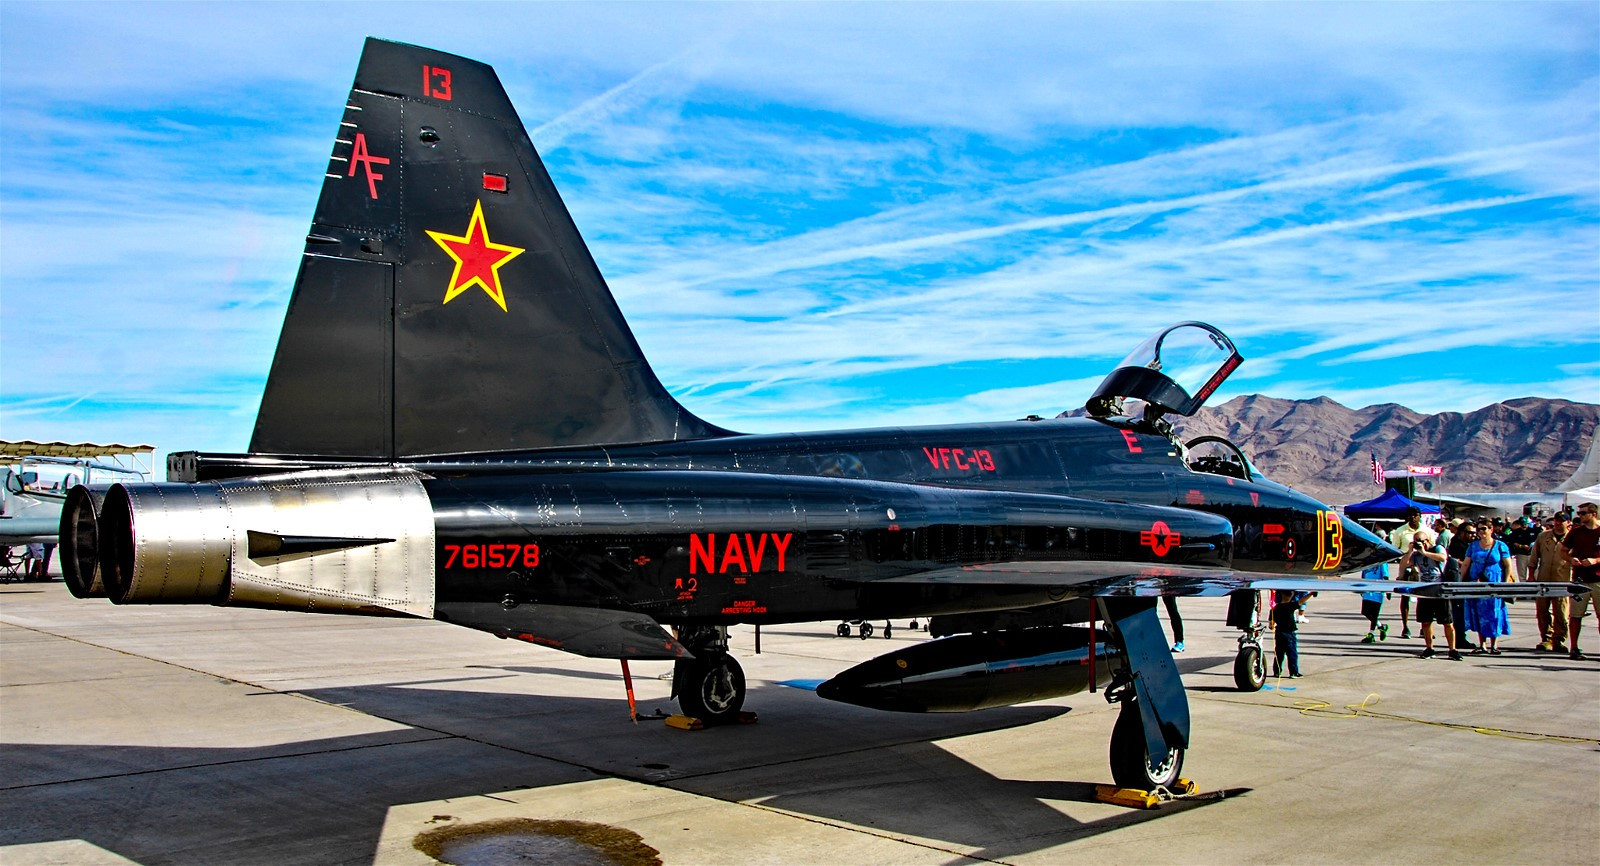
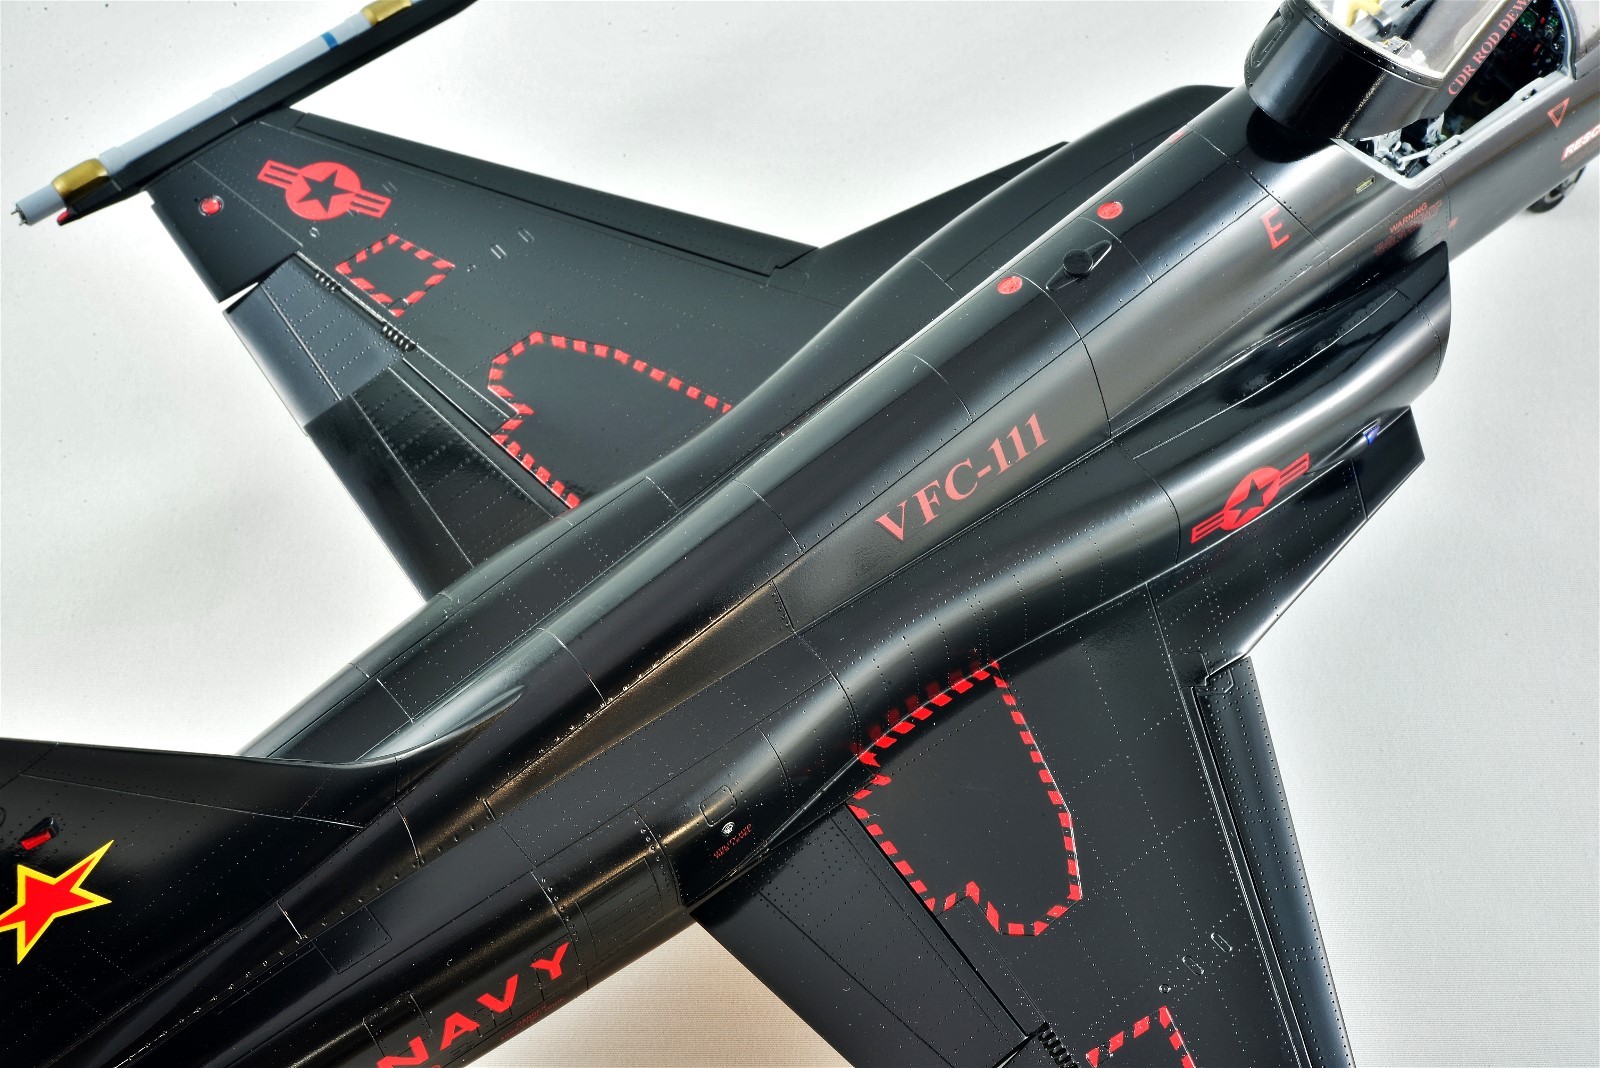
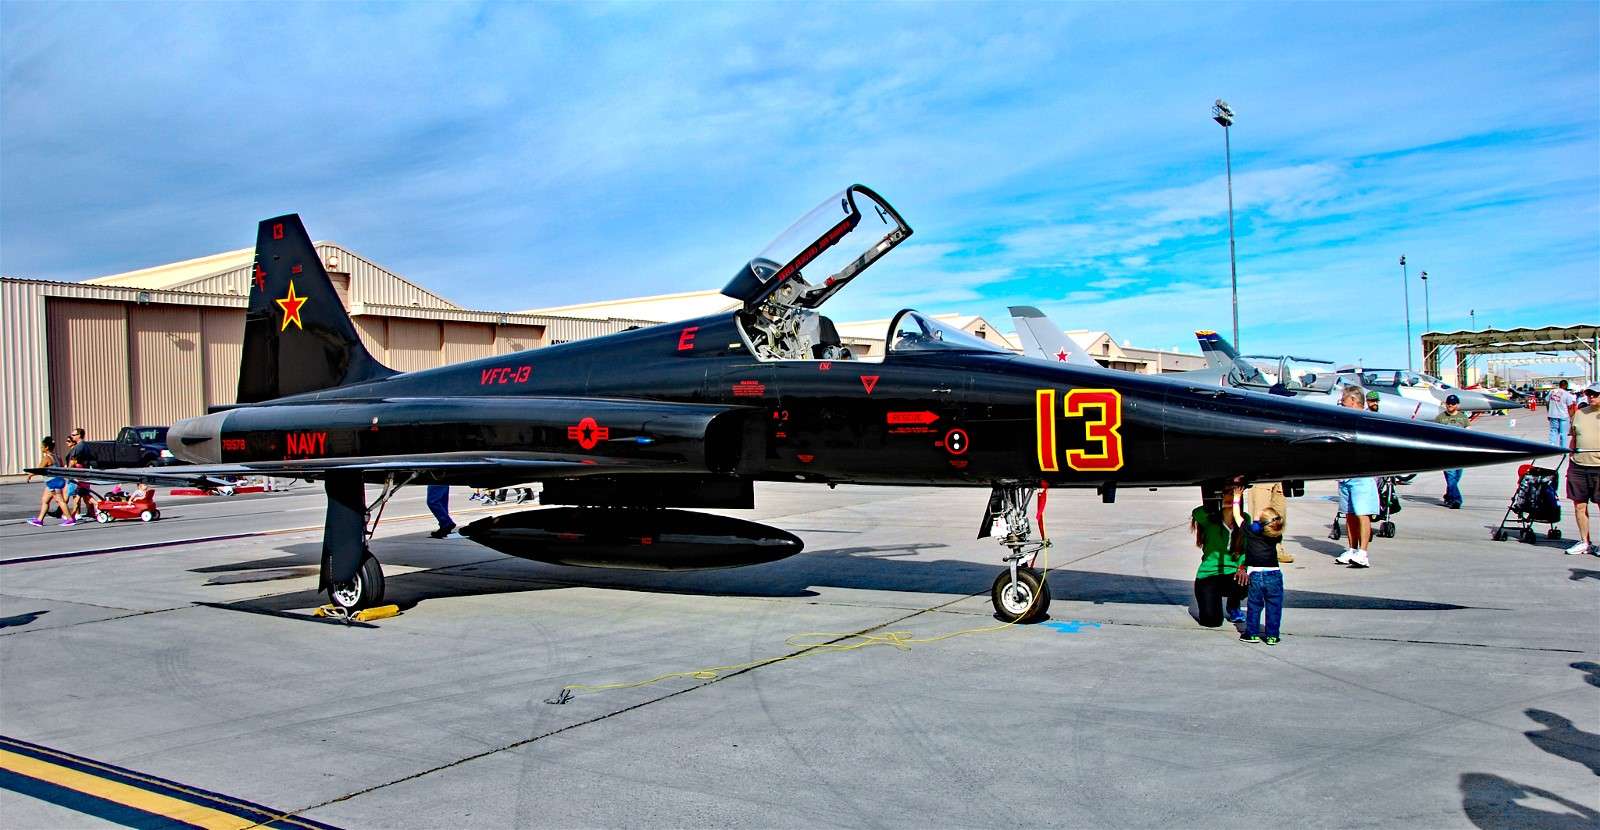
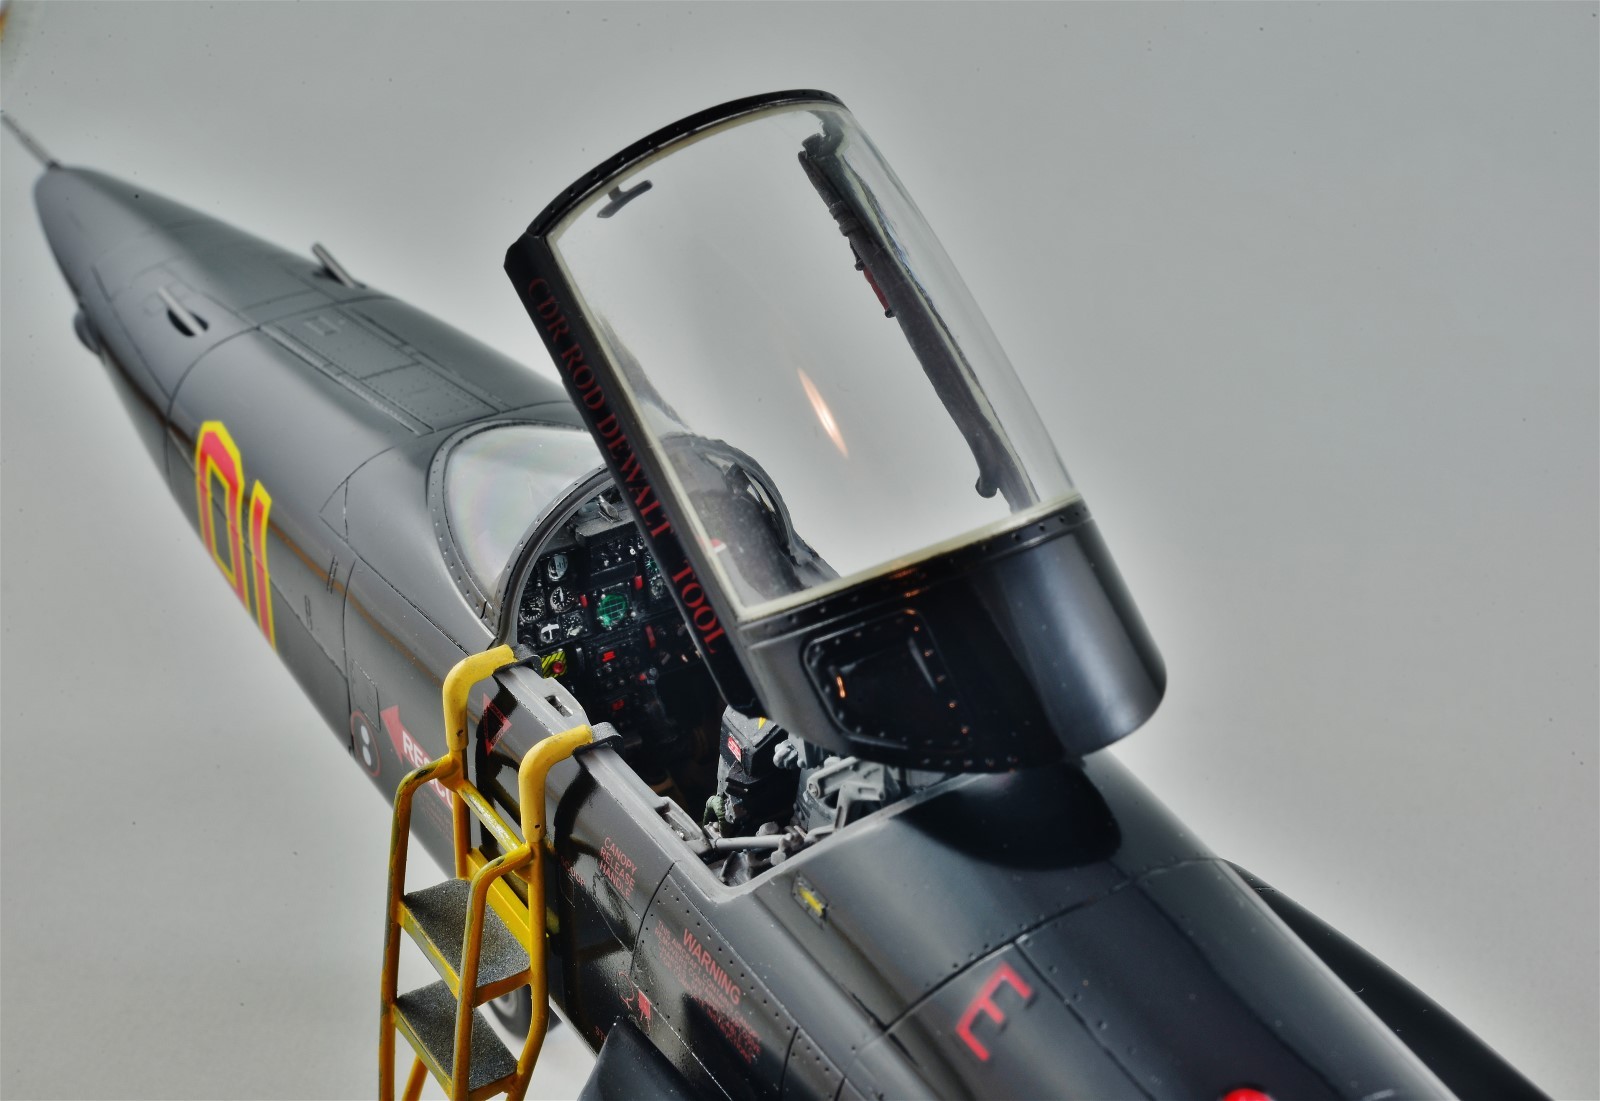
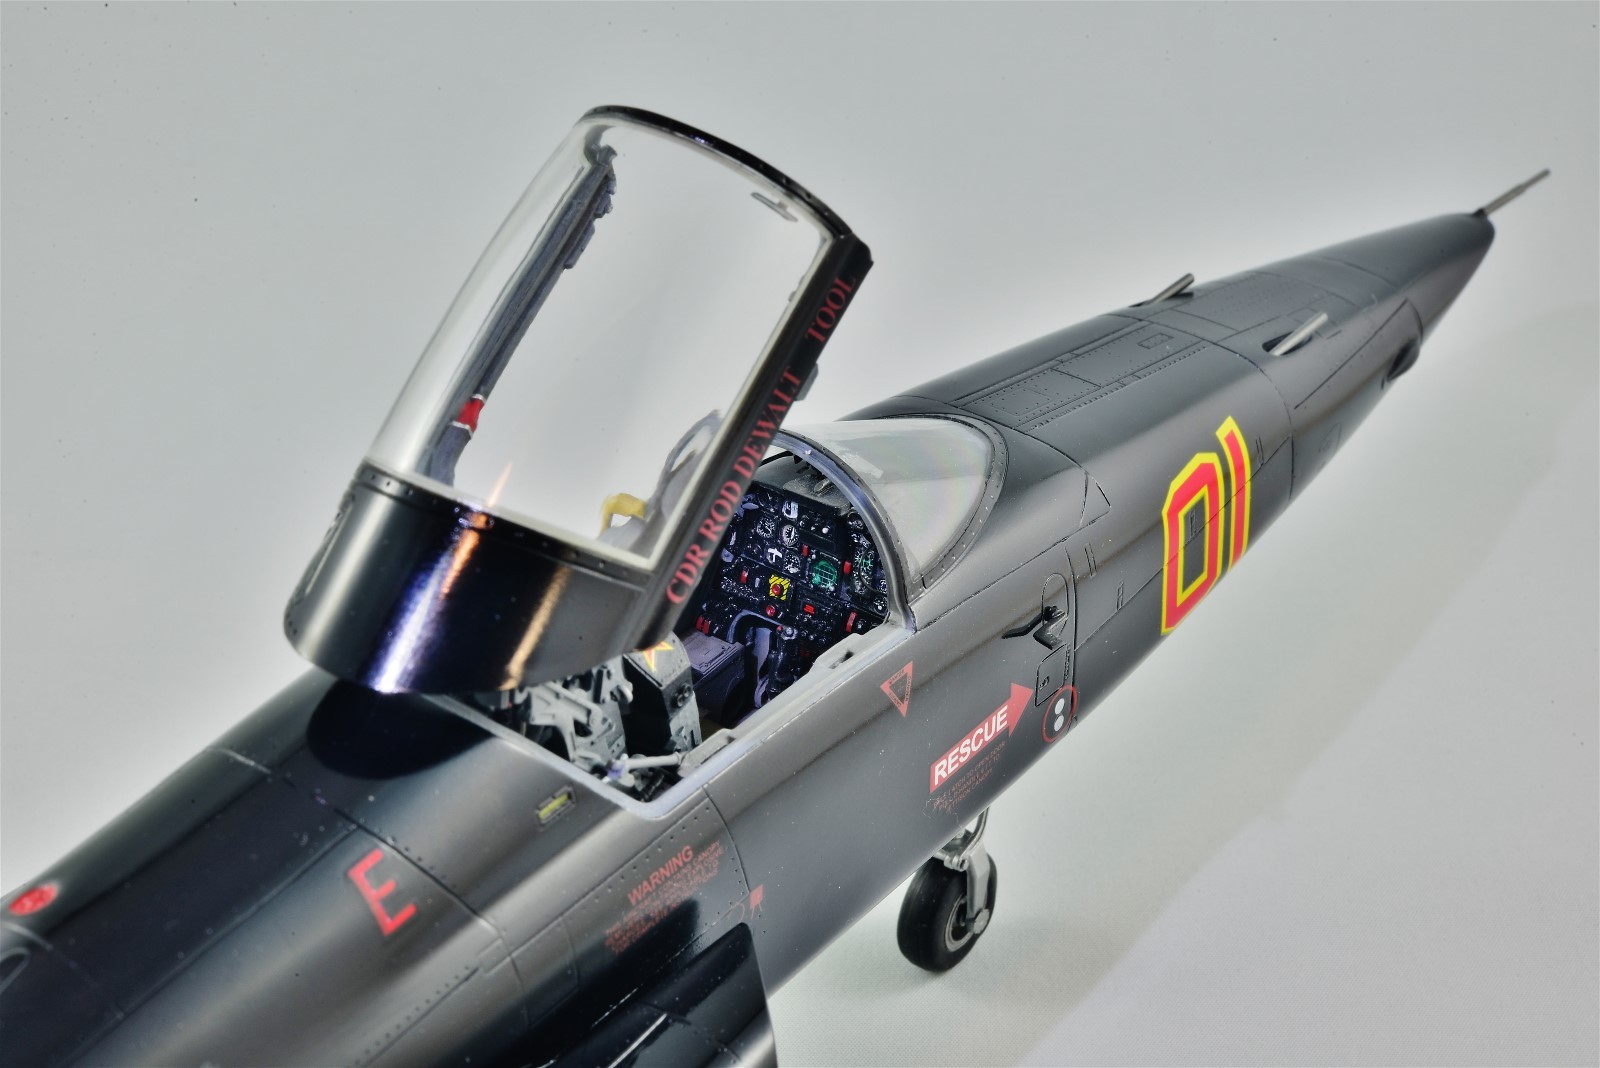
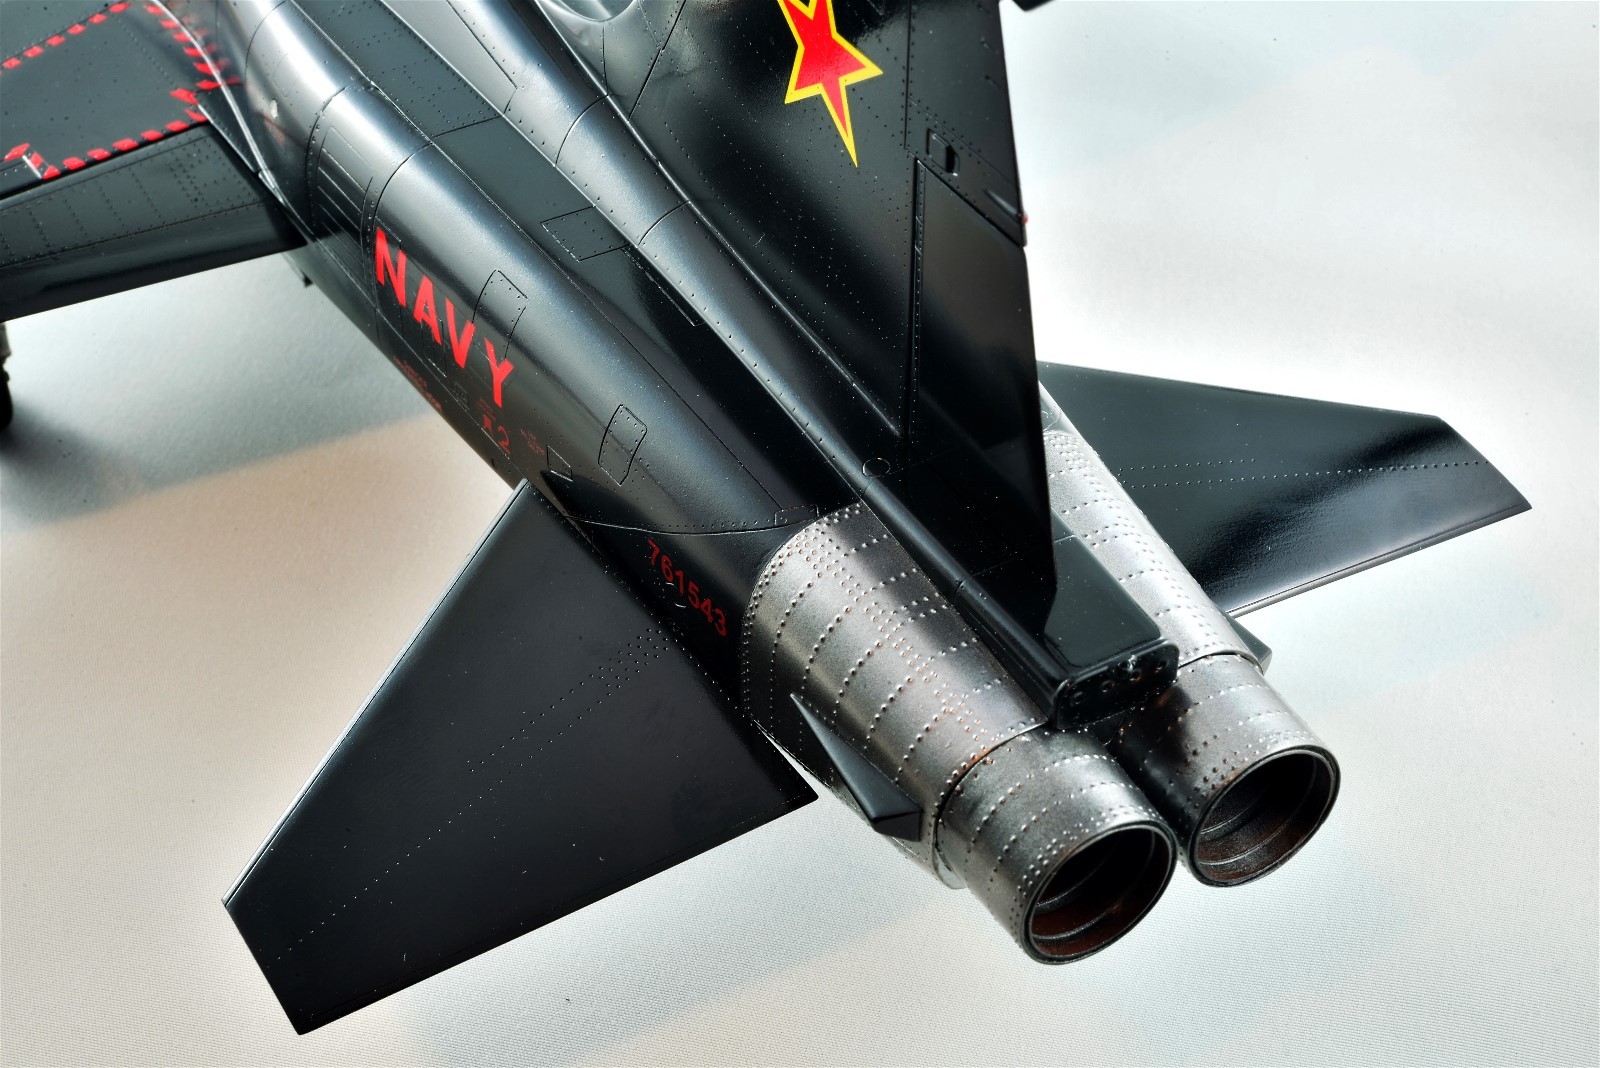
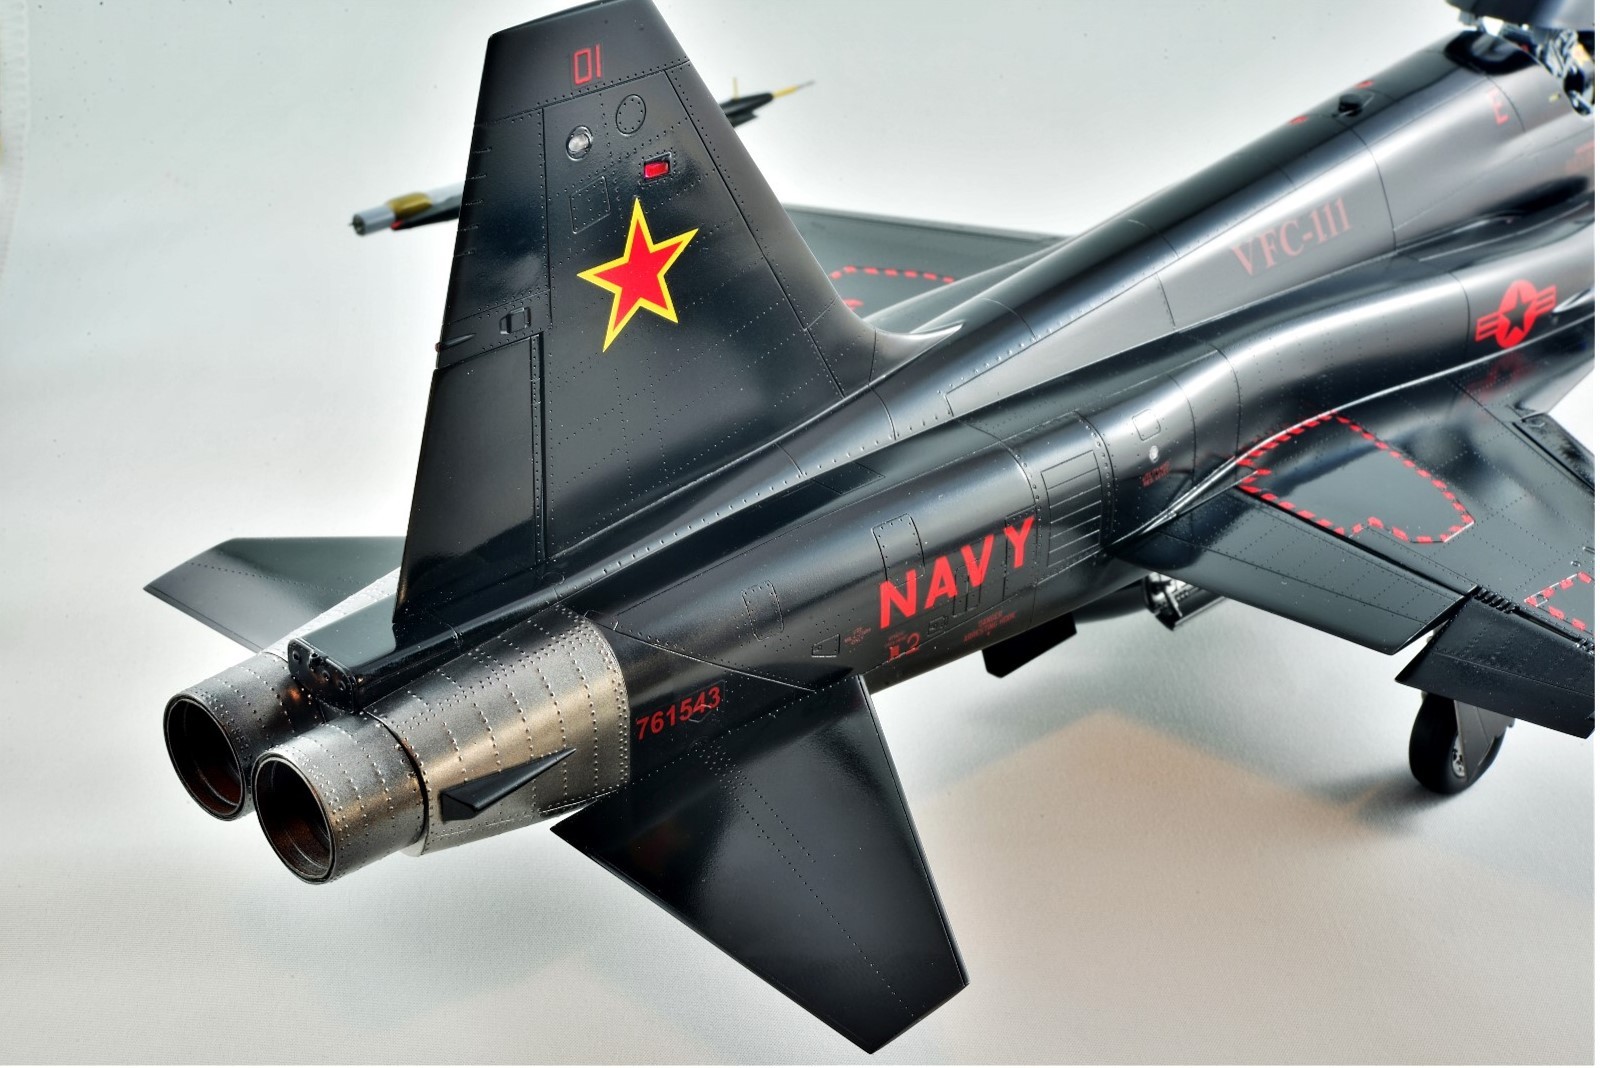
My goal was to create one of the gloss black Adversaries of the VFC-13 Fighting Saints that were fashioned after the “Mig-28” of the movie “Top Gun”, but nobody makes bright red decals for this subject in 1/32, so I was forced to go with a mixed bag of the following which created a bit of a “what-if” for squadrons:
- Kit Decals. Not many, because they are thick and often show white film underneath.
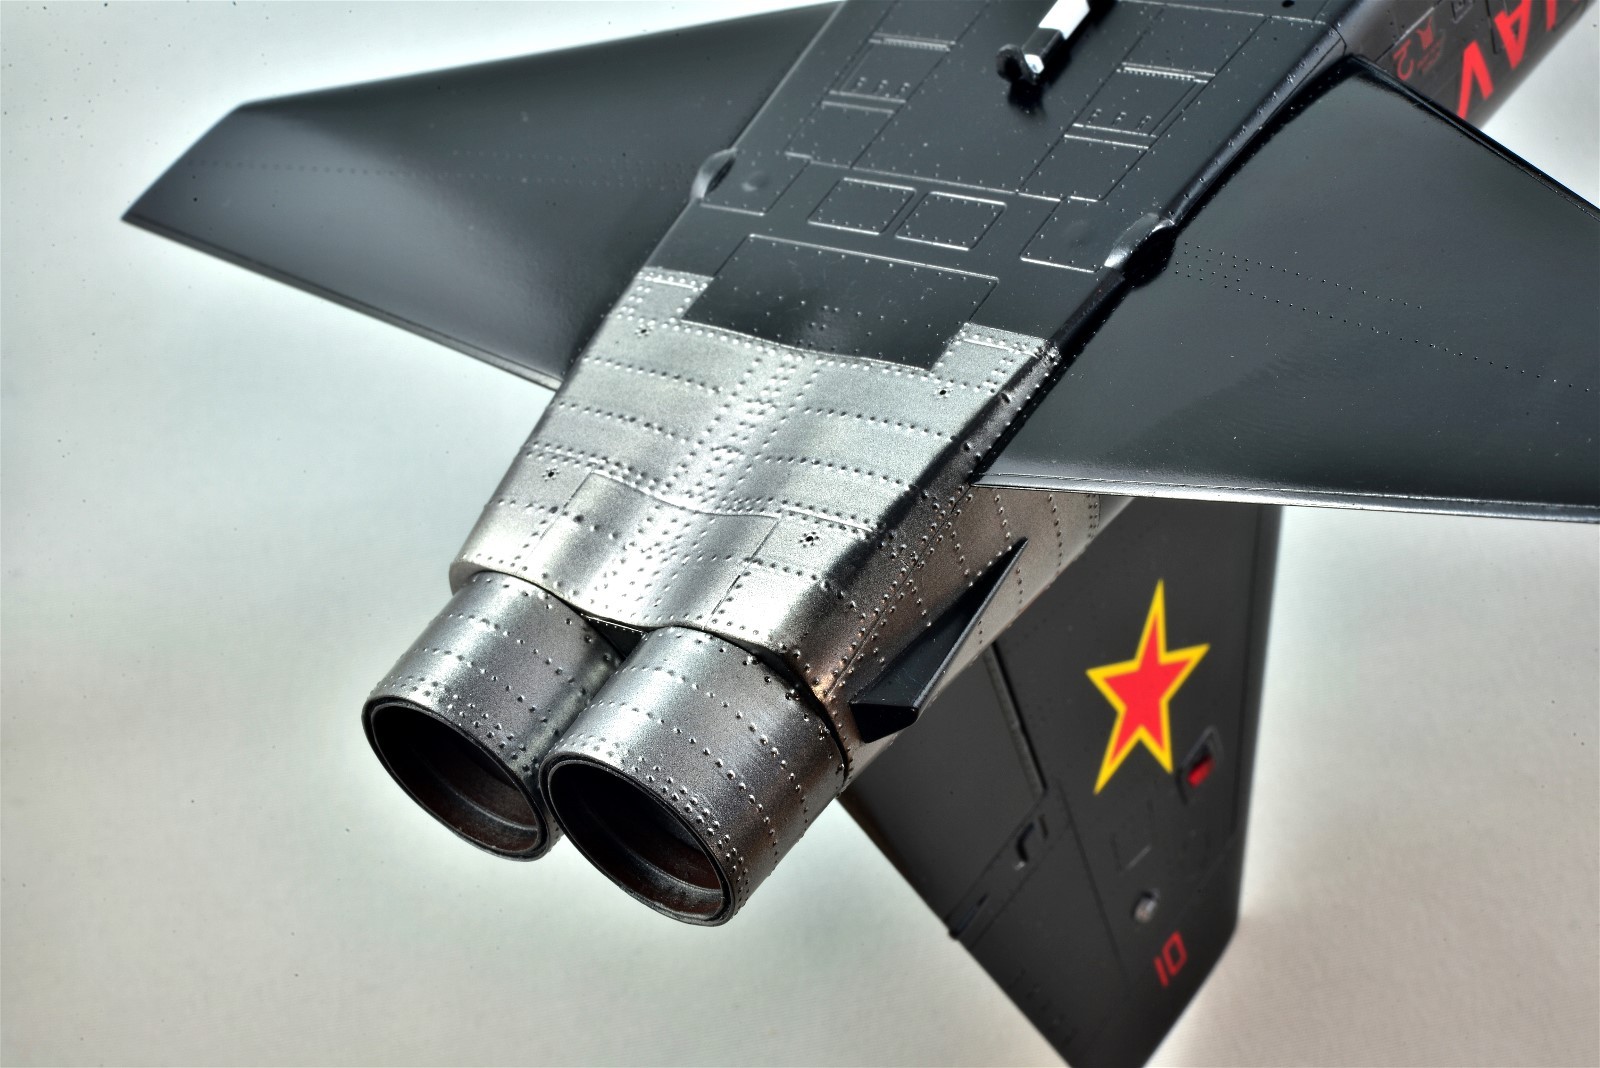
- ProfiModeler (32286). Red Star on tail and “01” on nose.
- Two Bobs Bad Boys Sundowners (32-040), hence the VFC-111 squadron instead of VFC-13
- Maketar Paint Masks (USAF Stars and Bars, Vol II, 32-066)
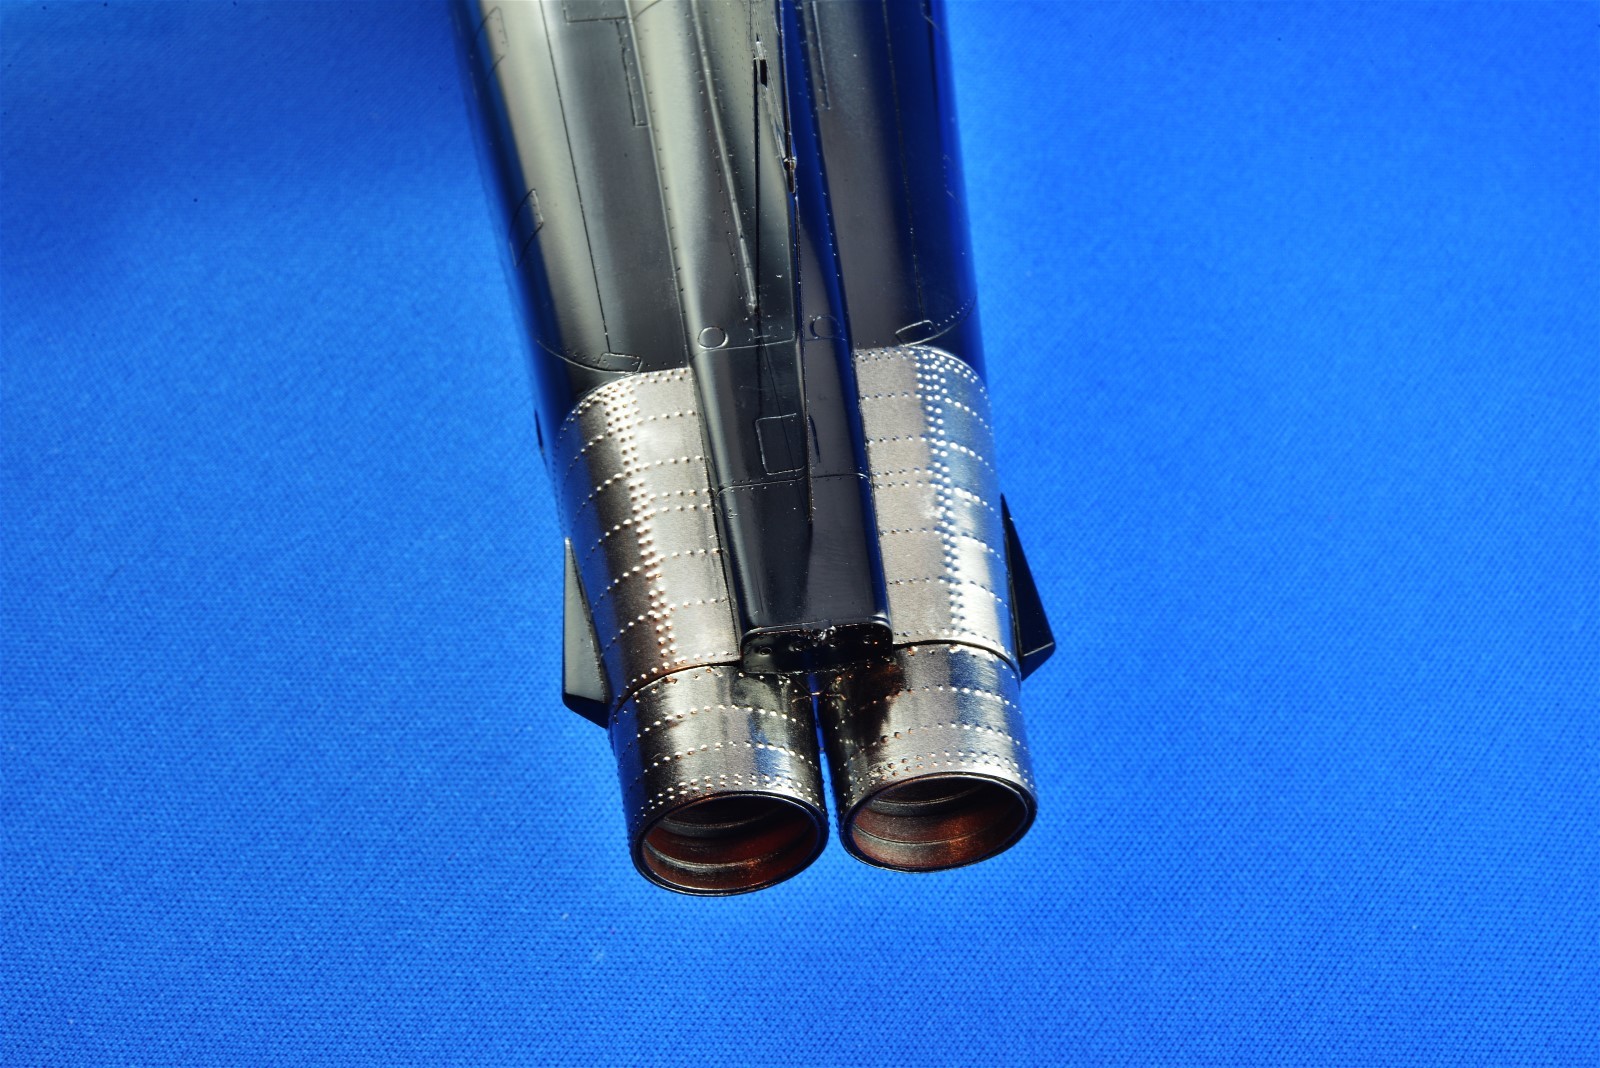
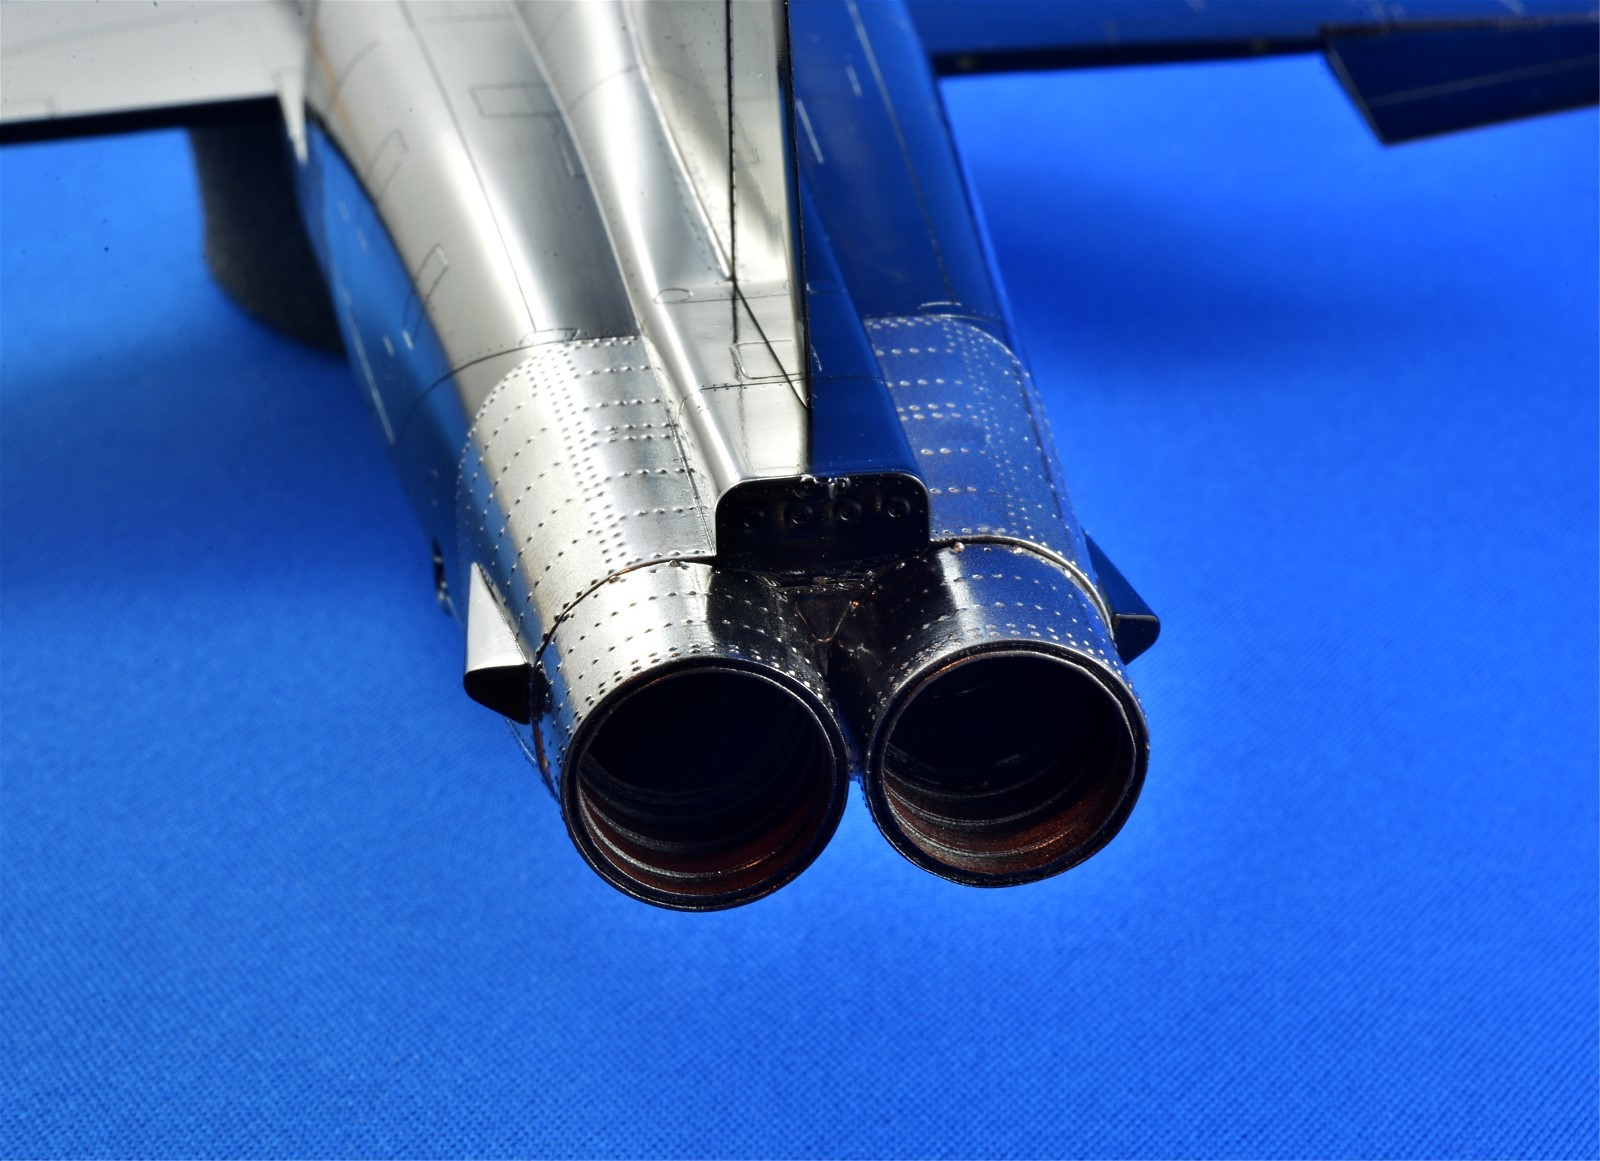
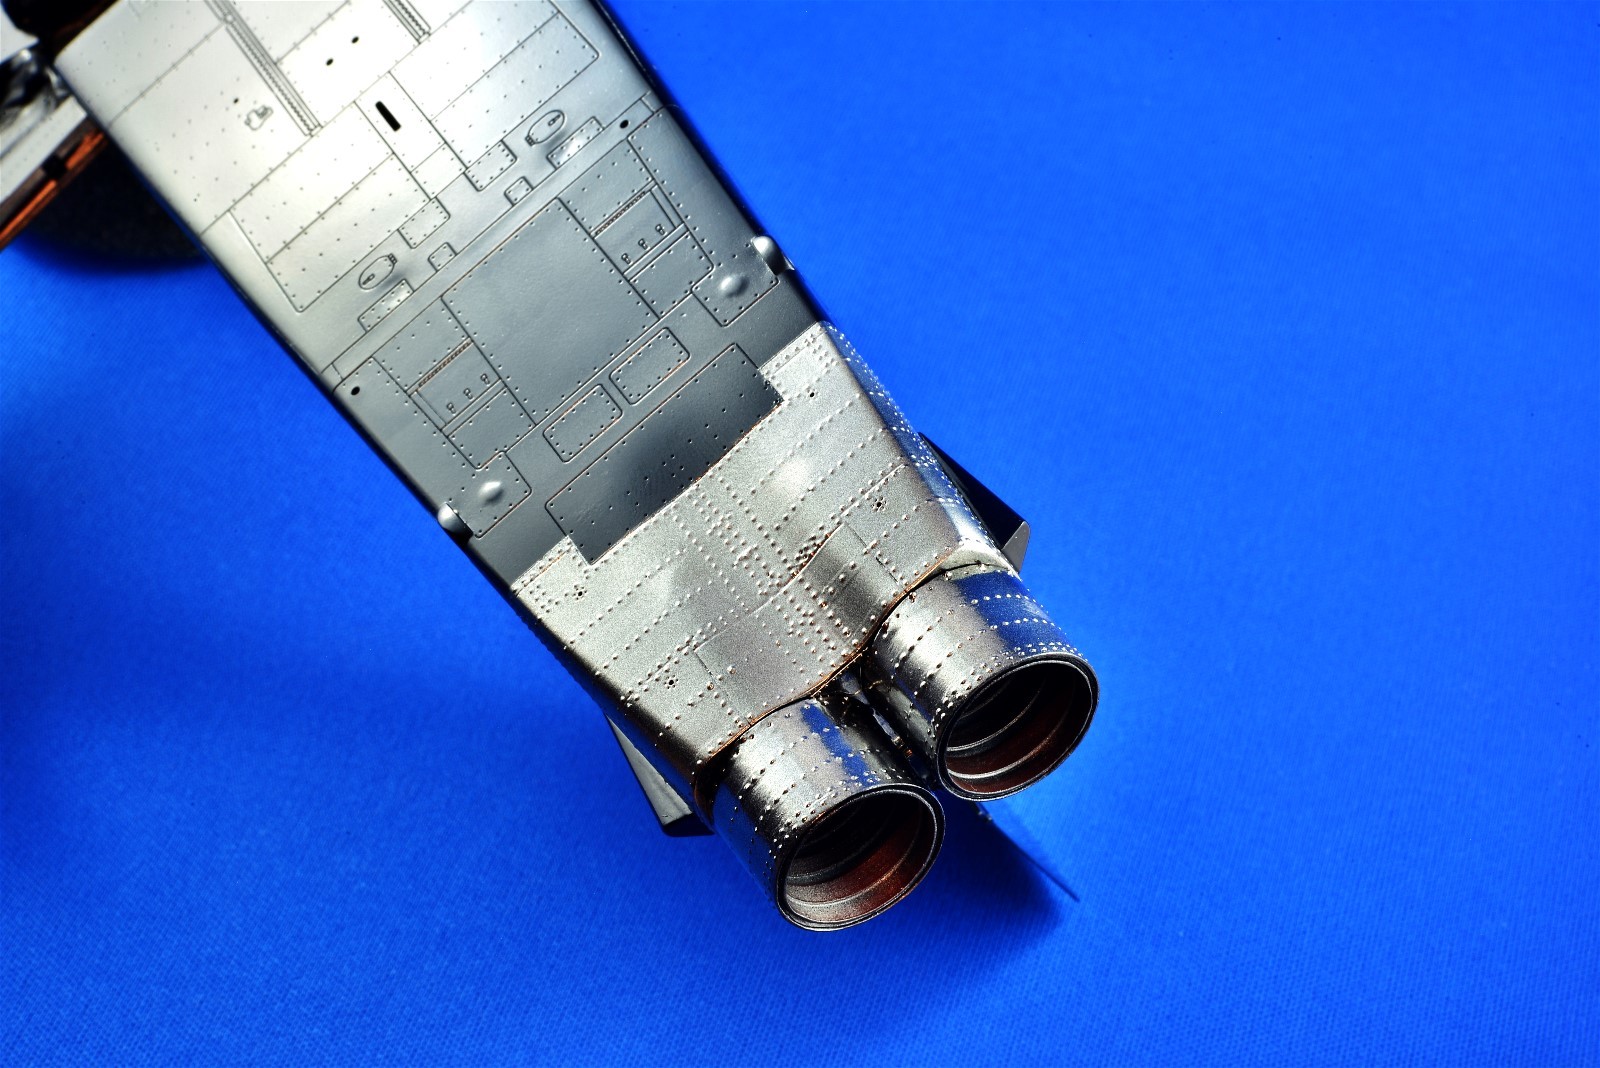
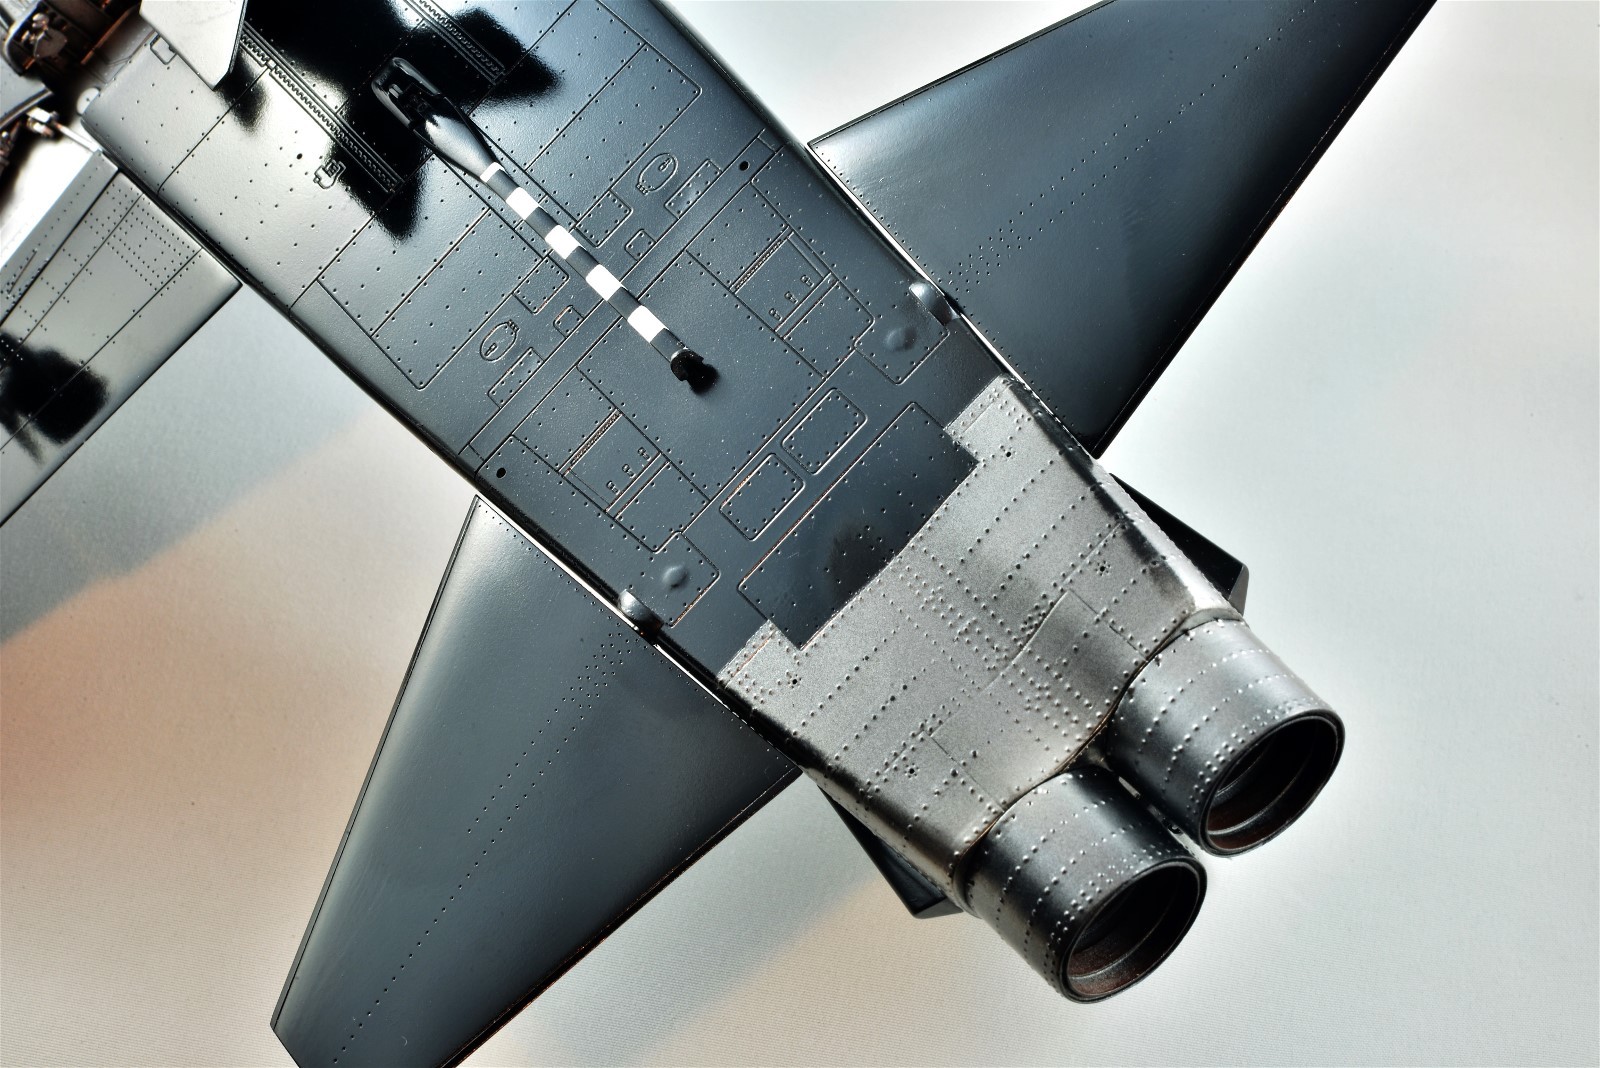
One big shortcoming of this kit is the engine intakes, which really don’t exist at all beyond the front openings. Although resin intakes are apparently now available, I made seamless intakes out of ordinary PVC water pipe which turned out fairly well.
Now several pics of just about every angle possible. With the super clean and shiny paint job which is typical of these jets, I didn’t see the need to dirty up and weather the landing gear wells, mostly because they will rarely be seen again.
Cheers,
Chuck

-
Guys,
I have been having trouble posting here lately so quite frankly I just gave up. If any body wants to see the end of this build they can view it over at LSP here:
Thank you,
Chuck
-
Obituary is here:
https://calgaryherald.remembering.ca/obituary/donald-mackie-1075652210
RIP Bruce
Chuck
-
5 hours ago, SERNAK said:
Any update?
In a word, No. 3 things are holding me back:
1) I started the decals and realized that I didn't have any US Insignia decals in red. Nobody makes them in 1/32 scale either, so I had to order Maketar paint masks which will take a few weeks to arrive.
2) I screwed up a big decal (more on that later) so I had to order a replacement. Same delivery time as above.
3) It's finally summer, so vacation and other summer-like activities are taking up most of my time.
I might have an update on the two wing-tip pods before then, so we'll see.
Cheers,
Chuck
-
1 hour ago, yurihul said:
Chuck,
Be careful with Tamiya Semi Gloss, depending on the decal maker etc, I have seen Tamiya Lacquers melt decals after application. If you choose that path, very light coats 🙂
Y
Thanks Yuri! It looks like some acrylic X-22 should go down first, followed by the Tamiya lacquer.
Cheers,
Chuck
-
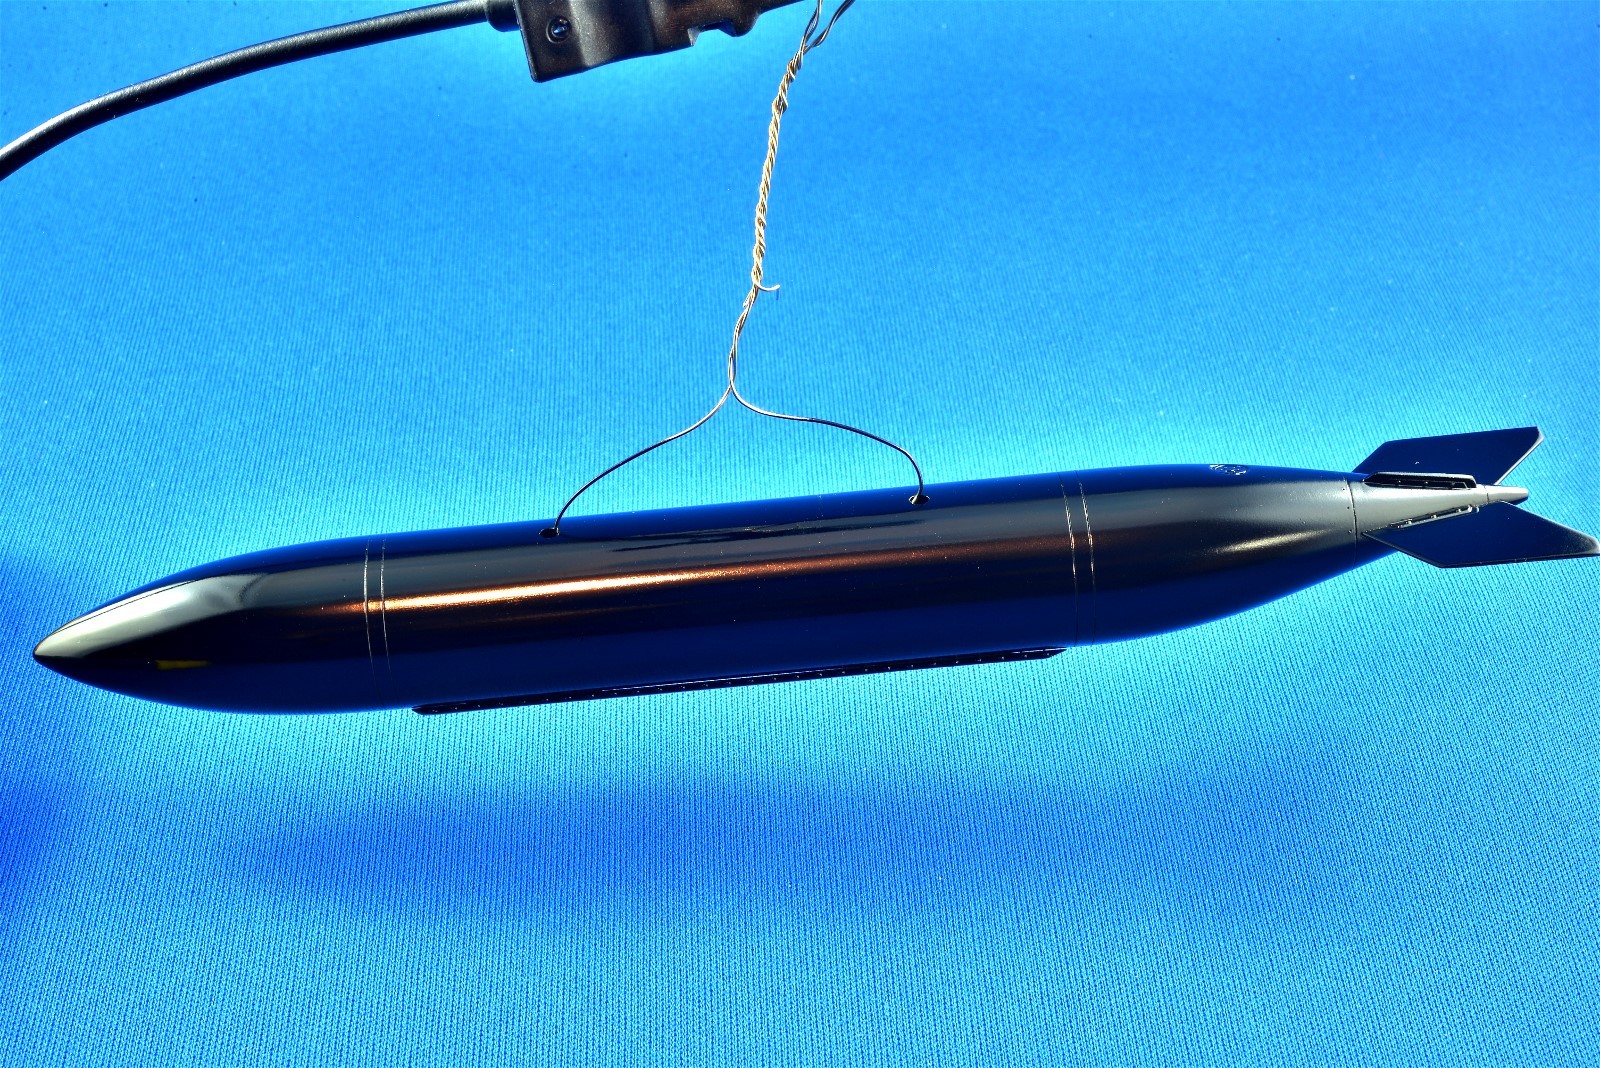
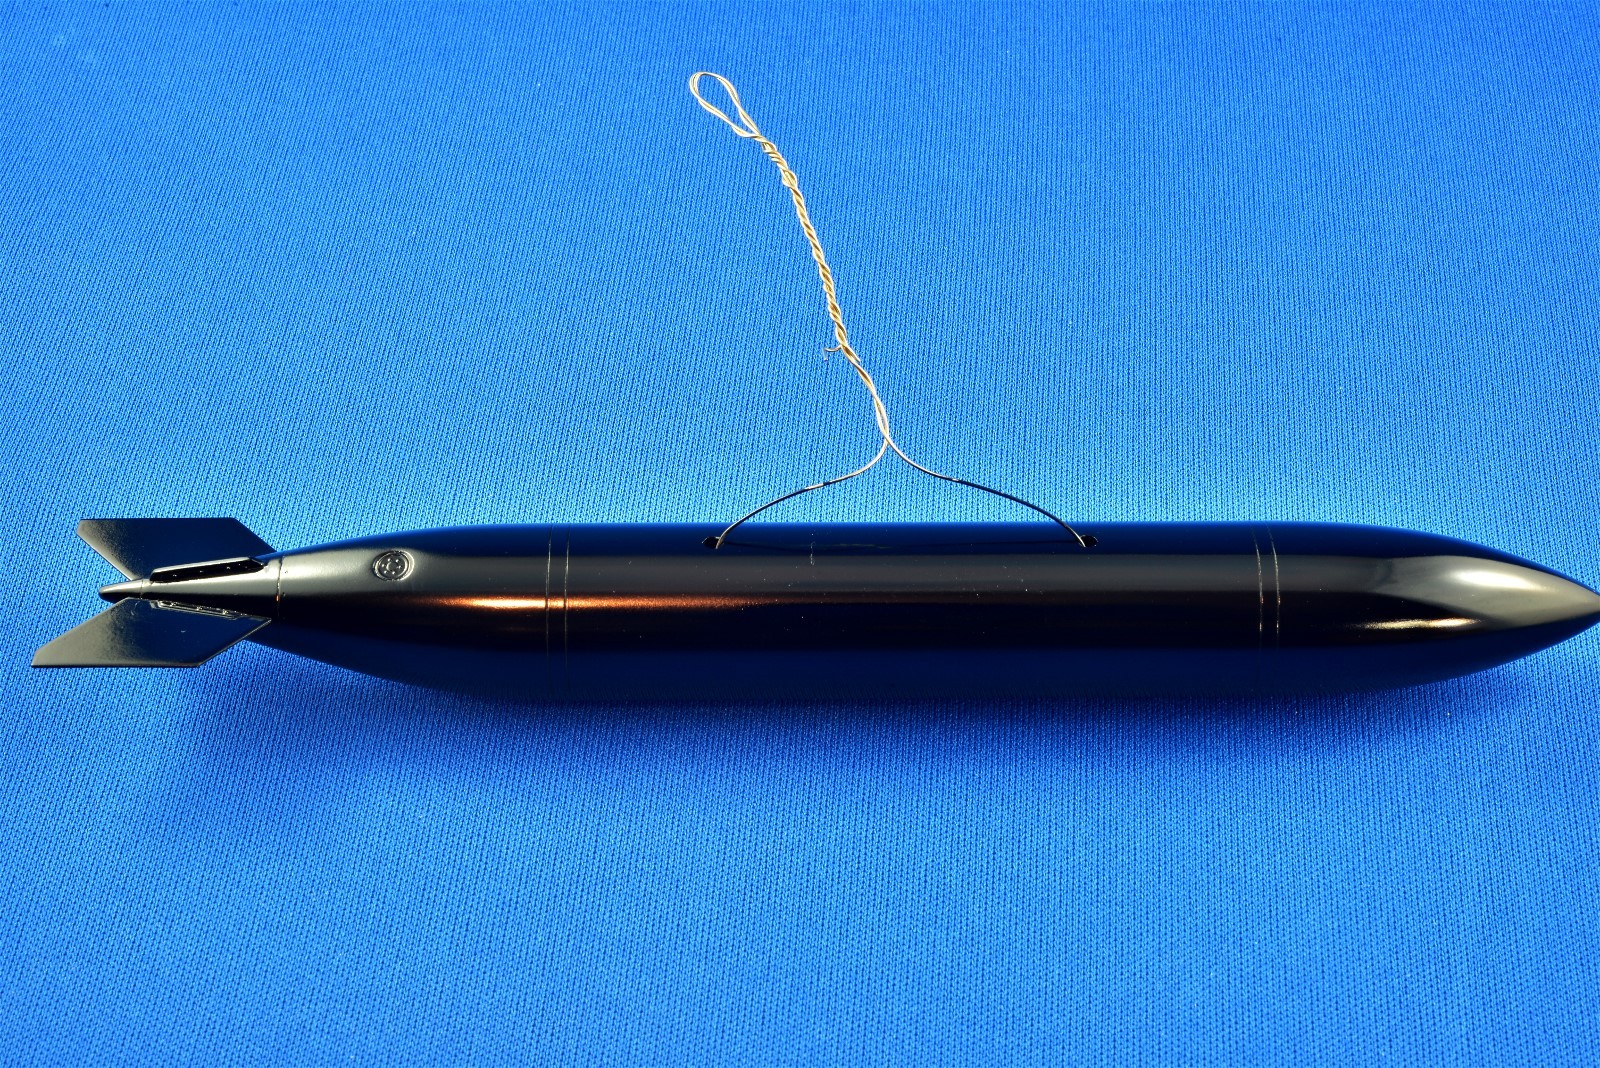
July 26/19
Inching along towards the finish line. One major addition is the big center line fuel tank, which my subject usually has strapped on. In many pics of modern F-5E/N’s, the vertical fin has been removed, leaving the base attachment, so I cut mine off.
Something missing is a fuel cap, because you’ve got to get the fuel in there somehow! I used another spare PE brass disk that I also used on the top of the fuselage when I moved the fuel caps from the starboard side to the port side.
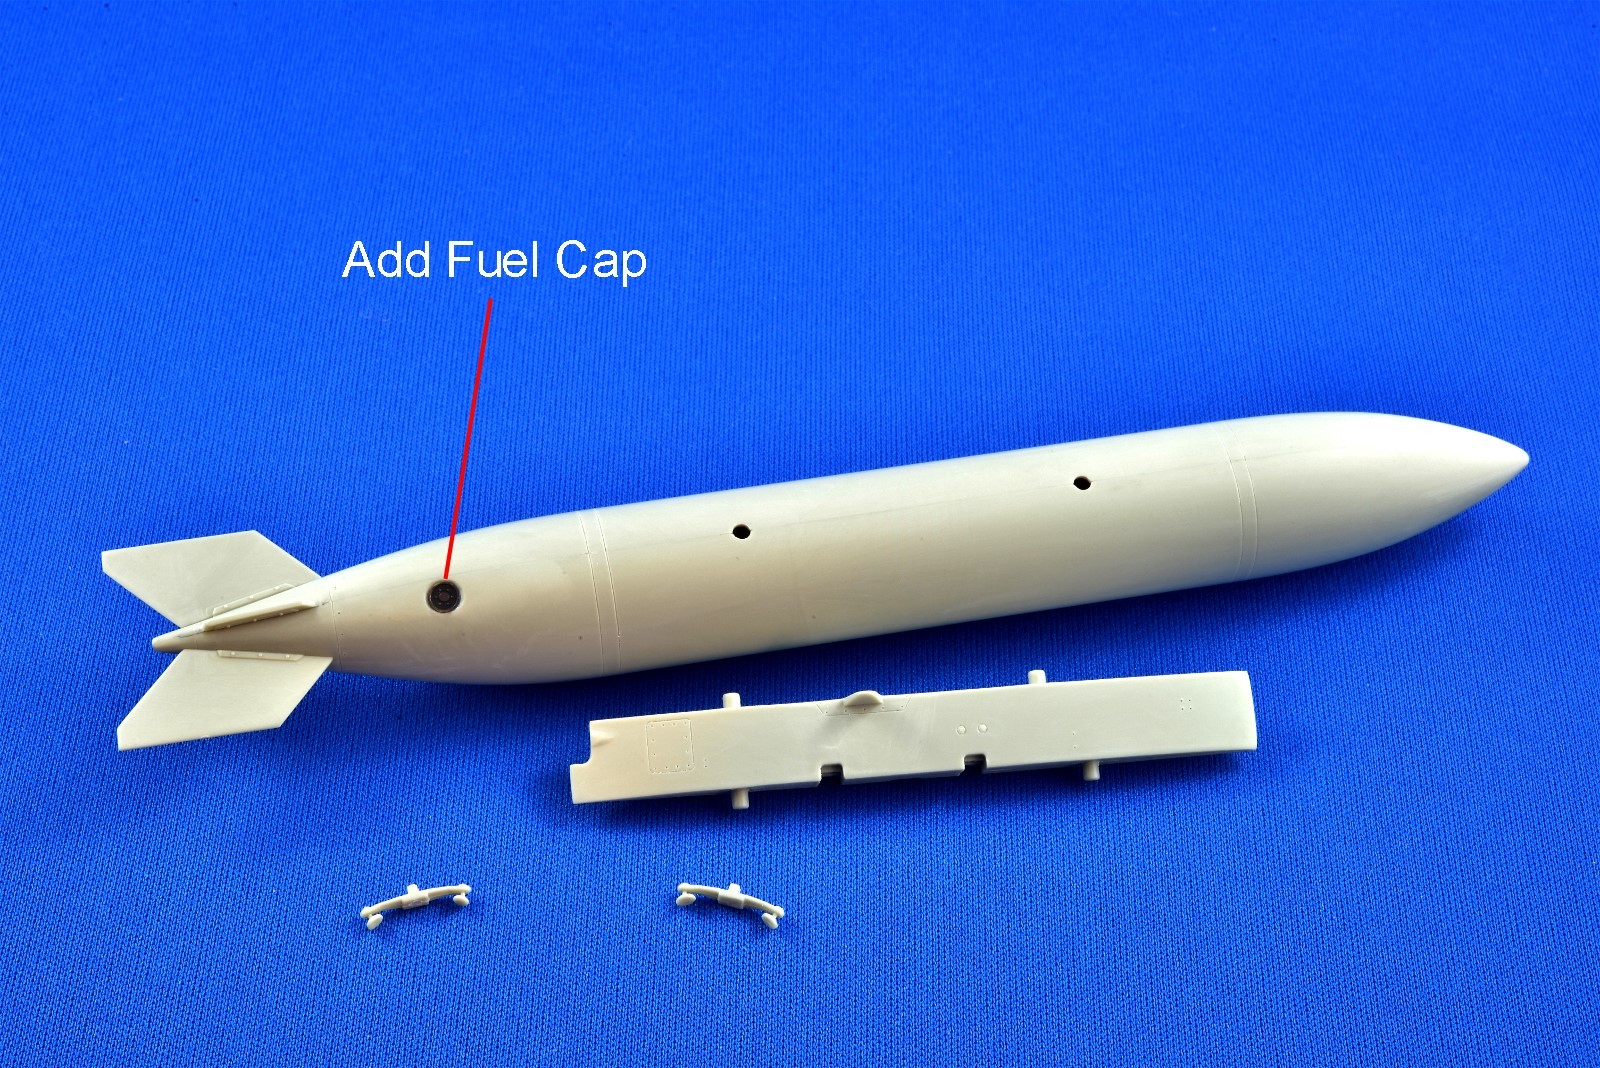
Painting circular objects can be tricky, so this wire contraption worked out quite well to keep the tank suspended without touching anything.
The other side. I will put a red circular decal on that fuel cap later.
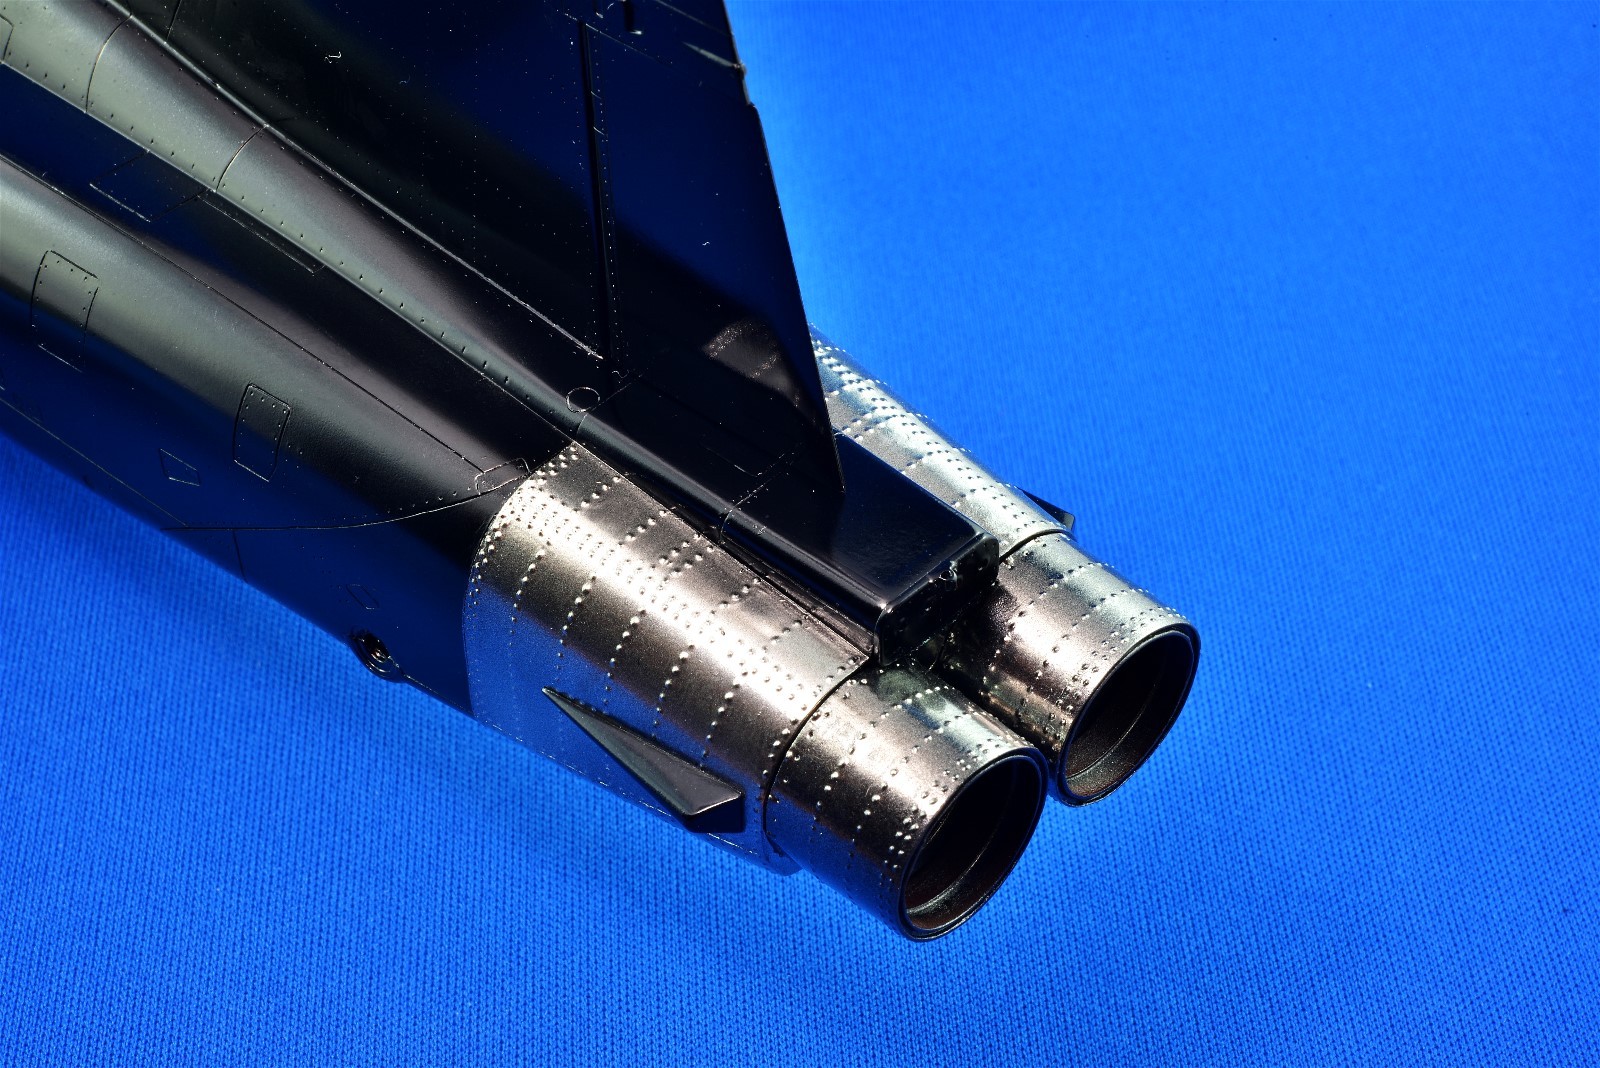
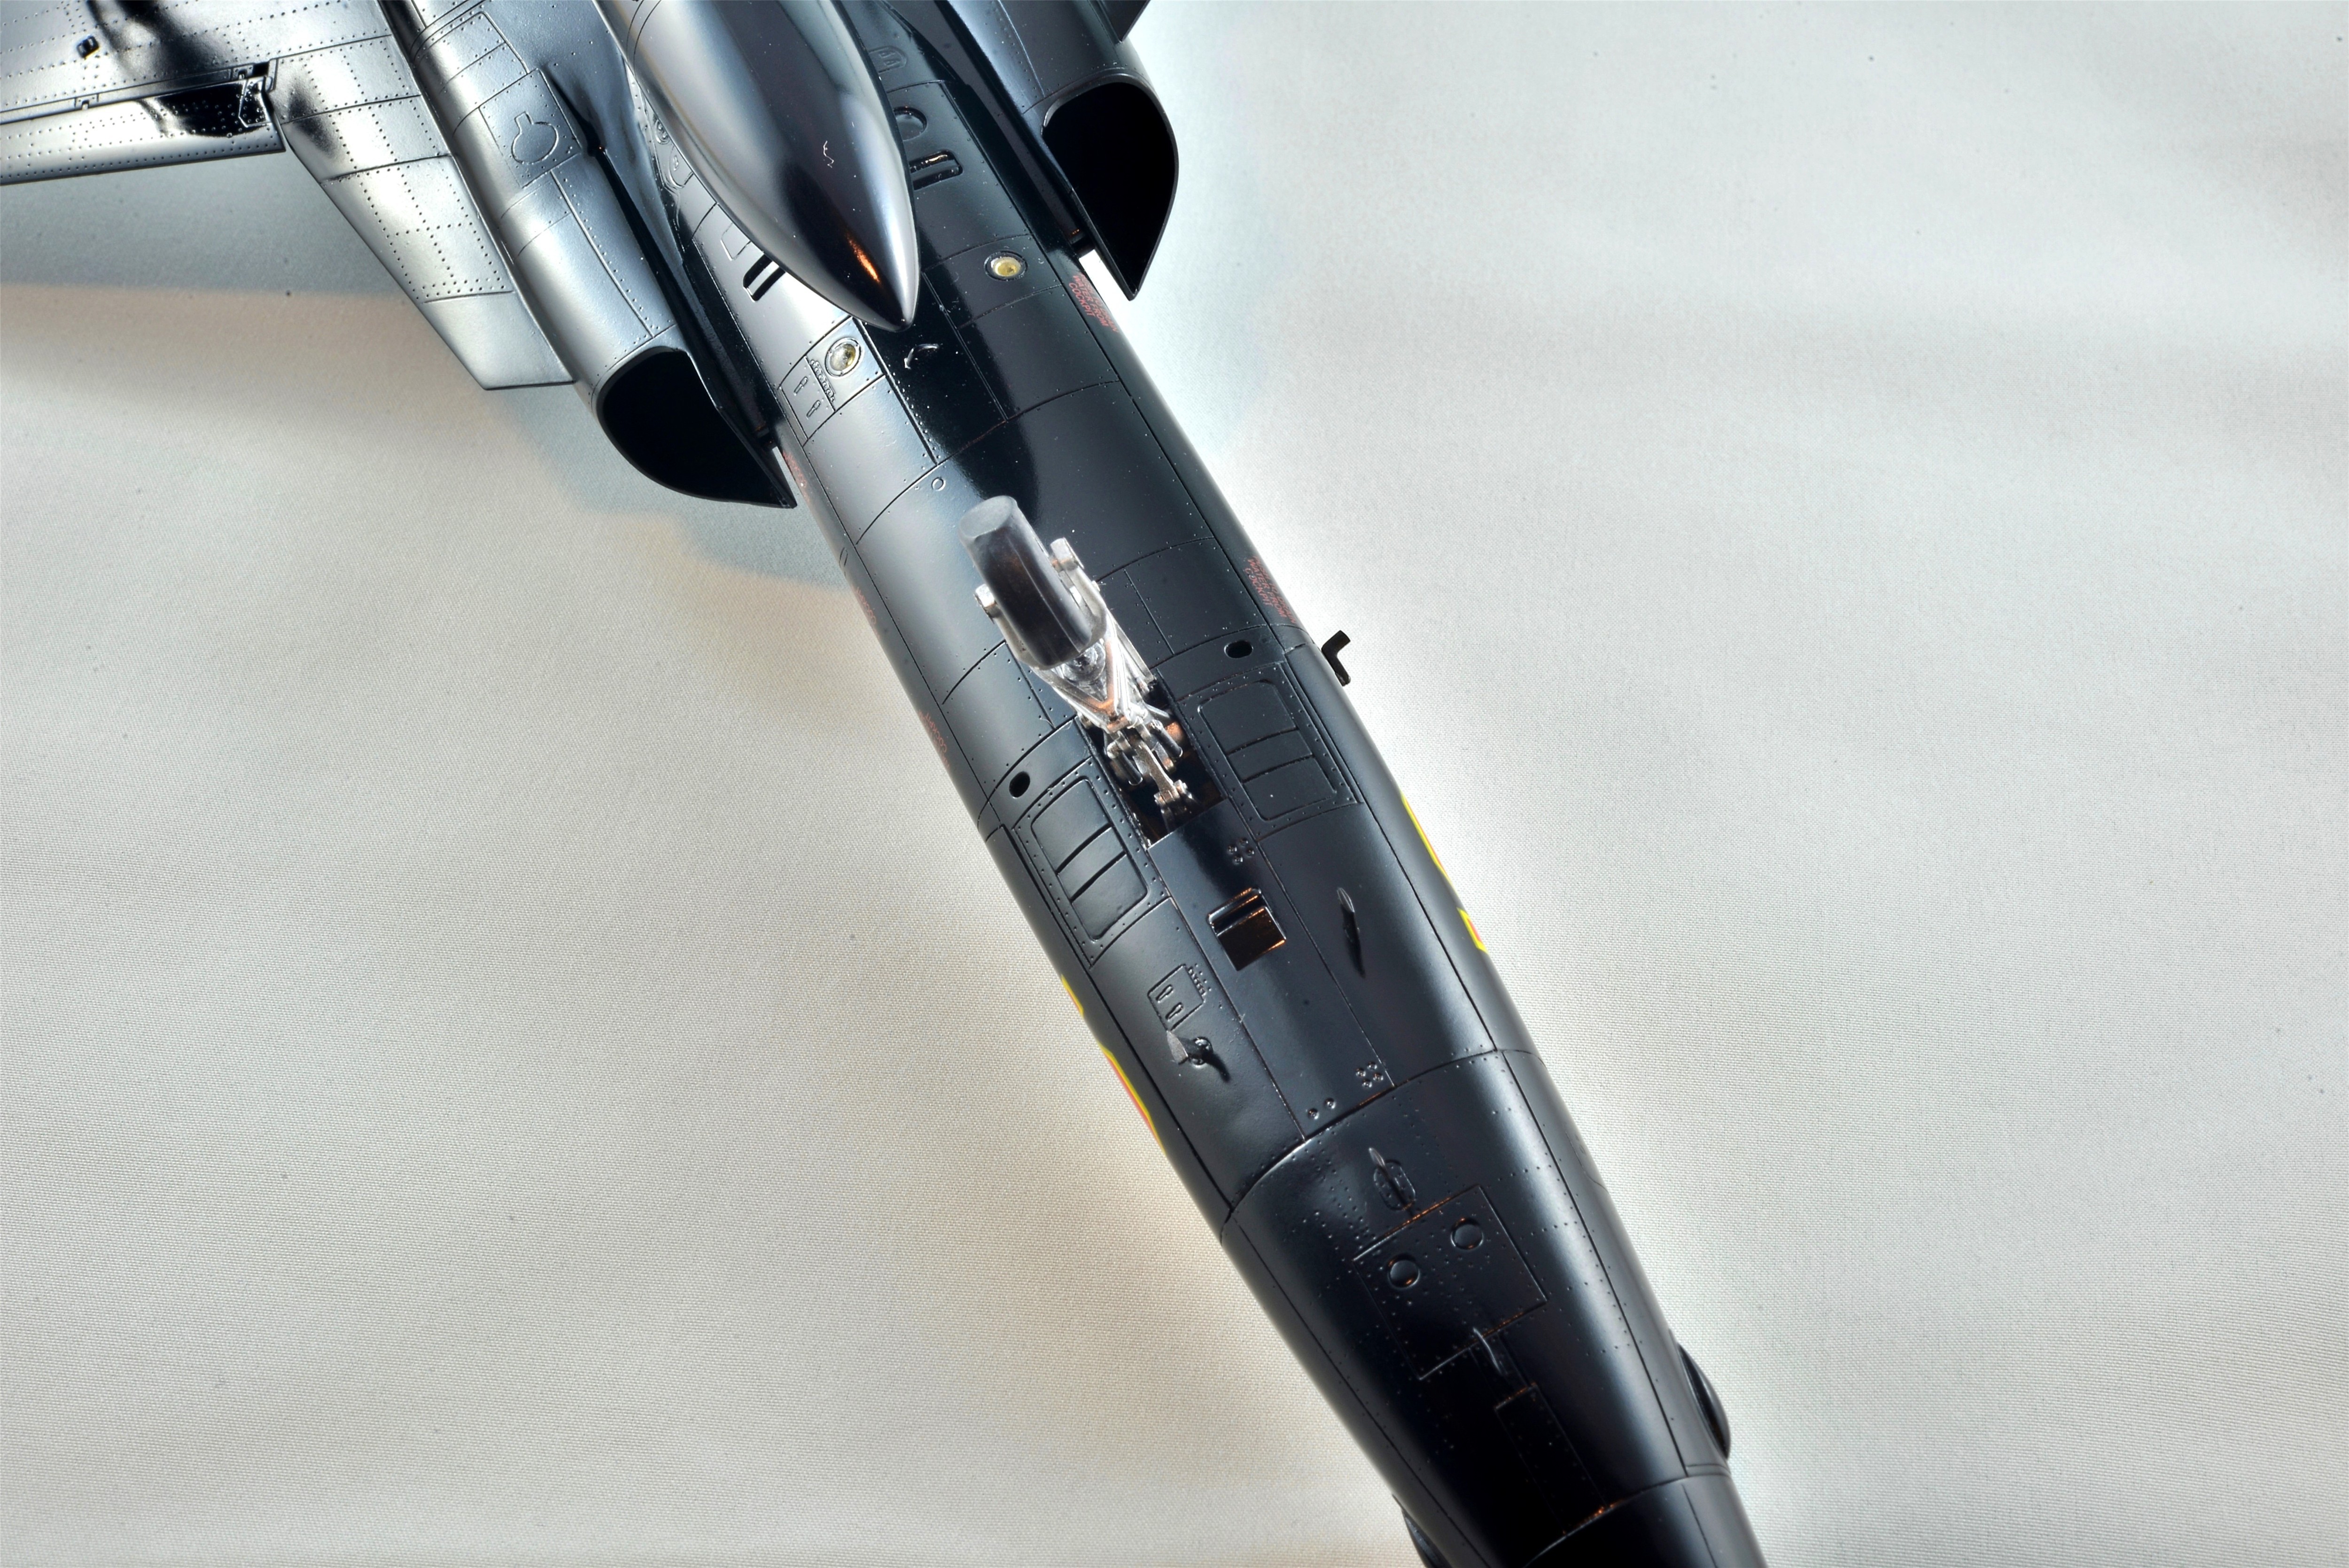
Now some real fun and before somebody alerts me to the fact that the titanium panels at the rear of the jet are often dull, I will be adding some semi-gloss lacquer to knock down the shine a bit later. For now, it looks pretty cool with all that raised rivet detail.
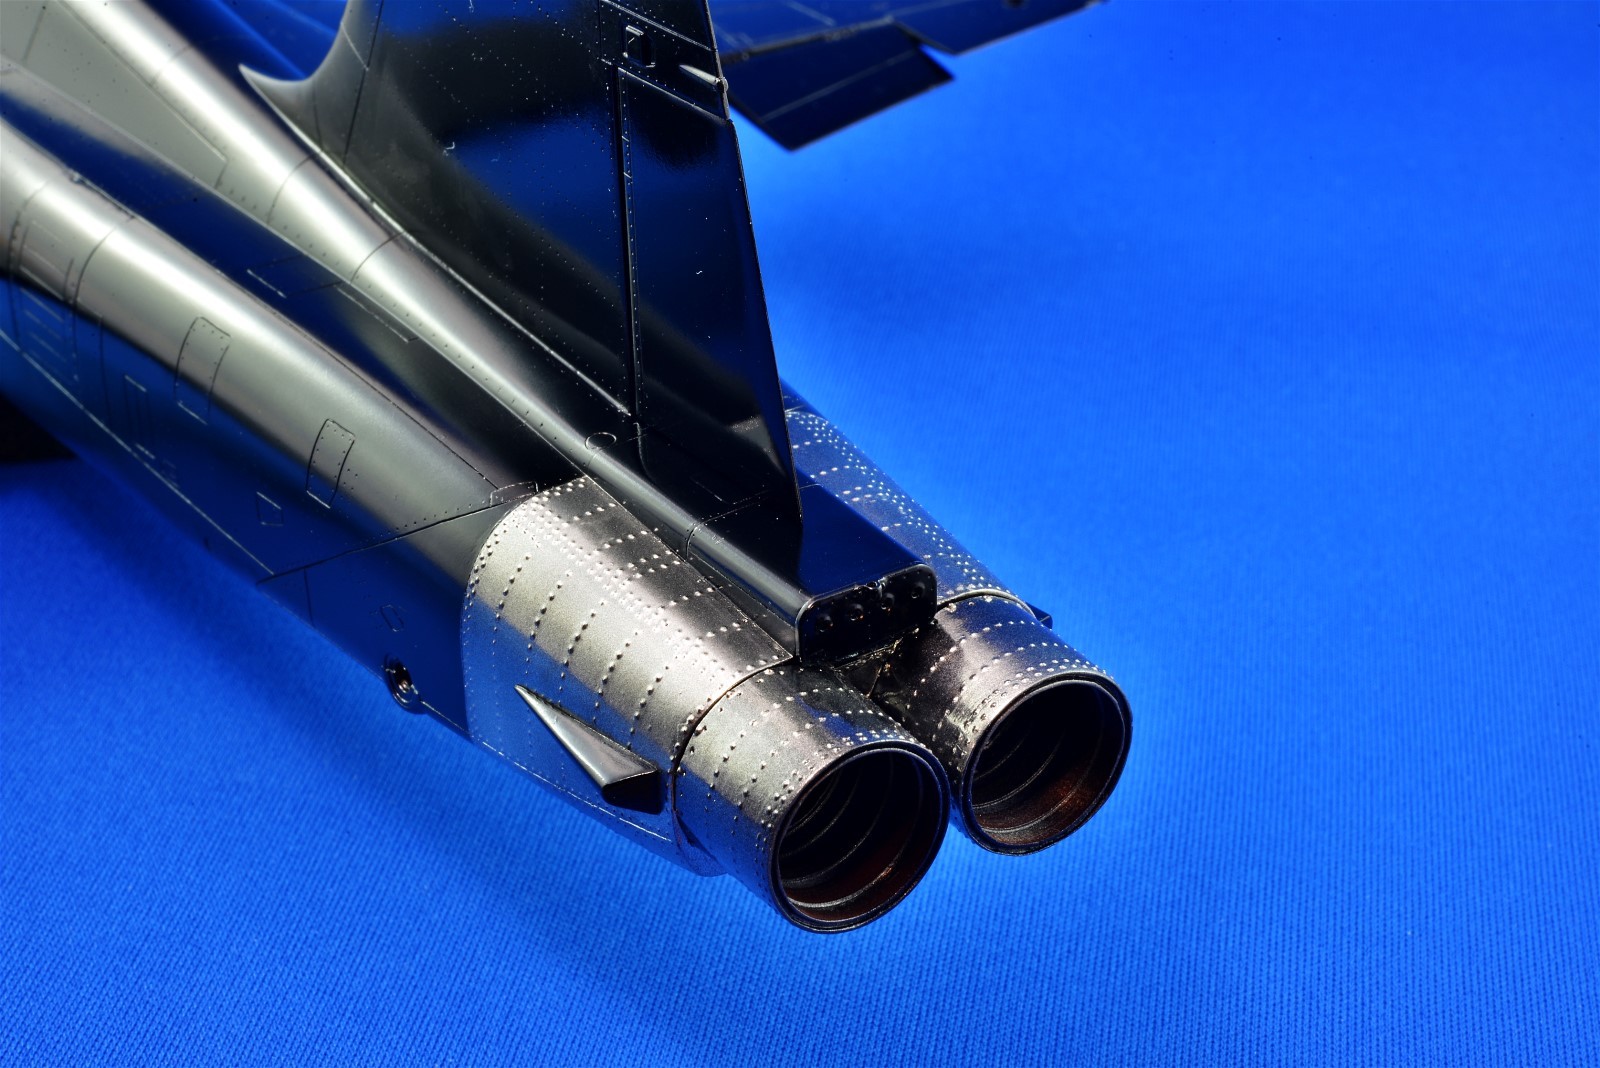
Next up are likely decals and here’s my plan. As cool as the gloss black finish looks, it’s too shiny for scale and I still need something to seal the decals in so that decal film edges will be minimized. To do this, I’m going to be spraying the entire model with Tamiya Semi-Gloss Lacquer right after decals, which will also tone down the shine of the titanium panels and exhausts. Fingers crossed that don’t regret this!
Cheers,
Chuck
-
6 hours ago, Solo said:
Chuck540z3, what source of light do you use in your workshop? Could you show us any pictures of your lamps?
Nothing special. Other than good overhead light within my paint booth, I have a couple of small desk lamps on the sides that I can move into position to allow reflections off the surface of the model I'm painting. You need reflected light to show how wet (or not) your paint is being applied.
Cheers,
Chuck
-
19 hours ago, Falconxlvi said:
Chuck,
Fantastic progress as per your usual standard! I know you mentioned markings weren’t available for the specific airframe pictured above. Have you ever considered custom vinyl masks to get the markings/identification numbers you are after?
Steve
Thanks Steve,
Yes I have and have used them before as shown below, but most of the placards are way too tiny for masks. If I'm going to use some decals, I may as well use all decals, but I have a plan to make the edges of them disappear- or at least be less noticeable.

Cheers,
Chuck
-
I was asked at LSP what my painting procedure is, so here it is again in sort of chronological order.
- As with all good paint jobs, the most important thing is to have a smooth and clean surface to begin with. You can’t spend too much time sanding and smoothing the plastic.
- I bet many of you guys thought I was nuts with all the fairly deep and prominent rivets that I re-punched and scribed all over the place, because it was sort of looking like an overdone Trumpeter kit. I overdid this detail on purpose, because after a few coats of paint it gets filled by at least 50%, so you need a bit of overkill to still see it after painting.
- I used decanted Tamiya Gloss Black Lacquer in the TS-14 rattle can line of paints. After decanting the paint and letting it sit overnight with a loose cover, I add about 40% Tamiya lacquer thinner, because I know it is very compatible. This paint sprays very smoothly and it dries to the touch very quickly.
- I usually use my ultra-fine Iwata airbrush with a tiny 0.18 mm needle for most of my painting of small parts or any Alclad, but for broad spraying of the entire aircraft, the more commonly used 0.3 mm needle works much better, so I use another Iwata airbrush for that. The smaller needle will work OK for a minute or two, but then it will start to sputter, while the bigger needle rarely does.
- Before you start to paint, remove as much dust as possible and then use compressed air from a rattle can to get the remainder off.
- I set the shut-in pressure on my compressor to a bit higher than normal at 23-24 psi, which sprays at about half that pressure in the 12-16 psi range. Experiment with the pressure on your setup, because a pressure too high will cause air turbulence and “dust balls”, while a pressure too low will sputter over time. This spraying pressure is also influenced by a host of other variables, like humidity, air temperature and how much the paint is thinned.
- Fill the paint cup of the airbrush with a pipette at all times, because you don’t want any crap from the lid to get into the cup.
- Have really good light and also directional light, so that you can see reflections to see if the paint is wet vs dull.
- After blowing a clearing shot of paint elsewhere, start spraying near your body and move away from it in one direction. Get the paint WET, but continue to move on once it is. If the paint isn’t wet enough it will orange peel and if it’s too wet it will run. You will find the sweet spot with practice.
- Paint in a continuous motion and always near where you just were. It might be tempting to stop and paint other areas, but if you do, you could leave ridges of dry paint behind.
- Paint just one horizontal surface at a time so that gravity is working for you and not against you. This allows you to get the surface nice and wet without any fear of runs. If you’re painting the top (or bottom), don’t paint the sides until the top is dry enough to handle. When doing the sides, hold the surface horizontal, or 90 degrees to normal.
- The first coat should be quite thin and just enough to cover the model to check for flaws. When the paint is dry for about 24 hours, fix the flaws, then re-punch rivets or re-scribe surface detail lost in sanding.
- Apply a second coat of paint after removing all dust, but this time thicker and wetter than the first. When dry, spot check and lightly sand out any crap that always manages to find its way onto the surface. Spot paint the repaired areas, but not the whole model, to reduce paint build-up in the details.
- Let dry for about 48 hours before handling it with your hands for any length of time. While seemingly dry to the touch, oil on your hands can create fingerprints that need to be sanded out and repaired.
That’s about it and like all painting, practice, practice, practice to come up with a routine that works for you.HTH,
Chuck
-
Thanks Guys.
12 minutes ago, my favs are F`s said:Well...how sexy it is...a lot; how beautiful those red soviet markings are... I'd always prefer the us markings 🙂 but the edits of all those misalignments and fit issues - well done! Absolutely fantastic. I wonder how you didn't edit them before though, even before the riveting and the describing...those were some pretty bold seamlines or at least they look like that in the closeups.
Congrats again on this....juicy "finish" 🙂
Well, I thought I did. Here's the fuselage join before paint. The join is behind clear CA glue, so it's very difficult to see what is totally removed and what is partially removed. Also, without making excuses, 90% of these seams would not have shown up on a regular flat finish. The gloss black magnifies everything like 5X magnifying reading glasses.
Cheers,
Chuck
-
11 hours ago, dylan said:
that paint finish...AMAZING. are you just decanting Tamiya gloss black from the rattle can and spraying it through your airbrush?
whatever it is the finish is flawless.
In a word, Yes!
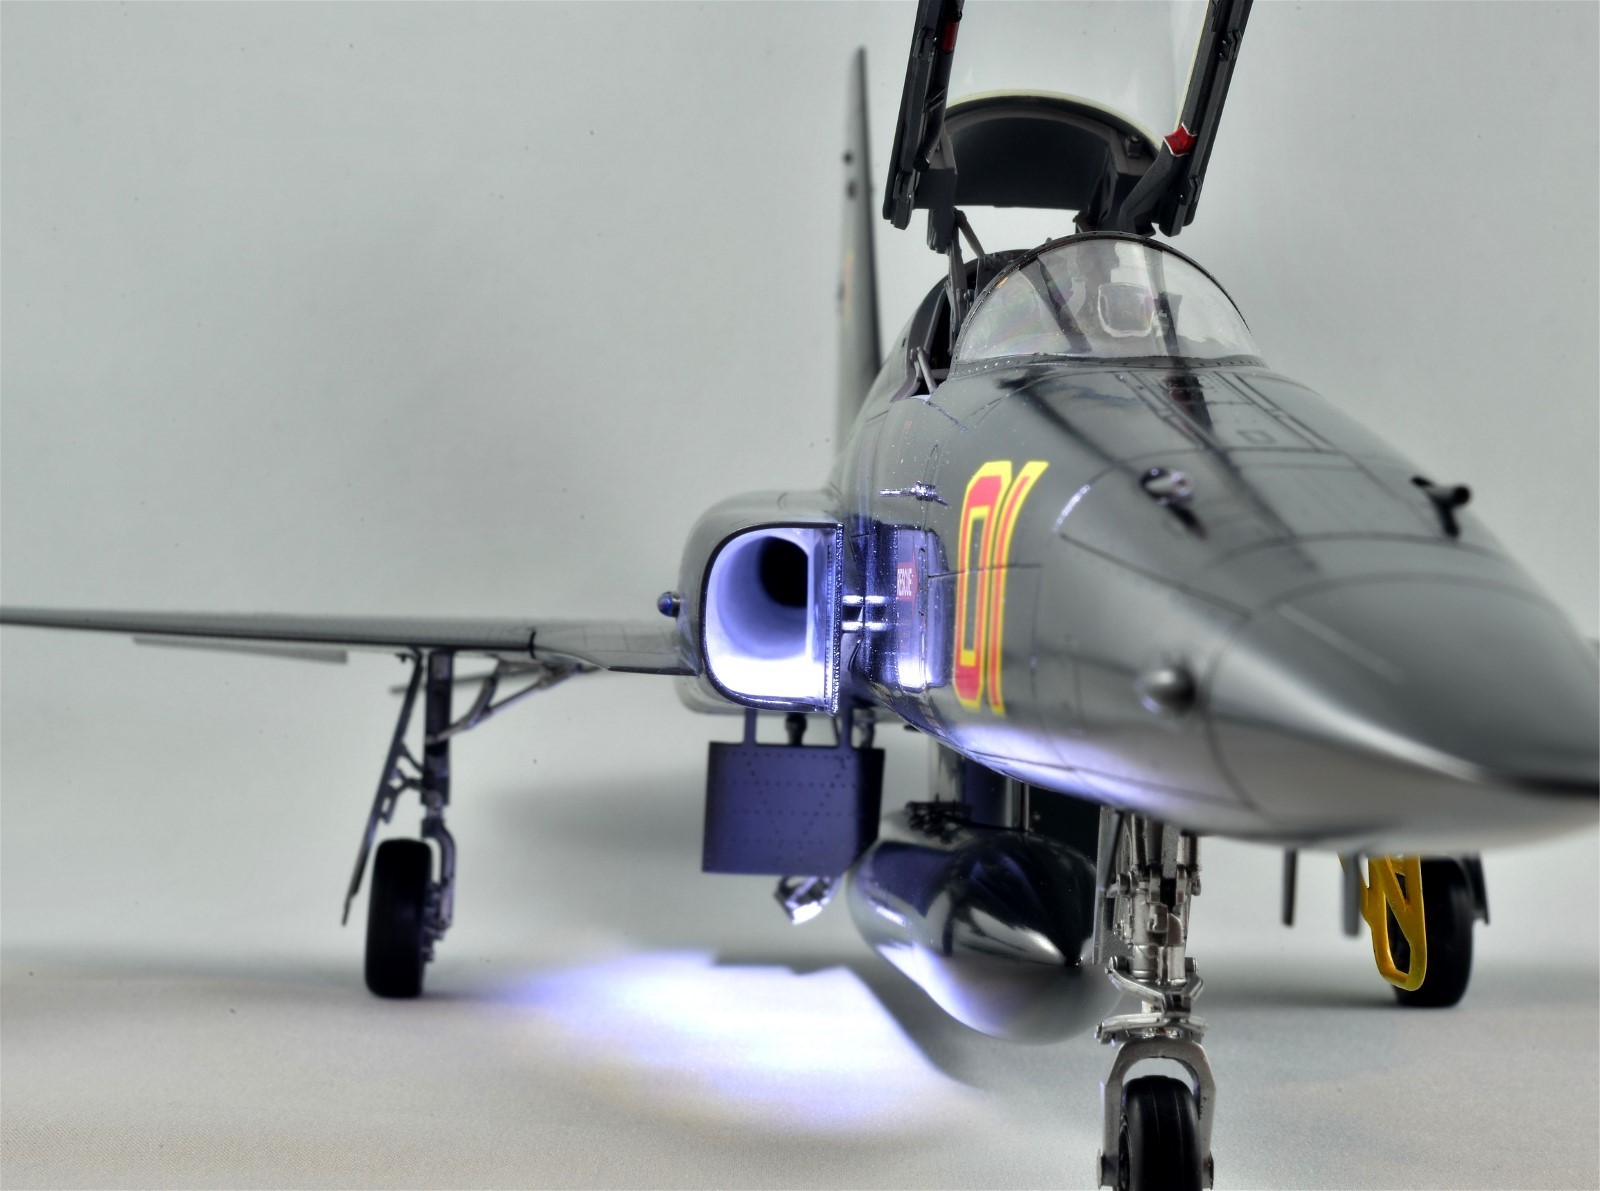
For those who might have missed it, this is the template, although nobody makes decals for this VFC-13 jet, so I'll have to compromise with a bit of a "what if" and use VFC-111 decals instead. Note how clean and shiny it is- and I don't care that it's likely that way just for the air show. If it looked that way for even 5 minutes, that's what I'm going to try and replicate.

Cheers,
Chuck
1/32 Kitty Hawk T-6/Harvard, "Kicked Up A Notch"
in The Display Case
Posted
DO IT! This aircraft is very popular and the kit would be much more popular if somebody fixed the width of the canopy parts, which is a major big time flaw. I bet you wouldn't be able to keep up with orders if you marketed a good product. Mark me down for your first sale if you do, since I have another kit.
Cheers,
Chuck