


swallows
-
Content Count
138 -
Joined
-
Last visited
Content Type
Profiles
Forums
Calendar
Posts posted by swallows
-
-
Hello, I have a query for canadian Labradors experts.
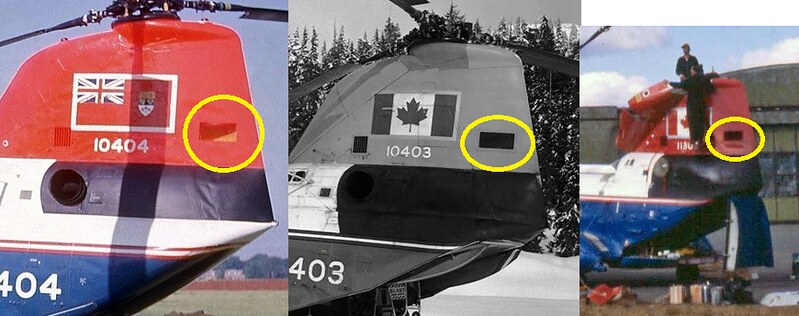
I'm putting the finishing touches to a model of the CH-113 in its initial delivery colors and I got curious about the strange aerials just behind the cockpit. Those on the left are simmetrical and can be seen in the first few years of service (late '60s - early '70s) while the strange plate came later and I think is only on the left side (on the right there would be the cabin door in the same position).
The first set is already identified being a common set for SAR duties in the early years, though the one on the right is quite obscure. Anybody knows what it is and how it worked?

Again speaking about details, what is that black vent(?) in the rear pilon? No other V-107 incarnation has it and it disappeared together with the above aerials when the fleet was upgraded and repainted in yellow in 1981.
Thanks a lot for any reply!
Fabio
-
Waiting for the 1/72 sheet, I have one question: is the medium blue of the VIP H-21B the same seen on Presidential 747s and 707s plus VC-140, VC-9B, C-32s, C-40s, C20s ?
Thanks
Fabio
-
Thank you for the hint Paul: I already have the Warrior sheet for the first scheme but I didn't know they had done also the later one.
A couple of years back, Jennings announced that fündekals:) was going to do the later C-123B Thunderbird, but he has recently stated that there was not enough interest. Recently, Warbird has released both early and late versions. Sorry, I probably shouldn't be mentioning competing brands here in the Caracal department. :(/>
-
Just ordered my sheet, waiting with trepidation!
As Paul pointed out actually you need the inscription for both sides, so it is just as well that you provided two.
I hope you will like it - I spent a lot of time getting the shapes right and triple-checking everything to fit the Revell C-54 kit. You will find that many of the elements that need to fit a particular kit part will fit very well - the passenger windows (One would think the windows would be evenly spaced. But no, dear reader - nothing ever is so easy in a decal designer's life), rudder and stabilizer decorations etc. But you will need to do a fair amount of manual touch-ups and adjustments, and some color matching. I could only provide two small color samples on the sheet, but hopefully they will help in matching the colors.
This scheme is 50+ years old and there is surprisingly little documentation about it - I was able to glean some details from old films and the early 1980s Squadron-Signal book. There was some uncertainty about some aspects of the markings, but I will mention these in the instructions.
(*): Before anyone points out: yes, I know the "City of Las Vegas" inscription is only on one side of the aircraft. But it felt cruel to break up the symmetry of the sheet. ;-)
-
Ok, maybe the question was too specific :tumble:/>
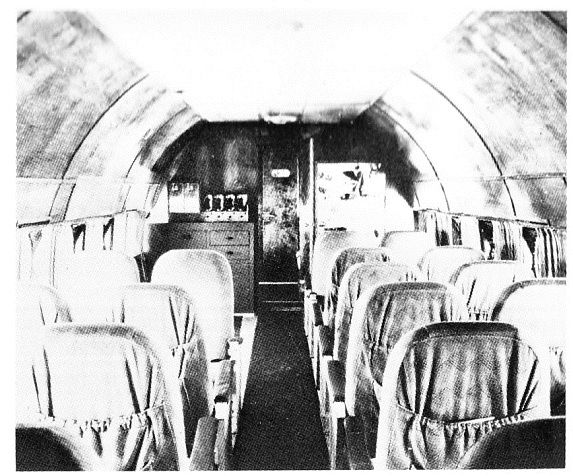
However, after more research and analisys of the very few images I could find of DC-4 interiors I came to these conclusions:
- the seat layout is probably the same as that used by civil airlines
- there are some missing elements such as the overhead baggage containers but otherwise the interior is very similar to any DC-4 airliner
- I guess there should be some kind of cargo area in the rear right end of the cabin since all the rearmost windows are blaked off: there are only 9 as on the left side which is quite unusual
I hope someone can add to this pieces of info I have collected: it's quite surprising how little references can be found online and in print on the C.54...
Cheers
Fabio
-
Hi, I'm preparing for the upcoming Caracal decals and trying to understand how the Thunderbirds Skymaster was internally arranged. I have only this image where quasi-airlines seating can be seen. Was this the normal arrangement for 'passenger' C-54? Would it have been the same for the whole cabin or could it be a 'combi' configuration?
Thanks Fabio
-
GORGEOUS!!
I have a Revell kit just waiting for this sheet.
May I hope for the same treatment of the Roden C-123B?
Cheers Fabio
-
Great choice Eri! Will follow with much interest, it's a subject I'd like to do in the smaller scale.
-
I'd like to join with the build of a Japanese helicopter: actually I'm starting it for a group build on another site but I'm not too confident I can finish it in time and here there are two full months more. Is this 'plan' admitted or should I start only here?
Thanks Fabio
-
Very nice result!
Will you share your recipe for the green?
Bye
Fabio
-
We'll be doing the Thunderbirds and Blue Angels C-54s
Glad to know. But when will be available the Thunderbirds C-123B decals announced in march?
-
If I remember well each Decal set contains generic instruction for the application: they say that the printing ink is quite stiff and so more difficult to have the decals conform to tricky surfaces. The suggested tip is to use very hot (not boiling) water to soften the decal.
I'm going by memory not having the instructions in front of me, however I suggest you contact directly the producer Greg Drawbaugh, he's always been very helpful and honest regarding his products.
Good luck
Fabio
-

This is a replica built in the sixties and donated to the Museum of Army Flying. It isn't necessarily true to the original...
Cheers Fabio
-
Hello,
I'm a helo fan and really don't bother with the other subjects in this sheet so the price is quite inflated for my wallet. Hope to meet a jet fan who don't like helos and want to make a deal :D/>
I'm in Italy and can pay with Paypal, I consider also a trade if I can help.
Thank you
Fabio
-
Hi Ryan,
you've been extremely helpful, thank you!
I just found the same problem with the jet exhaust, will take care with the decals.
Best regards
Fabio
-
Thank you Andre but these are only some of the possible painting schemes.
Hope someone can supply the whole sheet.
Fabio
-
Hello,
I recently bought the aforementioned kit and I was stunned at the amount of different decal options in the box (I counted about 15!).
Problem is that I haven't any painting instructions: on checking the few reviews available online it seems there should be a colour guide to the many options but I found nothing in my kit.
Anyone who bought the same can help me sending a scan of the instructions?
Many thanks in advance
Fabio
-
Hello,
I saw that Drawdecal has released a new decal sheet for the Swiss A340-300.
They say “The decal is available in both 1:144 for the Revell kit and in 1:200 for the various push-fit kits.â€
Anybody can give me an advice on which of the various kits in 1:200 is the best from a modeller’s point of view? I mean best overall shape and least toy-like details.
Thank you
Fabio
-
color laser was somewhat picky about the decal paper and not every brand of paper worked. I hope someone with the exact type of printer can help you get an answer.
Hi KursadA, thank you for your kind reply. In absence of any positive feedback I decided to be the guinea pig and purchased this printer. The first experiments went ko because it seem unable to carry the decal sheet and carry it through all the rollers even with 'cardboard' setting for the paper.
Perhaps the sheets are too stiff, they are from Tango Papa Decal but some years old. Ordered brand new stuff from CraftyComputerPaper, will see how it comes out...
Regards
Fabio
-
Hi all,
I resurrect this thread to ask a question regarding current laser printers: I saw in a previous post that Kursada used with success the CLP-325 to prototype his silk-screened decals. I'm going to purchase a colour laser for my home needs and would like to try also printing some decals for my own pleasure. The current model, more or less equivalent the CLP-325 is the CLP-365 which is publicized as using polymer toners working at lower temperatures: my worry is that these subtle change may affect its ability to work with decal paper and maybe the new toner won't stick to the decal film: anyone has tried this specific model and can say if it still works or not for printing decals?
Thank you
Fabio
-
Hi Roberto,
very nice model, I especially liked the subtle weathering. Could you tell me what white paint you used to cover the dark grey plastic and at the same time not fill the very thin panel lines? I have the same kit and am afraid of loosing all that lovely surface detail...
Cheers
Fabio
-
Some more......
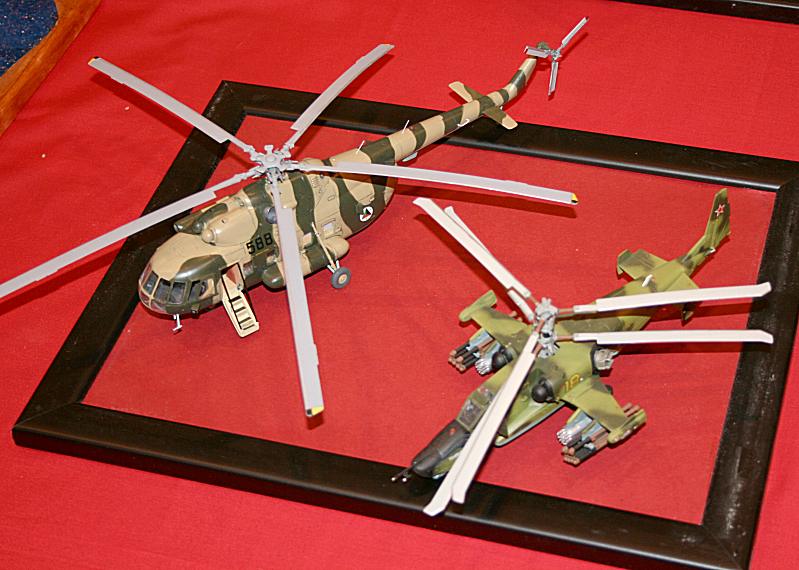
Ken
Hi Ken,
great models, it's an impressive collection

I have just a curiosity regarding this Mi8: do you remember how the rotor balancing weights were done?
Fabio
-
Hi John,
it's coming out very good!
Any news about your A-109 complete kit?
Fabio
-
Hello,
I have the Fly DC-9 kit which, as far as I know, is the same plastic as the AZ one. It represents a DC-9-30 so you don't need any special modifications to make it a C-9B. There are only two things to watch for: first check if the airframe you want has this flat antenna in the tailplane fairing.
Secondly the DRAW sheet is probably tailored on the Airfix kit which is slightly shorter than the Fly one: this may cause some problems with the fuselage cheatline...
It's a pity you haven't this kit which offers all you need in one box.
Hope this helps.
Fabio

CH-113 Labrador external details
in Helicopter Modeling
Posted
Thank you for your contributions, they stimulated further research and I drew the following conclusions based on observation of images and snippets of info found here and there:
Just when I was doing the umpteenth google search I found this page were everything is very well explained in word and pictures:
http://cdnsarlab.blogspot.com/2012/02/operational-differences-antennae.html?_sm_au_=iVVnM4FMP2RkHZqdK82BvK0JskMpq
Well, at least I was not wrong 🙄
Now there is still that black vent in the rear pilon. I checked hundreds of images but it seem a peculiarity of just the early Labrador, no other V-107 has it.
Really strange!