


jonbryon
-
Content Count
962 -
Joined
-
Last visited
Content Type
Profiles
Forums
Calendar
Posts posted by jonbryon
-
-
OMG, you are coming from Zhengzhou, and you talking about how hard getting Trumpeter kits, are you joking?
hehe, as we know, Trumpeter always sell their kits late about one or two seasons inside China after the release date in US market, don't panic, they will come to you eventually... Long wait, but cheaper price, satisfied?
Is the small shop you said is Jin Yi model? Go to www.sonicmodel.com to ask them for what you want.
Not sure of the name of the model shop I know - mainly RC and armour there, only about 10 aircraft kits (plus a lot of old Matchbox Dornier floatplane models!). I'll follow up the website you've recommended - thanks!
Jon
-
I have to admit, jonbryon's first question is what I concerned, the shipping fee to Shanghai is more higher than regular HK based dealers, more like shipping from Japan to China.
But, I have to admit also, I got what I paid for everytime, their ordering system is more sweet than some other webshop(they are also very kind), for example, I order 10 items together, they could be send to me in 3 or 4 packages, coz it's hare for LM to collect all I want at one time or keep all of them for one single pack, they just send me what they got this week, and maybe the next week I got some others, and above all, NO ADDITIONAL FEE! I can live with that no problem, coz LM did try to help me get all I want.
newca96,
Where do you order from in China/HK other than Luckymodel? I want to get Trumpeter's new Panther, but find it faintly ridiculous that I can't get one in China and have to order it from Hong Kong (which is quite expensive on postage). There is a small model shop in Zhengzhou, but they carry no Trumpeter aircraft - only armour (although I may try and see if they can order me one). Which companies offer better shipping prices to the mainland?
I did email Luckymodel to find out why it costs more to mail a package across the border than across the Pacific, but, although they replied, I still don't know why!
Cheers
Jon
-
I'll add to the chorus of 'they're great' platitudes - I've ordered from them quite a few times recently. I've two gripes:
1. Why is their shipping to mainland China more expensive than to the US?
2. Their 'in stock' descriptions can be incorrect - I ordered a Hase F-104DJ that turned out to be out of stock and it took an email from me to establish this. They are excellent at replying to emails though and easily changed my order to the F-104D.
Cheers
Jon (whose wife is taking him on a model plane buying trip to Hong Kong today - how lucky am I?)
-
Just to say that, while others may want this thread to fade away, I'd really like to see that revised table from Craig. I'm really hoping I can pick this kit up in Hong Kong this week, but I'd like to check out the dimensions compared to the documented measurements.
Thanks to all for a great thread. I'd really appreciate as much info as possible; many on other forums still seem to be sure that the Trumpy kit is too long, but that seems far from certain at this stage.
Cheers
Jon
-
Thanks for the info. I'm used to only thinning 20-30%, so I've just gotta get used to a different paradigm.
I am using Mr Leveling Thinner at the moment, but thanks for the advice!
Cheers
Jon
-
Thanks Grant. I've used Citadel, Tamiya and Gunze Mr Hobby Color acrylics in the past, but never seen this phenomenon before. I guess I'll be thinning my paint more from now on (and oh how I miss enamels!).
Cheers
Jon
-
Craig,
Thanks for the clarifications.
I've never seen a Monogram Panther (nor the Trumpy one yet), but given that the two have different dimensional errors, do you think Hobbycraft copied Monogram (as everyone else seems to be asserting?).
At least you've reassured me over my future purchase! The Trumpy kit is cheaper that the Revell one where I am, and I *hate* rescribing.
Cheers
Jon
-
Craig,
Thanks so much for such a thorough job - really helpful. I am going to purchase the Trumpy kit next week, and was wondering if you could confirm what I conclude from your research:
*The Trumpeter kit is the correct length and removing 10 (or 8, depending on who I believe!) scale inches would make it too short.
*Although it is the correct length, some of the proportions are wrong - fixing these looks far more difficult than just removing a part of the forward fuselage. This is also true of the Monogram kit.
*It is impossible that the Monogram and Trumpy kits *are* the same length.
Thanks again
Jon
-
Hi,
Now I live in Asia, Gunze Mr Color paints are by far the easiest to come by, so I've been forced to switch from my beloved Xtracolour. It's been okay, but twice now I've powered up the airbrush, thinned the paint and started painting at about 10 PSI, only to have the paint form 'strings' like cobwebs. These not only clog up the detail of the kit and stream off the edges, but fill the air with cobweb-like paint! I've managed to reduce it by cranking the pressure up to 20 PSI or so and more heavily thinning the paint, but this reduces the control I have over painting and makes the paint pretty translucent (especially with Mr Base White). I am using Mr Self Levelling Thinner (400) and a Badger 200. Is there any way to *not* have this 'cobwebbing' and still spray at a lower pressure and with better opacity. I have heard a lot of good things about these paints, but so far I am finding them a lot less user friendly than the enamels I've been using for the past 10 years or so.
Thanks for any help
Jon
-
Thanks guys - appreciate the kind words.
Merry Christmas!
Jon
-
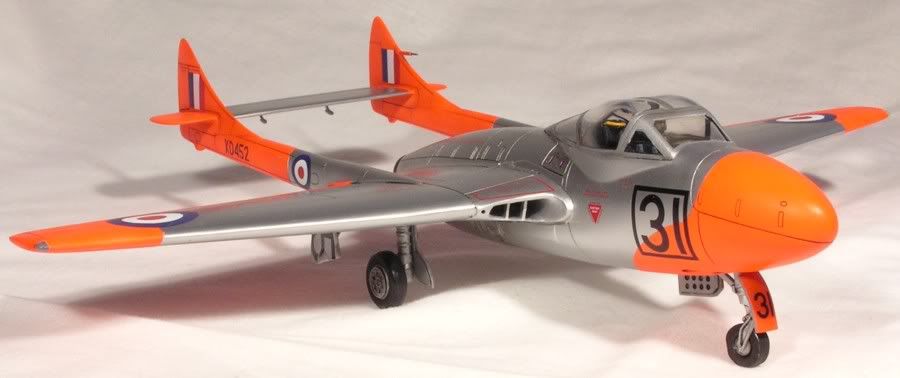
Moved from the UK to China this year, so only managed five. And two of them were Classic Airframes Vampires, so took a while to put together! Two Hasegawa AV-8Bs are on the way to the paint shop, so not a bad year! All 1/48.
Cheers
Jon
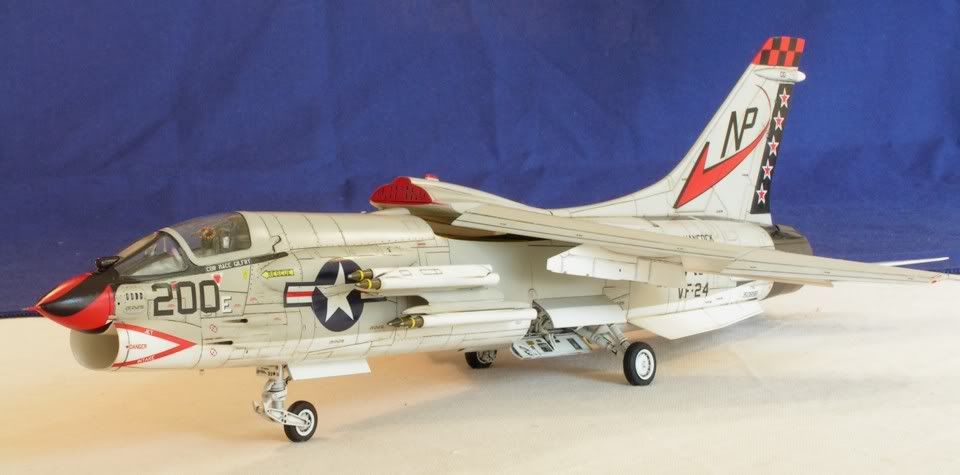
Hasegawa F-8E Crusader + Cutting Edge seat
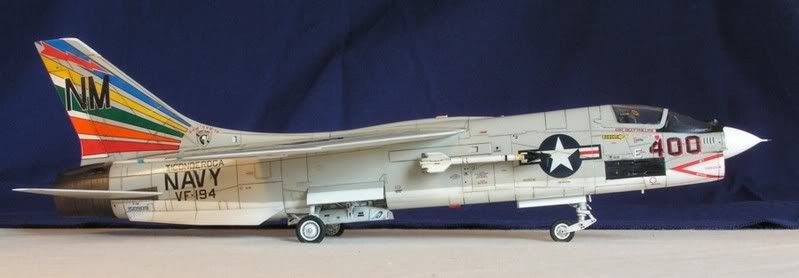
Hasegawa F-8J Crusader + Cutting Edge seat
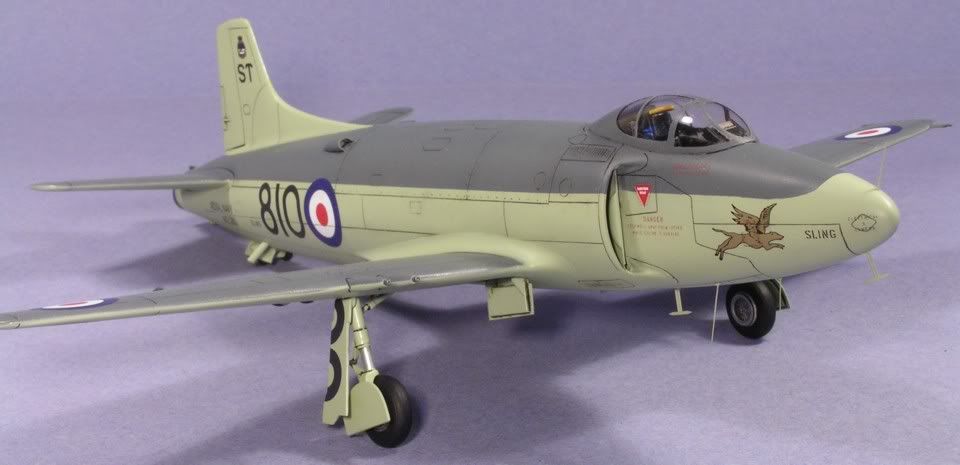
Classic Airframes Attacker FB2
Classic Airframes Vampire FB5 + Aeroclub fuselage, intakes and canopy, Xtradecals
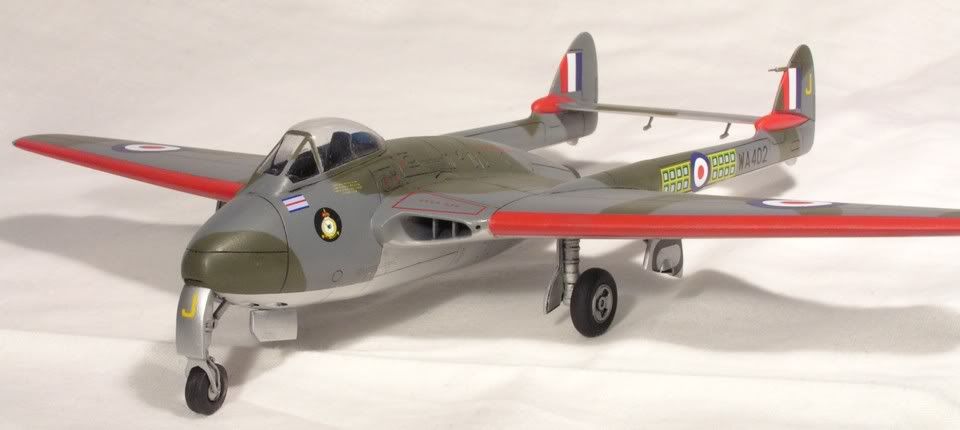
Classic Airframes Vampire T11 + Aeroclub intakes
-
I've built two, and I built them at the same time. I've seen worse. One trick is to attach the intakes *without the internal trunking attached* (i.e. don't follow the instructions). I got a gapless, flush fit doing it this way. I've a B in the stash I'm very much looking forward to building. The only issues I had were the join at the front to rear fuselage, installing the main gear bays, and fitting the nose gear.
Jon
-
I had that happen as well once, apparently had somethig to do with the Future not being properly cured. But the great thing about futuring first is if the part fogges it is easlily removed by dipping the part in Future again.
David.
Well, maybe so! But my canopy was well and truly on when it fogged (see below), so there was no way I was going to remove it.
Jon
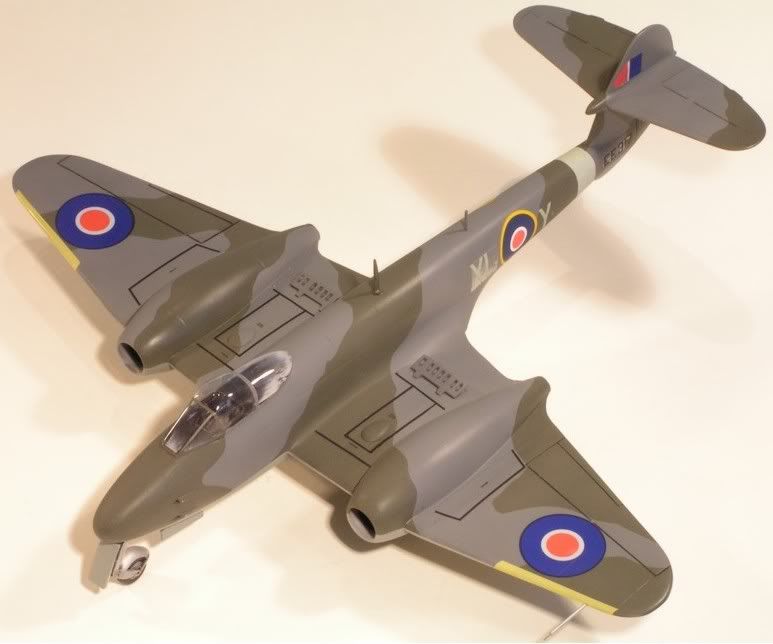
(Aeroclub Meteor - an old build, so pretty poor quality...you can see the fogging at the rear of the canopy.)
-

Is it just me, or is the deflection of the flaps on the SH in the bottom right corner (107) pretty miniscule?
Disclaimer: I read all the posts on the flaps up/down controversy when both kits were released, both here and on HS, and followed John Chung's build with interest. I bought both a Hase F and Revell E. I won't be buying any more (I only build one of each type).
Jon
-
Actually, liquid poly cement works fantastic for glueing clear plastic. I use MEK and touch a loaded brush to the joint, well away from the part of the window that will remain clear. It even works when the surfaces to be glued have been painted. The resulting bond is stronger than if using either superglue or white glue. But, be careful not to let any of the glue touch the window itself, otherwise it will craze (but can fairly easily be polished out if this does happen).
Everyone says that you can use superglue with future/klear, but I tried that and the canopy fogged. Not an experience I want to repeat, so I stay well away from superglueing windows now!
Jon
-
Ah, the CA Vampire....what a disappointment to me that was; fit-wise, one of the worst kits I've built & like you, I used the Seroclub parts. Nice site by the way (but my stash is bigger than yours!)
Graham
Yeah, they were a challenge, but I am sorely tempted by the NF version, and will hopefully get a couple of the coming Venoms as well. I have to admit I did enjoy building them!
My stash is rather anaemic, but I'm a poor English teacher and they're expensive to ship to China. Kind of a good way of limiting what gets bought these days!
Cheers
Jon
-
Jon, I think I got away quite lightly with this one. There was a slight step "fore & aft" once the LERX was fitted which simply required a bit of sanding, but there were quite large gaps underneath which are very awkward to treat effectively with filler - I simply ran in some PVA on the end of a cocktail stick; not perfect but acceptable.
Ahh, I see. I did have some slight gaps on the underside of the LERX. I used superglue and sandpaper wrapped round some photo-etched saws to get rid of them, followed by Mr Surfacer. But honestly, some people seem to think this is a poorly-fitting kit! Having just built two CA Vampires (which you can see at www.jonbryon.com/model_index.html) with the Aeroclub mods, these Harriers are a complete doddle to put together (IMHO of course)!
Cheers
Jon
-
Parts & decals right out of the box. Paints are Xtracolours & are the correct colours for this machine, rather than the incorrect call-outs on the Hasegawa instructions. No real problems apart from the awful fit of the LERX where a little filler, card & PVA was called for. I had wanted to fit the gun pods but the fit of those was TRULY awful - like they came from a different kit!!
Nice model Graham. But where did you have trouble with the LERX? I have just completed the fuselages for an AV-8B and AV-8B+ (both 1/48 Hasegawa) and the only gaps I have had are a small gap between the upper and lower LERX halves on the B+ (and no gaps at all on the B, with its 65% LERX). I have read that a lot of people had trouble with the fit of these kits, but in my opinion the fit is better than the Hasegawa Hornets and Tomcats, about the same as their Crusaders, and not quite as good as their Skyhawks or Starfighters. On the other hand, I did completely ignore the instructions and dry fit the entire airframe before deciding how to stick it all together (and using a completely different method that Hasegawa suggest).
Nobody should be put off this kit - it fits great if you take your time!
cheers
Jon
-
Thanks Seamaster. Seems to me that going with spoked wheels is safer for earlier models. Thanks also for confirming the air intake issue - I was going off some photos of F-89Cs for the 74th FIS and none that I could see had them. I doubt I'll ever build another C model, but if you do turn up any info on them carrying rockets operationally, I'd be interested! It's one of those planes which is so ugly you've gotta love it, so I might build a D or J in the future...
Thanks for the compliments.
cheers
Jon
-
Jon, the modifications you done to your F-89C did not necessarily make it totally accurate. After seeing yours which looks terrific and reading about your mods I decided to get out all my material on the F-89 since it peaked my interest again. Went thru my Detail & Scale F-89 and my F-89 Photo Chronicle ( 124 pg Black & White & Color pics ) I found a close up shot of the right side of the nose wheel. It,s exactly like the kit nose wheel. No spoke and smooth. Apparently some aircraft differed. So the kit nose wheels would not really be wrong if you wanted to use them. I also have a copy of Airpower Magazine Special Issue on the F-89, May 1981, Volume 11 No 3. On page 20 it shows a B&W photo of an F-89C with the ground crew installing rockets. The writeup for the photo states that, installation of 8 HVAR on A, B and C models was in compliance with the ground attack requirement which was also well supported by the 6 20mm guns in the nose but that requirement was eventually dropped. The adding of the tank fins like you said is essential. In essence ,using the kit nose wheels and leaving the racks for the rockets or even adding the rockets would be alright according to the photo and writeup. Thanks for tweaking my curiosity again.
Hi Seamaster,
Thanks for the feedback. It was years ago that I did the research on the F-89, and I got a lot help via the web from people like Roger Jackson (IIRC). I seem to remember that the spoked wheels were for the C model and that smooth wheels were added to later variants - is the photo you have definitely of a nosewheel on an operational F-89C, or could it be another model (I know the smooth wheel is correct for a J, and I think maybe a D as well)? I am not doubting you, but the only pics I could find of smooth nosewheels were for later Scorpions.
As for the rockets, again, is the picture of an operational machine, or a test example? I definitely saw some pictures of rockets on F-89Cs, but they were all for testing purposes. It would be interesting to know for sure if operational squadron aircraft carried them. I rather assumed they were like the dual sidewinder fuselage pylons for the F-104C - able to be used in theory, but not done so in practise (at least in the USAF).
Thanks for the info. I'd be very interested to see where this goes. Do you know if my fuselage mods to remove the rear fuselage air intakes were also correct?
Jon
-
I have one on the up in the pile- any notes to pass along? BTW excellent work!!

I built one a few years ago (see below). IIRC quite a lot of modifications need to be made to get an accurate C model. Mine include:
1. Filling and omitting various fuselage vents and air intakes.
2. Using paper overlays on the nosewheels to give them a spoked appearance.
3. Addition of fins to the wingtip tanks (they don't come in the box).
4. Removal of the rocket pylons.
I'm not an expert on the F-89 by any means, but used photos on the web to verify the changes I needed to make for the aircraft I was modelling. I rescribed the kit as well.
Nice model; I would built the J if I could find it.
Jon
-
I'm building two Hasegawa 1/48 Harriers at the moment (an AV-8B+ and an AV-8B). I'd read a lot about these kits before hand and approached them with some trepidation - people seemed the think the fit was generally awful! Well, it isn't. The trick is to ignore the instructions and dry-fit the entire airframe to figure out your plan of attack. I decided to do it this way:
1. Join the rear fuselage halves together with lower fuselage insert. Fit is very good.
2. Join the right and left nosecone halves to respective front fuselage halves and then join to make a complete nose section. Fit is very good.
3. Join lower wings to rear fuselage. Fit is good.
4. Fit lower LERX pieces (for both 65% and 100%) to the rear fuselage *making sure* part B3 (just behind the cockpit) is temporarily fitted in place. If not, the fit of the LERX will be awful as the rear fuselage needs spreading a little to fit the LERX and part B3. The fit of the LERX is very good, it's just that the seam is awkward to get to.
5. Attach the engine fan to the rear of the nose section (*not* the front of the rear fuselage - that really screws things up) and part B3 as well.
6. Then attach the upper wing followed by the upper LERX followed by the complete nose section. This eliminates any fit problems with the LERX, part B3 and the nose section.
I also attached the wing tips to the upper wing before attaching the upper wing to the lower to ensure they fitted flush.
Of the Hasegawa 1/48 modern jets I have built multiple copies of, this ranks better in terms of fit that their F-14 and F/A-18s and not as good as their A-4s and F-104s. I'd say it was similar to the F-8 in terms of overall fit.
I'm enjoying building them and am not put off building their GR5 and GR7.
HTH
Jon
-
Having received two Aires 1/48 resin S-III-S for my Hasegawa AV-8B+ and standard B, I was somewhat disappointed to find they are too wide for the kit cockpit (despite being marketed as for the Revell and Hasegawa kits). The loss of detail to add them means it's not worth it (they're pretty simple anyway and I'm gonna close the canopies), so I'll use the kit ones. Oh well - $10US + postage to Asia for the photo-etch seatbelts. Just a warning so that no-one else makes the same mistake...
Jon
-
EDIT ***PLEASE IGNORE TOPIC***
Had a thought once I'd written the below. Turns out I connected my pressure regulator backwards (not as impossible as it sounds, since the connectors are the same on both sides and there are no 'in'/'out' labels). Apologies for wasting your time reading this...
Jon
Hi,
I have purchased a new, tank-type compressor here in China. I have hooked it up to my old pressure gauge from home and Badger 200. However, although I used practically an identical compressor back in England, I seem to have lost the pressure control I used to have. I used to be able to regulate the pressure using a knob on the regulator. If the tap from the compressor was fully open, the amount coming out of the regulator into the airbrush was modulated accordingly. Now, the air comes through the airbrush, but the excess pressure is released by air being expelled around the regulator knob and the pressure of the air coming out of the 'brush is very high. The tank therefore empties very fast. The only way I can get the pressure to be what I want is to bleed air from the tank to reduce the amount going into the regulator - again, emptying the tank very quickly and requiring me to run the (very noisy) motor continuously.
Am I doing anything wrong. Is the regulator simply not coping with the airflow (I don't think so, because it coped with my old compressor fine). I've tried taking the regulator apart, but can't see anything obviously wrong (although it is pretty old!). What I want is for the regulator to simply allow through air at the pressure I want (say 10-15 psi) without any air bleeding out elsewhere, so I can fill the tank up and have it last me a good 20-30 mins spraying. Is this too much to expect (although it seemed to work before), and if not, is it common for pressure regulators to wear out?
Many thanks for any insights you might be able to offer!
Cheers
Jon
AV-8B unit questions
in Jet Modeling
Posted
Hi,
I dunno if anyone can help me, but I'm trying to pin down the details of two 1/48 Hase AV-8Bs I've just built. I simply need location and date.
The first is an AV-8B+ from the original (first) boxing. I've done the kit in the VMA-223 kit supplied markings (option 2) and have no clue as to the date of the markings. I know the Bulldogs got their Plus models in 1994, and the kit was made in 2003, so presumably the markings date from sometime in that period. Any help much appreciated (and I assume the plane was based in the USA).
The second is a standard AV-8B from the 'Desert Harrier' boxing, marking option 1 - VMA-231 Ace of Spades. I assume this is from early 1991, but does anyone know where VMA-231 were based for Desert Storm? Unfortunately the book I own that would tell me this info is in England, and I am not.
Many thanks for your help. I should be able to post some photos in Critique Corner in the next couple of weeks.
Cheers
Jon