


jonbryon
-
Content Count
962 -
Joined
-
Last visited
Content Type
Profiles
Forums
Calendar
Posts posted by jonbryon
-
-
18 minutes ago, polar bear said:
For Tamiya and Kinetic, I prefer Wolfpack design seat. Mine fits quite perfect.
The seat also comes with sheep skin cushion.
SHM F-16 seat is good too. But I have not heard from them for while.
Thanks - I intend to get the Wolfpack ones. It's for a US Navy F-16B so I think they might not be quite right, but they will be close enough.
I wish I could get SHM products, but I live the UK where they are unavailable (and shipping, at $25, plus the risk of adding 20% VAT and an £8 handling charge, is prohibitive).
Jon
-
5 hours ago, okthree said:
The Quickboost fits the Hasegawa tub like a glove, but is too wide for the Kinetic. In case you're wondering, its too wide for the Tamiya also.
That's really helpful - thanks.
Jon
-
Hello all,
Before I spend money, can anyone confirm which aftermarket resin seats are compatible with the Hasegawa 1/48 F-16 kit cockpit and the Kinetic 1/48 F-16 kit cockpit? I've made the mistake of buying resin seats before only to find they are too wide for the kit plastic.
I'm interested in the Quickboost 48002 resin seat and the Aires 4141 resin seats.
Many thanks
Jon
-
On 6/16/2020 at 5:06 PM, dai phan said:
BTW I ADMIRE your builds on the Net !!!
Thanks 👍
Jon
-
16 hours ago, dai phan said:
So by buffing I will not haver the issues of paint specs all over my hands ? Dai
No. You need to seal it.
Jon
-
18 hours ago, dai phan said:
I am surprised to find Mr Metal Color is rather poor as the paint is easily got rubbed off. Dai
Mr Metal Color is buffable and so needs sealing to prevent being rubbed off.
Jon
-
On 6/8/2020 at 2:38 AM, caudleryan said:
Incredible finish! With the troubles you had, it sure turned out stunning!
Thanks 🙂
Jon
-
2 minutes ago, dai phan said:
Thanks. Any issue of tip clogging with regular MC thinner? Dai
Not really, but that will depend on how you thin the paint and spray it.
Jon
-
On 6/1/2020 at 9:31 PM, dai phan said:
In the mean time I have to order Mr Color thinner and have to make do once the leveling thinner goes out. I assume the regular thinner just takes longer for the paint to dry? Dai
No - the reverse. Regular MC thinner is quicker to dry than MLT. You can make it behave more like MLT by adding a drop or three of Mr Mild Retarder in an airbrush cup full.
Jon
-
IMO the GWH T-33 is a very quick build for a 1/48 jet: https://jonbryon.com/great-wall-hobby-1-48-lockheed-t-33a-shooting-star/
Jon
-
On 5/23/2020 at 3:14 AM, Rodney said:
With everything going on, I was looking for a quick build. The Trumpeter JF-17 seemed like a good kit and got it down. For some reason, the I find the shape of this aircraft interesting. Also, I got inspiration from Aigore in this thread http://www.arcforums.com/forums/air/index.php?/topic/254336-jf-17-thunder/
The kit is ok. You have to test fit most pieces and do clean up on the parts. My intent was to do a closed canopy but it'd did fit well enough to go that route. So, last minute change. I used Caracal decals.
Thanks,
Rodney
Nice. I really hope this sheet is re-printed as I missed out on it.
Jon
-
7 hours ago, Curt B said:
I just took look at Sealcolor, and their prices are nice, but again, like so many other retailers, they don't seem to have the C511-C530 and the C351-C369 and the C391-C393 colors that, at least to me, are important (i.e., WWII armor, WWII aircraft and Soviet colors, respectively). But they do appear to have many, if not all, the other colors.
If I'm wrong, great...I'd like to buy paint at their prices!
They do, but some of them are sold out:
http://www.sealmodel.com/product_details.php?category_id=117&item_id=1204
http://www.sealmodel.com/products.php?category_id=117
Jon
-
Hello all,
This is Special Hobby's 1/48 Fiat G.55A Centuro. It's a mixed bag and what you'd expect from a 2008 moulding: variable fit, lots of clean-up, chunky mouldings and multi-media parts. The undercarriage is particularly terrible. The decals are excellent.
It's meant to be painted silver, not NMF. Various metallic paints used with oils on top, which was difficult as they tended to get little traction on the smooth surface. Canopy is vac-formed and was designed for a different kit so unsurprisingly, in my view, is the biggest weak point of the finished article. The undercarriage actuating arms and pitot have been fabricated from Albion Alloys brass tubing.
This is the first model I've made in the past 25 years (I think) with no clear coats on it. I finished it in under four weeks, so that's the fifth for 2020 and I'm on track with my build schedule
")
More photos and longish build article at http://jonbryon.com/special-hobby-1-48-fiat-g-55a-centauro/
Thanks for looking,
Jon


-
Thanks all for your comments 🙂
Cheers
Jon
-
My project to complete all the Hasegawa Skyhawks in my stash is now complete. This is their A-4H with Quickboost resin cannons (although the barrels were replaced by Albion Alloys brass tubing) and Armycast decals. A longer build article is at https://jonbryon.com/hasegawa-1-48-douglas-a-4h-skyhawk/, but the TL;DR is:
Built mainly from the box with some small modifications (filled in leading edge slat wells, some parts removed/filled in, fin on leading edge of tail added from plastic card). Paint is mostly Mr Color except for the green, which is MRP. All of the camouflage is free-handed, not with my usual Iwata Custom Micron, but with an H&S Evolution for a softer demarcation. The finish is Tamiya XF-86 that was thinned about 50/50 with Mr Rapid Thinner.
There's lots wrong with it - I wish I'd faired in the intake lips properly, the canopy isn't installed very well, and there are the faltering first steps of doing some oil paint rendering - but I'm happy enough with it in the display case.
Thanks for looking and comments welcome.
Jon


-
Excellent! I've been looking for F-111E decals in 1/48 and have noted there are practically none.
Jon
-
Thanks everyone!
4 minutes ago, Thadeus said:Didn't know TA-4's had a gun.
Some had a single gun fitted:
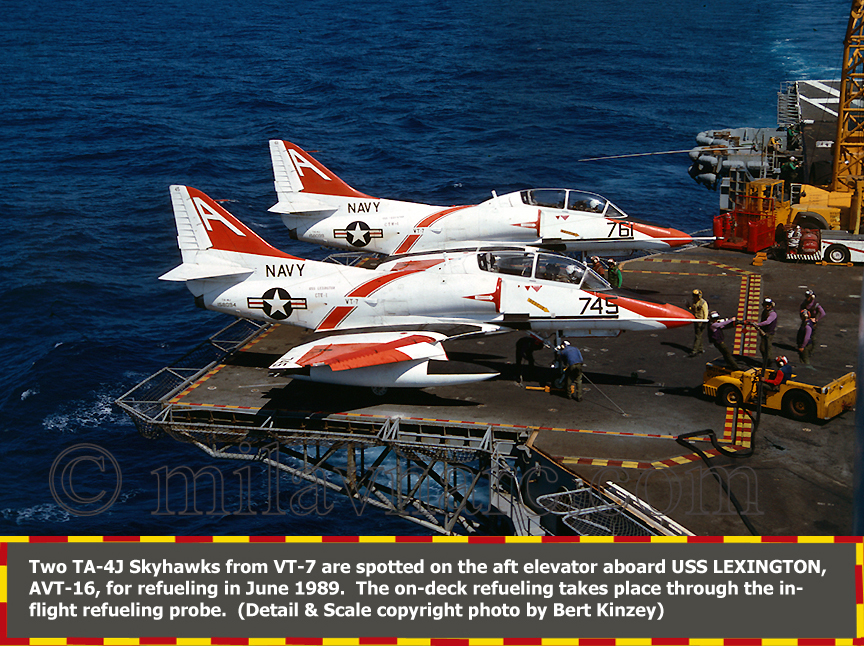
Cheers
Jon
-
58 minutes ago, crackerjazz said:
Flawless work, Jon! Thanks for the link - very interesting. I once masked (using Tamiya tape) and repainted an area once after decals and gloss-coat and still managed to lift the decals. I should get myself some of that Aizu tape.
Thanks.
I think what made the difference is using the Daco Red to melt the decal onto the surface, plus the amount of Mr Setter I used, which (as far as I can tell) basically glues the decal down. I think it's these two that made the difference rather than the Aizu tape. I actually didn't put a gloss coat over the decal before masking.
Cheers
Jon
-
If you can clean the plastic first with isopropyl alcohol (I use 100% IPA), that will help a lot with paint adhesion, but it might be a little hard to find at the moment. Using water-based acrylics is always going to cause you more problems in this area that using, say, a lacquer acrylic (like Mr Color, MRP, etc.) or a hybrid (like Tamiya or Mr Hobby), but I understand the limitations you have that restrict you to the water-based stuff.
Jon
-
9 hours ago, Mstor said:
Beautiful. Your paint finish is amazing. Perfectly smooth. The black area on the wing is like a mirror. Do you polish the paint?
Yes, this is sanded with Infini 2500 grit and then buffed with their 4000 grit.
Thanks!
Jon
-
Thanks guys 🙂
Jon
-
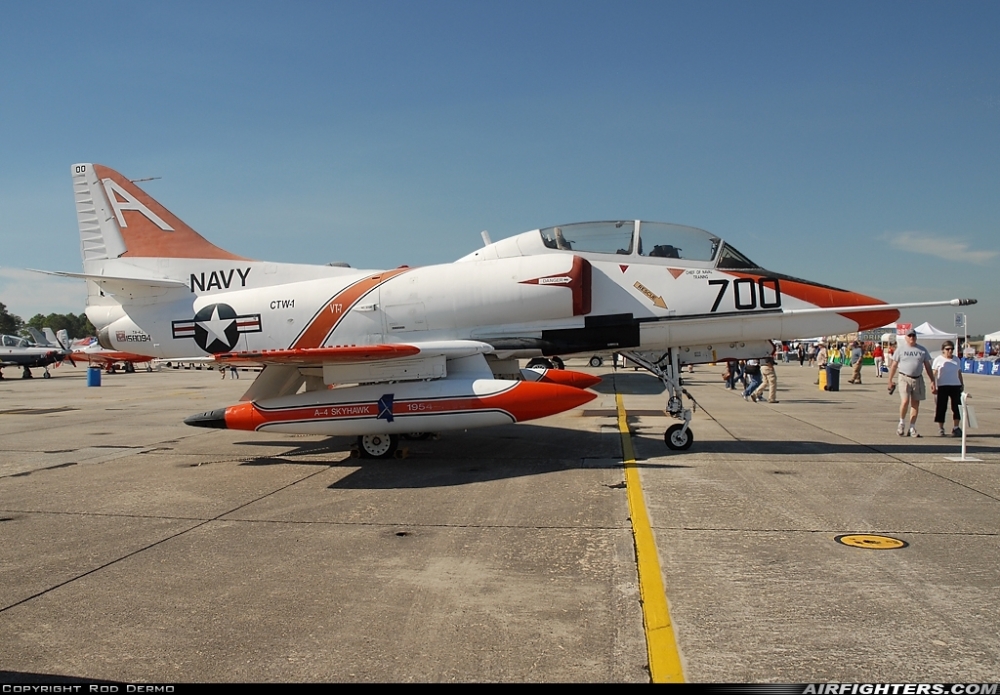
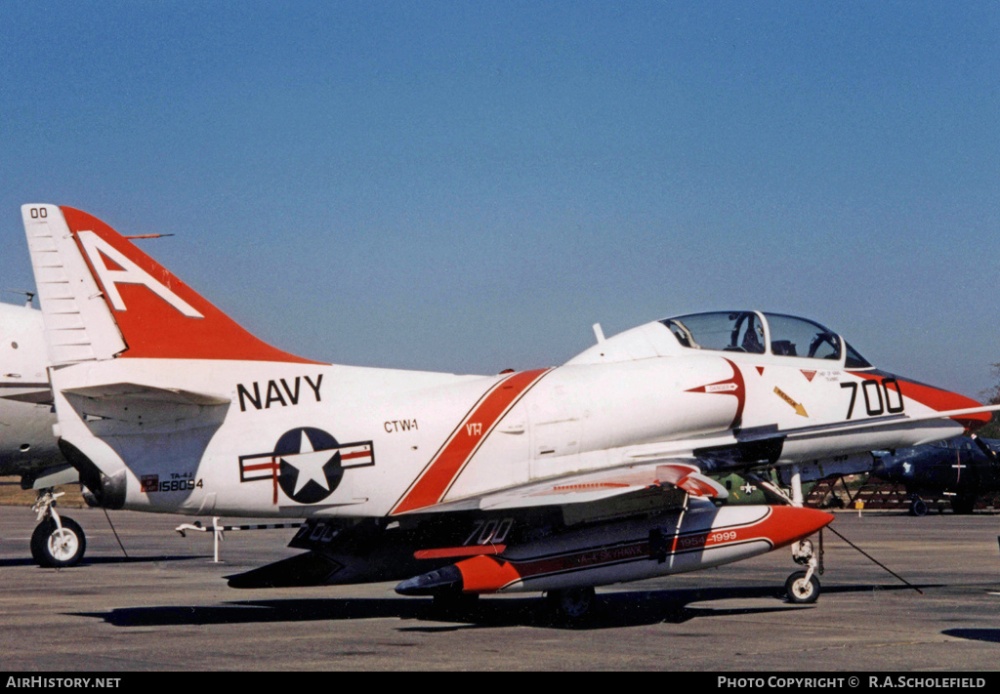
Despite continuing to work full time (I have the privilege of being an emergency worker) and having young kids at home, coronavirus has made for more modelling time. This is the third Hasegawa A-4 in my current 'group build' and it's the two-seater finished in kit markings. There's no aftermarket and the only significant changes are removing the lip for the leading edge slat 'bay' and making a new pitot from Albion Alloys brass tubing. The finish is Mr Color (for the white; a mix of C316 and Finishing Surfacer 1500), Hataka lacquers (mixed International Orange and Insignia Red) and MRP (black). The gloss areas are Tamiya X-22 and Gunze GX100 and the matt areas are GX113.
A lot more photos and a bit of a write-up at https://jonbryon.com/hasegawa-1-48-douglas-ta-4j-skyhawk/.
Comments welcome and thanks for looking,
Jon


-
Hello,
The F-100D sheet 48128 has a link for a reference to decal placement given as http://www.caracalmodels.com/references/cd48128/. However, this link simply leads to text that says:
The reference page this sheet will be online by July 3, 2018.
Does anyone know if this reference page exists?
Thanks
Jon
-
45 minutes ago, Whiskey said:
I don't think I've ever actually seen an A-4L in scale before, or at least that I knew of. Excellent work as per usual Jon. Always enjoy seeing your stuff. How was decaling that Stars and Bars over the refueling probe?
Thanks Whiskey. Surprisingly, the decal was fine. I just draped it over the probe over a large puddle of Mr Mark Setter, and then dumped a lot of Daco Red on it. It's the third time I've applied a decal like this (also on the Hasegawa A-4C and A4D-2) and each time it's gone better than expected!
Jon
Special Hobby 1/48 Fiat G.55A Centuro
in Critique Corner
Posted
Thanks guys for the comments - much appreciated!
Jon