


hooknladderno1
-
Content Count
248 -
Joined
-
Last visited
Content Type
Profiles
Forums
Calendar
Posts posted by hooknladderno1
-
-
Oliver,
WOW! That is beautiful. What a work of art - one can tell even with the fuzzy photos from the magazine. Norbert, thanks for sharing.
David
-
HI
I agree with you the floats are different. I like it.
Your helo turned out really nice. Its great to see bright colored helos on this site.
I know Coast Guards helos are always spotless.
If you were to do the same helo tomorrow what would you do different? Spend more time on paint, more time on building, more details? This is a question I always ask myself.
If it was my build I would have painted the whole helo in a darker color first as an undercoat. I would have built up the white color using various nuances of shading with the darker color underneath. This is only it was my build.
I really enjoyed reading the various steps of your Ranger build.
Oliver
Oliver,
I have never done any "preshading(is that the correct term?) or washes before. I would probably try them on my next build. I had thought about applying a wash to the vents on the engine cowling, but the detail of this particular kit as well as my thick paint/Future coats led me away from trying this step. Although I did a lot of reading/research on appying Future/masking the "glass", I need to work on developing this skill. Dropping the model and breaking loose the windscreen and chin bubble didn't help either... Thanks to everyone for their encouragement, constructive critiscism, tutorials, comments.
David
-
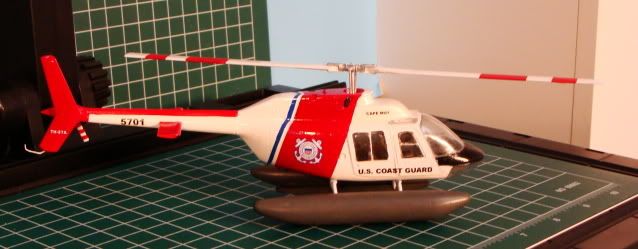
Happy New Year Gents!
Well, I have been able to squeeze in a little modeling time between family, work, and the holidays. This project is nearing completion. While it is not perfect, it is my first helicopter - hopefully one of many more to come. I did learn many things from this project, and that is what it is all about(as well as having fun). I still have to add the pitot tube, antennae, paint the anti-collision lights, etc. I think that I will go with the floats instead of the skids, as they are just different- you don't see many aircraft models with them. I am working on a wooden display base - also another first for me... I will post completed pics once everything is finished... Thanks for looking as well as your helpful comments and constructive critiscism. ARC is a great forum!
David
-
Instead of the Revell product consider using a Touch N Flow with either Tenax or Weld-On#3...much more superior IMO.
Gerald,
Any hints on keeping the tip of the Touch N Flow applicator from getting clogged? I have tried them twice in the past, each time getting clogged shortly after "first use". I was careful(at least I thought so) to empty the tube of liquid cement... Thanks.
David
-
Meindert,
Wow!
Simply remarkable. Very clean build. Nice attention to detail, and very colorful. I appreciate your explanation of the building process, part numbers, and modifications. I will soon be building a replica of the EC-135 that I fly on. All of your hints, tips, and suggestions are great. I will try the frisket film for the sliding windows. I am not familiar with the "Clear Fix". Is it for attaching clear parts, or something else? I have printed a copy of your post to use as a guide when building my model. Thanks again.
David
-
When this all gets figured out I suggest getting a Sharpie and putting a 1 and a 2 on the bottles...lol
Curt
Curt,
That's what I did. The other way that I remember it is:
In the alphabet, "E" in Set comes before the "O " in Sol.
David
-
There is a free open helipad 2kms away from where I live,I cannot go to take some pictures in these days cause I got a flu,it comes with some italian warnings placed there and there,some lights around the perimeter a big white circle and H and some yellow paintings around,is very big a Chinook just landed there some during this summer.Well if you are not in a rush I can go there and take some pictures.
It's close to the beach next to a parking lot,surrounded by woods,there is a "pronto intervento" or whatever is clinic 500 meters from it.
Luigi
Luigi,
Thanks for your offer, but you needn't trouble yourself. Your description is great! I have gotten some good ideas on how to proceed. Now, I just have to find the time... I hope you're feeling better.
David
-
something like this perhaps?

Semper Fi
Dan
Yes Dan,
Exactly! Nicely done. Any tips? Thanks.
David
-
Hi Guys,
As I am wrapping up my first rotorcraft project, I am thinking about making a simple display base for it. My only familiarity of the subject is civilian, hospital based helipads. As my USCG Jetranger would most likely be "based" at a Coast Guard facility, I am looking for ideas of what the ground markings would look like? I have already purchased a simple basswood plaque, wood stain, clear varnish etc. I plan to spray some 150 grit sandpaper as the asphalt "tarmac" This will be weathered with some washes/airbrushing, and the appropriate markings masked and painted(white/yellow lines, "H", etc.). Any ideas or photos would be appreciated. Thanks.
David
-
Well,
After several weeks on the "back burner", the Jetranger is back on the bench. I felt that the kit supplied main rotor mast was just too weak and spindly(is that a word)?
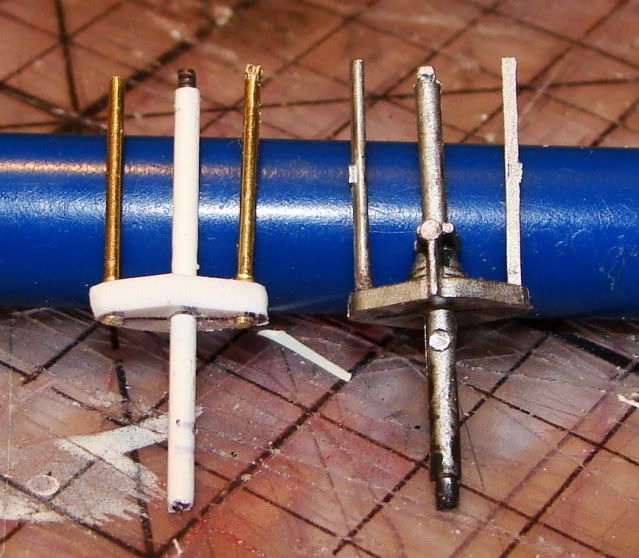
I thought I would try my hand at making one out of brass and plastic.
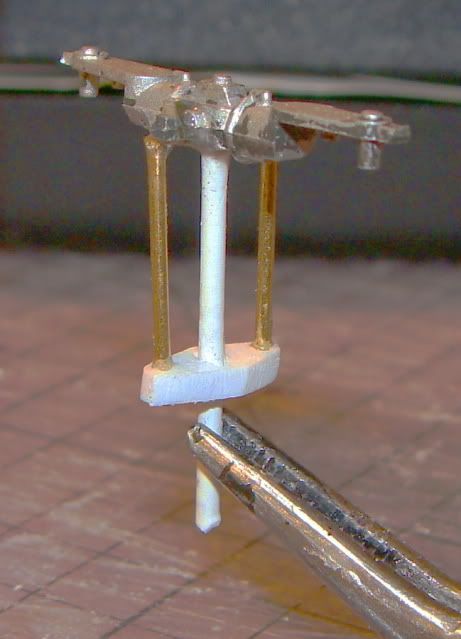
Although it lacks some of the detail of the original, it definitely is stronger, and fits into the hole in the top of the fuselage(since I glued it together prior to placing this piece - OOPS!). I painted it up, and attached it to the rotorhead. Glued the whole thing together - I was pretty excited to see my first helicopter model coming together!
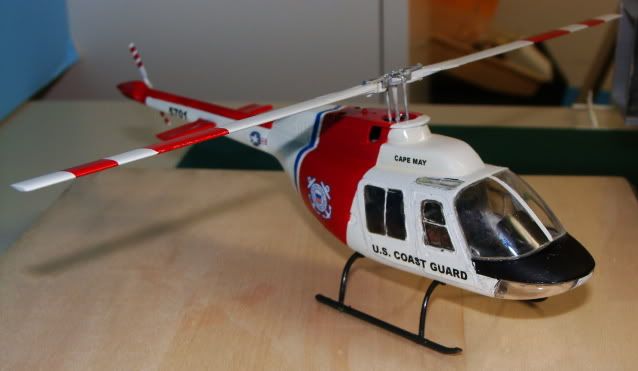
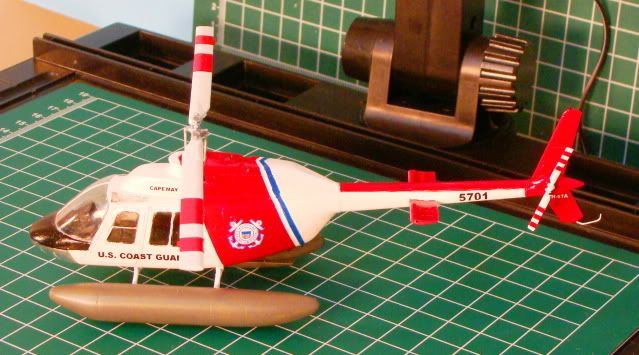
I also placed the regular skids underneath, just to see the difference from the floats. I may paint these up, and not glue either pair in. This would allow me to change the look as I wish. Still lots to do - touch up paint, re-glue tail to tailboom, etc. The Stars and Bars decals became worn from handling, despite Future(must have been too thin over that spot), so I will be replacing them. Hope to have this one wrapped up soon.
David
-
Nice start Michael.
Looks like another winner! Look forward to following the progress on this one.
David
-
Everett,
Nice story. I am a flight nurse with an Air Methods program in the Northeast. We fly an EC-135. Air Methods is a very safety oriented company. Most people have no idea of the amount of safety that is designed, built into and lived every day in our aeromedical culture.
We have a policy called "Three to go - one to say no". Basically, if any one of the crew(pilot, medic, or nurse) is not comfortable about any aspect of the flight, we turn the mission down. Many companies don't have that. Our pilots are not given any medical information about the flight prior to accepting a mission, as this might skew them into making a decision that may stretch the boundaries of safety and good judgement.
Each member of the crew has a job to do, is constantly listening to the radios(air traffic control, public safety, general aviation frequencies), scanning the skies for other air traffic, obstructions, etc. As they say in the military - Situational Awareness. No one gets to nap while the pilot flies the aircraft... We also have the collision avoidance system mentioned in your video, as well as a terrian avoidance system. The former advises of traffic in the area that you may not see, the latter about changes in the terrain as an early warning system. We receive daily shift briefings, do a walk-around the aircraft prior to lifting on each leg of the mission, perform a "fire guard"(crew member posts outside the aircraft to monitor for any engine fire that may occur during engine startup), and conduct post flight debriefs after every flight. Our pilots and mechanics perform daily checks, as well as weekly, monthly and periodic checks for systems based upon hours flown. Every 800 hours, the aircraft is torn down system by system to check for mechanical, electrical or hydraulic issues or failures that might otherwise not be noted by a chip light or sensor. Our medical crews also check every piece of equipment on each shift. Every crew member receives semi-annual safety training, including annual air medical crew resource management training. My program also does "dunker training", simulating a water landing. This provides team members with practical experience of how to handle an emergent ditching on the water.
Air Methods is in the process of outfitting aircraft throughout the country with NVG. Programs who fly in mountainous terrain or rural areas without ambient light are given priority. That said - NVG ARE NOT DESIGNED TO REPLACE GOOD JUDGEMENT, OR MAKE A MISSION FLYABLE WHEN WEATHER CONDITIONS ARE BELOW MINIMUMS. They are a great safety tool and no doubt have saved many lives. I look forward to the day when my aircraft gets them. Sorry for the soapbox speech, just thought that I would share a perspective of someone who is on the job, and a bit of our daily experience. We now return you to your regular programming...
David
-
Mark,
Really nice work. I too, especially like the paint job on the Huey. It is nice to see something other than the standard olive drab(sorry guys- no offense intended). Nice job on the 47 as well. That must have taken some patience...
David
-
Ernie, Try putting some bees wax on the threads. You can pick up a small jar in the hairdressing supply aisle of a dollar store. I think it is supposed to be for dread locks. but is just right for A/B threads.
Bob
How about a small piece of Teflon tape? If you have a roll, it may be worth a try...
David
-
Spitfire,
Obviously, everyone's situation is different. But, it sounds like you know what you want - the Alclad. I don't know where you are located, but you should be able to get some shipped to you via an Internet based shop, or ask if your LHS can order you the colors that you want? You have invested a lot of your time and money on your project. It would be ashame to see you use something that would give you disappointing results... As with any new technique, experiment first on something that isn't important. I prefer to use bottled water containters, or soda bottles. They are cheap, a great way to perfect your technique, and will help you to yield the result you are looking for. As you have no doubt seen on the forum here, there are many different ways to acheive a NMF. No one was is right or wrong. Find what works best for the particular subject that you are modeling, your budget, skill level, etc. Good luck on your project. Just my two cents...
David
-
Anyone here ever built a HH3F Pelican in 1/48 scale? From the limited research that I have done, no one offers this variant in 1/48 scale, so I would probably have to do a major conversion of one of the available kits. Just curious how difficult/challenging it would be? I can see that the tail boom is highly differnt, as well as the intake area over the cabin, possibly the doors and sponsons, etc... In looking around the Internet, it appears that I may have to combine the front cabin of a Hasegawa SH3H Seaking, , and the rear portion of a Revell CH53G, and/or an Academy CH53E. I am currently working on finishing up my Jetranger, converting another JetRanger into a LongRanger, and several other detailed projects. So, this is not something that I will do in the near future, but just gathering ideas, reference materials, kits(s), etc. I also hope to develop my skill level to the point where accomplishing this task and doing it justice will be possible. I am thinking of a United States Coast Guard HH3F, like this one from Wikipedia http://en.wikipedia.org/wiki/Sikorsky_S-61R . Thanks for your input.
David
-
Mike,
Yet another great job! Nice work on the skids. I think I speak for everyone here, that if it's not giving away too many of your secrets, a step-by-step tutorial on how you make them would be appreciated. Look forward to seeing what your next project will be... Also we would love to see your 412 fleet, and how you did the conversions. But that is a whole other subject and thread... ;) Thanks.
David
-
Mike,
WOW! The decals really tie everything together. A nice clean build, classic lines, and bright graphics! Super job. I think you have inspired at least a few Longranger projects...
David
-
CA ("super glue") As mentioned, good for attaching photo-etch parts or those fiddly bits you want to have set quickly. Also, obtain some sort of CA accelerator and remover. CA comes in several viscosities from gel (fairly slow-setting, which allows time to position parts) to medium (all purpose) to extremely thin "instant" which (in my experience) can set up far too quickly and is actually kind of dangerous if it goes where you don't want it.
To carry the CA glue idea just a little further, one of the best tips that I have received recently, is the use of Loctite Superglue GEL. It's thick consistency allows you great control of where you place the glue, AND the way that it's packaged keeps it from getting clogged and drying out. It is very inexpensive, and one of my most used tools these days. Everyone's suggestions are great. Welcome back to modeling. Remember - it is supposed to be fun. Don't get too stressed about the details. Enjoy!
David
-
Wow Mike!
Fantastic! You have really brought this project to life! What an inspiration. From the perfect proportions and body lines, to the new scratchbuilt skids and graphics. I know that others will try and hit the benchmark that you have set the standard for. Makes me wish that I was at home today(at work instead) working on marking the cuts for the Jetranger kit. I think you may have started something...
David
-
Wow, thats a nice looking helicopter with all of those sensors etc...........
Have you checked Bells own website, I think you will be suprised what is on there
Cheers
Anthony
I agree with Anthony. If you go on the Bell website, you can look under the airframe type that you are interested in, and the download the brochure for the specific aircraft. You can print whatever images or drawings that interest you. Many airframe brochures have over a hundred pages, If you are careful, and don't choose "All", you won't waste a lot of paper and ink. This will alllow you to get the specific drawings that you want without a lot of waste. I am also planning on completing at least one 412, but it is also a "long range" project. Good luck to you. Look forward to following your build.
David
-
EC-135,
Nice progress thus far. I like the addition of the control panel from the 145. I will have to compare it to the one that in the EC-135 P2 model that I fly in at work. I am gathering reference materials, photographs, kits and parts for a build of that aircraft soon. Following Anthony's lead, I may build two of them at the same time. Our sister ship is identical, with the exception of a WSPS kit, and tail number. Does the Luftrettung kit have the updated fenestron tail rotor sprue that was included in the Polis kit? Thanks.
David
-
Hey Guys,
Yes, another question... I had built a simple spray booth several years ago using a range hood. It worked okay, but wasn't powerful enough. Eventually, the fan became frozen from the paint going through it. The opening of the booth is 30 inches by 20 inches.
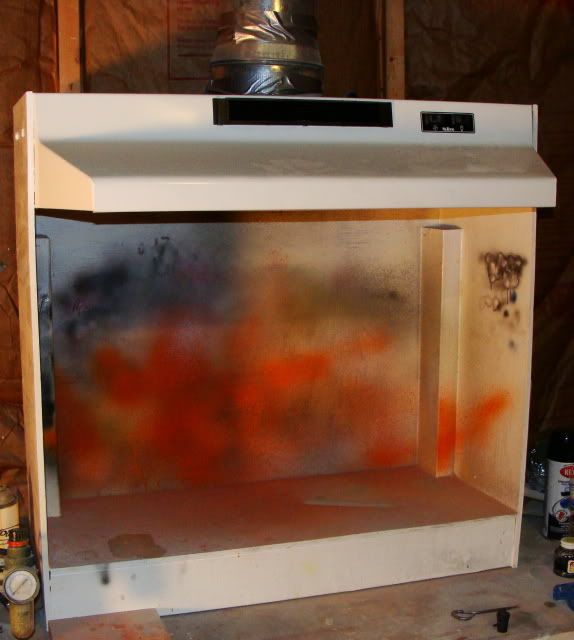
I am now looking to replace the blower motor with something more powerful. I have read that some booths removes between 100-150 cfm, and others recommend 300-500 cfm. I have looked on-line at the Grainger catalog http://www.grainger.com/Grainger/categorie...rifugal-blowers , there are so many choices... I don't have a lot of mechanical knowledge. I know that I should look for a 115 volt power supply, but am confused by the variable listings for the CFM such as "cfm@ 0.000 - IN SP" Also there are several other terms such as "shaded pole, psc, forward curve", etc. Any suggestions and ideas that you may have. Thanks.
David
-
I've never used the Tamiya product, however I've heard great stuff about it. I use the Mr. Surfacer 1000 thinned with Mr. Leveling Thinner, airbrushed at 10psi and I have nothing but praise for the stuff. It leaves a very thin, very smooth finish and never needs sanding. It's smoot that when used on some gray plastic you think you haven't primed yet...good stuff!!!

Where are you getting your Gunze products from? The Internet searches that I have done have mostly come up with older, outdated posts, "not in stock", or discontined" messages in the US... Any help would be appreciated. In the mean time, can I use "hardware store" lacquer thinner with the Tamiya primer, or do I need the Tamiya specific lacquer thinner? I usually stick with the proprietary brand products, but don't have any on hand and the only shop in my area doesn't carry it. Thanks.
David

Preshading Under a White Finish Coat?
in Tools 'n' Tips
Posted
Cheers,
I plan to try preshading for the first time. The finish color coat of the aircraft will be gloss white. It will also be one that is well maintained. Any suggestions on what color I should use? Primer will be Tamiya White Surface primer. Thanks.
David