


trietmcam
-
Content Count
469 -
Joined
-
Last visited
Content Type
Profiles
Forums
Calendar
Posts posted by trietmcam
-
-
Use the airbrush with just air blowing through, set at around 25-30 psi.
-
Have you looked into Albion tubes? Not sure what size you're looking for but they have some thin wall brass as well as aluminum. They also got rods that can go down to 0.2mm dia. Maybe a combination of rods and tubes is what you might need.
https://spruebrothers.com/albmbt06-albion-alloys-micro-brass-tube-0-6mm-x-0-4mm-od-id-3-pcs-mbt06/
https://spruebrothers.com/albmbt04-albion-alloys-micro-brass-tube-0-4mm-x-0-2mm-od-id-3-pcs-mbt04/
HTH
triet cam
-
It works the same way as labeling tapes. Being clear color, it's easier to see where you're position it relative to the surface. And with 1mm tick marks printed on the tape, it's a good guidance on the scribe length you want. One thing I noticed though, the tape can be used multiple times, unlike labeling tapes only lasted 1 or 2 uses.
HTH - T Cam
-
I might be on the left field by myself, but I prefer the side feed type like the Badger XF100. To me it's easier to see where I'm pointing, and the balance feels right. I have a Paasche Talon gravity sitting around collecting dust. Don't get me wrong, tt's a good AB, but never really got used to it.
-
On 2/9/2023 at 9:31 PM, CFster said:
Is Tamiya X-22 clear acrylic thinned with Mr. Leveling Thinner proof against enamel washes (and the enamel thinner cleanup therein?) if I went one step further and did the leveling trick of spraying a coat of MLT only on top off my X-22 clear coat would that also resist enamel washes and thinners?
Thanks.
MLT is lacquer, and by definition, hot. It could wipe out the gloss finish along with paint under it. It's best to buff the X22 gloss surface, using your preferred compound, to achieve the smooth finish instead.
-
Absolutely outstanding build in every way. WOW!
-
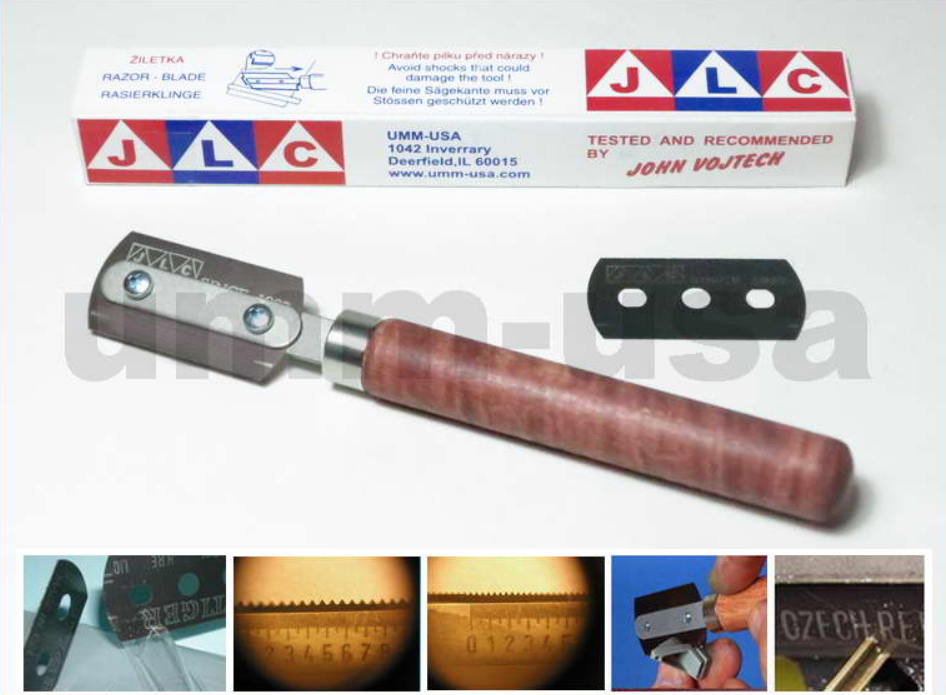
I use the JLC razor saw. Not only can it scribe very thin lines, it can be used as its original intent, cutting. With a little practice, you can actually scribe a straight line without any straight edge aid. There are various manufacturers make these razor saws, JLC, CMK, HQT. But serve similar functions. I think they are all interchangable also. UMM-USA carries them in stock.
http://umm-usa.com/onlinestore/product_info.php?cPath=21_28&products_id=35
-
Is this what youre looking for? There's a guy specializes in 3D print weapons. It's available in both scales
-
Maybe this forum can help. It's run by a few modelers who are vietnam scale model enthusiates. You have to register to enter though.
https://www.tapatalk.com/groups/rvnscale/index.php
-
3 hours ago, Gwen Phoenix said:
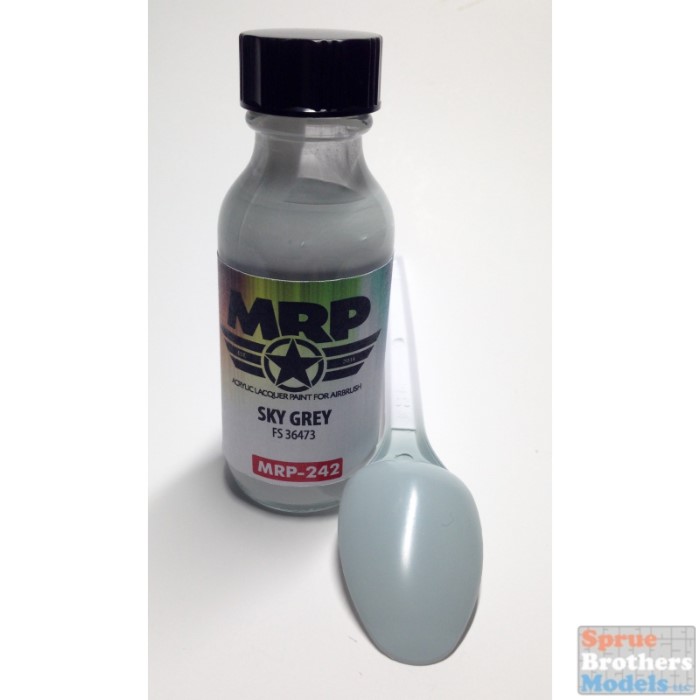
But doesn't the first figure (3)6473 mean it's actually matt finish?
When I sprayed it, after dried it left a slight satin sheen feel to it, though not super glossy. Kind of like the tested spoon here. You would think MRP would labeled it as (2)6473.
-
Srue Bros. has the MRP color in stock: https://spruebrothers.com/mrp242-mrp-mr-paint-sky-grey-fs36473-30ml-for-airbrush-only/
MRP called it sky grey. It is slightly gloss, so you can go directly to decal after it's dried. Very easy to spray, and no thinning needed.
-
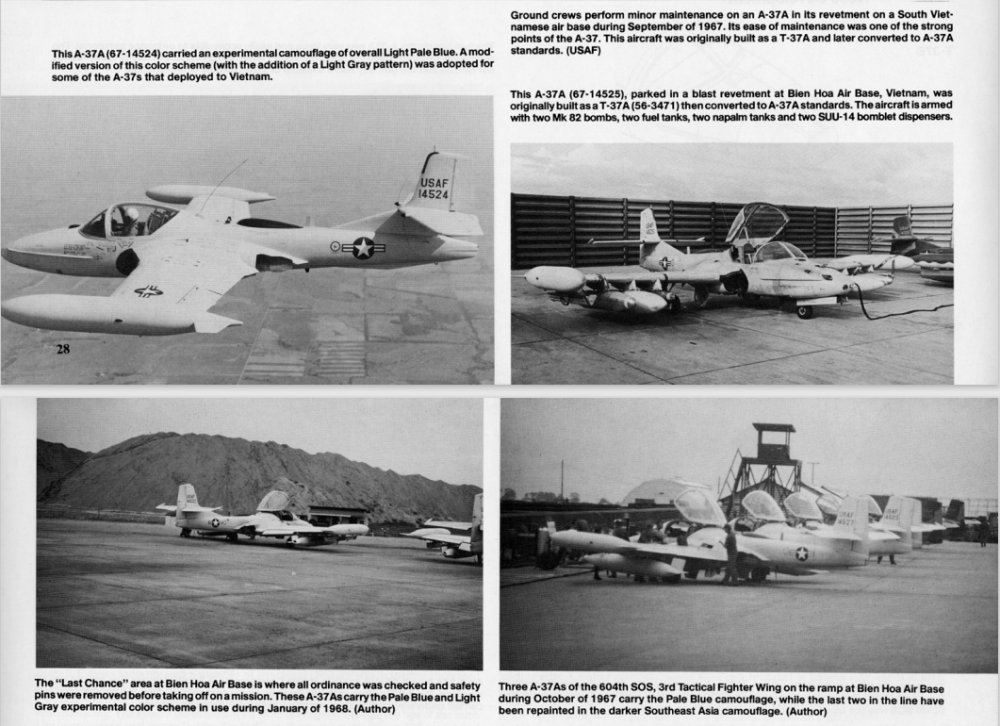
Must have been a one off color scheme did not lasted very long. Thre's no mention of which gray FS number. I guess ADC gray would be close.
-
If you're doing a Sandy SAR mission, the Hasegawa A-1H kit has what you're looking for; the 150gal centerline tank and 2 finned 300 gal tanks, plus cluster bomb dispensers. They're pretty accurate. The Hase Skyraider is kind of hard to find nowaday. Maybe posting on the classified forum might help.
All's left to complete the load out is some LAU rocket pods and Mk bombs. The Academy A-37 Dragonfly has all of those, or the Hasegawa weapon sets 1. Also, Quickboost did a complete pylons sets, should you need to upgrade those from the Monogram kit.
-
1 hour ago, ELLISW said:
My intention is kit bash replacing the Matchbox cowl with the Tamiya Raider cowl.
Ah, I see. You could contact Tamiya serive for a part. I lost a horizontal stablizer and they sent a replacemet for freee. But that was years ago, don't know if they still have replacement service.
1 hour ago, ELLISW said:Please clarify: What is ZM A-1?
I was referencing kit bashing a 1/32 Zoukei Mura A-1H with the Fisher Model A-1E conversion set. At one time Paul Fisher did an A-1E conversion set that would have enabled to fill the A-1E Skyraider void in 1/32. You just had to provide an A-1H donor kit, either the ZM kit or Trumpeter. Something tragic happened to his business, I think it was a fire burned down his place, so he's no longer in the business. It would've been an expensive project; $151 for the ZM kit, and $110? for the Fisher conversion.
-
9 hours ago, ELLISW said:
Answered my own question after some research.
Link below talks about Hypercat Resin and the origin of the cowl
Interesting reveal.
https://www.tapatalk.com/groups/hyperscale/viewtopic.php?p=2585914#p2585914
Is your intention to replace the ancient Monogram skyraider undersize cowl? If yes, I wouldn't bother. It's way too big to fit in the fuselage opening, creating a huge step that you'd have to sand down, making the nose look so out of place.
-
This is one outstanding build. Details went in is just so well placed. The weathering effects are just astounding. Love the tires mud look. Great job Tomas.
Best regards
Triet
-
Problem solved. ElectroSoldier's hint gave me an idea. Turns out, the trigger was not positioned directly on the air valve plunger when pulled all the way back. Due to it being bent over 30 years of usage, when i pulled the trigger all the way back, the trigger slowly came off of the air valve. And that's why no air coming in. Plus the spring back plate was also loose not engaging the trigger until it's half way back. This looseness may have encouraged the trigger to hop off the airvalve plunger. I replaced the trigger and spring backplate from the good 100 side feed airbrush, and it worked fine.
-
I'm looking for some help with the side feed 100 series. I thought I knew airbrush, but this stumped me. It is blowing very low air, barely can feel the air coming out. When I turn the compressor to max (>60psi) then air comes out hard, only for about 1 or 2 seconds. I swapped out the head with one I know is working - same results. Swapped out the air valve assembly with a new one (where the hose connects to) - same results. Paint cup, nothing wrong. So the only thing left is the main body shell casing. But it's been soaked in lacquer thinner. So it should be free of clogs. Last option is ditch the AB for a brand new one. Any ideas you can help is appreciated. Thanks. Triet Cam
-
First off, welcome back to the hobby. As you may already know, the modern kits are leaps and bounds in quality compared to when we were kids. Tamiya being one of the premier. You can't go wrong with Tamiya modern kits in general, as their fit and finish is second to no one. That should help your modeling skill to a higher level in itself. As for:
1. Airbrush is the way to go, even if the aircraft is in mono color. As for which airbrush, there are many answers, but I have been using Badgers for ages. Pasche is another good one. And both are reasonably priced. And don't go for those cheap knockoffs. The old adage goes "you get what you pay for"
2. Both, and yes you can use enamel, acrylic, and lacquer on the same model. Main thing is they must be cured before applied over the other. Each has its own ad/disadvantages in usage
3. Mr Surfacer is another tool to have for seams filling. Forget about the old Squadron putty from the tubes from the past; same goes for cement. Tamiya Extra Thin cement is the way to go, no mess, no fuss. Just let the capilary action do the work, and instant bond.
Another thing that don't get mentioned often is, take your time and dont rush. You're not running a race. Check for seams filling. Nothing cried out amateur more than seams and gaps showing on a finished model. If you can perfect hiding the seam gaps, that in itseft is a huge leap in skill, and master your airbrush handling. Don't expect to compare yourself to some of the master modellers stuffs posted. It'll only disappoint you. Just work on the basics before graduating to a higher details skills. Most importanly, HAVE FUN building.
HTH
Triet
-
8 hours ago, crackerjazz said:
Thanks for the tip, Mongrel714! : ) This Cricut is proving to be one useful tool! There's obviously some cleanup to do for styrene work, but it's a huge time-saver.

Most impressive! With the pin vise next to it, you get the sense how small the parts are.
-
So far I limit mine to just adhesive masking materials, but wouldn't cutting such thick styrene sheet quicken to dull the blade's life?
-
Keep it going if you like. I could use the learning curve. Just ordered one for $209. Considering what it can do compare to the Thinnerline, which is just cutting circles, this has far more possibilities.
-
There's one listing on ebay now.
https://www.ebay.com/itm/353476122059?hash=item524cd195cb:g:CU4AAOSwwgRgi1Ae
-
Tato, if I followed what you did exactly, you did in this order:
1. Primer,
2. Paint, lacquer
3. Future,
4. XF 22 gloss,
5. decals
6. XF 22 gloss.
7. Flat AK acrylic.
8. pin panel line wash
What are you wiping the wash with, enamel? The flat coat act as a sponge, and may have absorbed the wash below. So when you wipe the wash hard enough, it takes tout he flat coat. What if you do the wash after gloss coat, except use tamiya panel line (enamal)? And use mineral spirit to clean up.
best of luck.
TrietCam

AC-119K 3 Blade Props
in Props
Posted
Does anyone know what type props these were? They kind of look like the onse on the Constellation, but I don't know for sure. Is there something similar out there to replace the 1/72 Italeri gun ship? Thanks for your inputs.
T Cam.