

Sebastijan
-
Content Count
5,975 -
Joined
-
Last visited
Content Type
Profiles
Forums
Calendar
Posts posted by Sebastijan
-
-
Great work! It's a good thing DCS Viper is slowly on its way!
-
list refreshed
-
Thanks guys!
Yeah, she's ok now already. Luckily she only had fever without much or any pain, but on the other hand, we didn't know what's causing it until visiting the doc; antibiotics made a short work out of it.
Steve, thanks for pointing that out - haven't checked all the little details before the painting yet, but I might have missed that little detail if you haven't pointed it out.
-
refreshed the list
-
Not much time for model building last week as daughter had high fever and ear infection but nevertheless I managed to finish something during the weekend.

Dryfitted the wings and tailerons and attached the fins - Tomcat, baby!

Was playing with different shades of metallic colours, picking out single petals, and attacking those with washes. I’ll further putt a matt coat on them as they’re too shiny now and probably add a little more staining.

And dryfit of the nozzles - They look really nice attached to the fuselage. Had to bypass instructions a bit so I can remove and install them later in the build.
-
6 minutes ago, lesthegringo said:
Totally agree, I have the DCS A-10 C 'game' for the PC, and have set up the PC with a Thrustmaster HOTAS and Warthog stick, with a 20cm extension, and Saitek pedals. There is no 'game' about it, it's a stunning program that really makes you feel like you are flying the plane. If I may be so bold as to make a further suggestion, the use of a TrackIR unit enhances the experience, once set up properly
Cheers
Les
Yeah, I fly warthog with 5cm extension (more than enough for desk clamp mounted stick) and have been flying a10c since first beta in 2011 and the series since first Flanker game.
TrackIR is great but I've recently had a chance to get Oculus Rift VR set for a mere 100eur and it's a total game changer. Think of it as much of a step forward from TiR as it was from no headtracking to TrackIR.
-
On 11/20/2018 at 12:24 PM, janman said:
I need this on PS4! 😕
No you don't! Buy a PC and HOTAS, sell Linda and the kids and you're about ready 😉
DCS is simply amazing and calling it a game is almost an insult to its developers. Tomcat's just around a corner - goodbye modelling for me 😄
-
I'd order some if I could - Slovenia not listed under shipping options unfortunately.
-
Bargain prices and combined shipping available.
https://www.ebay.com/sch/huskythor77/m.html?_nkw=&_armrs=1&_ipg=&_from=
-
Time for weekly update:
Last week I received Reedoak 3D printed figures to be used on diorama. Oh boy, I can’t believe how far 3D printing technology has advanced! Layer edges that were in the past really prominent on this kind of prints are almost non existant on these figures. I had to use a magnifying lens to spot it, but even then, it look like a texture to the textile more than layering. Really amazing. These figures aren’t cheap, but they look better than anything I have seen so far.


I am no figure painter and it was a first time for me to work with Mr.Paint acrylic paints specially made for figure painting. I have to say I am satisfied with the result – keep in mind that the figure on the screen is several times the real size so everything looks better balanced on 1:1 scale.

Finished painting the “spine” interiors. Had to rivet all the inner edge details.

and she’s slowly coming together.
-
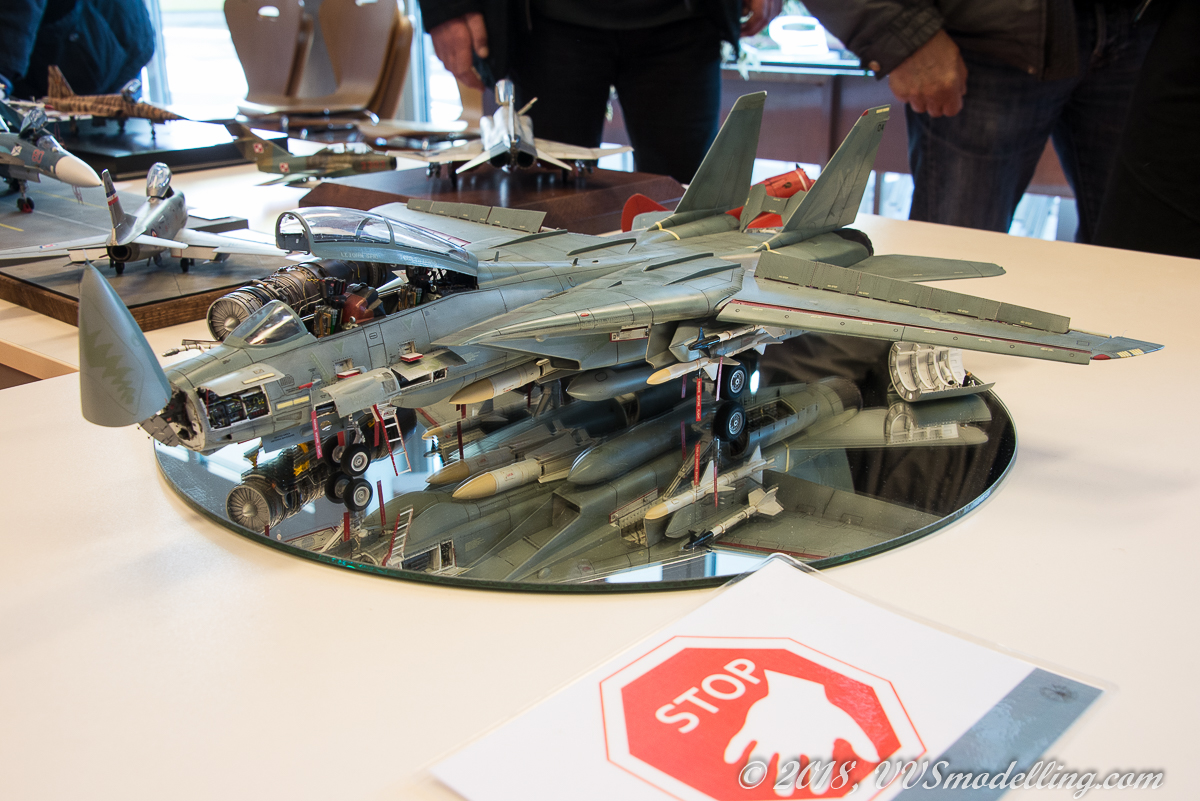
Small show by internantional standards, was this year, when it reached a quarter of a century, packed with excellent models.
Click on the photo for full gallery:
-
Thanks, guys!
-
Thank you guys!

Instructions mistake! Do this only if you're planning on closing the canopy!

Painting the exhausts... First white then progressively darker thin layers of brownish colours and some dark brown, black and grey pigments at the end.

Jet intakes finished - the lower rear ramp at the top of the intake is clearly visible including the actuator that opens it.

Interesting design of the rear fuselage - you have to attach the rear fuselage sides to the jet exhaust piping.

The whole assembly is then attached to the upper fuselage half.

The join runs by the panel line and is virtually invisible. The only area needing some filler will be right of the airbrake - nothing a swipe of PPP couldn't solve in few seconds.

Attaching the lower fuselage was a breeze - fit is just perfect and we finally have something resembling a Tomcat fuselage.

View of the lower fuselage - again no filler needed!

Oh and for those who didn't know - take a look at Tomcat's fuselage, bring those intakes closer together and voila! A-wing fighter from Star Wars E:VI Return of the Jedi!
-
Now that's an interesting bird! Following closely!
-
20 hours ago, janman said:
Oh, may I ask what exactly?
I've got a suggestion for the following paints, but they are, as you know it already, airbrush only. But they my give you some direction. I'll have to make a test if they're really suitable sometime in near future.
MRP-218 Dark Olive Drab 328 (Swedish paint standard)
MRP-228 Aircraft Grey-Green BS283 (British paint standard)
MRP-098 Light Gull Gray FS36440
-

Intakes painted up; one showing the one piece affair and the other one with rear part insert.

Front view of the intake insert. Stator at the front with a cone was painted Aluminum while the rear one with darker Magnesium, giving a nice sense of depth. Notice the reflections in the intake.

Cockpit was finally fitted in the fuselage halves and instrument panel shrouds installed. Turtle back behind the rear seat was bare of details so I added a horizontal beam and rivets per reference photos.

NeOmega seats arrived yesterday and they proved to be of identical dimensions as FineMolds ones but of course much better detailed. RIO's IP shroud received circular cooling vents at the sides and the wire that runs from the top handle to the side.
-
got some really cool paints prepared for mine!
-
Thank you guys!
2 hours ago, janman said:So here we go! It wasn't that huge a step from sauna talk to actually start building it. 😀 Will be following closely since this is definitely one of those kits I'll be getting sooner or later. The Koper connection was a new thing for me.
So, the pit we see is all plastics? Looks very sharp. Seems the raised details are quite crisp.
What are you going to use as the crew?
Yeah, I came up with the decision only a few days ago when going through my decal stash and it seemed appropriate.
Pit is all in-box plastic with the exception of small (canopy?) ejection handles to which Eduard PE RBF tags are attached.
Crew will be Reedoaks 3D printed figures - expensive but they look great and they should enhance the whole scene considerably.
-
following closely - lots of useful info I'll be copying to mine.
-
2 hours ago, SebastianP said:
That's for an 1/48 scale kit (haven't checked which one), it will definitely not fit this one. Also, at the moment the only kind of aftermarket products I'd expect to even fit this kit would be weapons, since it can most likely be safely assumed that it will have the same stores stations as the Su-33 and Su-27SM kits, anything else is pretty much up in the air at this point, especially since the Su-27UB twin-seater isn't out yet AFAIK.
Actualy, Naza also makes 1:72 conversion for Trumpeters Su-30MKK.
-
Cockpit is more or less finished. Of course the ejection seats are missing but as I am waiting for the figures, I’ll install them later. I might add some piping on the back walls, but I once again have to wait for the seats, to see how much would visible in the first place.


-
Hi everyone! Started a new project a few days ago. Finemolds 1:72 Tomcat that will be wearing markings of VF-41 Black Aces of 1997 cruise, when they visited port Koper, Slovenia and I got to see Tomcats for the first time. It will be a heavy maintenance diorama - deck chained aircraft with a number of open panels and crew inspecting them.

For a so much praised kit, I was surprised to find a huge number of pin marks in visible parts. While I'm not sure, these will actually be seen, buried deep in engine intakes.

Cockpit sidewalls are bare in the kit. It's true, only the most curious eyes will look that deep in the cockpit, but I just had to add some canvas wiring covers and the prominent circuit breaker boards in the RIO's pit.

Using just some careful painting, the cockpit is looking more and more alive. No aftermarket parts are available for this kit, so I have to work with what I've got.
-
How about a 1:72 sheet? New tool GWH and Academy kits just around the corner and an excellent FineMolds kits already available, I'm quite certain there's a market for them. Maybe it could also be a joint 1:72/1:144 combo to cut the costs and please all the small scale builders out there? Just a thought.
-
haha had to tease you :D
I once saw a post, I think it was on britmodeller, where a guy put a model outside in hoping to achieve a realistic weathering and sort of as an experiment...
well the test showed that the model weathered as model and not as a real aircraft - decals flaked off, small parts fell apart, heat did its thing to the plastic,...
Grumman F-14A Tomcat - dio/ update 06/05/2019
in In-Progress Pics
Posted
After a coat of AMMO One Shot primer I've put a marbled coat of Lt. Ghost Grey on.
Marbling was first done coarser and will be made finer later.
Before final painting I added brown marbling on the areas of higher wear and tear.
And the final subtle effect. But the painting is not done yet.