

Flyboy3394
-
Content Count
163 -
Joined
-
Last visited
Content Type
Profiles
Forums
Calendar
Everything posted by Flyboy3394
-
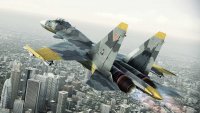
Im sure some of you have seen/heard about this, but the F15C may be getting a bit more than just new wheels: 16 AMRAAMs, CFTs, TALON HATE pod, and maybe some new wheels too
-
Hi all, Any ideas for a color to use for the clear/green HUD screen and the displays for a strike eagle. Ref. picture here: I have Tamiya clear blue and clear yellow that would mix to a clear green, then could allow the tiny little clear bit to be dipped. Additionally, I have a paint pen (below) meant for the green eyes of Gundam models that Looks decent as the display screens I did on a tester. Heres an accurate color swatch representation:
-
Update: Got the radome painted and the exhaust bits primed, then painted: And the Alclad Stainless Steel coat went down mostly perfectly. I will be repainting the left side (in the picture) as I got some paint pooling: Its impossible to tell here as it is right up against the masking tape, but I am not gonna let it go this time. This part is gonna be exactly how I envision it. Next: 5 days of curing for the model and the weapons, drop tanks, landing gear, etc. Then clear coat, decals, another coat, then an ENAMEL wash.
-
Update: Extensive masking of the exhaust areas: And painted with the base coat of Gunship Grey: The gunship grey came out a bit lighter than last time and was significantly more runny as I clearly used too much thinner. Overall it came out pretty well and aside from a couple minor areas of pooling, all is well. Next is painting the nose a darker shade of grey and then the exhaust areas.
-
Hi all, Need some help with assembling the Aires F15e exhaust set (172 Academy). There are no directions to speak of and this is the first time I am dealing with resin parts. I also cannot seem to find any kind of step by step from Aires or any other modeler anywhere on the interwebs. Feeling a bit lost, so any help would be greatly appreciated! For ref:
-
Update: Bird is built and I think I am on a much better track than previously: Little dry brushing with Tamiya Chrome Silver netted a fantastic result i think. It looks like an old, worn out cockpit. Love it! And just like that, she is ready for priming and paint!
-
Update: Got all the internals and the cockpit bits prepped and painted. Will be dry tonight and i will put the whole plane together, and lay down a coat of primer. Then Thursday the main coat of Gunship grey will go down and sit for a week or so. Really glad I have all the weapons and vertical stabs from the last kit painted, decaled and basically finished completely. I will post some pics tomorrow of the progress. Lessons were learned and this one is already coming together far smoother than the last. Now I just wish Model Master acrylics we
-
Well I certainly have a fully assembled tester now! Got the new kit and will begin that shortly.
-
Got the new kit and began cutting and sanding. Will begin initial build tomorrow. Hopefully prime by weekend and paint next week sometime. Cannot, however, figure out how to properly build these Aires Exhaust parts. Anyone have a suggestion? Directions are so lacking its not even funny. Do I need to cut stuff off? Do I need special glue to put the actuator rods on? So confused....
-
Paint curing box for accelerating dry times
Flyboy3394 replied to Flyboy3394's topic in General Discussion
Good to know. I have some Klean Strip green https://www.amazon.com/gp/product/B001FPHNTA/ref=oh_aui_detailpage_o09_s00?ie=UTF8&psc=1 Its cheap Lacquer thinner. I have been told though, that using lacquer thinner on enamels is not a good idea. Not sure what info I should trust then. Guess I will try it on some scrap plastic before using on my models. As for cleaning. Sure, seems simple enough. Except that the garage is a separate structure in the backyard, and simply cleaning and dusting will not really work as it would take me days to get it clean, only for it to -
Paint curing box for accelerating dry times
Flyboy3394 replied to Flyboy3394's topic in General Discussion
Only concerned about the model drying enough to not absorb dirt and airborne dust. After that I will let it do its thing. -
Paint curing box for accelerating dry times
Flyboy3394 replied to Flyboy3394's topic in General Discussion
Really all i am concerned about is making sure that while the paint is drying, it doesn't pick up any airborne debris or dust. Once its at least dry enough to repel that sort of stuff, I will air dry. Otherwise, I am fine air drying, but as I paint in my garage, there can be a lot of airborne dust and debris. I do have an airbooth with an exhauist fan that goes outside, but I am still painting in a dirty area overall, and one that is humid in the winter. -
Interesting. Must be an addition for the Slam Eagle they are using this kit as a base for.
-
Which scoops? Bit confused about what you are referring to.
-
F-15 Advanced modified build.... Is it doable?
Flyboy3394 replied to Flyboy3394's topic in Jet Modeling
Pricing this out with a Great Wall F15c as the base aircraft, and adding up everything as follows. - GWH F15c: $82 -2x Hasegawa Weapon E packs @ 20 a pop: $40 -2x Attack Squadron LAU115/127 dual launcher kits: $17 -a burner f15e kit to pull FAST packs/CFTs from: $30 Total: +/-$173 bucks Gotta find a less expensive way. Obviously the kit can be interchanged. But I hear its the best f15c in 1/48 -
Hi all, Looking to build a simple paint curing box in preparation for the wet/damp/humid winter months ahead. This summer, I put my freshly painted birds in a big plastic tub and sealed, with a couple silica packets in to eliminate moisture. Then I placed it out in the sun and it helped dry the enamel coats a good bit faster than usual. With winter coming, and little to no heat from the sun available, I want to mimic this, but instead using a heat producing lamp. I assume doing the exact same would work, with the lamp addition. Anything else I should consider?
-
F-15 Advanced modified build.... Is it doable?
Flyboy3394 replied to Flyboy3394's topic in Jet Modeling
Now I am wrong. On a couple of the sites to buy E, it shows 8 missiles. -
Agreed on that note. I painted my last bird with MM enamel and the smell took a week or so to fully dissipate. And that was in the heat of summer! Now its getting colder and wetter. Need to build myself a curing box with a heat lamp.
-
F-15 Advanced modified build.... Is it doable?
Flyboy3394 replied to Flyboy3394's topic in Jet Modeling
Just looked on Hasegawas website. Looks like E only comes with 4 AMRAAMs. Which at $27 a pop, would make this an extremely expensive venture. Wonder if i could but one of those weapon sets, and copy/cast them in resin to duplicate the rest of the 16? Would be time consuming and tricky, but much less expensive than buying many weapon packs. -
F-15 Advanced modified build.... Is it doable?
Flyboy3394 replied to Flyboy3394's topic in Jet Modeling
Thinking about it for sure. Prob worth doing in 1:48, and I could scratch build the quad launcher out of two of these guys. Then just gotta figure out the double AMRAAM pylons on the underside but again, scratch build something and glue em on. -
Well, as of about 5 minutes ago this all happened: Decided to strip this guy completely, and use this as my test/guinea pig model. I ordered another duplicate kit and will take the lessons learned in this comedy of errors and apply them to perfecting the next one. Good news is I only screwed up on the main body (sort of good news) and therefore will only really need to build that part of the jet when the new one arrives. I also ordered the Aires resin exhaust nozzles for the kit to make it even more detailed on the next pass. Lesso
-
What about masking over enamels? Would 24-48 hours be enough for model masking tape?
-
Falcon you are a lifesaver! Ordered! Now... to strip all that gunk off!
-
Has anyone thought about or tried to build/modify an F-15 Advanced? I love the idea of a 16+ missile laden F15 sitting on my shelf. Where would one start for something like this?
-
I tried their thinner. Did not do a damn thing. So I used 90% ISO alc. Worked, but stripped down to paint, and destroyed most of my hard decal work too! Maybe it is because I used an acrylic wash on top of Future, which is acrylic? Wow. I really mucked this up. On that note, anyone know of a good 1/72 scale F15e decal sheet I could buy to replace the destroyed ones?