


jpk
-
Content Count
934 -
Joined
-
Last visited
Content Type
Profiles
Forums
Calendar
Posts posted by jpk
-
-
I have one. PM me for details.
-
Unbuildable Kitty Hawk. LOL. Looking fantastic.
-
On 6/30/2021 at 5:34 PM, LV-246 said:
@Stef (#6) Thanks for the pointers! Still playing around with some ideas on how/where to add enough weight to the nose. I'm planning to hide electricals inside the empty space beneath the engine. This might effect the balancing even more, so I'll see what happens when I get that far. When you mention the aerial, are you talking about the "shark fin" above the cockpit? Good job on the model, if mine looks half as good I'll call it a win!
@rotorwash These are great, just what I was looking for, thanks! I was hoping there'd just be two lights underneath, since I'm going to try and add working lights to the model, so I think those photos confirm there are only two. The longline antenna is something I noticed when I discovered a photo of the QL404. I had no idea what it was until I did some digging. It looks like it starts on either the starboard or port side, zig-zags along the side of the tail boom and loops around the tailskid before continuing down the other side. I can probably scratch build the "pegs" running down either side and then fashion the aerial out of some EZ Line and see how it looks.
@rotorwash @jpk I had no idea the green lights appeared blue when unlit. This is strange because I've seen some photos where the plastic still looks green even when they're unlit, so it could have something to do with different coloured plastic used on different models, or something to do with the lighting in the shots? I've even seen one instance where the lights themselves really are blue and not green at all. The helicopter in question is fictional, but based on a UH-1B, so it's possible that actual reference images were used and someone mistook the blue plastic to mean the lights would be blue. Interesting!
Not only do I want to add light to the model, but I'm planning to add movement and sound effects. It won't fly of course, but hopefully I'll be able to recreate everything up to that point. With the press of a button, we'll hear the sound of the engine starting up and both the main rotor and the tail rotor slowly gathering speed. We'll see the exterior lights come on and the engine/rotor sounds will continue to intensify until those blades are moving full speed. I'll think of a safe way to turn it off without losing a finger!
I want to synchronise all of this to be as authentic as possible, but I'm struggling to find good examples of the lighting "patterns" on start up. I don't understand the purpose of all of the lights yet either so I'll need to do more research there. I saw some images of a control panel above the pilot and it looks like the exterior lights were controlled from there. Some could be set to full/half brightness, set to flash or simply turn on/off. The search lights on the underside appear to have been controlled from the actual flight stick? I'll have to do more digging to better my understanding.
Let's take the two green lights and the two red lights on the starboard and port sides. Would these be turned on and left running throughout the entirety of the flight and then turned off as the engine was powering down? I think the two white lights either side of the tail boom were the same. Solid, not flashing. Am I right in thinking all of the lights were turned on at the pilot's discretion and none of them came on from simply starting the engine? I'm just referring to the external lights of course.
Thanks again, really appreciate the advice and comments!
I would guess you could be using either led's or grain of wheat lamps for your project. To recreate a green light when on but blue when off, I would suggest using the translucent blue plastic from a cheap toothbrush for the lens sanded and buffed to the desired shape of the lens. The use a grain of wheat bulb which is approx 3k degrees kelvin and warm colored, or use a 3.2k led. That should give you the desired effect. Good luck with your project.
-
The reason when lit the lights are green. Blue plastic lens and the yellow of the incandescence lamp create a green light.
-
I need a replacement canopy for my Kitty Hawk FJ Fury that was crushed in shipment. I've already contacted Sophia Lymn at KH and she says the clear sprue is no longer available. So, here I am seeing if anyone has a trashed FJ-2 or 3 and has a canopy they will not be able to use. I will gladly purchase it from you. PM me here. Thanks.
-
On 7/16/2015 at 5:31 PM, jpk said:
There's always someone that will find a way to get around the manufacturer's proprietary system forcing you to only use their products in their devices. I have a printer that needs $100.00 worth of ink when it tells me it's out when actually there's ink still in the cartridges. I went ahead and installed a continuous ink system. I now have enough ink that will last me probably until I check out of this life and for less money than it cost to buy one set of cartridges that last less than a year. I did have to alter the printer cover because it has a proprietary interlock forcing you to use their cartridges. Some plastic surgery fixed that. Now I can say FU to Epson.
My solution for my Epson Artisan 835 as well. Been using a CIS for well over 5 years. I am just now finishing up my first supply of ink.
-
12 hours ago, Specter1075 said:
That does sound like a tough build.
I am in the process of acquiring intakes from the company in Russia called XMM. I don't know much about them, but they too offer early and late intake styles, and include a corrected tail cone. As for the tunnel cap, I do not have much information about it, to be honest. I am still researching, but I'm truthfully not 100% sure what I'm looking for vs what's in the kit because I don't actually have the kit in my hands yet. Is the tunnel cap something that mounts on the center-line ahead of the camera fairing?
When the Aires cockpit arrives, I can send some pictures your way if you'd like to see and compare with what you have.Yes, I'd like to see what the Aires cockpit looks like v the CE one.
I just pulled my Viggie out off the shelf of doom to take a peek in the box. I misspoke on the cockpit. It is a Black Box set. It has easily been over a couple of years since I looked at it. The tunnel cap has a fuel dump and a sensor pod that are really nice compared to what came in the kit as well as more accurate engraving.
The BB cockpit doesn't fit very well. the fuselage won't close up completely. Ill need to do some trimming to allow it to close up. I'd really just like to get another kit to rebuild the fuselage.
-
Fixing the fin top is easy no doubt but the weapons tunnel cap is nice over the kit part. They come together in the set. I had the CE cockpit set and it really wasn't worth the money. Not that is was inaccurate it just didn't improve over what trumpy did a whole lot. Plus if you close the canopy there's not much to see in the back cockpit. I've never seen the Aires set. If you can get the intake set it is worth the money. It also corrects the intake lips. CE did both early and late intakes so be sure to get the correct one for your build if you are going that route. I pretty much had all the aftermarket for that kit when it first came out. I'll bet I spent twice over what the kit cost. However, the kit is a tough build even without the aftermarket. Mine sits in the box partially done. Nothing fits. No control surfaces mounting tabs. I think it was one of Trumpy's first kits.
-
I have test fitted them sort of. Just to check if the diameters were close. I believe they were, it's been a long time since I last checked. Trumpy Viggie is such a lost opportunity by Trumpy. Just for general info. Don't bother with the Cutting Edge cockpit set. Or the forward fuselage correction. The intake trunk sets are good to have along with the fin correction and weapons tunnel cap...if you can find them.
-
12 hours ago, Specter1075 said:
Hello all!
In researching this aircraft, I have been doing the dance of trying to buy everything available to end up with a build that is consistent in its era. I know the Trumpeter kit is really not great, mixing elements of aircraft from different blocks, but I think I have decided that 156609 from 1972 on the Constellation is the one I'll go with. Given this airframe was one of the later produced, it is my understanding that its engines would have been the J79-GE10, which is the same as was used on the F-4J. With that said, and the apparent unavailability of late-style after-market exhaust, would it be at all feasible to buy aftermarket F-4J exhaust and expect them to be correct? (Assuming they fit) Or would the engines be externally different despite being the same model?I have a friend that worked on both F-4J's and RA-5C's while in the Navy. The engines aside from any minor airframe detail points are the same. So that would be the J79-8's that were used in the F-4B/N are the same for the early RA-5C's and the J-79-10's for the F-4J's and late RA-5C's. Any J79 burner cans for the respective airframe would be correct.
I have a set of Aires resin J79-10 burner cans for the F-4J that I would have been using on my Trumpeter Viggie.
-
I just bought a Thrustmaster T-Flight headset, US Air Force Edition. Very nice. They imitate the look of a set of David Clark headsets. The replaceable graphics are kind of cheesy other than that very nice.
-
1 hour ago, GW8345 said:
The Sidewinder's are test articles, they are doing carrier suitability testing hence the blue rocket motors and orange seekers.
The rocket motors are inert, the seeker heads are test/live, they are testing how the seekers handle the carrier environment (i.e. cats/traps or what we call "shake n bake").
Operational (live) Sidewinders (AIM-9B's) were all white.
Thanks for the info.
-
1 hour ago, habu2 said:
Citation?None. Just a fellow modeler said to me they had filed. He follows these sorts of things. I'll ask him where he heard it.
Ok, I asked my friend for specifics on what he told me. He could not remember the modeling site where he had read it. He did correct himself to saying it was in reorganization. Whatever that means. Maybe they have other things occupying their attention now.
I just did a google search for any info on any sort of bankruptcy or reorganization and came up with nothing. My friend may have misunderstood what was being published at the time. Hasegawa seems to be for all intent and purposes doing just fine. Disregard my previous post. I should have verified it myself before posting that.
-
On 5/26/2021 at 11:00 PM, Corey said:
I was just rewatching that fabulous video posted above. The Sidewinders being carried, are they practice rounds or live missiles? I don’t think I’ve ever seen Sidewinders in those bright colors. They must have been brand new in 1956 too, maybe part of the testing program?
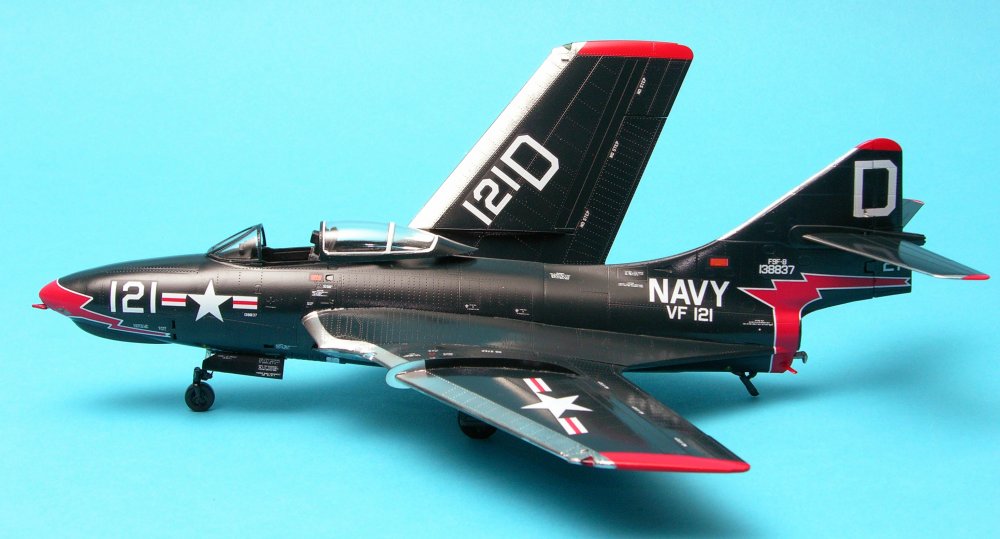
I was wondering if they were practice rounds or live as well. In Ginter's book there's a small segment on the sidewinder. There are 4 B&W photos from the testing program with markings similar to the color footage from the video however the heads are different. There are also a few more B&W photos of operational Fury's with sidewinders and the bodies appear to be all white like later examples. The Fury was the first fighter to be deployed with the Sidewinder. I will be looking forward to Bert's new book on the Fury series.
-
I've heard that Hasegawa is NOT in bankruptcy.
-
On 6/8/2021 at 12:08 PM, jonbryon said:
I don't think that's quite correct. There were a fair few kits between the F-94 and the TF-9. In 1/48 the F-35s, Mirage F.1s and Jaguars were all prior to the two-seat Cougar.
Jon
I stand corrected. That would explain the much larger part trees in the F-35 kits. There was enough plastic in those to mold another kit.
-
12 hours ago, quang said:
Just call me ‘unbuildable’.

Very nice.
-
On 2/25/2021 at 3:10 AM, paulsbrown said:
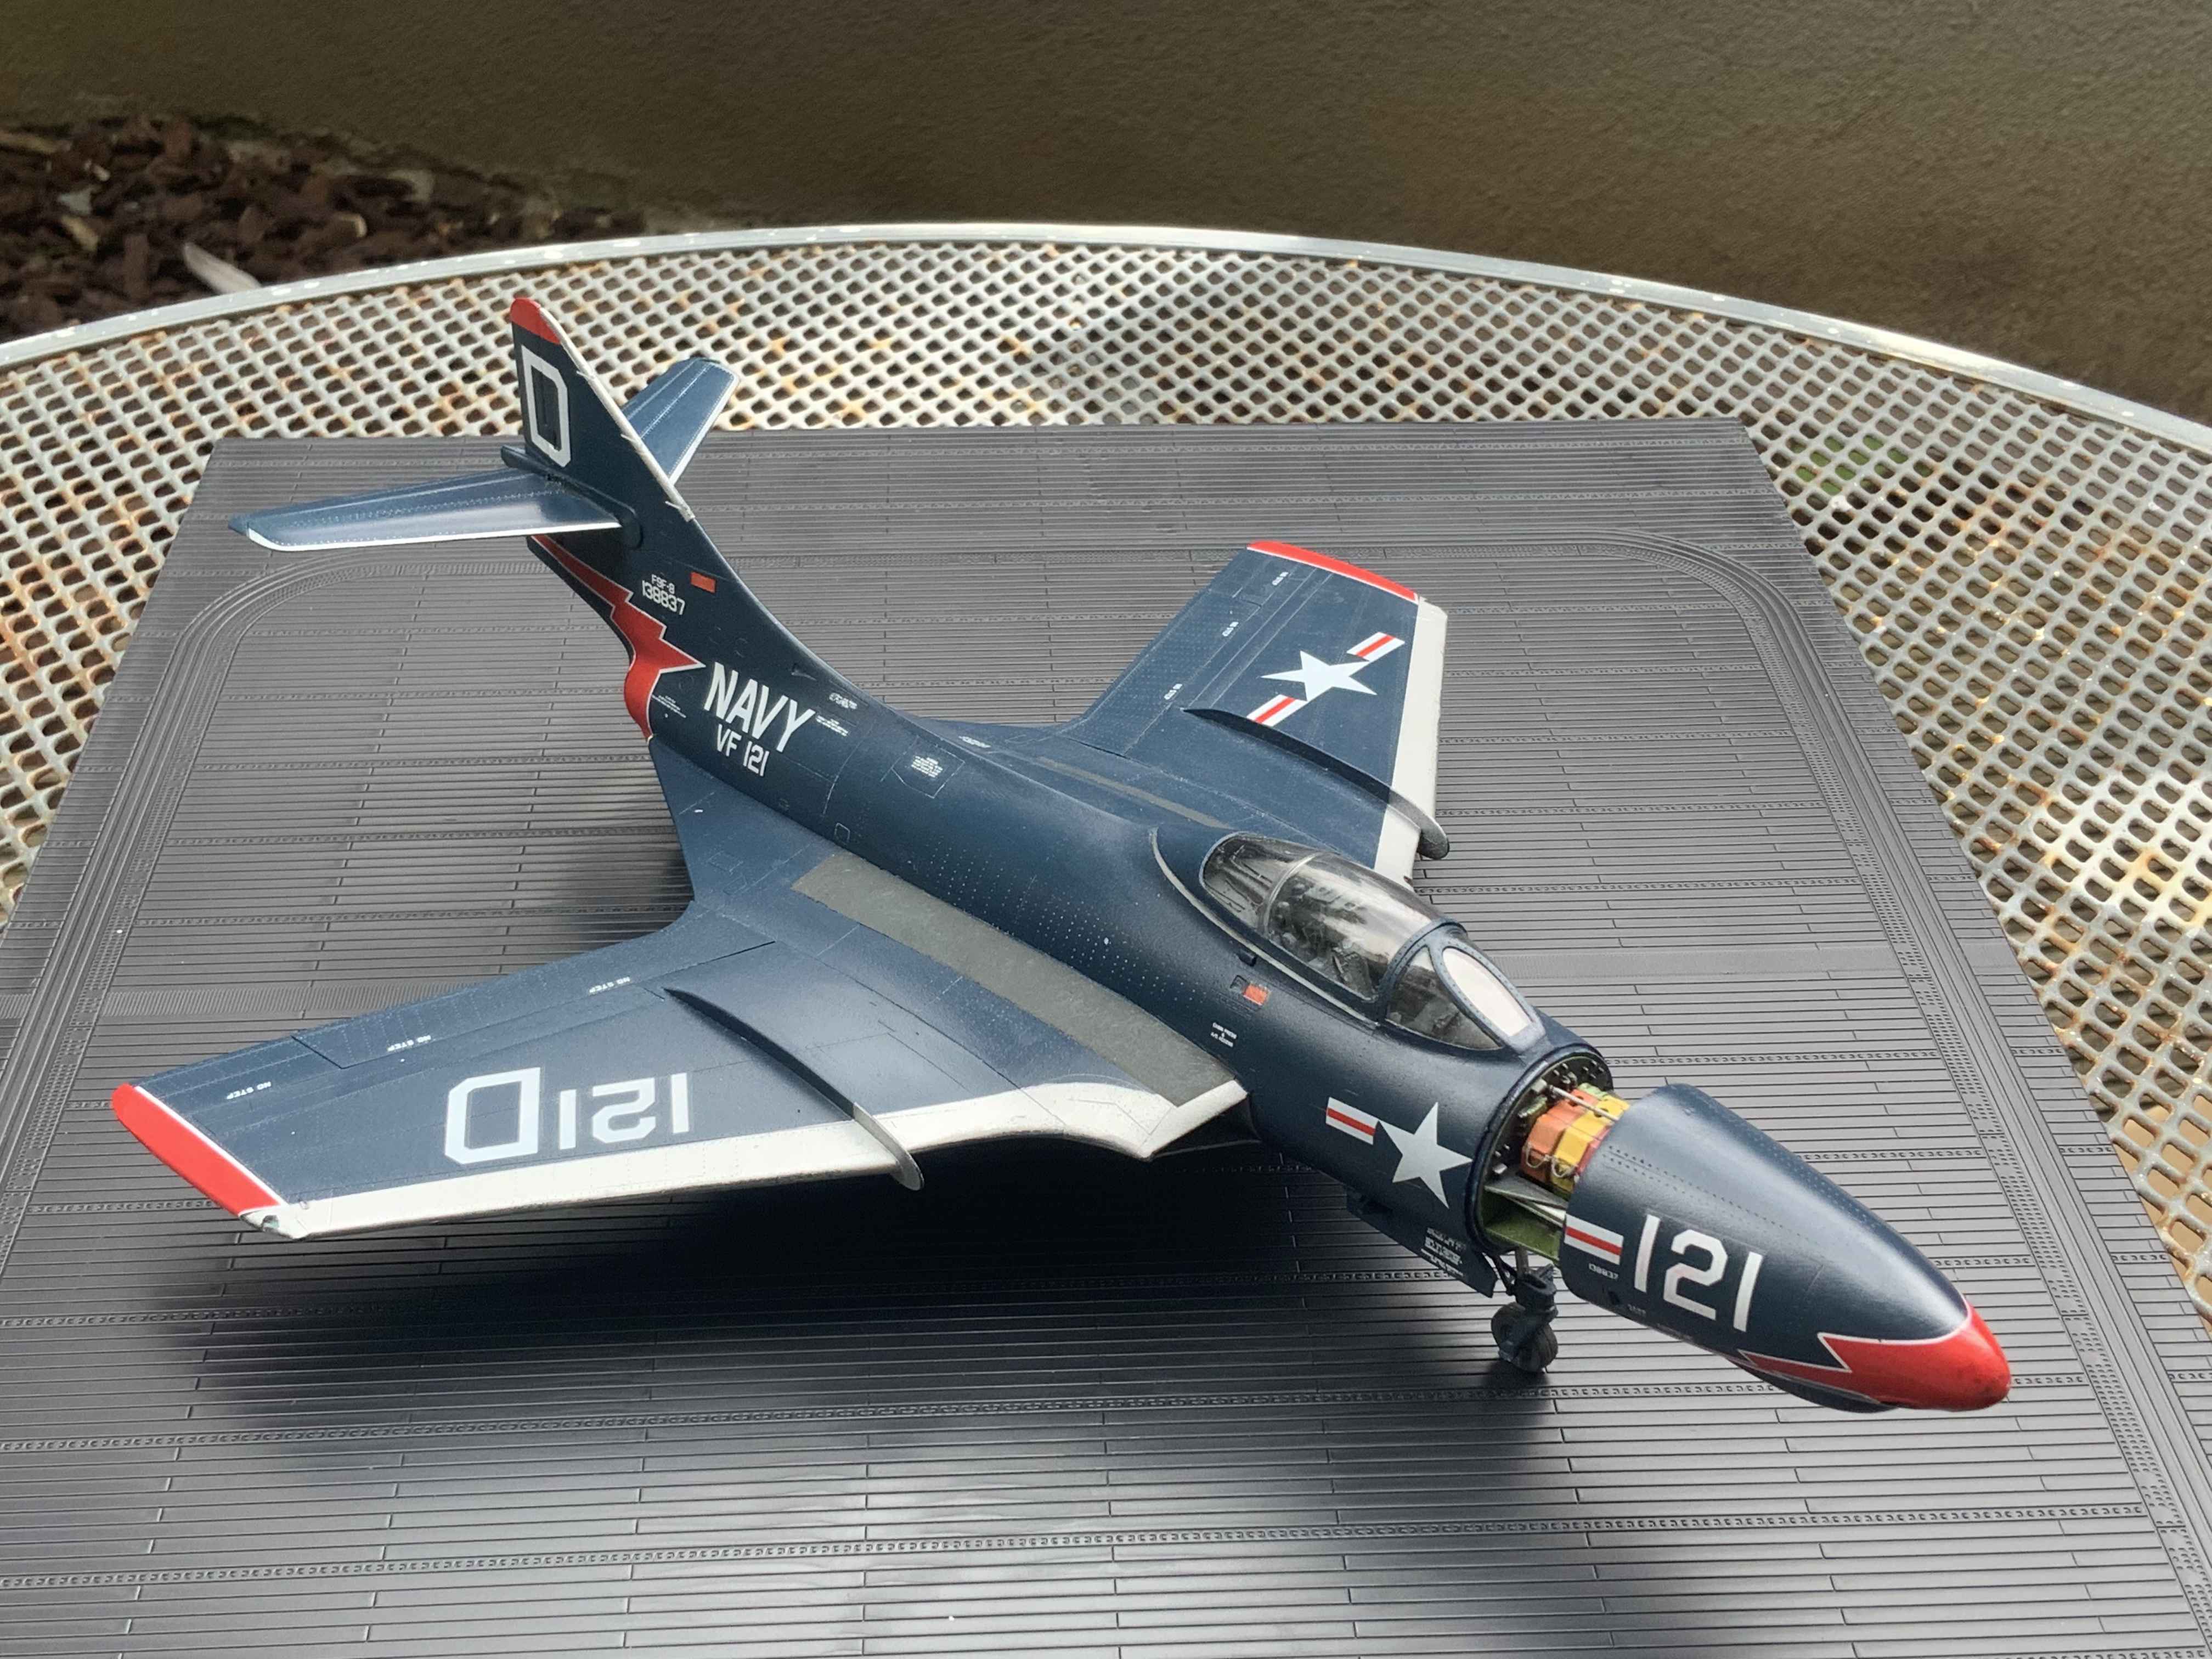
It does test patience. But it does look good finished and on the shelf. I think it must be an early effort by KH, I remember the sprue trees being the thickest I have ever seen in a kit like a limited run thing. The newer KH Flankers I've built are pretty good.
Sorry for the repeat of information. The F9F-8T was Kitty Hawk's second kit after the F-94 Starfire. Then they released the single seat Coug after that. The Starfire was released in 2012. I remember talking with the KH rep at the Nationals in Orlando about future releases. He said two USN subjects were planned. He did not reveal what they were but now I am assuming one obviously was the Cougar the second, possibly the Banshee. Originally KH was going to release the photo Coug as a separate kit. Wisely I think they decided to combine it with the single seat kit. The sprue trees are very thick in the Cougar kits. They got a lot finer in their later kits as their engineering improved.
-
On 2/20/2021 at 11:30 PM, Paul Boyer said:
Yeah, there were some funky fit problems and strange engineering. But I got through it OK. Of course, I'm just usually a 1/72 scale kit builder, so what do I know?:
Nice build.
-
A buddy and I are hoping to make the trek up from NE Florida.
Well out of the question this year. I need back surgery sometime towards the end of the month. Maybe next year.
-
I think if Kitty Hawk indeed folds, eventually their molds will be assumed by Trumpeter due to the relationship they've had in the past.
-
Aside from Song having previously worked within Trumpeter, I believe there was a personal relationship between Song and the owner of Trumpeter. It was this that allowed him to start KH with support from Trumpeter. Song had a very aggressive release schedule between KH and Panda. Probably the financial realities caught up with him. Releasing too much too fast.
-
15 hours ago, Geoff M said:
I don't know what there marketing strategy was? Same for any of the model companies. I am sure they all advertise in modelling magazines and Facebook. Outside of that I can't say anyone outside of modelling would have heard of any of these companies except maybe Tamiya since they are into R/C too.
I don't believe accuracy killed them. There are lots of companies out there producing questionably accurate kits that have been going for decades, (italeri, testors, heller).
So if they are truly gone, it is probably more to do with business practices and financials than their product or marketing. My $0.02.
Geoff M
I agree with you.
-
This would only be my guess. I tried to see which seats were in which airframes using the photos in my digital copy of D&S's Cougar. However in this particular issue for some reason the photos cannot be enlarged like in other issues. I would guess the MB Mk5 seat would have been transitioned to when the Cougs went to the reserves. The Navy mandated all fighters be equipped with the MB seat around 1958 if I recall. I would guess that the Cougs which were being replaced by then with Crusaders, Demons and Skyrays had priority for replacement since they were the newest frontline fighters. That is only my guess. I wish the photos could be zoomed in to see as the photos are of pretty good quality. That would be helpful. Others may know more.

New Sukhoi fighter
in Jet Modeling
Posted
Looks like they copied the diamond shaped wing with ruddervators of the YF-23 Black Widow. Certainly the nose will have to be enlarged to accept a radar suite that would be effective. Looks like the early YF-16's slim nose.