

Hammerhead11
-
Content Count
138 -
Joined
-
Last visited
Content Type
Profiles
Forums
Calendar
Everything posted by Hammerhead11
-
Tamiya 1:48 P-47D Bubbletop "Oh Johnnie"
Hammerhead11 replied to Hammerhead11's topic in In-Progress Pics
Managed to get some paint on the wheel wells and gear doors. Pretty happy with it all so far. I need to put some paint around the lower lip of the wheel wells, and around the opening to the ammunition bays then I should be able to get the wing halves glued together. I've also started working on the landing gear struts. Thanks, Brett -
Tamiya 1:48 P-47D Bubbletop "Oh Johnnie"
Hammerhead11 replied to Hammerhead11's topic in In-Progress Pics
Hello everyone, sorry for the dry spell here. I'm fortunate enough to have a job that allows me to work from home and you would think that that would mean more time at the work bench. Yet, in the two weeks I've been working from home now, I've barely been able to get to the bench between an increased work load at work and kids needing help with their school work. I was also waiting on some new drill bits to arrive and those took a little longer than expected. But, this weekend I was finally able to make a little bit of progress on the P-47. I've been working on the wheel well -
Tamiya 1:48 P-47D Bubbletop "Oh Johnnie"
Hammerhead11 replied to Hammerhead11's topic in In-Progress Pics
Thank you, I've hit a small snag. I'm currently working on the wheel wells, and will need to add many of the lines and hoses with floral wire, but my micro drill bit that I was using broke, and now I'm waiting on a new set of drill bits to arrive before I can continue, I will try and snap some pictures of what I've done so far. There is a decent amount of photo etch added to the wheel wells from the Eduard set, mainly to add detail to the side walls of the wheel wells. Each piece has fit perfectly and I have been satisfied so far. Thanks, Brett -
Tamiya 1:48 P-47D Bubbletop "Oh Johnnie"
Hammerhead11 replied to Hammerhead11's topic in In-Progress Pics
Thanks Dutch! Brett -
Tamiya 1:48 P-47D Bubbletop "Oh Johnnie"
Hammerhead11 replied to Hammerhead11's topic in In-Progress Pics
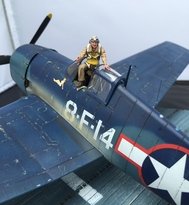
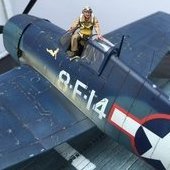
Thanks Dutch, I’d be lying if I said I wasn’t nervous. This is my first serious project with a lot of photoetch. well, the figures are now complete. Over all I’m satisfied, I may tinker with them throughout the project, but for now I’m calling them done. I’ve also finished the ammunition bays. I laid down a coat of primer, let it dry for 12 hours then laid down a coat of MIG Zinc. Let this dry for 12 hours as well. Then added some Tamiya dark brown panel liner to add some weathering and added the placards. Once this was dry it was on to add -
Tamiya 1:48 P-47D Bubbletop "Oh Johnnie"
Hammerhead11 replied to Hammerhead11's topic in In-Progress Pics
Quick update today. I’m in the middle of painting the figures and will post pictures once they are done. I’ve started working on the wings as well, cutting open the panels for the ammunition bays. As well as assembling the photo etch for the bays and panels. thanks for looking, Brett. -
Tamiya 1:48 P-47D Bubbletop "Oh Johnnie"
Hammerhead11 replied to Hammerhead11's topic in In-Progress Pics
Don, Thanks for sharing, glad to hear it's such a great kit. I will do the same and hold off adding the LG and such until the end. -Brett -
Just started by build log for this: -Brett
-
Hello Everyone, I have begun work on my next major project. I will be modeling Lt Knights P-47D "Oh Johnnie" and will be using the Tamiya P-47D as my base. I have purchased the Eduard Big Ed set and a set of EagleCal decals. It is my intention to model the following image: In addition to the airplane it's self I will be adding Lt. Knight and his crew chief Sgt. Childers onto a diorama base. I will try to replicate the scene as best as possible, however, there are a few area's where I will deviate for "creative license". I will be posing both ammunition pays i
-
Airfix 1:48 Sea Hurricane and Revell 1:48 BF-109 G10
Hammerhead11 posted a topic in The Display Case
So, I’m between major projects, my son and I decided to do a dual build together. My son picked the Revell 109 so I got the Sea Hurricane. This was my son’s 3rd model (he’s 15), and I guided him, but he did it all himself, including using the airbrush for the first time. Super proud of him! Not bad for a 30 year old kit. I didn’t take the Hurricane too serious, I added some Eduard seat belts and drilled out the gun ports and exhaust but otherwise it was a straight OOB built. It was pretty nice, detail was adequate but the fit, especially around the wing to fuselage join was not -
A rare Aggressor - F-16C Block 30, 527th Aggressor Squadron
Hammerhead11 replied to Nev's topic in The Display Case
Very Nice! -
Dutch, Sent you a PM. Thanks! Brett
-
Dutch, If you could get a scan of that article that would be amazing! Yeah, it's really unfortunate that he was so close to base when he crashed, within 25 miles if I recall. He almost made it. I suppose this all speaks well to the ruggedness of the P-47. If he was taking multiple hits from flak and ground fire each mission and taking the same plane back out the next day, it was well built. -Brett
-
P-38 Weathering - Tape Residue and Exhaust Stains
Hammerhead11 replied to ESzczesniak's topic in Props
Hey Eric, For what it's worth, when I was researching for my White 147 build, I didn't find any evidence that they panel lines were taped on the wings. The only evidence I could find was that the nose/cockpit and engine areas were taped up for transport. I recall reading a small article about the purpose of the tape, it only referenced the engines and gun bays, but I cannot recall where I saw that article. As for the exhaust staining, as I understand it, it wasn't so much exhaust staining as it was heat damage. I don't believe that the forward portion of the superc -
I need to get me one of these. The spinner looks great, and overall, even without the finishing touches you want to add, this is a good looking kit. Brett
-
I'm not the biggest fan of Russian aircraft, but this is a joy to look at, well done! Brett
-
Very nice, that’s really unique. Brett
-
You're not kidding, those are really nice. I'm especially drawn to that Hurricane in US markings with the sharks mouth! Thats sweet! I might have to plan some more projects...Sigh...better check the bank account. Brett
-
Rick, thank you, this is fantastic! Brett
-
Hey Rick, thanks for the additional info, unfortunately the link you supplied isn’t working for me. But I’ll have to try and track down a copy of that book. Brett
-
I managed to find a copy of the text from the book and you're right it doesn't outright state that both wings were replaced, but merely says "flew through his own bomb blast...necessitating a wing replacement..." But, like you said, I'm sure the author did his due diligence on his research as well as the artists of the images in the book. I think then, to replicate the photograph, I will paint the aircraft with both wings in natural metal, the fuselage with OD/Grey with the wavy demarcation from stem to stern. As a side note, further in the same text from the Osprey book, it app
-
Thanks curt! Well, you’re not wrong. It’s possible to model this particular aircraft prior to it’s wing replacing incident. However, and perhaps I wasn’t clear in my initial posting, I’m looking to build my kit as it’s represented in the photo I posted, which I believe was taken after the wing replacement. I did find the idea of the contrast between the od/gray and the natural metal to be fascinating and was drawn to doing that scheme, just wanted to make sure I was getting as correct as possible. That’s a lot of helpful information! Thank you so much! Unfortunately this i
-
Excellent, thanks! Everyone has been very helpful. Brett
-
So the next question then, would the wavy pattern continue down along the back of the fuselage like how it is on the cowl? Brett
-
The story of the pilot is just as interesting. One of the last recipients of the Medal of Honor in the US Army Air Force in WWII. Unfortunately he earned it posthumously. He had a knack for taking out ground targets and claimed multiple aircraft destroyed on the ground. I want to try end replicate the picture. I have some old monogram figures that I will try to modify to resemble Lieutenant Knight and his crew chief. Brett