


ESzczesniak
-
Content Count
1,028 -
Joined
-
Last visited
About ESzczesniak
-
Rank
Full Blown Model Geek

- Birthday 10/01/1983
Recent Profile Visitors
12,488 profile views


-
SH-60B "Greenhouse" Canopy - Any Tint?
ESzczesniak replied to ESzczesniak's topic in Helicopter Modeling
Thank you too! Perhaps that explains my difficult calling it from outside photos. And the cockpit photos I was finding were all showing the MIP, and not overhead. -
SH-60B "Greenhouse" Canopy - Any Tint?
ESzczesniak replied to ESzczesniak's topic in Helicopter Modeling
Thank you! -
Somewhere I got the idea the overhead windows in the SH-60's were tinted either green or a smoke color. If I'm correct looking through reference photos, they seem just standard clear canopy? Can anyone confirm? I'm finding very few overhead shots which would make me feel the most clear. They sometimes look dark, but I think this just related to the areas behind these windows being more dark.
-
Thank you! I agree it appears bare metal. The frame is also bare metal. There so many references for that being a zinc chromate yellow-green, it really makes me wonder if this was time period and/or plant specific and an airframe with a primed engine mount may also have done that on the tank.
-
I'm building a standalone 1/12 scale Packard Merlin V-1650 Engine that is modeled as mounted in the P-51D. This is modeled up to the firewall. There's a large tank mounted on this fire wall that I think is a fuel tank? Through google image searching, I'm finding this tank as... Yellow:; http://www.ipmsstockholm.se/home/wp-content/uploads/2012/04/walkaround_p51_e_006.jpg Zinc chromate yellow-green: https://scontent-ord5-3.xx.fbcdn.net/v/t39.30808-6/479916819_9067874416595001_349340846238306133_n.jpg?_nc_cat=100&ccb=1-7&_nc_sid=33274f&
-
Took the plunge and started designing decals: Dash Two Decals
ESzczesniak replied to mynameismatt's topic in Jet Modeling
You may need to look in to applying with the DoD to use their markings. Someone on this board (despite their best intentions) had some experiences and I’d solicit the advice of those offering. I’m being a bit vague on details because I’ve learned this type of contractural/legal stuff isn’t always best for a public forum…and I’m fuzzy on the actual details myself. -
Thank you! It wasn't quite matching up to what I was seeing, and the medium gray makes sense.
-
Would anyone be able to help me with the correct color for the rotor hub on a USCG HH-60J? I can find good colors of HH-60H's which I expect to be the same. Here it appears a dark graphite metallic color. However, I'm finding some photos of coast guard birds seem like the rotor hub is a lot lighter and perhaps not metallic, such as this one... But I can also find plenty of photos where it looks dark like the HH-60H. Does anyone have guidance or other knowledge to help me sort this out? I appreciate any t
-
I've ordered items listed as "in stock 6+". Took over 2 weeks to ship, and then I asked to cancel. Then magically before I could get a response it moved to "pack and ship". But tracking didn't show as active for almost 2 weeks (air mail, so should be relatively quick). I'll never order from them again. They're not even that cheap in more. If you want to save money, you have to use their sea shipping, which is 3-6 months.
-
I really appreciate the help from everyone! I think I'm calling her done. I feel I could go on forever with small weathering details, but am in a good place. The final thread...
-
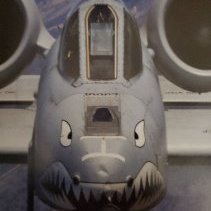
I've been through a number of A-10 boxes to eventually model the A-10C, but most fizzled. The Hobby Boss needed a lot of work, and that was before turning it in to a -C. The Academy is rather nice, but I hit a paint disaster and by the time I had motivation to come back the GWH kit was out. The GWH kit is marvelous. It is well detailed, fits well, and a very smooth build. I would give it comparisons to Tamiya somewhere between their F-16 and F-14. It's not as good as their new F-35 or P-38, but rather good. I keep wanting to call this OOB, but it's not. The cockpit has Quin
-
Thank you, I love the lengthy explanation! And the Hog, so love learning the details. Would this circled streamer be for the gun? It sounds like what you described about the streamer hanging out of the door. I know you said this picture had the battery streamer, but unfortunately I picked a pic with 3 streamers all nearby. Now I have to figure out of I can remove the streamers on the LAU-131 and AGM-65. Put those on already since I was pretty sure of those...on the LEFT hand side of the pylon.
-
I think this may be my last question. And thank you all for the help. I'm trying to place the -21 equipment realistically. Eventually I'll have a pilot figure on climbing the boarding ladder. So all the airframe pins and covers are off. If I'm correct, the seat pins stay with the pilot, so those are remaining. What I have is to sort out what ordnance/pylons would be pinned. My final loadout is: LAU-131, SUU-25, GBU-38 x 3, GBU-54, AGM-65L, and an LIGHTENING pod. Based on what I've read and learned in the past, it could be only the forward firing ordnance that wo
-
It is a tedious as hell kit to build, but can get you there…