as205
-
Content Count
284 -
Joined
-
Last visited
Content Type
Profiles
Forums
Calendar
Everything posted by as205
-
FlyAndFight, Thanks for the kind words. That was my first Special Hobby kit build. I wish now that I had picked up the Special Hobby 1/72 scale kit. I'm sure it would have been better than the Monogram one that is in my stash.
-
Thanks, those details came out better than I expected. I've seen posts by another modeler that did the 1/32 scale one and he used brass wire. It looked beautiful. I didn't have any on hand of a proper size and I wasn't sure I could get the standoffs all drilled perfectly in line, so I used the styrene rods that I did have. They were a bit more forgiving than the brass rod would have been.
-
Thanks Geoff. One day I may pull out the Special Hobby X-1A or the X-1E and give them a try.
-
Davidf888: Sorry for the late reply. I purchased the stand from Amazon it was item "SkyMarks SKRWSTAND Large 4.5 x 3.5 inch Wood Stand For Large Body Airliner". Believe me, it took a lot of searching to find the right stand. When I originally bought it I thought I was going to have to buy a threaded insert to make it work. I was very pleased that it came with one. It was not advertised that it came with it. dekon70: Thanks for the kind words. It turned out better than I thought it would when I started.
-
Pete, Yes, he definitely compensated me for the work. (More than I expected.) He is a high power rocketeer and a fan of the X-15, he is really into it. And, I agree, it is hard to imagine the upcoming generation doing something like this. Maybe the projects of SpaceX will inspire them.
-
Thanks, crackerjazz. Yes, this was a build that I finished back in September (started in May), I just never got around to posting the build until now. Thanks on the info about the weathering masters. I'll try that next time.
-
Thanks, I wasn't sure about it until it actually went down. There was just enough difference between Tamiya NATO Black and the Vallejo Black Gray. I forgot to mention that I did add a light rub of Tamiya Weathering Master Gunmetal on a few panels but it just about disappeared with the matte coat.
-
This is the home stretch on the build. Just a few minor things to do. First was to finally remove the masking from the underside of the plane. There was very little bleed from the black over spray. It was easily touched up. You can also see that at this point I’ve added the two underside antennas. I left the masking over the screw hole so that the upcoming clear coats will not gum up the threads. There is also some small rectangles of masking tape that are covering the area around the alignment holes for the external tanks. Those will provide a glue surface between the exte
-
I started painting by covering part of the bottom area with Vallejo White from the ventral stabilizer and up to the nose gear door. Then another white area from wing tip to wing tip near the flap hinge line. I then masked off exactly where I needed the white stripes to go. I used 1/8 inch wide tape for the wingtip to wingtip stripe and two strips of 6mm tape slightly overlapped for the stripe from the ventral fin to the nose gear door. With that done I sprayed the model with a base coat of Tamiya NATO Black. I decided to mask off some of the panels to paint
-
Back on the X-15 itself, I glued on the dorsal fin/rudder with Tenax. There is a gap that will have to be filled where the fin meets the fuselage, but it is not too bad. I also glued on the resin helium tank box. It will require a bit of filler to make it properly meet up with the air brakes. There are also a few small pinholes on one side that will need filling. I then glued on the ventral fin. It too has a gap at the fin/fuselage joint that will need filling. It also had a much larger gap at the base of the air brake on the right side. I couldn’t use fille
-
I wrestled with how to get the piping painted without messing up the paint underneath for a while. Trying to mask it would have been a pain. Then a little synapse fired and I thought about brush painting the pipes with slips of paper slid underneath.
-
I have the external tanks primed and the first color applied. If I was doing it again, I'd wait to install the resin part that represents the tank jettison rocket. I got ahead of myself and installed that before painting. I painted the rest of the tanks. All that is left is to paint on the final few details and then spray them with a clear coat prior to adding the decals to them. I’m sure that I will have to run a drill bit through the small holes to remove the bits of paint and clear coat so the 0.015 rod will pass through. The external tanks w
-
Pete, The kit came with the resin parts. Much of the resin is for the ground dolly. I didn't build that since he wanted this to be an in-flight version. This version did not have any PE. Randy
-
I’d been procrastinating on doing the windows for the cockpit. The windows have to be cut from a supplied square of clear plastic. I started by cutting out a rectangle of the approximate dimensions and then I carefully sanded the rectangle into an oval shape that will fit the openings in the cockpit canopy. It actually wasn’t as difficult as I was imagining. It did take a while to get a shape that fit, but careful sanding slowly created window that fit well into the opening. In the picture below if you look closely you can see the window in place. I used Plasti-Zap CA glue. It does not fog cle
-
Habu2, Yes, I saw that post and it confirmed what I found in my reference material. Thanks.
-
I moved on to the external fuel tanks. I glued them together and used a bit of filler putty to cover the seam. I also glued the pylons to the tanks. The standard model would pretty much have you stop there and have you add a few resin details. 1/48 scale is large enough to allow modeling of the piping that ran along the top of the tanks. The 1/32 scale kit includes the parts to do just that. For this model I needed to scratch build the piping. Beside the piping there were some standoffs that kept the pipes off the surface of the tanks along with some hardware that assisted with ej
-
I finally finished the nose gear door. The scoop door required a lot of reshaping to fit the hole. I suppose it would have been less noticeable if I was modeling it with the gear down, but with gear up you have to carve quite a bit off to make it fit. You can see from the above photo that the RCS nozzles were drilled out. The original molding was just a small engraved circle. Here is a before photo: Next I painted the cockpit parts. Mostly gray with some black panels, gauges, yellow eject handles, red cushions on the seat and headrest, and some orange on var
-
I didn't go crazy with mods on this kit but I did make a few changes here and there. At the end of the previous post I showed the progress on the dorsal vertical stabilizer. Well, after looking at it, and then doing some dry fitting, I discovered that the wedge should have been flush with the back of the fin sides and the resin back piece should have been put in below the wedge. So I removed the back piece and then cut a small piece of .01 x .01 inch strip and glued that to the back of the wedge. Then I re-installed the resin back piece. Here is how it looks now.
-
I haven't posted much lately, I've been busy with other things in between builds and haven't been able to post. I have also noticed that the forum has been fairly quite of late so here is a thread on a build I completed back in September. A friend of mine saw my 1/144 X-15 build and asked if I would like to build his 1/48 X-15. He had bought the kit several years earlier and each time he opened the box, he felt a bit overwhelmed and put it away. I gladly said yes and thus the build began. Here is the box art for this version of the Special Hobby kit. The kit c
-
That is oh so cool! I love it. Nice work.
-
habu2, I've had the Saturn IB on preorder with Culttvman since it was announced. I figure I'll be lucky if it comes out by the end of the year. I'll be ordering the book as soon as it is available.
-
Aussie-Pete, those tanks look great. I'll have to try my hand at them. I have an extra Dragon X-15 1+1 kit and I could convert that into an X-15A-2 with a set of external tanks. At 1/144 scale I probably wont include the piping but I'm sure my Mars 2 Pro will work just fine to print a set of them. Now, off to open up Fusion 360 and draw a set of tanks. Keep it up.
-
I just saw this thread and it is great. I love all the details fixed and added. I also love that Evergreen storage set up. I've got copy that idea! Keep up the great work. Randy
-
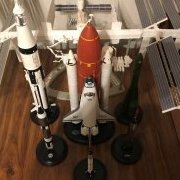
Habu2, Yes it does kind of blend in a bit. I did the black base to match the others in the collection, but it does kind of hide it. It's not quite as bad when it is with the others, but I see where you are coming from.
-
Pete: Thanks. I do them just for my own enjoyment. Maybe someday I'll get the nerve to enter one in a contest, but for now I'm just building for me. CaptKirk: I'm still thinking about the next project. Yes, a diorama of a Starship landing might need a large display area. 😃 Of course that is why they test. I remember seeing the original Falcon 9 Hopper tests and they had a number of failures then too. Eventually they will get it right. Pretty brave of them to do all their testing out in the open. Randy