


Rittic
-
Content Count
20 -
Joined
-
Last visited
Content Type
Profiles
Forums
Calendar
Posts posted by Rittic
-
-
The crew looks great! This is really coming along well.
-
WOW! This will be fantastic once completed. Is this a kit or did you 3 model it?
-
this looks fantastic!
So do the other models in the background! -
This is simply amazing!
Im talking jaw dropping amazing. Where did you get the figures..? they look fantastic! The cargo bay is.... wow. Im at a loss. thanks so much for shaing! -
This is fantastic! VERY WELL DONE !
-
Thanks @southwestforests I really appreciate it. Im hoping the print I am making now will fit. Then I can finish the detail and get it painted.
-
Hey @Homer
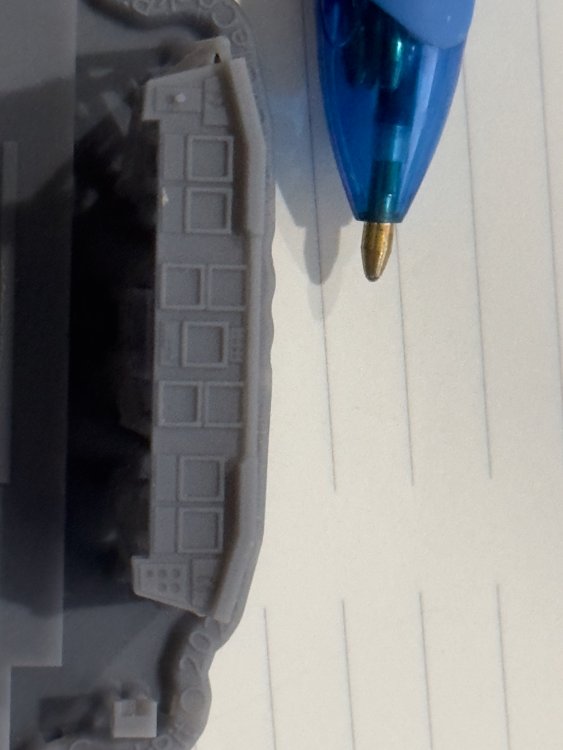
Thanks! these parts min extrusion is .25. So the reinforcement bars on the seats are .25 as are the head rests. The seat frames vary. The HUD's are .25 as well. It's hard to see but there are small nibs in the back on the inside of the HUD frame and a small slot in the back for the clear plastic to rest so it's at the right angle.
Im hoping my 4th print will fit in the model. I have one hot point and trimming the geometry to the downward facing slope is the hard part. If this doesn't work I have one more thing to try. Then, I may take you up on that and really appreciate the offer. My goal was to make a solid version for painting and then a version with holes for a back light or fiber optics. I personally am not going to light mine as it will be depicted sitting on the runway at Edwards with the support vehicles. So, the lights won't be the focus or add to the display. (or thats my original thought).
At some point you need to tell me how you event thought to get the geometry that way. Absolutely brilliant and it clearly worked well. I'll go check out the link! thanks for sharing it and the how.
-
Hey @Homer your work on the Monogram cockpit inspired me! Ive been working on re-creating it for the Revell kit as I wasnt happy with the stock kit and the one I purchased I didn't like the PE parts. So, it's now a Fusion360 adventure. Not sure how you did this, Matching the geometry inside is HARD.
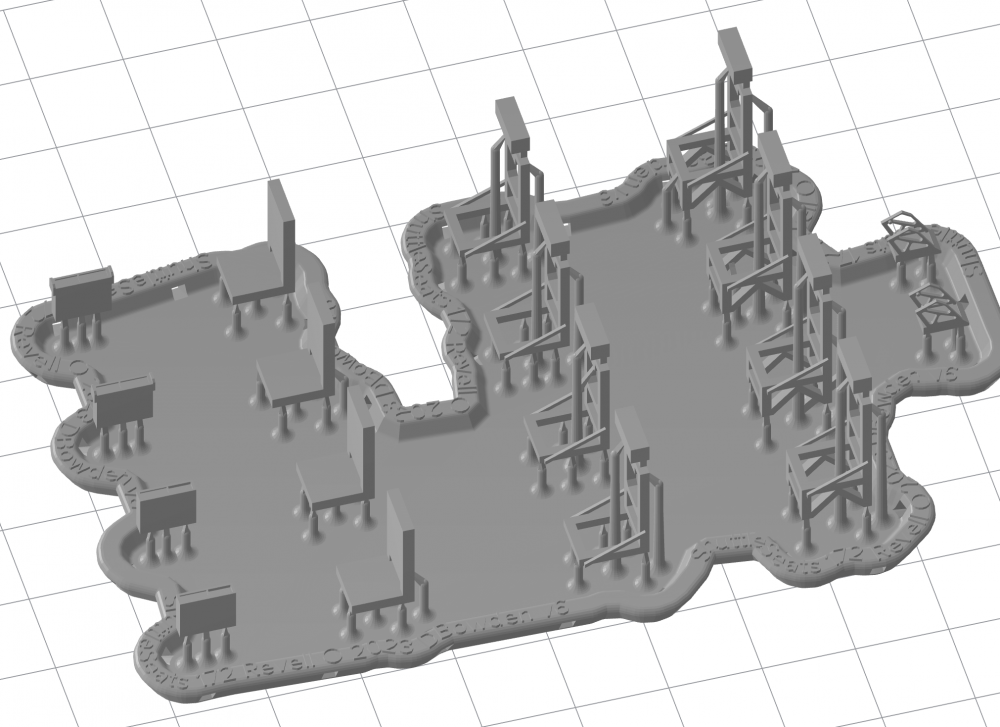
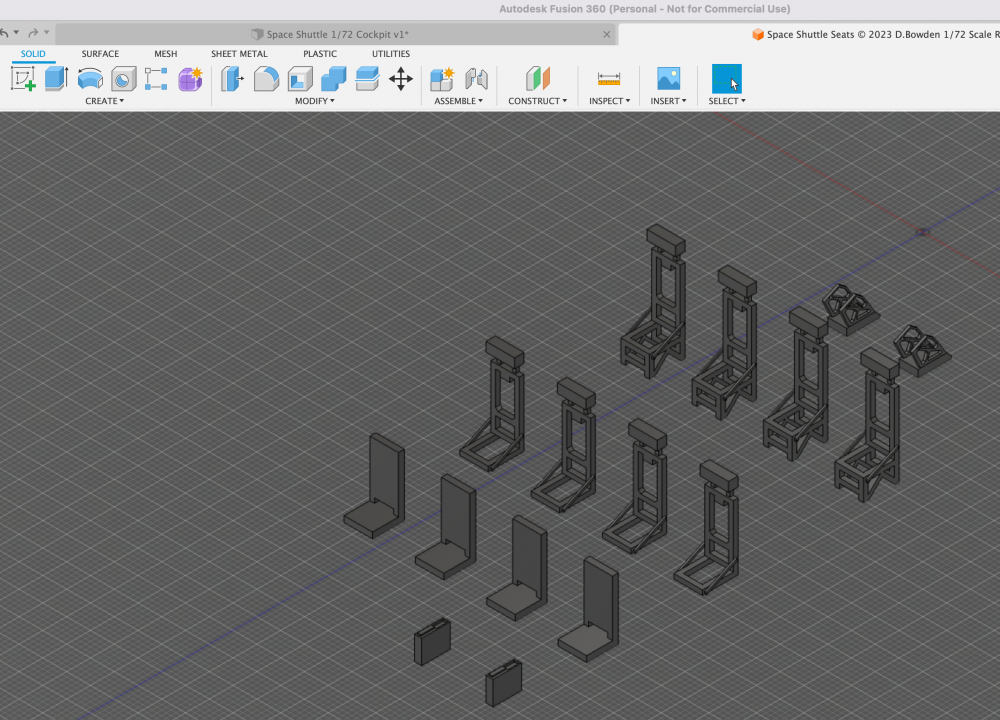
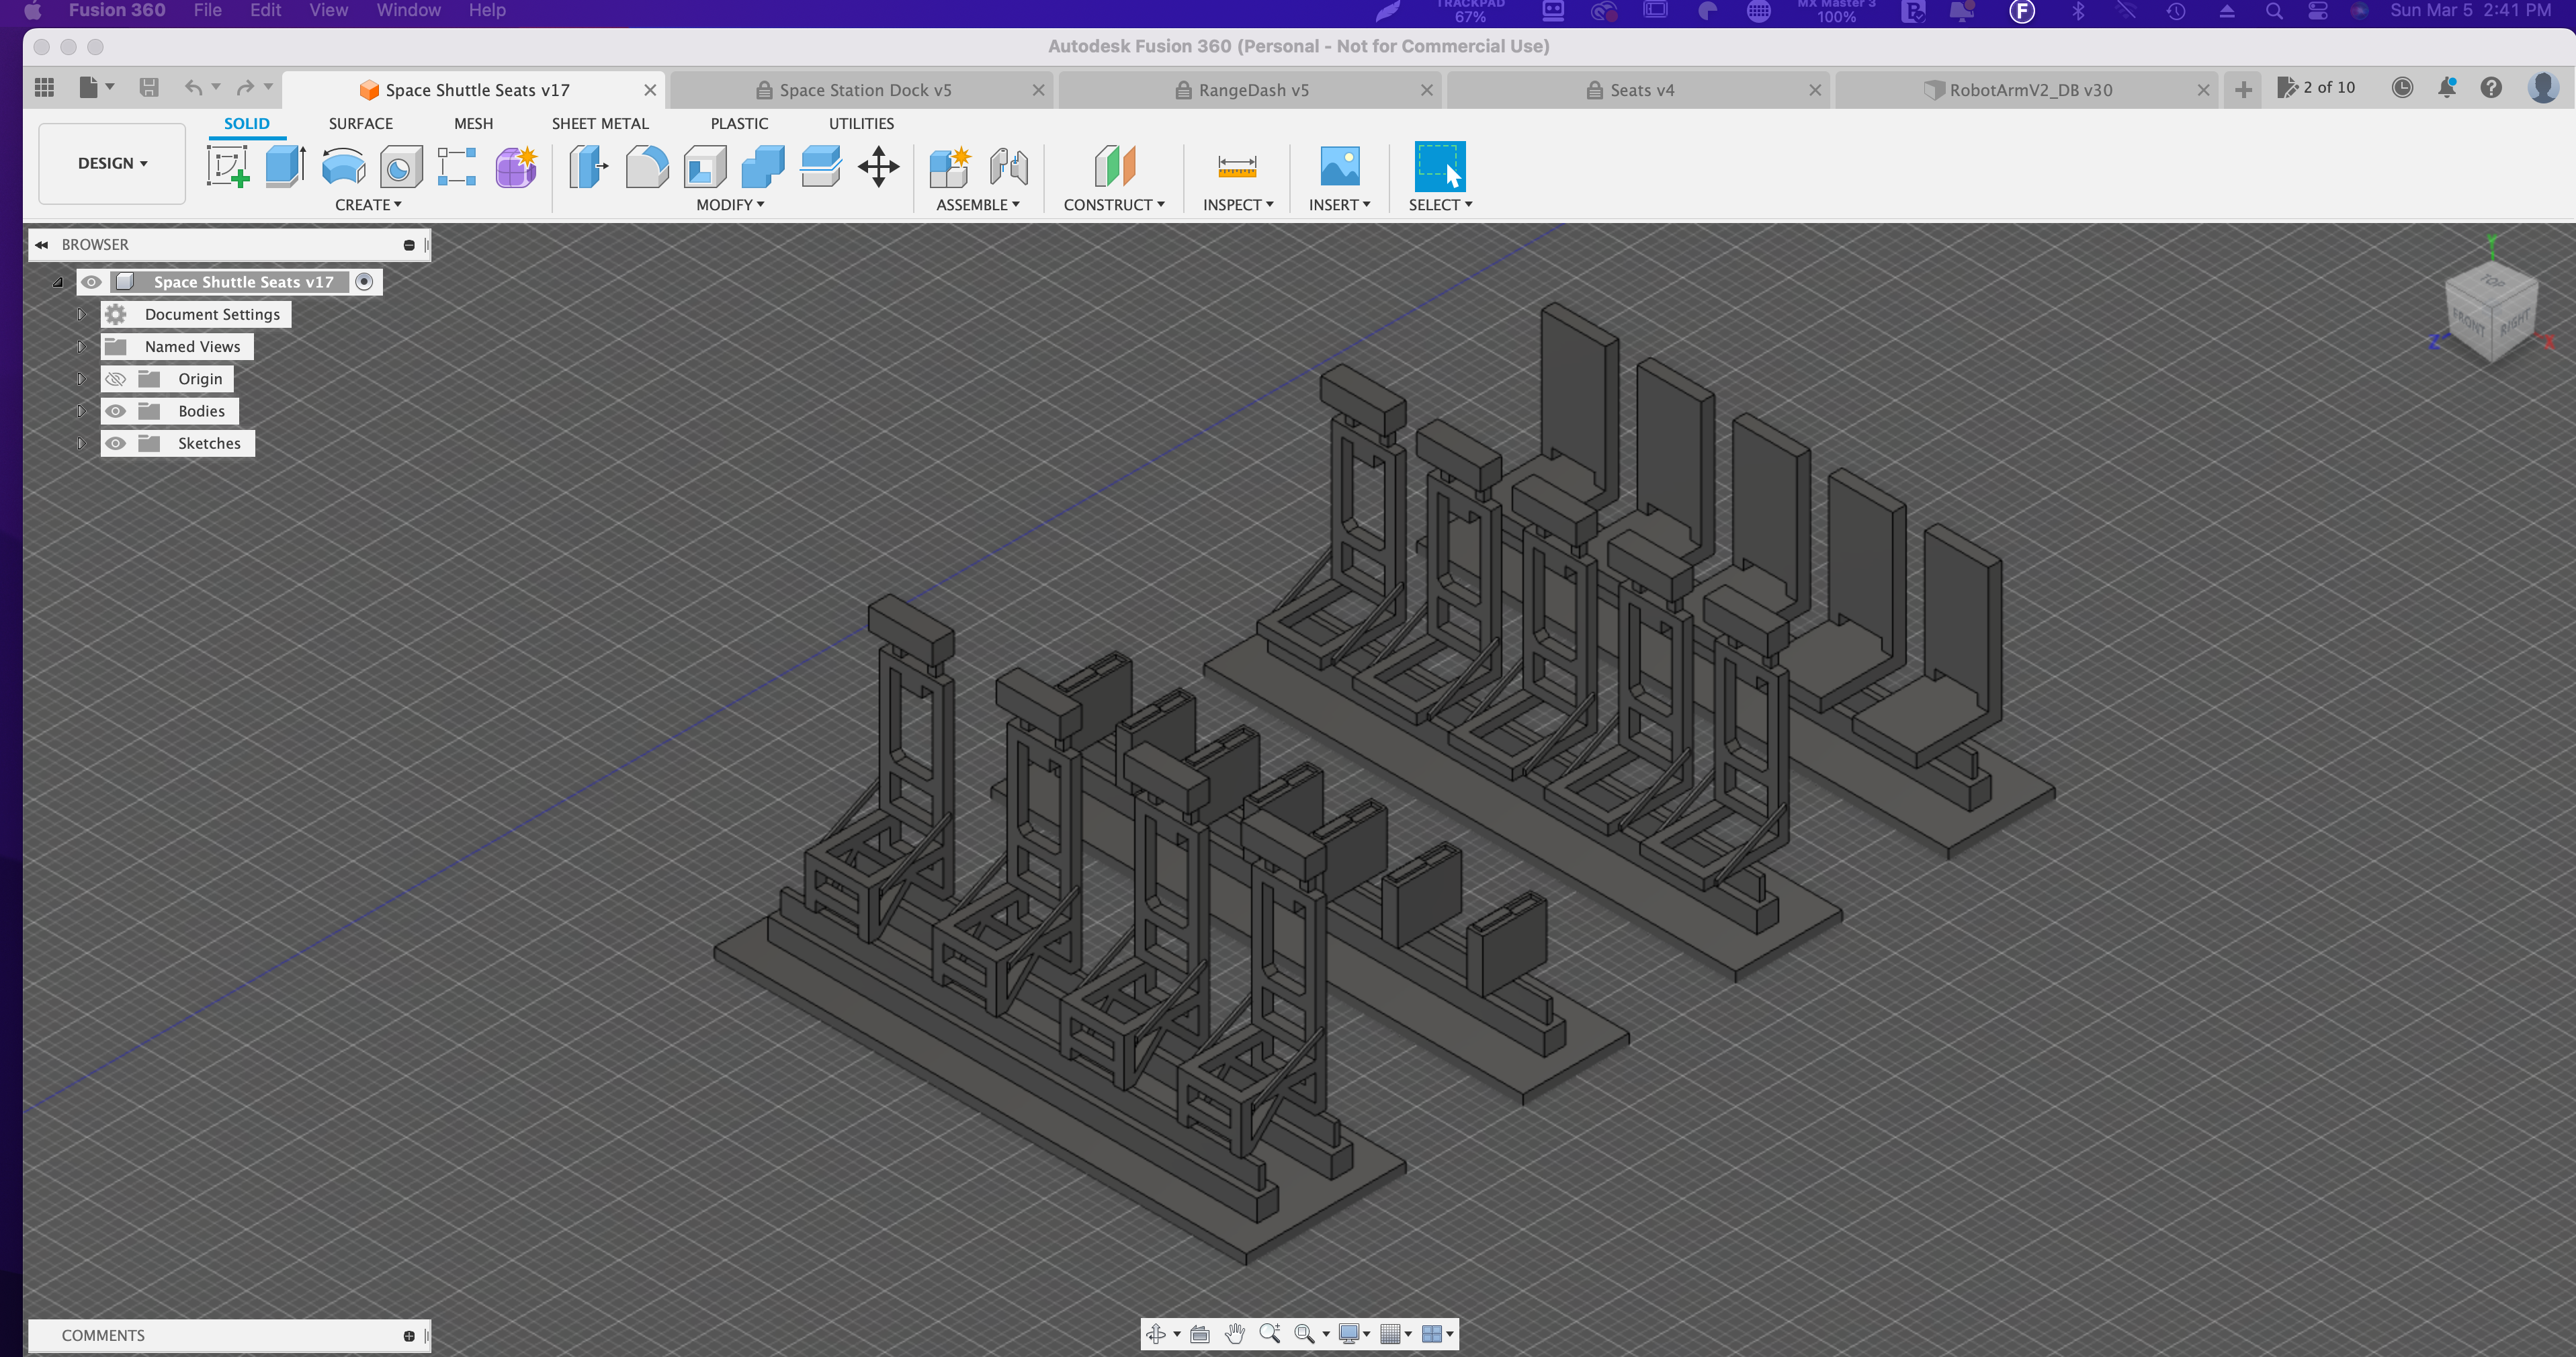
here is where I am presently with the seats, cockpit and heads up display.
The seats are two pieces (aids in painting) the black frame and the cushion. The cockpit is a base with the front control panels on the left and right + the front dash. The remaining panels are separate pieces.

-
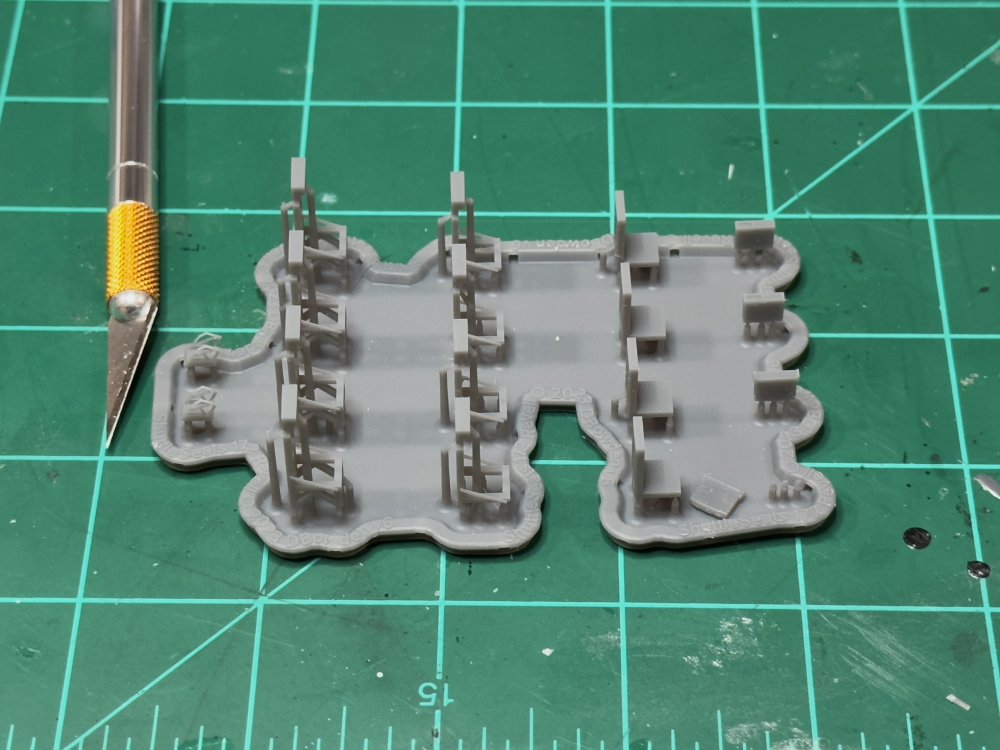
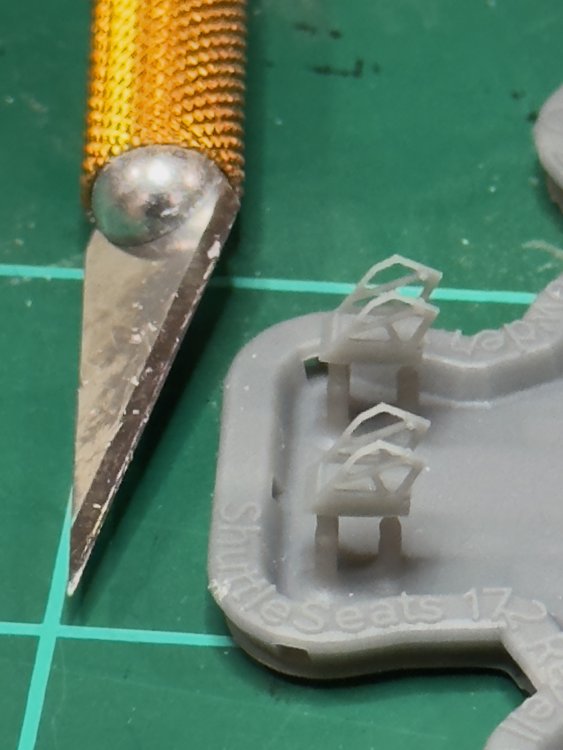
After 2 print tries, I have finalized the seats and HUD models. Everything is done and has been tested for scale and fit. This is the final model. Only a few supports were needed. This makes removal of the parts very easy. Im pretty happy with how this all turned out. Photos of the finished items soon.
-
@southwestforests
Ya know, I misspoke and didn't do my homework. Since I am SO focused on the Discovery, it didn't occur to me that the control surface colors may be different from Shuttle to Shuttle.
The articles and write up for this model are amazing and youre right when you said, "not new to NASA." thanks for the thoughtful reply. I found this and was egar to share as the detail was nothing shy of amazing. I should have taken a hot second to validate my thought. -
I just found this and thought I would share with everyone. a 1/12 scale model. Its pretty incredible. Its a shame that some of the colors (like the control panels) are incorrect. So much amazing detail, and then to get some of the colors wrong. Either way, I was impressed.
http://scalemodelingdomain.blogspot.com/2015/01/112th-scale-space-shuttle-cockpit.html?spref=pi
-
Something else to try! Thanks @southwestforests
-
Print #2 on the way to the Form3 now with the HUD's added. I had to make some slight adjustments to the seats, and then decided to add my HUD model to the mix. 8 Hours to go! so they will be ready to prime and pain this evening.
The HUD was based on: https://www.pinterest.at/pin/179721841353224907/Attached are the Fusion360 and Preform models.
.thumb.png.d28bcfafae71ca705322de2b1b741e7c.png)
-
Hey Pete,
Thanks for that. Ive always used Alcohol and had no idea about vinegar. So, next time I will try that and REALLY appreciate the tip. For the record the Updraft PE has great detail, but painting or their suggested Sharpie coloring is very difficult as things are compressed.
Resin, ive never had an issue with. Soap and warm water but for whatever reason, this 3D print resin that they used had adhesion issues for primer. The resin I use on the Form3 cleans up after the bake and primes real well. I've never had an issue with it.Thanks for the tip! I really do appreciate it.
</Dave>
-
@CaptKirk & @crowe-t
Thanks for the replies. I just got the first set of seats off the printer last night. They are all cured up and ready to be cleaned, primed and painted. As soon as I get them installed I will share a shot or two. In parallel, I am re-modeling the entire cockpit to see if I can make something that will be easier to light and more accurate. Even on a Form3, the details at 1/72 are sometimes hard to replicate.I was using CA glue for the resin and PE parts. I should have used epoxy. It's been removed now (which as you can imagine destroyed it) so, im rolling with the decals unless my interior model turns out better.
Dave
-
Hey Pete,
Thanks for the note. I will share more pics. I have the current cockpit almost done and now I am modeling a new one to see which I like best. My chairs turned out good, so once I get them painted and installed I will share a picture.
On the PE, I did clean them. I use alcohol not vinegar. I thought it was the plastic they used for the resin. Despite cleaning the resin parts, they had a hard time taking primer. Nothing stuck real well (I even light sanded for batter adhesion).
More soon! -
Hi Everyone,
I have officially started my 1/72 Revell Space Shuttle build. Before I get into this first share, I wanted to make sure everyone understands my build as there are some detail decisions that I have made based on the build. This is a sentimental build for me as I designed a project that flew on the Discovery in 1985 (51G). So, this build will be on the Discovery on the ground at Edwards with all of the support vehicles and gear servicing the orbiter once landed.I have purchased several 3D or Resin parts. One of which was the Cockpit from Up Draft. The quality of their parts is fantastic. My only issue with their cockpit kit is the the PhotoEtch had problems adhering and painting at that microscopic level was problematic. (for those that have the kit, they recommend using a ultra fine tip permanent marker (as seen in their photos) which looks ok, but isnt representative of reality. I wanted to light the cockpit but their resin parts are solid and accurate drilling for fibre optics wasnt something that could have worked with the PE parts.
I have done the cockpit 3 times now.
The resin parts work great and are pretty accurate. I decided to 86 the Photo Etch parts. Then, I started looking at the seats. The PE parts were very flimsy at scale and trying to get them to stick was a problem. So, I decided to model my own in Fusion360. Several may ask why I bought parts if I can model them. Short answer is, if you dont model 3D parts at scale, its a LOT OF WORK to get them right. So, when makers have great parts I like to cut to the chase and save me some time. These seats however bothered me, so it was off to 360 to make some new ones. (I did leave the dash PE in place as it allowed me to use Future on the monitors to give them a glow).
Then I noticed the HUD that came in the kit (also PE) was not correct. So, I modeled that as well. Finally, the Pilot/CoPilot seats were missing the back control base that sits at the floor behind their seats. So, I made something (that vaguely resembled) the back control base and have those items printing now on my Form3 in Grey Resin.
In the end, I decided to use the decals on the Up Draft parts for some "better than I could get on PE" detail. Since my model will have runway and service vehicles, being spot on isnt necessary as it will barely be visible. So, the control surfaces having some detail was good enough for me. The Seats will be accurate with blue cushions and the black metal frame that the cushion is mounted on. (2 pieces) instead of 4 like the Updraft kit. Having these separate makes painting easier and allows for better adhesion because they are resin.
So, updates may be slow as I am trying a few things I haven't seen attempted here in the forums for the tiles and detailing. Bare with me and as I progress I will share more.
Thanks!
Now that I think about it, I may model the entire cockpit so that the pieces are thin walled for drilling fibre optic holes for backlighting along with some cable management rings on the back and underside. While this wont be visible from my build, its always fun to include some lights and Homer did an amazing job with his. I did buy both a Monogram and Revell kit and any parts I make, I will make for both. The Monogram will just come later :)

-
That is a FANTASTIC collection!
-
Hi,
Im new to the party and wanted to share. First and foremost, thanks to everyone's contributions, images, links and suggestions. Im about to start a build and have been collecting and ordering parts / materials and hope to start soon. Homer and Hotdog have been especially helpful both here and in direct correspondence.My build will be of the Discovery (Flight 51G). This is "My Bird," I like to tell folks as its the shuttle that an experiment I designed flew on in 1985. So, I will be doing a build of the landing scene at Edwards for that flight along with all of the support vehicles and equipment @ 1:72 scale. Im in my late 50's now and hope that I can finish the kit before I retire 🙂.
I did notice that there are a few that have asked for suggestions at the 1/144 scale and wanted to pass along this link:
https://www.modellversium.de/galerie/24-raumfahrt/9985-space-shuttle-tamiya.html
There is an ENGLISH toggle at the top of the page (unless you can read German) that will translate the site. Andreas Gordes's approach was creative and not one i've seen before at that scale, so I thought id share.
Thanks again everyone. Im going to blog the build (since it will take forever) and will share here as well.
</Rittic>


.png.7d2dd8613889e449b0a373ca7b2d955e.png)

Gemini 1/12
in Real Space Modeling
Posted
This is absolutely stunning. I wish I could buy one of these. I can't find it anywhere. This is really fantastic!