Joel_W Posted April 8, 2018 Share Posted April 8, 2018 16 hours ago, AlienFrogModeller said: Joel, Went to Hobby Lobby, Master Series brushes on sale for 50% off, and used my 40% coupon on my Tamiya glue and my Mrs used her 40% coupon on the brush conditioner. $14.00 for Xtra thin glue, 20/0, 10/0 round and flat 10/0 brush and brush conditioner! We shoot...we scored! AFM, Nicely done. I have a Hobby Lobby about 45 min from my home. Only been there once when it 1st opened. Really should check it out again. Where did you get those coupons? Joel Quote Link to post Share on other sites
AlienFrogModeller Posted April 8, 2018 Author Share Posted April 8, 2018 1 hour ago, Joel_W said: AFM, Nicely done. I have a Hobby Lobby about 45 min from my home. Only been there once when it 1st opened. Really should check it out again. Where did you get those coupons? Joel We have the hobby lobby app on our phones. See we often go together so we split the merchandise and pay separately, enjoying the price reduction. Quote Link to post Share on other sites
Joel_W Posted April 8, 2018 Share Posted April 8, 2018 1 hour ago, AlienFrogModeller said: We have the hobby lobby app on our phones. See we often go together so we split the merchandise and pay separately, enjoying the price reduction. AFM, Thanks. Will check it out Joel Quote Link to post Share on other sites
AlienFrogModeller Posted April 8, 2018 Author Share Posted April 8, 2018 (edited) Just to close out the Cockpit for now. here is some review pics. Over 130 buttons added total, 100 pieces for the hell holes. Approx 70 pieces on the side consoles. I am actually excited to start painting the cockpits as Joel "Guru" W has given me some tips to help me along. Edited May 9, 2018 by AlienFrogModeller Quote Link to post Share on other sites
AlienFrogModeller Posted April 8, 2018 Author Share Posted April 8, 2018 (edited) Just a bit of info as I was checking out the lower fuselage. Mold lines between the arrows. Another mold line, they exist on both sides of the lower fuselage, gently sand them out. Edited May 9, 2018 by AlienFrogModeller Quote Link to post Share on other sites
AlienFrogModeller Posted April 8, 2018 Author Share Posted April 8, 2018 (edited) As I move back I decided to look at the exhaust area. I will be trying to get this effect as indicated by the arrows. The top area is a definite gap between the Variable Exhaust nozzle (VEN) and the Turkey Feathers. Also the notable V shape between each exhaust outer shells. Edited May 9, 2018 by AlienFrogModeller Quote Link to post Share on other sites
AlienFrogModeller Posted April 8, 2018 Author Share Posted April 8, 2018 (edited) The left is un-modified, and the arrow shows a lip that should be removed. The right example is a modified VEN to remove the lip as indicated by the top arrow and the lower arrow shows the V shape by using a jewelers file. Edited May 9, 2018 by AlienFrogModeller Quote Link to post Share on other sites
AlienFrogModeller Posted April 8, 2018 Author Share Posted April 8, 2018 (edited) Utilizing a compass cutter, I created two washers. The left washer was .020" and the right .010". I like the .020" washer. Once they are glued into place the gap will not as big. Note the Styrene rod in the Horz stab holes to help solidify the AB Cans in-place for dry fitting purposes. Edited May 9, 2018 by AlienFrogModeller Quote Link to post Share on other sites
Joel_W Posted April 8, 2018 Share Posted April 8, 2018 (edited) AFM, Impressive cockpit assembly line Those cans do look pretty darn good. Joel Edited April 8, 2018 by Joel_W Quote Link to post Share on other sites
AlienFrogModeller Posted April 8, 2018 Author Share Posted April 8, 2018 (edited) 1 hour ago, Joel_W said: AFM, Impressive cockpit assembly line Those cans do look pretty darn good. Joel Thank Joel, I'm looking forward to painting the cockpit, but won't be for sometime tho. I want to get all the details correct on the fuselage before assembly of the upper and lower fuselage. Right now I'm looking at the wheel wells, contemplating the level of detail that I want to place in there. I was thinking...when do I ever lift the kit up and look underneath...when has anyone lifted your kit to look underneath? (rhetorical question) Edited April 8, 2018 by AlienFrogModeller Quote Link to post Share on other sites
crackerjazz Posted April 8, 2018 Share Posted April 8, 2018 48 minutes ago, AlienFrogModeller said: ...Right now I'm looking at the wheel wells, contemplating the level of detail that I want to place in there. I was thinking...when do I ever lift the kit up and look underneath...when has anyone lifted your kit to look underneath? (rhetorical question) How true. I myself question why I even super-detail areas that will be closed up or won't ever been seen or noticed. Maybe only if I have the time and really enjoy doing it (or enjoy torturing myself). They do look amazing in buildup photos and inspire others. They bring back good memories, too. I see the ones I did years ago and I'm wonderfully surprised, thinking "I slaved over those?" : ) Quote Link to post Share on other sites
AlienFrogModeller Posted April 9, 2018 Author Share Posted April 9, 2018 1 hour ago, crackerjazz said: How true. I myself question why I even super-detail areas that will be closed up or won't ever been seen or noticed. Maybe only if I have the time and really enjoy doing it (or enjoy torturing myself). They do look amazing in buildup photos and inspire others. They bring back good memories, too. I see the ones I did years ago and I'm wonderfully surprised, thinking "I slaved over those?" : ) Crackerjazz, well said sir. I have deliberated over this point for years. As you can see this is my first real attempt at making some detail into the cockpit. It is more of a work up for my 2 1/32 CF188 Hornets in the future. As for the details in the Main Landing Gear Wheel Wells (MLG WW), I have decided to work it a little bit, bit not crazy like the cockpits I have done. It will more than likely become a proving ground of techniques I have been wanting to try. Quote Link to post Share on other sites
Joel_W Posted April 9, 2018 Share Posted April 9, 2018 CrackerJazz & AFM, Excellent points on detailing for sure. Then there's guys like me, who in his golden years (unfortunately for me), has gone in the other direction. For the most part my goal is simply build the best presentation model I can. Sure, most builds have some amount of detailing, but I try to keep it to a min or reasonable level most of the time. For me, there's far more models I want to build, then time left to do so. Joel Quote Link to post Share on other sites
AlienFrogModeller Posted April 9, 2018 Author Share Posted April 9, 2018 38 minutes ago, Joel_W said: CrackerJazz & AFM, Excellent points on detailing for sure. Then there's guys like me, who in his golden years (unfortunately for me), has gone in the other direction. For the most part my goal is simply build the best presentation model I can. Sure, most builds have some amount of detailing, but I try to keep it to a min or reasonable level most of the time. For me, there's far more models I want to build, then time left to do so. Joel Joel, I too am approaching this sunset as well. too many kits, so little time. After a few more kits of detail, I am winding down the detail. OOB is the future for me. Quote Link to post Share on other sites
Aigore Posted April 9, 2018 Share Posted April 9, 2018 Really nice production line you have going. Lovely details! Quote Link to post Share on other sites
AlienFrogModeller Posted April 9, 2018 Author Share Posted April 9, 2018 3 hours ago, Aigore said: Really nice production line you have going. Lovely details! Aigore, Thank you sir. Quote Link to post Share on other sites
AlienFrogModeller Posted April 9, 2018 Author Share Posted April 9, 2018 (edited) Cut your outside Diameter first with a compass cutter, then place under tape. I have multiple washers to make as you can see. The tape will hold your washer in place for the inside cut.Locate the original pin hole made by your compass cutter, it can be re-used to place the compass cutter for the inside diameter cut for centering purposes. Edited May 9, 2018 by AlienFrogModeller Quote Link to post Share on other sites
bradebaugh Posted April 11, 2018 Share Posted April 11, 2018 the builds look great. bring some of the in progress stuff to the next RL Scott chapter meeting. Bruce Quote Link to post Share on other sites
AlienFrogModeller Posted April 11, 2018 Author Share Posted April 11, 2018 (edited) 4 minutes ago, bradebaugh said: the builds look great. bring some of the in progress stuff to the next RL Scott chapter meeting. Bruce Hi Bruce, I'll bring some in. Thank you for the kind words. Glad you can see the pics, I can't. Something's happen to photo image dot org, but from what was said in another section of general discussion, redirection should occur. Edited April 11, 2018 by AlienFrogModeller Quote Link to post Share on other sites
AlienFrogModeller Posted May 9, 2018 Author Share Posted May 9, 2018 Gentlemen, My absence has no excuse, however, California was nice. Some pics I am re-posting to update the new host ... slowly. My Local IPMS Chapter RL Scott, has been very good to me since my arrival. They have welcomed this alien into their group and have offered some very interesting prospects. Bruce has offered his molding services and we are going to try the Canadian ID light and the Fatboy Pylon in it's entirety. So maybe you can buy with out purchasing the complete update package like some companies want you to do. If this goes well, maybe I can convince Bruce to help us raise a few bucks for the local IPMS Chapter by selling a few extras if there is any interest. Bruce also mention the cockpit and he suggested a good Canadian cockpit setup can can be used in all versions (minor changes can be made by the customer if they like - backdating would be easier). So lets walk before we run, we are going to try the ID light and Fatboy 1st. Then... maybe... the cockpit and I would like to see a current "P4" (just a tech name not the real name of the item on stations 1 or 9). Also the minor mod of the mysterious panel behind the cockpit of the single versions. My wish list would also include a proper tank attachment point to the pylon, station 4/6 blanking pylon, Vert stab bumps, dorsal spine strengtheners, coke can, wing fold cans to name a few. However the cans can be easily made from sprue/styrene. Glad to be back, but progress will be slow over the next few weeks as I will be travelling to Canada at end month and then I'll be helping (hopefully not getting in the way) for the local June 9 IPMS Show at the Warner Robins Aviation Museum. Then off to Oklahoma, San Antonio, St Louis, Canada and another place...ugh...can't remember now over the next few weeks through the summer. Stay tuned! Quote Link to post Share on other sites
Joel_W Posted May 9, 2018 Share Posted May 9, 2018 AFM Sure sounds like you've got a real full plate for the summer. Enjoy all your trips. Joel Quote Link to post Share on other sites
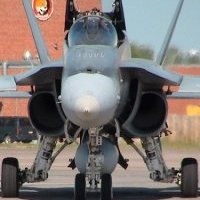
ALF18 Posted May 10, 2018 Share Posted May 10, 2018 AFM All I can say is WOW!!! So much detail. I admire your patience, especially since you seem to put up with Scooby... 😀 That little box on the left rear of the cockpit (near the G suit test button) is the Data Loader receptacle, right? Looking at all the tiny details you have added takes me back to my 10 years flying these great machines. For example, the ECS vents beside the centre pedestal of the MIP; I remember using them to defog my visors, and I have yet to see them represented as well as you have. Ditto for the landing gear handle, parking brake, wing fold... and even the utility light and map case! Holy cow. I am especially awed by your attention to detail on the airframe itself (drain holes, horizontal stab reinforcements, centre barrel reinforcements, etc). Thanks for posting all these great tips. If I use about 10% of them, my next Hornet will be much better. I sure hope you get around to creating what you have called the "P4" pod. I believe you mean the BLOS Comms pod? (Beyond Line Of Sight) for NORAD ops. That is the one on the right wingtip of this picture taken by my friend Stuart Sanders in Comox. Or do you mean the current ACMI (Air Combat Manoeuvring Instrumentation) pod for mission debrief? I think that's the pod on this one: I have searched far and wide for an acceptable ACMI pod in 1/48 and 1/32. Seems to be a huge void in the aftermarket. If you are looking for something that would sell, I humbly suggest ACMI. Those pods are carried by multiple NATO aircraft, and there could be a big market for them if you created some. And, of course, if you ever come out with a cockpit, I will buy several! I did up 902 in 1/32 scale, using a PE cockpit set, and that was as good as I have done, but that set pales in comparison to your scratch-building. ALF Quote Link to post Share on other sites
AlienFrogModeller Posted May 10, 2018 Author Share Posted May 10, 2018 (edited) 23 minutes ago, ALF18 said: AFM All I can say is WOW!!! So much detail. I admire your patience, especially since you seem to put up with Scooby... 😀 That little box on the left rear of the cockpit (near the G suit test button) is the Data Loader receptacle, right? Looking at all the tiny details you have added takes me back to my 10 years flying these great machines. For example, the ECS vents beside the centre pedestal of the MIP; I remember using them to defog my visors, and I have yet to see them represented as well as you have. Ditto for the landing gear handle, parking brake, wing fold... and even the utility light and map case! Holy cow. I am especially awed by your attention to detail on the airframe itself (drain holes, horizontal stab reinforcements, centre barrel reinforcements, etc). Thanks for posting all these great tips. If I use about 10% of them, my next Hornet will be much better. I sure hope you get around to creating what you have called the "P4" pod. I believe you mean the BLOS Comms pod? (Beyond Line Of Sight) for NORAD ops. That is the one on the right wingtip of this picture taken by my friend Stuart Sanders in Comox. Or do you mean the current ACMI (Air Combat Manoeuvring Instrumentation) pod for mission debrief? I think that's the pod on this one: I have searched far and wide for an acceptable ACMI pod in 1/48 and 1/32. Seems to be a huge void in the aftermarket. If you are looking for something that would sell, I humbly suggest ACMI. Those pods are carried by multiple NATO aircraft, and there could be a big market for them if you created some. And, of course, if you ever come out with a cockpit, I will buy several! I did up 902 in 1/32 scale, using a PE cockpit set, and that was as good as I have done, but that set pales in comparison to your scratch-building. ALF Alf, Thank you for the kind words sir. Loved, still love, these birds. One of the many reasons why i joined. Love the pic of triple pig, great ac away from home. Data loader, yes it nice, glad you like and picked out the details. Thinking of both pods as you mentioned, but maybe at least one more from back in the day. LOL I liked how you mentioned using the center ECS louvers for your visor, many times I placed my hands over them while I ran jets in the dead winter in Cold Lake. I remember one night I ran four jets and had them placed in a nice little row, hopping from one to another, placing my hands over the louvers for warmth as I wait for B Betty to talk to me while carrying out my functional checks....good times. I miss them. Edited May 10, 2018 by AlienFrogModeller Quote Link to post Share on other sites
AlienFrogModeller Posted May 10, 2018 Author Share Posted May 10, 2018 5 hours ago, Joel_W said: AFM Sure sounds like you've got a real full plate for the summer. Enjoy all your trips. Joel Joel, Terribly busy, love the travel and meeting new people, but as my career winds down, I look forward to staying at home and enjoying every sunset with my special beautiful lady ...even if it is over snow. LOL but for now, loving the job and the beautiful area I'm in. Quote Link to post Share on other sites
Scooby Posted May 10, 2018 Share Posted May 10, 2018 2 hours ago, ALF18 said: AFM All I can say is WOW!!! So much detail. I admire your patience, especially since you seem to put up with Scooby... 😀 And, of course, if you ever come out with a cockpit, I will buy several! I did up 902 in 1/32 scale, using a PE cockpit set, and that was as good as I have done, but that set pales in comparison to your scratch-building. ALF Wiener! 😉 My name is on the 1/32 Cutting Edge F-18 cockpit, it has most the Canadian mods, the seat belts were missed on the seat though (storage). Quote Link to post Share on other sites

Recommended Posts
Join the conversation
You can post now and register later. If you have an account, sign in now to post with your account.