


ALF18
-
Content Count
3,864 -
Joined
-
Last visited


-
An earlier post led me to recheck all the instructions with the decals. My scrubbing of the detail from the top of the e-bay part is confirmed by the first picture in this post, showing in blue the areas where Red Fox says to remove surface detail and smooth out the part to receive their decals. The shot of the final result shows how it looks. Of course, there are some tiny misalignments in some of the decals, but in real life they don't show that much. It's too late to fix, anyway. One thing I found with these 3D decals is that no water is required. I simply slid a sharp knife blade unde
-

Hasegawa and Hobby Boss F/A-18's + a Kinetic one!
ALF18 replied to Thadeus's topic in In-Progress Pics
These are looking awesome! I love the paint job you're doing. I've built several Hornets, and for the light ghost grey I like to use Tamiya Light Grey primer spray cans. I find that Modelmaster Acryl FS 36375 is too dark - and I've never used Gunze or other paints since I can't find them in my local store. ALF -
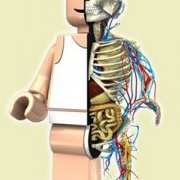
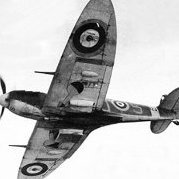
This is what the area in the e-bay looks like. Under the raised thingies (technical term) is some colourful detail. I'm 100% sure that Red Fox intended for the modeller to scrub the raised thingies, apply each of the decals, then add part numbers 33. In any case, that's what I'm going to do... 😉 And sorry, Fav's are Fs... this will be an overall camouflaged green aircraft. The natural metal ones didn't have tiger emblems on the tails, and I want to make this one a definite Tiger Squadron bird. Like the one in the second photo. That's my father at the far right. ALF
-
1-32 Tamiya Spitfire Mk IXc with Quinta Studio interior decal
ALF18 replied to ALF18's topic in In-Progress Pics
Don't get me started! I've spoken with several people (some of them are not even Boomers) about this. In an effort to foster inclusion and diversity, they seem to have torpedoed the very thing that draws dedicated people to military service. I hope the pendulum swings back even more toward a little bit of discipline and pride in appearance. ALF -
Next step is to paint the cockpit parts Tamiya XF-83 grey. Thanks for stopping by! ALF
-
One part that had me scratching my head a bit was the text that said ''The part marked in green must be placed on top of the shape parts at the end!'' Hmm. Look at the kit part in the image, then notice that between and around the side panels on the decal sheet, thre are a bunch of decals that replace the raised details from the kit. So, in other words, scrub the detail off. Then, apply each of decals 22, 23, 24, etc... and finally add a part 33 decal to each of those segments that had raised kit detail. Maybe it's my old age, but sometimes reading the instructions a few
-
First step was to scrub the raised detail off the cockpit and e-bay parts, as per the Red Fox instructions.
-
One thing I really love about this kit is it includes options for multiple F-104 variants. For example, the main landing gear doors. Canadian 104s did not have bulges on the doors, while F-104Gs (Luftwaffe, etc) had bulged doors and thicker wheels. Canadian doors parts 7 and 8 (left side of first pic); G models parts 22 and 23.
-
1-32 Tamiya Spitfire Mk IXc with Quinta Studio interior decal
ALF18 replied to ALF18's topic in In-Progress Pics
Scooby Good for him! It takes a lot of dedication to succeed that far. The military training system is in rough shape - it seems to be quite slow. At the museum in Bagotville last summer, I spoke with a young 2Lt who has graduated from RMC in Kingston - and now has to wait two years for a Harvard II course in Moose Jaw. I also texted a former student of mine from the aviation college in Chicoutimi (CQFA). She graduated from RMC in 2022 - and was also told she had 24 to 28 months to wait before Moose Jaw. She already had a commercial IFR from CQFA, so after some deliberation she decided to -
Time for one of my favourite aircraft: the CF-104. This build will honour my late father, who flew CF-104s in the early 70s at CFB Baden-Soellingen, West Germany. I was a High School student on the base at the time, and I got to watch these jets every day. We visited the squadrons often, and to this day the distinctive howl of a taxiing 'one-oh-four' or one rolling into the overhead break animates my dreams. I love this Italeri kit. For the cockpit, I bought a Red Fox Studios decal set. It's for an F-104S, but it's quite similar to the Canadian CF-104. The main differences are in t
-
Thanks Shawn! Always nice to hear from you. ALF
-
I'm calling this one done. Not a masterpiece, but a good 3-footer next to the other (Hasegawa) Spit.
-
One trick to these decals is that the carrier film covers the whole sheet, so it's necessary to trim very close to the decal itself.
-
I never learn my lessons on some kits. Having not intended to display the engine, I should have simply ommitted it, and glued the frames and cowlings in place but n-o-o-o... I had to do the whole thing. Here it is installed. I ordered some decals from Above and Below Decals (which is the one who took over the business from CamMilAir). The roundels were super thick in the kit, and Andrew's decals are nice and thin. I chose the Buzz Beurling sheet.
-
1-32 Tamiya Spitfire Mk IXc with Quinta Studio interior decal
ALF18 replied to ALF18's topic in In-Progress Pics
Scooby The sheet actually does have kill markings (a whole bunch of maltese crosses), which for some reason don't show on the image I copied from Above/Below's website. That's one reason I picked it, especially because Buzz is one of my idols. BTW, I'm willfully ignoring the fact that the Mark of Spit is different from the one that the decals represent... but I thought they looked cool! 🙂 (Ducking for cover as the Spitfire purists rain down hellfire on me for being so historically inaccurate) ALF