polar bear Posted September 15, 2014 Share Posted September 15, 2014 My latest Viper is Tamiya’s, converted to be Block 60. Tamiya 72nd F-16 , IMHO, is the most beautiful Viper in its scale. This box provides grill on right side of the front fuselage that represent later Block52+ and absent of splitter plate over the intake for Sufa. The bad thing is lack of under wing stores despite there are decals for pods, fuel tanks and load outs. I reviewed this box in the local model club site. Description are in Thai. You might google-translate them. http://www.thaimsot.com/index.php?option=com_kunena&Itemid=2&func=view&catid=25&id=145053 username: arcguest password: guest So, with all reasons above I converted it into Block 60 of United Arab Emirates Airforce that take part in OOD/OUP. Here is my inspiration. To build F-16 Block 60, I need some parts from Hasegawa E boxing. Additional sprue for Hasegawa F-16E (credit: Britmodeller.com) Block 60 is much difference from earlier blocks. Most of them are avionics lumps and bumps, pods, antennae, bigger rudder base and CFT. Quote Link to post Share on other sites
polar bear Posted September 15, 2014 Author Share Posted September 15, 2014 (edited) Cockpit As usual, I started with cockpit. Tamiya provides nice raised details for72nd scale. But Block 60s need to change front instrumental panel into three large MFD screens. Stock seat is poor. I replace with Wolfpack design ACES-II. It need some adjustment to fit the rail. Add some side wall details with plastic sheet. Painted. Edited February 15, 2015 by polar bear Quote Link to post Share on other sites
polar bear Posted September 15, 2014 Author Share Posted September 15, 2014 (edited) Radome Block 60s are equipped with AN/APG-80 Active Electronically Scan Array (AESA) radar. The junction between radome and fuselage is moved a little bit forward and in angle. First, glue pitot into radome. Sharpen the tip, delete old lightning stripes. The panel line of AESA radome is hard to scribe. It curves downward. I have repeat itagain and again until get satisfy. Add new lightning strips and rivet. Drill 3 holes for AOA probes. Get primed. Edited September 15, 2014 by polar bear Quote Link to post Share on other sites
polar bear Posted September 15, 2014 Author Share Posted September 15, 2014 (edited) Avionics bump at the side of the nose There are many upgrades around this area. Starting with cut the RWR. They left hole after it that need filling. Add bumps from Hasegawa’s and plastic sheet. Add another electronics pod (red arrow)and formation light from plastic sheet (blue arrow) And Infra-Red Search and Tracking(IRST)pod. Edited December 15, 2014 by polar bear Quote Link to post Share on other sites
nicholassagan Posted September 15, 2014 Share Posted September 15, 2014 I'm liking these updates!! Keep 'em coming! Quote Link to post Share on other sites
Ruud Posted September 15, 2014 Share Posted September 15, 2014 Cool! Quote Link to post Share on other sites
ChernayaAkula Posted September 16, 2014 Share Posted September 16, 2014 Very interesting project! Quote Link to post Share on other sites
Thadeus Posted September 17, 2014 Share Posted September 17, 2014 Oh, that's nice :) Gonna keep my eye on this one for sure! Quote Link to post Share on other sites
Aigore Posted September 17, 2014 Share Posted September 17, 2014 Neato scratching! :) Quote Link to post Share on other sites
rom Posted September 17, 2014 Share Posted September 17, 2014 nice work!! Quote Link to post Share on other sites
polar bear Posted September 20, 2014 Author Share Posted September 20, 2014 (edited) Thank you everybody for your comments. Sorry for keep you waiting. Here is some progression on Air intake and ECS complex The kit's intake consists of many parts. assembling and sanding are tricky. I cut upper part of intake to allow FOD guard insertion later. In early blocks, there are ECS (Environment Control System) inlets just over the intakes. Someone call them ‘splitter plates’. The ECS exhaust is placed just before left main gear bay. But in block 60s, they need more air to cool avionics. The original inlets are closed and blended to intake root. So, there are new inlets at each side of intake. The ECS exhausts are added to two and bigger. Splitter plate, ECS intakes exhausts Tamiya provides original splitter plates (H2, H3). I switched to another one (H4, H5). New ECS intakes from Hasegawa box are solid. Need some hollowing. Kit's ECS exhaust was deleted Edited December 15, 2014 by polar bear Quote Link to post Share on other sites
polar bear Posted September 20, 2014 Author Share Posted September 20, 2014 Completed ECS- intake complex Quote Link to post Share on other sites
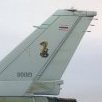
polar bear Posted September 30, 2014 Author Share Posted September 30, 2014 (edited) let's move to another prominent area: Rudder Rudder base of E type Viper is bigger than usual because it contains more avionic suites. It also need more air to cool down. Many inlets and outlets are added. I use entire Hasegawa vertical stabilizer, but add some rivet to match the rest of Tamiya’s kit. Formation lights are also added. Intakes and exhausts are drilled / hollowed. Some need reshaping Edited September 30, 2014 by polar bear Quote Link to post Share on other sites
polar bear Posted September 30, 2014 Author Share Posted September 30, 2014 (edited) Primed. Need some modification and adjustment to fit the fuselage. Edited September 30, 2014 by polar bear Quote Link to post Share on other sites
Thadeus Posted September 30, 2014 Share Posted September 30, 2014 It's a pleasure to watch You build these F-16's. Can't wait for another update! Quote Link to post Share on other sites
Ruud Posted September 30, 2014 Share Posted September 30, 2014 indeed! Now you just need to make some resin masters... for those of us that are less capable at scratch building. Quote Link to post Share on other sites
Joel_W Posted September 30, 2014 Share Posted September 30, 2014 Polar Bear, A really remarkable conversion with excellent scratching building and parts swapping as needed. While I'm mostly a prop man who has just started to have a modeling interest in Jets, your explanations are easy to understand. Looking forward to your next update. Joel Quote Link to post Share on other sites
polar bear Posted October 15, 2014 Author Share Posted October 15, 2014 Hi, Thanks for all comments. Sorry for no updating fro a while, duty calls. Ruud, I am not a casting expert. I'd tried once but everything come out bad. Wings Flaperons are cut for reposition at 20 degree downward. I build particular aircraft that act as Combat Air Patrol (CAP) in OOD/OUP. I have to add 6 A-A pylons and missiles. Drill holes for pylons. Quote Link to post Share on other sites
polar bear Posted October 15, 2014 Author Share Posted October 15, 2014 (edited) Load outs Pylon Station 2/9 LAU-129 pylons and AIM-120C are from Kinetic. Station 3/8 16S210 pylons are from Revell. But AIM-9Ls are from the box. Station 4/7 pylons have no upper sway braces. I made them from plastic sheet. Two 370 gal. fuel tanks are from Academy. I have to drill new holes for Tamiya's pylon locating pin. The center line station is left empty per reference photo. I think she has two CFT and two 370 tanks. That is enough for hours in patrolling mission. Edited October 16, 2014 by polar bear Quote Link to post Share on other sites
Joel_W Posted October 15, 2014 Share Posted October 15, 2014 Your kit bashing skills for just the right part amazes me, as you've now used parts from the, Haseagawa, Revell, and Academy kits. Looking forward to your next update. Joel Quote Link to post Share on other sites
ST0RM Posted October 16, 2014 Share Posted October 16, 2014 The Blk 60 E & F I refueled on 01 Apr 11 for Libya Ops did have the center lines empty. Weird combo of 4x120s with the 9s inboard. Not something I was used to seeing. Good luck and hope you get back safe. -Jeff Quote Link to post Share on other sites
polar bear Posted October 17, 2014 Author Share Posted October 17, 2014 Thanks for your comment, Joel_W and Jeff. Jeff,I refer to my reference in the first post that E carried AIMs in all pylons in OUP. I try to seek more load out option but nothing found. Would you please suggest ? Quote Link to post Share on other sites
ST0RM Posted October 17, 2014 Share Posted October 17, 2014 PB, you got it. That was the config I saw. They only flew CAP on my missions, but the targetting pod was retained. Quote Link to post Share on other sites
polar bear Posted December 13, 2014 Author Share Posted December 13, 2014 (edited) Hi, I'm back. After been distracted by other projects, I continue Blk60 again. Exhaust nozzle F-16 E/Fs are equipped with GE F-110-132 that have longer petal. In 72nd scale, I am not able to lengthening the petals with plastic sheet because it is so small and too thin. I choose to shorten inner petals. It looks OK in this scale. Tamiya's kit has no flame holder. I cut the end and try to replace with new one. I know it is from P&W engine. I can live with it. Edited December 13, 2014 by polar bear Quote Link to post Share on other sites
polar bear Posted December 13, 2014 Author Share Posted December 13, 2014 CFT Conformal Fuel Tanks provide extra 40% range. I have to make a decision between Hasegawa’s and Kinetic’s. I choose Hasegawa’s one due to better details. Once they was in places. Huge gaps needed filling. Quote Link to post Share on other sites

Recommended Posts
Join the conversation
You can post now and register later. If you have an account, sign in now to post with your account.