spejic Posted September 11, 2009 Share Posted September 11, 2009 I'm building an 1/144 Attack MiG-21 MF, and my current plans are to build a Croatian MiG-21bis, but that might change if my experiments in making my own decals does not go well. I think the small differences between the two types are swamped at this scale. Here is the box of this kit. It is nice - not like modern Revell 1/144, but better than most older kits I have built. The decals (Iraqi, Syrian, Soviet, and German birds) are excellent. It comes with all the stores you see on the box top and a reconnaissance pod. It comes with a single-piece resin cockpit tub. It is good, but I wanted a more accurate instrument panel so I tore out the old one and scratchbuilt a new one. Oh, man, these macro photos reveal lots of imperfections. I'll have to take this to a really bright light and try scratching out some of those bits of dust. And I forgot that by law every 1/144 photo has to have a coin in it somewhere. Lets try that again. Quote Link to post Share on other sites
Sebastijan Posted September 11, 2009 Share Posted September 11, 2009 Welcome aboard! I just remembered that I have 1/144 SMT in my stash that I could build... ;) Which Cro markings do you plan to make; the new camo ones or the old grey version? Keep up the good work! Quote Link to post Share on other sites
spejic Posted September 11, 2009 Author Share Posted September 11, 2009 Welcome aboard! I just remembered that I have 1/144 SMT in my stash that I could build... Which Cro markings do you plan to make; the new camo ones or the old grey version? The new one - I like the colors and I think the Croatian roundels are really pretty. The MiG-21 is also a simple shape, so masking it for the camo pattern should be easy. Quote Link to post Share on other sites
Azgaron Posted September 11, 2009 Share Posted September 11, 2009 Nice start Spejic! 1/144 is pretty small, so getting nice detail that looks good on macro pics ain't easy! Think you've done a good job so far! Cheers, HÃ¥kan Quote Link to post Share on other sites
dragan_mig31 Posted September 11, 2009 Share Posted September 11, 2009 nice cockpit.if you build the new croatian camo and markings you must know that those mig-21's are modernized so you must add the small bits and pieces that a standard mig-21 bis does not have ... Quote Link to post Share on other sites
pkrasna Posted September 13, 2009 Share Posted September 13, 2009 Small but great build. Keep up the good work! Primož Quote Link to post Share on other sites
spejic Posted September 15, 2009 Author Share Posted September 15, 2009 Arghhh. I'm going backwards. The resin cockpit tub is weird - if you put it in the right way, the seat is way too low. But you can't reposition it higher because of the way it is designed. And once it is in, the little prongs on the sides of the seat prevent the canopy from fitting correctly. Then when I was cutting the tub to fit better, I totally destroyed it. So I'm scratchbuilding a new cockpit. I've done this plenty of times for other 1/144 models, but I was hoping this one would come together quicker. Quote Link to post Share on other sites
r0t0rdr1ver Posted September 17, 2009 Share Posted September 17, 2009 Always love to see 1/144 kits, nice work so far! Quote Link to post Share on other sites
spejic Posted September 25, 2009 Author Share Posted September 25, 2009 I can't build one model at a time, so for a while now I have been distracted by a few other kits. But I'm back to the MiG-21. I've put together the cockpit. And I've put together the fuselage. The nosecone was particularly difficult to line up, as it does not have a positive location to attach to. I glued it in using Testors non-toxic, which is very slow. This allowed me to reposition it (many times over half an hour) after I glued the fuselage. I painted the nosecone green on the outside and metal on the inside, but I shouldn't have bothered as it is impossible to see inside, even if you shine a flashlight in there. I also needed putty at the bottom of the tail and inside the exhaust. The wing connection to the body is poor. I cut off the old positioning bump, sanded the wing root flush, and added large pins to better hold the wings on. Quote Link to post Share on other sites
Azgaron Posted September 27, 2009 Share Posted September 27, 2009 Nice work Spejic! Cheers, HÃ¥kan Quote Link to post Share on other sites
Nemsy_29 Posted September 28, 2009 Share Posted September 28, 2009 Hehe Balkan bird... Going ok so far Quote Link to post Share on other sites
pkrasna Posted September 29, 2009 Share Posted September 29, 2009 Nice progress! Keep up the good work! Primož Quote Link to post Share on other sites
spejic Posted October 9, 2009 Author Share Posted October 9, 2009 I had finished the main construction and I wanted to move on to the detail work. Then I saw Flankerman's post on the differences between the MiG-21 MF and bis. I hate you Flankerman! I was so much happier when I was innocent... So I'm fixing the location where the spine ends. First I put Tamiya two part putty there (I also used this to fill the gaps around the wing and stabilizers because otherwise the connections there would be weak). Then I sanded it down to shape. I also put in some of the detail, such as new wing fences and those little stubby things below the cockpit. Quote Link to post Share on other sites
dragan_mig31 Posted October 9, 2009 Share Posted October 9, 2009 looks nice.but MF and BIS spines are different in widht too... Quote Link to post Share on other sites
spejic Posted October 9, 2009 Author Share Posted October 9, 2009 looks nice.but MF and BIS spines are different in widht too...Yeah, but that's something that won't be as easy to fix. Besides, this model's spine is kind of half-way between the MF and the bis, so I figure it's good enough for both. Quote Link to post Share on other sites
Laurent Posted October 10, 2009 Share Posted October 10, 2009 (edited) Besides, this model's spine is kind of half-way between the MF and the bis, so I figure it's good enough for both. I'd say it's a 'bissed MF' spine. The maximum spine width is at the the front of the spine (as it's supposed to be in a MF) but that width is too big (the bis spine is very wide but a the middle of the fuselage). Correcting this on a 1/144 model is too risky. Great model spejic ! Edited October 10, 2009 by Laurent Quote Link to post Share on other sites
spejic Posted October 16, 2009 Author Share Posted October 16, 2009 I painted an initial coat to see where the problem areas were, and filled and sanded the remaining gaps and ridges. I then added all the unique details of the Croatian MiG. I should start painting in a few days. Tamiya Light Blue (which is what I used here) doesn't seem light blue enough for the underside of the Croatian paint scheme, but I don't have anything else close to that. Does someone have a recommendation for the right kind of blue? Quote Link to post Share on other sites
dragan_mig31 Posted October 17, 2009 Share Posted October 17, 2009 you can easyly mix it with some white revel 57 grey and some other grey green Quote Link to post Share on other sites
spejic Posted October 20, 2009 Author Share Posted October 20, 2009 Here are my steps in creating a 1/144 cockpit: 1) Built the frame using plastic card. 2) Add lots of microscopic detail. 3) Spend hours painting little details. 4) Put on the canopy. 5) Cry because you see nothing inside. Nothing. I'm going to see about smashing a new canopy and possibly posing it open. Quote Link to post Share on other sites
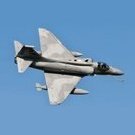
4scourge7 Posted October 20, 2009 Share Posted October 20, 2009 WOW, real nice work Real nicely proportioned in 144th scale, you`re really doing it justice. Cheers, Ian Quote Link to post Share on other sites
spejic Posted December 17, 2009 Author Share Posted December 17, 2009 I just wanted to say I hate creating a new canopy with the fury of 10 nuclear bombs. That is all. Quote Link to post Share on other sites
Sebastijan Posted December 17, 2009 Share Posted December 17, 2009 but all the hatret aside, how are you doing with your canopy? any progress? Quote Link to post Share on other sites
spejic Posted December 17, 2009 Author Share Posted December 17, 2009 but all the hatret aside, how are you doing with your canopy? any progress? I made almost a dozen heat-and-smashed canopies the day after I said I was going in that direction, and in the last months I've fogged, cracked, stretched, or boiled into nothingness all of them trying to get them to fit. I have to start over again. And in the process I've damaged the original, so I can't really go back. Quote Link to post Share on other sites

Recommended Posts
Join the conversation
You can post now and register later. If you have an account, sign in now to post with your account.