


taggor
-
Content Count
592 -
Joined
-
Last visited
Content Type
Profiles
Forums
Calendar
Everything posted by taggor
-
Hey Joel! I still dont have internet but, I had to compliment you on the beautiful work on your cockpit! Even if you say it was easy, it sure looks impressive! Looking forward to more ........as always! -Mark
-
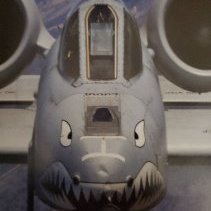
A Hog Swimming with the Sharks, 1/48 Hobby Boss A-10A
taggor replied to taggor's topic in In-Progress Pics
Hey there Elmo! As you know, finding time to model is a challenge at times. I put in an average of one hour per day and about another (let's say) six hours total on the weekends (more or less). I am away from this kit about two weeks a month too so that doesn't help progress but, sometimes is a much needed break. With this project I have used PE for the first time. My work with the paper details is a first as well. Heck building a plane as an adult is a first for me too! There have been a lot of hours spent remembering what was in my tool box when I left the hobby and struggling with adding "n -
A Hog Swimming with the Sharks, 1/48 Hobby Boss A-10A
taggor replied to taggor's topic in In-Progress Pics
Thanks Vincenzo! The support is much appreciated. I agree with you on "learning from your mistakes" and believe me, I have made a LOT of them over the course of this project and I am sure there are more to come. Of course I will be interested in your continued A-10 work. I imagine it must soon be done by now. I have learned much from your WIP as well and I will try not to copy too much of it! Haha. Thanks again! -Mark -
A Hog Swimming with the Sharks, 1/48 Hobby Boss A-10A
taggor replied to taggor's topic in In-Progress Pics
Hey Joel! Yes you have been with me since day one and I applaud you for sticking with me through this. Of course, it isn't over yet! Haha. Still you make these outrageous comments about "less skilled modelers!" Haha. I was quite pleased with the inlet fan faces as well. Sorry about using such tech terms to describe some of the parts of the kit but, I figure that other builders, who are working on the same subject, might be able to use their reference materials better or have the part/area I am working on described as "what it is" in order to look it up online. Even though you are the "prop man -
A Hog Swimming with the Sharks, 1/48 Hobby Boss A-10A
taggor replied to taggor's topic in In-Progress Pics
Hello falcon20driver! I have a little time at work to try to respond so here goes! You are too kind with your comment. I suppose I just feel that I need to keep moving forward rather than fixing things that would otherwise be minor. My ultimate goal is to finish the project as I can always get caught up in "the perfect build." That's just not going to happen where my current skill set is at the moment(if ever!Haha). Honestly I am not so sure there is such a thing. I don't think I would have a chance to grow as a model builder if I didn't accept some of these blunders! Haha. Thanks again for -
A Hog Swimming with the Sharks, 1/48 Hobby Boss A-10A
taggor replied to taggor's topic in In-Progress Pics
Hey there falcon20driver, Joel, and Vincenzo! I am having some serious network issues at home right now so I am typing on my phone! I cant stand having to type on my phone! Haha. I want to thank you all for the kind comments and continued participation in my WIP here. When I get back online I will respond to you each individually. My appologies for the delay and I am not sure at rhis time how long it will take. Thanks again for the continued support! -Mark -
A Hog Swimming with the Sharks, 1/48 Hobby Boss A-10A
taggor replied to taggor's topic in In-Progress Pics
Haha! Thanks Erik. It's great to have you stop in. I always laugh when I think of our PE talk a few pages back. I am happy to see you on the board with your Viggen build! I will follow along with interest. -Mark -
Well I wouldn't call you "damaged!" Haha. That's a cool and interesting fact that your grandfather worked at SAAB! It makes it all the more clear why it's important to you. Definitely a distinctive seat! Thanks for posting the pic of the "real deal." I would have had no idea. Are you going to try to "scratch" the mesh in the front of the seat whenever you do your own seat. It looks like it could be done with a sprue jig and some mesh. That would be challenging for sure! BTW: Remember to add switches to the cockpit tub! -Mark
-
Hey Erik! Great start. Your struggle with the seat reminded me of my struggle with the Aires ACES II for my project. At least, in terms of accuracy and how the seat would be viewed. Sometimes it's hard not to let these minor things not bother you. -Mark
-
A Hog Swimming with the Sharks, 1/48 Hobby Boss A-10A
taggor replied to taggor's topic in In-Progress Pics
Update 9/10/15 Part tree! Yay! (I meant to type tree! Haha.) More with the engines! Again, using Sid's build as my guide I chose to use the Italeri exhaust units. I was able to continue the "totally inaccurate but, I like it" recessed rivets using these parts and "go nuts" at having a completed part of the airframe. I used oils and acrylics to achieve the oil staining and "burnt" look of the "pipes." Again I used a modulation of paint as a base much like the interior of the engine nacelles. Another shot of the bottom of the left engine pipe (I hope I remember to install it on the left! Hah -
A Hog Swimming with the Sharks, 1/48 Hobby Boss A-10A
taggor replied to taggor's topic in In-Progress Pics
Update 9/10/15 Part deux! So I had run out of supplies in order to keep at the windscreen, so I chose to work at the engines. First step was to take off the molded ECU ram air duct between the engines and assemble the upper and lower halves. Not to mention filling the huge gap inside the two parts. Yet another issue from the Trumpy kit. I wasn't going for style points. I used strip styrene and putty. I used Mori Mori for the rear most gap because I have nightmares of Tamiya putty shrinking and falling out in clumps in areas that I would want to last. I used Tamiya putty as well and tried to g -
A Hog Swimming with the Sharks, 1/48 Hobby Boss A-10A
taggor replied to taggor's topic in In-Progress Pics
Update 9/10/16 Hello all! So why "Two steps forward and one step back?" well, I think we all have been there and I am no exception to that "curse." Admittedly it is a "curse" I do to myself. I have been obsessing over the windscreen and since last time I have worked with about 4 or 5 examples of the Revellogram windscreen. All of them failures for one reason or the other, however, I have another one ready to go. Much of my work has been really uninteresting but, necessary to fit the windscreen in place. The HB windscreen has an unusual curved shape where it attaches to the model and I neede -
You many want to elaborate or specify what your subject is to help clarify what techniques you are looking for. For example the exhaust burners inside of an A-10 differ, color wise, from a F/A-18 or a B-1B. At least, that is what I have seen. -Mark
-
Great work Halo J.! You should put up your pictures in the Display case. I never would have seen your hog if I wasn't in the Jet Modeling part of the forum and I don't like missing an excellent Hog build! -Mark
-
F-14A Tomcat VF-154 Black Knights OIF 2003 [Fujimi 1:72]
taggor replied to Spook's topic in In-Progress Pics
Sorry about that Andreas. Middle Age moment! Haha. -Mark -
Gianni, the pit and seat look great! I am especially fascinated with the seat cushion! The modulation of color makes it look like fabric. Outstanding work. I will look forward to your next installment! -Mark
-
I would love to "jump on" that Tomcat build right now but, I still have my own two projects going since the beginning of the year so it will be a while until I get to the "cat." Besides, I don't want to have to follow after all the great builds of Tomcats going on right now! Haha. It would be embarrassing! I have made a promise though, that I would do a "prop" model for my third attempt at aircraft modeling. So, that pushes it back a bit. As far a the A-10 goes, you have no one to satisfy but, yourself. As honest as I can be.... I just love to see others work on the A-10. I (like most folks)
-
F-14A Tomcat VF-154 Black Knights OIF 2003 [Fujimi 1:72]
taggor replied to Spook's topic in In-Progress Pics
Kai, thanks again for sharing these tips. The links and your explanation have been very helpful! Your work is very inspiring and I hope I can add some of your techniques to my "toolbox." I am looking forward to your continued progress. -Mark -
F-14A Tomcat VF-154 Black Knights OIF 2003 [Fujimi 1:72]
taggor replied to Spook's topic in In-Progress Pics
Hello Spook! Thanks for sharing the many tips on this build. I especially like your work on the GBU-12 thermal coating. I very much appreciate the tip about using Mr. Surfacer to depict the thermal coating on the GBU-12's. Would you say that the same effect could be obtained with larger scales using this method? It looks great on the 1/72 ordnance. I would want to use it on 1/48 scale ordnance. I also wanted to ask about the black framing on the windscreen. Did you pre-paint the inside and the outside? Or perhaps just the inside? I am working with the windscreen on my own project and I am coll -
Hello Nat! It's always a pleasure to see one of your builds and this one is just as amazing as your F-16's! -Mark
-
As all the others before me have said, "Very nicely done!" It reminds me so much of a Tomcat build that I have wanted to do and have been collecting supplies for which is Fast Eagle 107. As a certifiable A-10 junkie I am looking forward to your build and hope you will share your progress with it in the "In Progress" part of the forum. -Mark
-
Sorry fella's I had meant only to comment on the actual A-10's new(er) flight controls. Not as a complaint about the current offerings of AM mfg's A-10 related cockpit parts. However, from my current experience, which is limited to only those AM mfg's parts I have chosen to use with my own project, even the current crop of "A" cockpit parts in 1/48 doesn't satisfy the "correct" or "drop in" requirements (subjective to what those two words mean to each individual) but, they sure beat having to make all of the changes from scratch! So with an eye toward a "C" variant in 1/48 with what is curre
-
No worries Gunny! Thanks for the update. I wouldn't have known about Eduard's new A-10C bits if you hadn't posted about it. So thanks! .... and thanks for the e-mail address. -Mark
-
In fact it is taken from the F-16! The throttle has been "enhanced" as well to deliver true HOTAS to the hog driver. -Mark
-
I am really enjoying the scratch building Joel! Even if you wont see much of it as you say it's still great to look at. You could always do a "cut-away" if you are ambitious. Looking forward to more progress! -Mark