Floyd S. Werner, Jr. Posted June 25, 2009 Author Share Posted June 25, 2009 I don't know what it is,at the local forum it created a debate-the censor allowed to publish thesephotos,but people were still unconvinced they should. And there's this one,looks like not operational yet: Isaac Oh well, they do tend to do things differently than us. Makes making a model of an IAF Cobra difficult sometimes. Floyd Quote Link to post Share on other sites
Floyd S. Werner, Jr. Posted June 26, 2009 Author Share Posted June 26, 2009 Moving right along. One thing that I wanted to add was the inlet filter screen. It isn't included so it requires some scratchbuilding. Here it is before paint. And after. You'll note that the engine is not weathered or even given a wash. It is so far hidden in there that there really in no gain for doing the extra work. In reality you couldn't have seen it as it would have be compartmentalized. And installed. I will weather the yellow green later when I get to weathering the rest of the helicopter. Most of it isn't seen so there will not be too much weathering inside. The fuselage has been mated with the cockpit. Since I didn't have instructions and I built the cockpit by itself this will create issues for me in handling. At this point only the upper pylon area and the engine/transmission truss are glued in place. I ensured that the mast was straight up and down with a needle file to check alignment. Once this whole thing is dry I will glue the rest of the fuselage and start adding the resin lower pieces. All in all it is coming along nicely and rather quickly. This is certainly a build where you take your time. No rushing here. The fit so far has been impeccable. Joseph really did a nice job on this baby. Hopefully more later this weekend. Floyd Quote Link to post Share on other sites
Anthony in NZ Posted June 26, 2009 Share Posted June 26, 2009 Nice work Floyd, I particularly like the extra details you are adding. Looks to be a fairly big model. Cheers for the update Anthony Quote Link to post Share on other sites
Floyd S. Werner, Jr. Posted June 27, 2009 Author Share Posted June 27, 2009 I just realized the engine sits too far back as made in the model. I'm not going to change it but it is just for your information. That whole tressle thing is wacky. Oh well in the finished product it is effective if not accurate. Floyd Quote Link to post Share on other sites
Cobra nut Posted June 27, 2009 Share Posted June 27, 2009 Floyd, I've been following this one for a while, you're making great progress. This resin kit by Joseph looks really comprehensive, it's going to be awesome when complete. Have you decided what markings it's going to wear? Ken Quote Link to post Share on other sites
Floyd S. Werner, Jr. Posted June 27, 2009 Author Share Posted June 27, 2009 Floyd,I've been following this one for a while, you're making great progress. This resin kit by Joseph looks really comprehensive, it's going to be awesome when complete. Have you decided what markings it's going to wear? Ken I want to do the 2nd ACR machine that Joseph has decals for but I painted the cockpit black so it should be a later version. There is a distinct possibility that the 2nd ACR would have had an early grey cockpit. I don't know for sure but that is the one I want to do. I'm open for some suggestions. As much as I like the Israeli and Turkish aircraft I just can't make myself do it. It has to be a US at least this one. Maybe the next will be Israeli. Floyd Quote Link to post Share on other sites
Floyd S. Werner, Jr. Posted June 29, 2009 Author Share Posted June 29, 2009 The fit of the Monogram kit is not the greatest, especially considering its lineage. So while the fuselage was closed up and drying it was time to take on the real reason for doing this particular version, the TOW missile system. First off you must be careful removing the parts from the pour stubs as always but particularly these center pieces. I found this method the best to remove them. The saw is from Jon Votech. I just didn't use the handle and this allowed me to get under the part and remove it perfectly. You'll want to make sure that your upper and lower TOW racks fit together. It is easier to do this without all the stuff on them. This is going to look so cool. Now after you bend photo etch, attach the resin pieces and stuff and a little solder to scratchbuild the wiring. This is what you get. This is so cool. I think I will attach two TOW missiles, one in each outside upper launcher to represent the survival tubes we use to carry around, but I have to say that this is almost too cool to do that. I will paint one launcher an OD color and the rest aircraft green. This will add some visual interest and color to the drab helicopter. LOL I hope you like this as much as I do. I took off work for a week just to do this helicopter because it has infiltrated my dreams at night. LOL I really need to get a life. LOL Floyd Quote Link to post Share on other sites
rotorwash Posted June 29, 2009 Share Posted June 29, 2009 Floyd, She's looking beautiful! I really like the TOW launchers. Ray Quote Link to post Share on other sites
Floyd S. Werner, Jr. Posted June 29, 2009 Author Share Posted June 29, 2009 If one rack is good then two racks are better. Here is one with a missile installed. The charging handle is not installed on the missile rack. That will be added later when the whole thing is painted. I know I've said it before but this set is awesome and impressive. This is the best aftermarket set I've had the pleasure of dealing with in quite some time. Floyd Quote Link to post Share on other sites
petebuilt Posted June 30, 2009 Share Posted June 30, 2009 (edited) Dang Floyd, It looks like you took a real one, and hit it with the shrink raygun! Very impressive indeed. Pete Brown Edited June 30, 2009 by petebuilt Quote Link to post Share on other sites
petebuilt Posted June 30, 2009 Share Posted June 30, 2009 Double dang!!! Quote Link to post Share on other sites
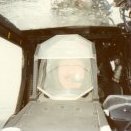
Floyd S. Werner, Jr. Posted June 30, 2009 Author Share Posted June 30, 2009 (edited) OK worked on the belly today. Checked for the seam work. So far it looks good. I scribed the bottom of the model. I hope I don't change my mind later. LOL Easier to do it now before the landing gear gets added. I left the tailboom without scribing. I added some detail parts such as the engine inlets. Then it was time to work on the front and the back. First the backside, I happen to like backsides, anyhow the new tail fit on much easier than the previous one I used on the G model. It was attached with five minute epoxy and just clamped into place until it set up. Easy Then came the nose. After attaching the part that would hold the turret itself (mid resin piece if you will) I had to hollow out the nose cone to allow the cockpit and instrument panel to fit. Well let me say that if you don't have a Dremel tool and cutting bit this will take you some time. I took my time and hollowed it out until the cockpit fit perfectly. Yes the Dremel tool did jump twice, but the damage was minimal and will be an easy cleanup. Also notice the safety gear, visor with lighting and protective mask. There is a lot of dust in case you didn't notice. I think I need to lose some weight too. I need to add some to the model's nose but remove some of that gut. LOL I hope to take on the HSS and the detonation chord tomorrow. I hope I can pull it off. At least I have a bunch of canopies to work with. LOL We'll see what happens. Floyd Edited June 30, 2009 by Floyd S. Werner, Jr. Quote Link to post Share on other sites
BrittMac Posted June 30, 2009 Share Posted June 30, 2009 Nice to see how it is coming together Floyd. Don't worry bout the belly.....no one can see it when you are at 2000ft. How much of the nose cone had to be hollowed? Quote Link to post Share on other sites
11bee Posted June 30, 2009 Share Posted June 30, 2009 The model is looking great! Can't wait to see it all together and painted. John Quote Link to post Share on other sites
Floyd S. Werner, Jr. Posted July 1, 2009 Author Share Posted July 1, 2009 How much of the nose cone had to be hollowed? Just enough to fit the cockpit floor and the instrument panel on. LOL Floyd Quote Link to post Share on other sites
Floyd S. Werner, Jr. Posted July 3, 2009 Author Share Posted July 3, 2009 Most of my work yesterday was wasted trying to figure out the canopy, HSS and det chord. I did get some things done. The belly was scribed. And of course it is now official it will be an AH-1S (Mod). The nose is grafted. It was a pretty painless procedure once I hollowed out the nose cone. Don't worry the Mr. Surfacer is on there to check the joins. I'll have to restore the panel lines but that should be easy enough by now. Today however was a long but prosperous day. I ended up deciding to have the canopy doors open. SOoooo that meant having to remove the canopy doors themselves. I did this with Dymo tape and a very fine razor saw. The procedure was pretty easy to do. A little note though, put the kit canopy underneath the Werner's Wings one and this will give it some strength and help you cut it. I did slip on the pilot's door, but lucky for me I still have some canopies left in the business. By the way, I am getting low and once they are gone, they are gone. There is a lot of detail on the inside of the canopy, like HSS rails, det chord, compass, grab handles and door struts. Well if you are going to put that stuff in there I don't think there is a way around having to build up the canopy frame work on the inside. I used styrene and went slowly. Even going slowly there are about two places where a little sputz got on the canopy. I'll have to polish the out. I also got two hair line cracks, or crazing, around the mid canopy area when I added the strip and glue. The glue caused the cracks. Well that and my man handling. I figure I'll put a bird up there and some bird caca to hide it. Works for armor guys. LOL Because the det chord had to be added first I rolled out some Aves Apoxy Sculpt and tinted it with charcoal pastels (thanks Joseph for the tip). You can place the epoxy where you want by adding talcum powder to the surface. This doesn't allow it to adhere right away. Then when you are happy where it is just add a drop of water and let it set. Perfect det chord, well perfect enough for me. Very realistic looking too and no paint. HSS railings were the next business of the day. Using .005 needles that I have and some .004 solder and some styrene, I scratchbuilt an HSS system. It ain't 100% accurate but it certainly is representative. Let's put it this way, the rollers will adjust on the HSS rails. Yes I know sick but I thought it was cool. You won't be able to play with it once installed but it made fitting the parts easier. Front Seat HSS rail HSS System- don't worry about the powder I haven't cleaned it off yet. I'll polish it and then I'll Future them to clear things up and hopefully hide my flaws. LOL Looking inside from the pilot's side. Canopy is just sitting on the model for coolness. LOL And now from outside looking down. Now it is time for a beer or two or three. Should probably work on the fit of the canopy tomorrow. The kit canopy which we based the master off of isn't the best fit in the world so my canopy is a little short too. I didn't know that at the time or I would have made it bigger. No big deal but it will take a little work. Floyd Remember: Modeling is fun! Quote Link to post Share on other sites
rotorwash Posted July 3, 2009 Share Posted July 3, 2009 Floyd, The HSS rails are cool! They really add a lot of visual interest to the canopy. Looks like you're in the home stretch now! Ray Quote Link to post Share on other sites
11bee Posted July 3, 2009 Share Posted July 3, 2009 Great job on the canopy, it came out fantastic. Fireball just has to release a series of cockpit sets... That cockpit is the best looking resin I have seen. John Quote Link to post Share on other sites
Retired GunPilot Posted July 3, 2009 Share Posted July 3, 2009 Floyd, just awesome! Charlie Quote Link to post Share on other sites
Anthony in NZ Posted July 3, 2009 Share Posted July 3, 2009 Wow!! Awesome Floyd! Quote Link to post Share on other sites
Cobra nut Posted July 3, 2009 Share Posted July 3, 2009 Holy Crap Floyd, You've done more in the last week than I've been able to pull off in the last two months on my TOW J ! Looks absoloutely fantastic, great work. I've been working on the TOW's and finishing details on the Iranian J. Just about done. Ken Quote Link to post Share on other sites
BrittMac Posted July 7, 2009 Share Posted July 7, 2009 (edited) Anymore teaser shots Floyd? I know, I know, everybody has to work and all. Can't wait to see more of this project though, so I can see how mine wont turn out lol. I hope everyone is able to get a kit for this. If you do not, keep an eye on Evilbay. I have seen three on there in the last week, and I know one of them went for less than $10 (not counting shipping, which is artificially high these days). If you guys can't find one, maybe we can figure something out. EDIT: like this one on Evilbay.....not one bid on it as I post this, but shipping is a little high IMHO. http://cgi.ebay.com/ws/eBayISAPI.dll?ViewI...em=220445693976 The kits are out there, lets prepare for this conversion! Edited July 7, 2009 by BrittMac Quote Link to post Share on other sites
Floyd S. Werner, Jr. Posted July 7, 2009 Author Share Posted July 7, 2009 (edited) Anymore teaser shots Floyd? I know, I know, everybody has to work and all. Can't wait to see more of this project though, so I can see how mine wont turn out lol. Funny you should ask. With the 4th of July holiday I was required to spend some time with the family and drink heavily. LOL That does not necessarily mean that I have to be drunk to be with my family. LOL But it was a holiday. Anyway, I have been working on it but now that I'm back to work the going is slower than last week. With that said, the next thing I did after getting the HSS rails done was to start about the other things on the canopy that would have to be done. I scratchbuilt a compass, rear view mirror (hey an aviator has to watch his butt and the guy in the back), grab handles, and door struts. They are suppose to work like this. While playing with the canopy area, I restored all the things that I knocked off because I have big hands and five thumbs. I also added the det chord actuator from the PE fret and added a little Remove Before Flight tag made out of Tamiya tape, tinted with a red Sharpie. I think they look cool. Then it was on to smaller exterior things. First off was the APR-39 antennas, then the lights and finally one of the PE access panels for the belly. Because this panel had two exhaust openings I had to drill some holes in the tailboom. Nothing fancy but it certainly adds to the look. There are some circular extensions that have to be put on but I'll save those for a little later. Rear Front There is another hole up front by the antenna that needs to be there. Joseph simply forgot to include the PE part. Not a problem as even if you didn't add it only he would have noticed. LOL I added mine from a PE panel from an Eduard Zoom Set designed for the Academy P-47. It actually had two of these panels just in case I screwed up. I like the way it looks. You'll have already noticed that the horizontal stabilizers are attached, at least temporary. I mounted them like the real thing. I drilled out some parallel holes and inserted tubing the tailboom width. Then just superglued it in. Now this section will be a pain. My kit had some flaws in the tailboom that had to be filled. Then I had to fill the opening with some Aves Apoxy Sculpt, but I'm still not quite happy with it. I ended up sanding off some rivets. I'll end up replacing them with some Archers rivets. Then there is the turret. This thing is really nice. The only thing you need is a sharp 1/8" drill bit. It was not difficult to keep center as the master piece has a starting hole in each side. This thing looks cool. You have to drill deep to get the gun and chunker to sit properly. Do not cut the mounts. They are designed to allow the armament to sit inside the cutout with room on all sides and it works perfectly too. Last night before going to bed I added the landing gear. These things are great. They are thick like the real thing and even have the frackin skid shoes on the bottom of the skids. They do require more clean up but the round cross section really makes these things different from the original. I believe Joseph will give you an option to either use the round or faired landing gear, but either way they have a wire running through them for strength. They fit much better in the kit than the original too. I did have to fill the area with some Apoxy Sculpt but we'll save that for another night when I get them cleaned up. That is it. My Cobra is sitting on it's own two feet. Now it is just a matter of adding some minor things and then washing the model prior to painting. I hope and I know this is optimistic to have the model primed by this weekend. I'm sure I'll have to do some touch ups here and there. I never get it right the first time. LOL Floyd Edited July 7, 2009 by Floyd S. Werner, Jr. Quote Link to post Share on other sites
Avus Posted July 7, 2009 Share Posted July 7, 2009 Now where have I been?! I completely missed this awesome thread. Outstanding work Floyd. From mow on I'll be following with interest. Quote Link to post Share on other sites
Joseph Osborn Posted July 7, 2009 Share Posted July 7, 2009 Floyd hasn't built his tail rotor yet (that I know of), but here's a photo of the completed 12-piece assembly: I'm having to split my time between making new stock to fill orders and building up an AH-1S for the assembly guide, so my progress on both fronts is pretty slow right now. I'm trying to document several tips and techniques to make the assembly as pain-free as possible. The only major parts I haven't built up yet are the wings and the main rotor. Quote Link to post Share on other sites

Recommended Posts
Join the conversation
You can post now and register later. If you have an account, sign in now to post with your account.