salvador001 Posted April 13, 2014 Share Posted April 13, 2014 (edited) Hi guys, been very busy lately so i havent got time to post my build, i made some progress in my MD500E so here it is what ive got so far. Ive used the CMK OH-6 interior that i have modified to make it compatible with the E model. The pilo seat is scratchbuilt as the kit ones are horrible, i made them with stretch sprue and tamiya tape, seatbelts are PE from Eduard OH-6 and UH-1C, IP is Eduard PE with some scrachbult. This bird will be armed with the XM27E1 minigun system so ive used the Werners Wing set that ive modified, the minigun barrel is from RB, the minigun sight is full scratch using PE and stretch sprue, the M260 pod is from Fireball Modelworks and the mount is made from PE and sprue. High skids are made sacrificing other skids and PE. Hope you guys like it. Thanks. Rod. The real bird im modelling: Model progress: Edited October 30, 2015 by salvador001 Quote Link to post Share on other sites
Loach Driver Posted April 13, 2014 Share Posted April 13, 2014 Great work so far, Rod. The Dragon kit isn't great but with some good modelling skills, it can turn out like yours. Please post up as many photos as you can. LD. Quote Link to post Share on other sites
Rotorman Posted April 15, 2014 Share Posted April 15, 2014 looks clean. Nice job. I do like the pedals uneven (nice touch) OLiver Quote Link to post Share on other sites
salvador001 Posted April 20, 2014 Author Share Posted April 20, 2014 Hi guys, been doing some work on the cockpit, i installed the XM27E1 minigun ammo case and the réflex sight, high skids, scratchbuilt PRC-77 radio between pilot seats, scratchbuilt back seat, etc, well, here it is what ive got so far. Hope you like it. Thanks. Rod. Quote Link to post Share on other sites
Loach Driver Posted April 21, 2014 Share Posted April 21, 2014 Hi Rod. Great work on the front and rear seats as well as lowering the bulkhead. Can you measure the length of the skid legs (front and rear legs) so we can have an idea about how to build some tall skids for the Dragon kit in the future? Thanks. LD. Quote Link to post Share on other sites
salvador001 Posted April 21, 2014 Author Share Posted April 21, 2014 Hi LD, thanks for your encouragement. The dimensions for the skids are front 32mm and rear 33mm aprox, you have to enlarge the skid tube, add 5mm to the front and 4mm to the last portion of the rear leg. Rod. Quote Link to post Share on other sites
11bee Posted April 21, 2014 Share Posted April 21, 2014 (edited) Great work! First rate interior, I really like the natural positioning of the harnesses. Are the harnesses aftermarket or scratch built? Also, do these helos use the reflex sight? I thought that was developed back in the Vietnam days and it was discarded as being a bit impractical. Lastly, what's up with the missing pilot's seat? Is that still a work in progress or do El Salvadoran birds have them removed? Sorry for all the questions, just very interested in an uncommon subject. Looking forward to more updates. John Edited April 21, 2014 by 11bee Quote Link to post Share on other sites
AH6C-SIP Posted April 21, 2014 Share Posted April 21, 2014 I have used that silly sight a couple of times, but never in a OH-6. It was also part of the M27 system on the OH-58A model. Just give me a grease pencil X on the front of the windshield. But for the authentic look, you've done a superb job. I don't think I've seen a real one, mounted in an aircraft, since... 1970? Quote Link to post Share on other sites
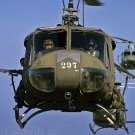
salvador001 Posted April 21, 2014 Author Share Posted April 21, 2014 (edited) Hi guys, glad you like it, thank you very much. John, when you say harnesses are you referring to the seatbelts? If thats so, they are a mix of PE that came in the Eduard OH-6 and UH-1C sets. For the back seat, i used the PE seatbelts for the UH-1C instructor seat and scratch the buckle with PE. As for the other pilot seat, is still in progress, believe me, making this seats is a killing job and im afraid not doing it well like the other one. Yes, El Salvador Hughes/MD 500 D/E models use the reflex sight, they came with the XM27E1 systems back in the 80s, i understand 20 systems were delivered with M260 rocket pods only for the E models, D models only carried the minigun without the reflex sight. Heres a photo of an 1984 E model showing the system with the reflex sight. El Salvador received in 2012 3 new MD500E models, and they are fitted with stock XM27E1 without the sight, awaiting for the dillon aero twin minigun an rocket pod system. Greetings. Rod. Edited April 21, 2014 by salvador001 Quote Link to post Share on other sites
HeavyArty Posted April 21, 2014 Share Posted April 21, 2014 Its looking really nice. Great job on it. The PRC-77 came out nicely aas well. Quote Link to post Share on other sites
kike Posted April 23, 2014 Share Posted April 23, 2014 Super chivo!!! * (* Great) nice details, very good build Quote Link to post Share on other sites
salvador001 Posted April 28, 2014 Author Share Posted April 28, 2014 Gracias Kike. Heres another update, i built the other pilot seat and added the wiring of the IP. Hope you guys like it. Rod. Quote Link to post Share on other sites
Loach Driver Posted April 28, 2014 Share Posted April 28, 2014 Great detail, Rod. The interior looks amazing. Please post up a detailed how-to when you add the windscreen to the fuselage. I really need to see how you make that canopy fit well. Thanks. LD. Quote Link to post Share on other sites
11bee Posted April 28, 2014 Share Posted April 28, 2014 Great detail, Rod. The interior looks amazing. Please post up a detailed how-to when you add the windscreen to the fuselage. I really need to see how you make that canopy fit well. Thanks. LD. Rod, If you didn't see it in another thread, someone came up with a trick to make the windscreen install go a bit easier. They cut the top part of the fuselage framing, then glued the windscreen in place, then glued the framing back together. Seemed to make the whole process go a bit easier. Wish I knew of that trick when I did my AH-6C, that part of the build was a PITA. Good luck! John Quote Link to post Share on other sites
salvador001 Posted April 28, 2014 Author Share Posted April 28, 2014 (edited) Thank you guys for your support. I have finished the interior, its time to install the windshield, oh no, one of the most difficult part of the build. Ill try to make the trick John says and lets see how it goes, my trick was to extend the upper part of the windshield with styrene and glued it with CA glue with some pressure applied, it left minor seams that putty sealed perfectly, not bad at all. BTW, as all of you know, this bird will be armed with the minigun and the 7 shot rocket pod in the right side, does anyone has a good photo showing were does the pod cable/wiring is connected to the fuselage? Is one or two cables connected? The pod has two holes that means two cables must be connected to the bird. Thanks. Greetings. Rod. Edited April 28, 2014 by salvador001 Quote Link to post Share on other sites
rotorwash Posted May 1, 2014 Share Posted May 1, 2014 Rod, That is one beautiful build. Good luck with the canopy. Ray Quote Link to post Share on other sites
salvador001 Posted May 2, 2014 Author Share Posted May 2, 2014 Thanks Ray, BTW, what happened with your Bravo Huey? Is it still in production line? I installed the windshield/canopy yesterday, man, this is a fuc...shi... piece of crap, it just dont fit well, i didnt cut the parts as Jorge Oppenheimer did with his AH-6 as i was afraid of ruin the model cause that part is very fragile, i went on the traditional way, glue it applying pressure with CA glue, huge gaps were made in the upper joint and the right joint, left was not so much, i sealed with putty and now it looks good but not perfect, ill post some photos today to show you all. Thanks! Rod. Quote Link to post Share on other sites
rotorwash Posted May 2, 2014 Share Posted May 2, 2014 Thanks Ray, BTW, what happened with your Bravo Huey? Is it still in production line? I installed the windshield/canopy yesterday, man, this is a fuc...shi... piece of crap, it just dont fit well, i didnt cut the parts as Jorge Oppenheimer did with his AH-6 as i was afraid of ruin the model cause that part is very fragile, i went on the traditional way, glue it applying pressure with CA glue, huge gaps were made in the upper joint and the right joint, left was not so much, i sealed with putty and now it looks good but not perfect, ill post some photos today to show you all. Thanks! Rod. Rod, You guys aren't really making me excited to build a Loach with all the glowing comments about the canopy! The B model is still going. Work has taken over my life a bit these days, but Summer is around the bend and I plan to get back to work on her. Ray Quote Link to post Share on other sites
salvador001 Posted May 3, 2014 Author Share Posted May 3, 2014 Ok, so i installed the windshield, M260 pod and painted the bird, here it is how it looks now, it still needs some painting work and some details to add. Oh man, that windshield/canopy really is a PITA, it doesnt fit well in all angles, i ended up filling and sanding with putty the whole edge of this piece, hope you guys like it. Greetings. Rod. Quote Link to post Share on other sites
salvador001 Posted May 12, 2014 Author Share Posted May 12, 2014 Hi guys, made some progress to my 500E, i installed the GAU-2, removed the masking and flat coat it, for the tail number ill use stencils, i just needs to add some details and paint touch ups and its ready to rumble. Hope you like it. Rod. Quote Link to post Share on other sites
rotorwash Posted May 12, 2014 Share Posted May 12, 2014 Rod, That is freaking amazing, man! Great work. Ray Quote Link to post Share on other sites
ALEXANDRE REZENDE Posted May 13, 2014 Share Posted May 13, 2014 Rod, What a wonderful kit! An incredibly real result! Very good! []s Quote Link to post Share on other sites
salvador001 Posted May 15, 2014 Author Share Posted May 15, 2014 (edited) Thank you guys, very happy you like it. Model is now finished, heres some photos, hope you all like it. Thanks. Rod. Edited August 25, 2014 by salvador001 Quote Link to post Share on other sites
rotorwash Posted May 15, 2014 Share Posted May 15, 2014 WOW.... double WOW! Quote Link to post Share on other sites

Recommended Posts
Join the conversation
You can post now and register later. If you have an account, sign in now to post with your account.