AlienFrogModeller Posted May 13, 2018 Author Share Posted May 13, 2018 Cockpit painting, I really must thank Joel for his help, guidance and confidence in me to get to this point. I hope it looks good! Rinse repeat 3 more times. Quote Link to post Share on other sites
AlienFrogModeller Posted May 13, 2018 Author Share Posted May 13, 2018 Hell hole work. Quote Link to post Share on other sites
AlienFrogModeller Posted May 13, 2018 Author Share Posted May 13, 2018 (edited) I have questions... I know they have been asked but I would like a spot where i can refer to them easily. Assuming that we are using a medium needle, and not a fine needle. 1. Vallejo Primer - what do you use for reducer and clean up? 2. Mig Primer - what do you use for reducer and clean up? Edited May 13, 2018 by AlienFrogModeller Quote Link to post Share on other sites
Joel_W Posted May 14, 2018 Share Posted May 14, 2018 (edited) AFM, No need to thank me, you're work is simply super detailed, and accurately done. As for your questions on primers, I use Mig Black and Gray primers. I air brush my primers with a Iwata Revolution M2 using a .4mm needle/nozzle. I thin the primer 1:1 with either Tamiya Yellow cap or Mr. Color Self Leveling Thinner 400. Honestly, I've been trying to compare the two, and they seem to have nearly identical results. As for cleaning my air brushes I always use generic Lacquer Thinner as it's cheap and works just fine for that application. I never use it for thinning paints. Joel Edited May 14, 2018 by Joel_W Quote Link to post Share on other sites
AlienFrogModeller Posted May 14, 2018 Author Share Posted May 14, 2018 1 hour ago, Joel_W said: AFM, No need to thank me, you're work is simply super detailed, and accurately done. As for your questions on primers, I use Mig Black and Gray primers. I air brush my primers with a Iwata Revolution M2 using a .4mm needle/nozzle. I thin the primer 1:1 with either Tamiya Yellow cap or Mr. Color Self Leveling Thinner 400. Honestly, I've been trying to compare the two, and they seem to have nearly identical results. As for cleaning my air brushes I always use generic Lacquer Thinner as it's cheap and works just fine for that application. I never use it for thinning paints. Joel Thank you sir for the guidance on the primers, appreciated. Quote Link to post Share on other sites
AlienFrogModeller Posted May 18, 2018 Author Share Posted May 18, 2018 Evening Folks, I have updated this forum of the links for the photos. They should all be working now. I am going to try and get a few things done over this weekend and hopefully share with y'all. After Sunday I have to leave the country for a couple weeks, will be back and continue! See you soon!! Quote Link to post Share on other sites
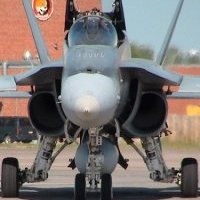
AlienFrogModeller Posted June 17, 2018 Author Share Posted June 17, 2018 Evening/Morning/Good day folks, I'm back and made some progress this evening. Working on the intakes Test fitting, then glued the intake in-place, but only placed glue at the bottom. Quote Link to post Share on other sites
AlienFrogModeller Posted June 17, 2018 Author Share Posted June 17, 2018 (edited) As you can see I placed the intake lip on a small angle forward to eliminate the gap that could have existed between the intake lip and the boundary layer separator. It is easier to repair the gap behind the intake, rather than in front. Edited June 17, 2018 by AlienFrogModeller Quote Link to post Share on other sites
AlienFrogModeller Posted June 17, 2018 Author Share Posted June 17, 2018 Little fill, little sanding, done. I used AV Plastic putty first to take up the major gap. Then used Mr. Dissolved Putty in smaller amount after. Quote Link to post Share on other sites
AlienFrogModeller Posted June 17, 2018 Author Share Posted June 17, 2018 Intakes looks good to me..as my dad would say "good enough for the girls I go out with" Quote Link to post Share on other sites
AlienFrogModeller Posted June 17, 2018 Author Share Posted June 17, 2018 Now lets look at the rear section as I review the over all fit. I don't like that. Quote Link to post Share on other sites
AlienFrogModeller Posted June 17, 2018 Author Share Posted June 17, 2018 Before After Dry fit...much better, less putty and sanding after. Quote Link to post Share on other sites
Joel_W Posted June 19, 2018 Share Posted June 19, 2018 AFM, Those intakes in the before pic aren't even close. That's just pure sloppy engineering, and then the "Good Enough" for the average modeler so it won't eat into the budget to fix them. Excellent job in getting to fit correctly. I gotta just break down and try that AV Plastic Putty. I use Vellejo's Acrylic putty for small jobs, but it's not the greatest, and my go to Bondo must be sanded every time. Nice bit of engineering with the sheet plastic to force the sides into the correct alignment. Joel Quote Link to post Share on other sites
AlienFrogModeller Posted June 19, 2018 Author Share Posted June 19, 2018 5 hours ago, Joel_W said: AFM, Those intakes in the before pic aren't even close. That's just pure sloppy engineering, and then the "Good Enough" for the average modeler so it won't eat into the budget to fix them. Excellent job in getting to fit correctly. I gotta just break down and try that AV Plastic Putty. I use Vellejo's Acrylic putty for small jobs, but it's not the greatest, and my go to Bondo must be sanded every time. Nice bit of engineering with the sheet plastic to force the sides into the correct alignment. Joel Joel, Those intakes...my experience with Hasegawa, Kinetic, Testors, Italeri and Revell get it wrong on one way or another. So this one has good shape and like the end result. So the devil I chose to get to know is the Kinetic version. After a few builds, I find it easy enough now to get it right. Although I'm not going to argue with you on the engineering side of things. Thanks for the compliment, before I attach the two halves, i should have pics in the next day or two, I added some PE (louvers, screens, chaff/flare boxes) and will be priming-to-test for imperfections and security. LOL, I also have a photo journal on a 1970 Monte Carlo build. I will be placing in the appropriate forums section probably by the weekend. Quote Link to post Share on other sites
Joel_W Posted June 19, 2018 Share Posted June 19, 2018 AFM, Looking forward to reading through your Monte 70' build. Joel Quote Link to post Share on other sites
AlienFrogModeller Posted June 21, 2018 Author Share Posted June 21, 2018 (edited) On 6/19/2018 at 4:07 PM, Joel_W said: AFM, Looking forward to reading through your Monte 70' build. Joel Joel, I have to hold off on displaying the build...until after we present it to our LCol for his departure ceremony. Edited June 21, 2018 by AlienFrogModeller Quote Link to post Share on other sites
AlienFrogModeller Posted June 29, 2018 Author Share Posted June 29, 2018 (edited) All, Ops Pause for abit. A local friend has shown me his skill sets for molding my Fat Boy Pylons...impressive results. Now we are discussing the possibilities of more products. Taking one of my cockpits and maybe make a mold and cast with resin. MTF Edited June 29, 2018 by AlienFrogModeller Quote Link to post Share on other sites
AlienFrogModeller Posted July 1, 2018 Author Share Posted July 1, 2018 I will be taking a break from posting...but not building. as this will now be a healing hobby for me for the foreseeable future. My precious son (second oldest) has passed away, I will miss him dearly. I will return someday but for now a break. Quote Link to post Share on other sites
Scooby Posted July 1, 2018 Share Posted July 1, 2018 (edited) 2 hours ago, AlienFrogModeller said: I will be taking a break from posting...but not building. as this will now be a healing hobby for me for the foreseeable future. My precious son (second oldest) has passed away, I will miss him dearly. I will return someday but for now a break. So sorry to hear Carmen, thoughts and prayers for you and your family. I tried to send you a private message, stay strong my friend. Gary Edited July 1, 2018 by Scooby Quote Link to post Share on other sites
Joel_W Posted July 1, 2018 Share Posted July 1, 2018 AFM, My sincerest condolences to you and your family on the passing of your son. Take all the time you need to heal as well as helping other members of your family to do the same. We'll all still be here when you feel you're ready to return. God bless, Joel Quote Link to post Share on other sites
JohnS Posted July 1, 2018 Share Posted July 1, 2018 2 hours ago, AlienFrogModeller said: I will be taking a break from posting...but not building. as this will now be a healing hobby for me for the foreseeable future. My precious son (second oldest) has passed away, I will miss him dearly. I will return someday but for now a break. Very sad news. Our condolences to you and your family. Quote Link to post Share on other sites
skyhawk174 Posted July 1, 2018 Share Posted July 1, 2018 This is such sad news. My deepest condolences to you and your family. Please take all the time you need as family is more important than this hobby of ours. Quote Link to post Share on other sites
bmccarron Posted July 1, 2018 Share Posted July 1, 2018 My thoughts and prayers are with you and your family. Brian Quote Link to post Share on other sites
SERNAK Posted July 4, 2018 Share Posted July 4, 2018 (edited) My condolences for your loss. Edited July 4, 2018 by SERNAK Quote Link to post Share on other sites
phantom Posted July 4, 2018 Share Posted July 4, 2018 So sorry for your families loss. Quote Link to post Share on other sites

Recommended Posts
Join the conversation
You can post now and register later. If you have an account, sign in now to post with your account.