

AlienFrogModeller
-
Content Count
1,534 -
Joined
-
Last visited
Content Type
Profiles
Forums
Calendar
Everything posted by AlienFrogModeller
-
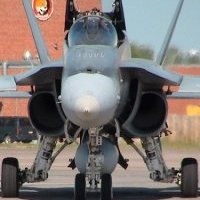
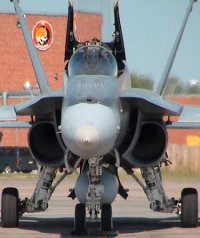
Kinetic CF188 1/48 Production Line x4 Completed
AlienFrogModeller replied to AlienFrogModeller's topic in In-Progress Pics
Added the missing Chaff/Flare button and the canopy ejection handle. Also, hard to tell in this pic but I added the canopy sill hook holes, the place when the canopy hooks into just behind Capt "Reekoak" Awesome's elbows would be and then added the velcro for the "hellhole" radar mesh. Cheers AFM -
A-4C Skyhawk - VA-36 Roadrunners (1/48 Hasegawa)
AlienFrogModeller replied to crackerjazz's topic in In-Progress Pics
Incredible... Cheers AFM -
Kinetic CF188 1/48 Production Line x4 Completed
AlienFrogModeller replied to AlienFrogModeller's topic in In-Progress Pics
While I wait for heat shrink, I didn't like the Tape on the chocks... I decided to work on the seat and Capt "ReedOak" Awesome. A few shots...I'll leave for a day and review in the morning to see if I need to redo or add some details I missed. Cheers AFM -
Kinetic CF188 1/48 Production Line x4 Completed
AlienFrogModeller replied to AlienFrogModeller's topic in In-Progress Pics
Testing the seat, Canopy and Capt Awesome. Cheers AFM -
Kinetic CF188 1/48 Production Line x4 Completed
AlienFrogModeller replied to AlienFrogModeller's topic in In-Progress Pics
Yes Black CA, I find that this stuff is much easier to control apply and sets quickly. The advantage I love aside from the control is the "rubberized" ingredients. Makes a great CA for me and allows for some flex especially when in storage during shipping. IC-2000 by Bob Smith sometimes you'll see different names but sma elabel, they make it for other companies as well. https://smile.amazon.com/gp/product/B002N507I0/ref=ppx_yo_dt_b_asin_title_o00_s00?ie=UTF8&psc=1 Cheers AFM -
Kinetic CF188 1/48 Production Line x4 Completed
AlienFrogModeller replied to AlienFrogModeller's topic in In-Progress Pics
In maint we call this robbing... Took the Canopy ac mount point and placed on my custom cockpit... Kinetic build instructions does not offer a very good look at how to install this part, so here is what I see. I installed the Canopy Actuating Arm first to the Canopy frame. One drop of black CA to attach the canopy actuating arm to the canopy frame. Then I test fit the robbed Canopy frame mounting point to ensure proper alignment before complete assy. Now the form, fit and function.. Cheers AFM -
Kinetic CF188 1/48 Production Line x4 Completed
AlienFrogModeller replied to AlienFrogModeller's topic in In-Progress Pics
Well she's on the ground...pins in, chocks in... Just have to paint the chocks now, but thats for tomorrow. Cheers AFM -
Wow, stunning! Inspiring workmanship! Cheers AFM
-
Kinetic CF188 1/48 Production Line x4 Completed
AlienFrogModeller replied to AlienFrogModeller's topic in In-Progress Pics
Well first pin in...may have to work on the pin itself...here is what i made and next pic what it should look like. Close enough I think... Cheers AFM -
Kinetic CF188 1/48 Production Line x4 Completed
AlienFrogModeller replied to AlienFrogModeller's topic in In-Progress Pics
Before I take her off jacks... Gotta make me some landing gears pins and hook pin. Cheers AFM -
Kinetic CF188 1/48 Production Line x4 Completed
AlienFrogModeller replied to AlienFrogModeller's topic in In-Progress Pics
Too kind, thank you sir. Cheers AFM -
Tamiya 1/48 F-16C Block 52 Swamp Fox Jet
AlienFrogModeller replied to Drew T.'s topic in In-Progress Pics
Impressive. Cheers AFM -
Kinetic CF188 1/48 Production Line x4 Completed
AlienFrogModeller replied to AlienFrogModeller's topic in In-Progress Pics
A little bit of gun corrosion, cordite (or similar) + titanium + exposure of the elements = this... Cheers AFM -
Kinetic CF188 1/48 Production Line x4 Completed
AlienFrogModeller replied to AlienFrogModeller's topic in In-Progress Pics
Added some detail to the Ant...Hasegawa Ant + A.M.U.R. Reaver PE4810 ant base. You can clearly see the difference between the Kinetic Ant (left) vs the Hybrid Ant (right). Cheers AFM -
Kinetic CF188 1/48 Production Line x4 Completed
AlienFrogModeller replied to AlienFrogModeller's topic in In-Progress Pics
A little more work underside...need to dirty up the Ext Tank and touch up a few areas. I'll also need to add some NWW details as well on the doors. Cheers AFM -
Looking like a real beauty!! Cheers AFM
-
Revell (Germany) 1/32 Spitfire Mk II
AlienFrogModeller replied to MA Cooke's topic in In-Progress Pics
Is this kit avail in NA? NVM...found it, after I asked for a notification of its stock...now ordered. Cheers AFM -
Kind words...Thank you, but do not sell yourself short "I see real genius in your flying But I was afraid..." Oops wrong quote. You doing a great job, keep it up, I still need to learn from cunning modellers like you, it's how we all become good modellers!! Cheers AFM
-
Kinetic CF188 1/48 Production Line x4 Completed
AlienFrogModeller replied to AlienFrogModeller's topic in In-Progress Pics
Some minor bottom work... See you after the Superbowl! Go Chiefs... Cheers AFM -
EA-18G from Italeri, or is it Revelleri?
AlienFrogModeller replied to Thadeus's topic in In-Progress Pics
Nice. Very nice. Cheers AFM -
Looking great! Cheers AFM
-
Kinetic CF188 1/48 Production Line x4 Completed
AlienFrogModeller replied to AlienFrogModeller's topic in In-Progress Pics
Some back yard work...putting up the mosquito netting...LOL Cheers AFM -
Kinetic CF188 1/48 Production Line x4 Completed
AlienFrogModeller replied to AlienFrogModeller's topic in In-Progress Pics
First time with oils...nice thing is , I have some time to re-evaluate the application and change if so desired/required. Two more to go... Cheers AFM -
Kinetic CF188 1/48 Production Line x4 Completed
AlienFrogModeller replied to AlienFrogModeller's topic in In-Progress Pics
A little work on the MLG/NLG Wheel Assys Name of the pen I used.... Cheers AFM -
SJU-5/6 Vs. SJU-17 Headrest Accuracy?
AlienFrogModeller replied to Breaddy-Stack's topic in Research Corner
You're more than welcome...and thank you for the kind words. That hole in the seat cushion...allows the techs to visually check the O2 level gauge in the seat pack. Cheers AFM