


wm_cheng
-
Content Count
113 -
Joined
-
Last visited


-
Finally finished the Nu-Galactica - not the greatest of kits (I've been spoiled with Japanese kits that just goes together!). Lots of huge gaps, internal sprue gates to cut off and shaved an entire deck off the nose and ground away so much plastic just to the head to align correctly with the body. The Admiralty turret guns were a highlight to use, but the string of dollar store LED lights were too dim to see in the daylight (you get what you paid for) afterwards. The Acreation Models decal set were great and added a lot of depth to the ribbed areas, however there was a variation in darkness be
-
Not really, they were good, just some trimming here and there to fit, the only thing was the rear RIO panel was not the right shape and I had to piece together some bits and was left with some empty space to fill in the upper section. I do wish they had a specific set for FineMolds.
-
Thanks for the advice, I went with spray can so I don't have to use my airbrush for the clear coats - I find they often clog up my airbrush really fast especially the flat/matte clear coats. I would just go back to spraying airbrush clear coats instead of decanting, I think I should try again with a much lighter initially misting first and build up in layers, I thought I wanted to give a thick enough clear coat to hide the decal carrier film edges and allow it to self level, but I think I might have over done it and maybe didn't shake up the can long enough. OK I've finally gotten
-
I think I managed to save it by re-piecing the VF-84, but the font is subtly different and because I always know what I did, my eye is always drawn to the paint repair instantly, I hope it doesn't look repaired to the fresh person seeing it. Its getting there very slowly, very hard to find time to work on it when I'm working.
-
Argh, I might be getting old, but it always seems like 2 steps forward and 1 step back. Thought I'd finally seal in all the decals under a gloss coat before the final finish, but for some reason, the gloss coat (maybe the Mr. Hobby Mr. Super Clear gloss spray cans - are these different to Mr. Color Spray gloss?) went on a little too thick, it "melted some of the decals" and pulled them in the direction of drying - I stood my model up on end vertically (in hopes to provide less surface for dust to fall on the drying clear coat) and the clear coat seems to have shifted and took some decals down
-
Well the kit could be $30 if you lived in Japan, but with shipping (only available through couriers like UPS, FedEx, DHL) nowadays during the pandemic, that tacks on another $20-30usd and if you live in Canada, there's courier brokerage fees and customs and duties that tacks on another $20-$30. Mine arrived after $25 shipping + $26 brokerage fee and customs just for a $30 model!
-
What are those metallic decals for the engine metal sections? Are there links to where those are sold?
-
Is there any secret to reviving old Flory Weathering Wash?
wm_cheng replied to wm_cheng's topic in Tools 'n' Tips
I am laying it over a gloss coat of Future. When its new, it pulls in by capillary action, very smooth, but now that its old and I added water to it to try to thin it a bit, it tends to bead up on the glossy Future and I have to work the pigments into the panel lines a bit more, sometimes it beads and creates a empty spot in the panel lines where I have to go over it again afterwards. It still works, just not as nicely as it once did when the Flory Washes were newly arrived. -
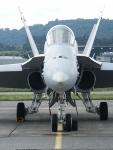
Thank you for all your helpful comments and links to photos. Well, I found a bunch of photos showing the AIM-120C inboard as well and I prefer the longer missiles inside of the shorter ones - I just think it goes with the angle of the wings aesthetically. I'm glad it seems to work both ways and I didn't make any obvious mistakes by gluing them this way. I think I can call this puppy done. Quick notes, tonnes of mistakes in G.W.H. instructions but nothing really beats that amazing surface detailing in 1/72 scale, horrible thick decals and wrong grey color print (use 3
-
Is there any secret to reviving old Flory Weathering Wash?
wm_cheng replied to wm_cheng's topic in Tools 'n' Tips
Yes, I've been to their site, that's why I started to add water when it began to thicken up, but it just won't mix as smoothly as the new one. I'll take a picture to show, it clumps up very small/tiny pigments, instead of being like a smooth watered down paint when it was new. I got the big box that included 8 bottles a few years ago, and they have all become like that now. I re-purchased the black and it great new. I tried everything, but the SS balls (which I don't have any), I stirred and shook till my arms fell off. I just used room temperature water, not warm though, but it wouldn't -
Is there any secret to reviving old Flory Weathering Wash?
wm_cheng replied to wm_cheng's topic in Tools 'n' Tips
I tried water it just makes it clumpy, very small clumps, but I can see the individual pigment. I've shook it and shook it and still couldn't get it to mix, but I haven't tried BB balls in the containers though. My new bottles and old are like night and day. -
Great! Thanks, I tend to like the longer missile inside and the shorter one outside asthetically... I just didn't want to break any rules for my era stationed in Japan. Also these are marked as live munitions on my decals and most of the references I see are either dummies or blue striped training missiles.
-
Hi there, I'm building the G.W.H. 1/72 F-15C 44th Fighter Squad. (box supplied decals - I would not recommend them, if I knew they were printed in the wrong shades of grey I would have gone 3rd party/aftermarket - plus they are way too thick). I don't know where to mount the AIM-9X and AIM-120C missiles on top of the tank. The instructions call for the AIM-9X to be inboard and the longer AIM-120C to be outboard (but there are so many mistakes in the instructions already and I've already been burned following GWH instructions on my F-14A build - so I tend not to trust t
-
Is there any secret to reviving old Flory Weathering Wash?
wm_cheng posted a topic in Tools 'n' Tips
Hi there, I love using Flory Weathering Wash to panel line my aircraft models. However after they have been sitting around for a while, they tend to thicken up. I've tried adding water (as I'm told they are clay based) and even some dish detergent to break the surface tension but it just never like getting a new bottle. Is there some secret to thinning that stuff out to get the original consistency again? Whenever I add water with a touch of soap, the pigments/clay just clumps up and doesn't flow like it used to. Thanks. -
Yes! Are there substantial differences in instrumentation between the E/EJ and the F-4J? Will this fit the F-4J cockpit or will there be a dedicated set for that as well?