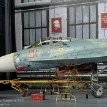
haneto Posted March 29, 2022 Author Share Posted March 29, 2022 Then I move to anti-heat covers on AL-30F engines. This time I used a new method considered by me: the hybrid one combined with painting and sanding. Here is how I did it. Quote Link to post Share on other sites
haneto Posted March 29, 2022 Author Share Posted March 29, 2022 I still want to add more texture on non-metal area, so I also used another method: dry brush with enamel gloss coating paint. Quote Link to post Share on other sites
haneto Posted March 29, 2022 Author Share Posted March 29, 2022 A big relief when I found no paint leaking on clear parts after removing the masking tape. Quote Link to post Share on other sites
haneto Posted March 29, 2022 Author Share Posted March 29, 2022 So here are all the parts, waiting for final assembling! Quote Link to post Share on other sites
haneto Posted March 29, 2022 Author Share Posted March 29, 2022 So the final assembling begins. The very last part of wiring work still remains, since it has to be added only after gear bay is glued in place. Quote Link to post Share on other sites
haneto Posted March 29, 2022 Author Share Posted March 29, 2022 And the "how to" about Detail & Wonder Studio 3D print gears installation. Patience, patience and patience! Quote Link to post Share on other sites
haneto Posted March 29, 2022 Author Share Posted March 29, 2022 ALWAYS glue the wheels at last! ALWAYS! I cannot bear the wheels not touching ground flatly, can you?? Quote Link to post Share on other sites
haneto Posted March 29, 2022 Author Share Posted March 29, 2022 The final "dirty job", is to deal with the gaps between vertical fins and fuselage. Nothing serious, if you use the correct method. 😉 Quote Link to post Share on other sites
haneto Posted March 29, 2022 Author Share Posted March 29, 2022 I have seen many fantastic Flanker builds, but very very few of them noticed the unique angle of the pitot tube on the nose! Here I share with you some trick, to install that small but very noticable part correctly(I mean the angle). That's all for now. Thanks for watching and stay tuned! Quote Link to post Share on other sites
haneto Posted March 29, 2022 Author Share Posted March 29, 2022 Almost forget to special thanks to "Frozen" team for helping the built! 😉 Quote Link to post Share on other sites
Solo Posted March 29, 2022 Share Posted March 29, 2022 Beautiful painting job. Quote Link to post Share on other sites
uncarina Posted March 29, 2022 Share Posted March 29, 2022 Haneto, I love following all of your builds. You’ve given me a whole new respect for attention to detail! Cheers, Tom Quote Link to post Share on other sites
delayar Posted March 30, 2022 Share Posted March 30, 2022 Fantastic! Cheers, Markus Quote Link to post Share on other sites
Scooby Posted April 3, 2022 Share Posted April 3, 2022 Fabulous build! This will be my guide and my inspiration for my own build. Gary Quote Link to post Share on other sites
Aigore Posted April 4, 2022 Share Posted April 4, 2022 Masterful as always Yufei! You are an inspiration to us all 🙂 Quote Link to post Share on other sites
RichB63 Posted April 5, 2022 Share Posted April 5, 2022 Extremely realistic finish you’ve achieved - very impressive work! Rich Quote Link to post Share on other sites
BastianD Posted April 8, 2022 Share Posted April 8, 2022 Awesome, stunning, excellent result! Cam you replace the decals for Ukrainian airforce? 😉 Quote Link to post Share on other sites
Gwen Phoenix Posted April 8, 2022 Share Posted April 8, 2022 Wait. Where and how did the Frozen team help the build, Yufei? 😄 It's like watching at the real thing sitting on your bench. Cheers, Gwen Quote Link to post Share on other sites
haneto Posted April 12, 2022 Author Share Posted April 12, 2022 Thank you guys! On 4/9/2022 at 1:06 AM, BastianD said: Awesome, stunning, excellent result! Cam you replace the decals for Ukrainian airforce? 😉 Well there is no need, since: 1. Russians are not using Su-27 in current conflict with Ukraine. 2. This paint scheme only appeared in Fall 2003, so it does not exist any more. 🙂 Quote Link to post Share on other sites
haneto Posted April 12, 2022 Author Share Posted April 12, 2022 OK, so the final few steps! I used AK pencil to add some chipping effect to replicat the used trace. Quote Link to post Share on other sites
haneto Posted April 12, 2022 Author Share Posted April 12, 2022 (edited) The painting process for AL-31F engine exhaust nozzles. I used some resin sample from Tempmodels. There is some 3D printing trace on some padels on the master, since it was created by 3D print. But I was told the trace will not appear on formal products. Better to check before your purchase. 😉 Edited April 27, 2022 by haneto Quote Link to post Share on other sites
haneto Posted April 12, 2022 Author Share Posted April 12, 2022 So, after 5 months built, the aircraft itself is finished! Still working on some small accessories for the final diorama. 😉 Will find some time to take formal photos of the aircraft itself later. Oh by the way, when I designed this kit, I offer you to switch canopy from open and close condition any time even after you finish it. So that you can enjoy the beautiful out line and detailed cockpit, at same time! Stay tuned! Quote Link to post Share on other sites
Scooby Posted April 12, 2022 Share Posted April 12, 2022 Very nice build! Really enjoyed the progress pictures and will use it as a reference for my own build. Quote Link to post Share on other sites
Teeradej Posted April 12, 2022 Share Posted April 12, 2022 Impressive built! Excellent weathering job. Quote Link to post Share on other sites
Thadeus Posted April 13, 2022 Share Posted April 13, 2022 Wow. I... errr.... Wow. Quote Link to post Share on other sites

Recommended Posts
Join the conversation
You can post now and register later. If you have an account, sign in now to post with your account.