delayar
-
Content Count
470 -
Joined
-
Last visited
About delayar
-
Rank
Tenax Sniffer (Open a window!)

- Birthday 09/21/1976
Recent Profile Visitors
10,819 profile views


_profile.thumb.jpg.2fa73c4fd9e3b6b2b83af86f90375c87.jpg)


-
I am at a very slow building pace right now, since I finished my motorcycle kit and have other projects in the garden running. However, I painted the false canopy on the underside and painted some details. Furthermore, I made some light post shading with thinned down smoke. I kept the weathering very subtle, since the pictures I found from this particular aircraft shows it in a very pristine paint condition. I also started with the ordnance, using parts from a Tamiya F-16 kit (Sidewinders, Lightening pod, GBU-12) and Res
-
Hi, Your stuff looks excellent. Would you consider a reprint of the 1/32 Barak conversion set? Cheers, Markus
-
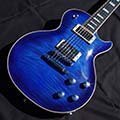
Hi, Here is my recently finished 1987 Honda VFR750R. After three years, another entry in this category 🙂 Kit ist from Tamiya, with the Hobby Design Detail Set, which includes a lot of PE details, among them a PE chain. Some parts like the buttons on the handles and the rear reflector are scratch built. Al in all it went together well. The body parts had some weird mold seams, and the decals were a bit of a hassle.
-
I made some slow progress over the last weeks. I tried to replicate the wiring for the Scorpion system: It is made from stretched sprue and the isolation from a very fine stranded wire. Then I sprayed the primer. The toothpick is there to rest the aircraft on its back without contact to the tabletop. I did a preshadeing, but after I sprayed the final colors, almost nothing is visible of the preshading, so I will do some subtle post shading. Cheers, Markus
-
Thanks a lot! Cheers, Markus
-
The landing gears are painted and assembled: The tire parts are not yet glued to the gears. That will be done during installation, to have the flattened part in the right position. The windscreen and canopy frame were painted black on the inside. The airframe is soon ready to get painted. The tails also received some paint and decals: Cheers, Markus
-
Thanks for the information. The BLOS antenna I can do without a correction set, I already did that with another build. I thought that the demo jet had the CDU installed. Cheers, Markus
-
Any news about the 1/32 CDU? I received the 1/32 sheet for the demo viper today. Cheers, Markus
-
Hi, The fuselage is joined to the wings: And the IP was fitted with the Eduard PE HUD: Also, I removed the supports from the 3D printed gear parts and put on a white coat of paint: Cheers, Markus
-
Hi, Your progress looks good. This will be a great model once you are finished. And no, it probably was not a mistake. The intake section is a nightmare with this kit. Apart from some other missing details, especially in the region of the exhaust, this is the worst part of the kit and requires a lot of work to hide all the seams and gaps. That is the reason why I don't intend to build another one, even if by now there are a lot of interesting liveries to build. I hope that one day we will get a better kit of the Eurofighter. Cheers, MArkus
-
Hi, I am coming back to this thread, since I am finally committed to the project (although it now is a GWH A-10C, without all the Phase Hangar Resin). I am still undecided about the loadout. Even if this particular aircraft with these markings was never deployed in actual combat missions (or am I wrong here?), I am considering a combat loadout. However, I don't want to do a complete fantasy-what-if-loadout, therefore I wanted to ask what an appropriate loadout for this timeframe would look like. Thanks again, Markus
-
Thanks a lot. I continued with the engines. The components: I didn't bother with filling the seams, since they won't be visible once everything is closed up. A detailed look at the compressor face: And the fan in its housing: And the assembled engine: And without further ado, the engine pod gets assembled. No filler needed, everything fits perfect. As per the other thread about the exhaust color, I will pain
-
Thanks! Also, before closing the fuselage, the wheel well was painted and glued in place. And the gun nozzle fairing from Art Scale Kit was attached: the wing section also was very easy to assemble. Only at the seam of the landing gear pods some minor filling and sanding was required. And the included weight to prevent a tail sitter was firmly glued in place with CA glue. You definitely don't want that thing to become loose after assembly 😉 Cheers, Markus
-
That is a great project. I tackled this kit some years ago, and it was not an experience I would like to do again. I guess it is already too late, but I think that APU Resin part is supposed to go under the kit plastic, with only a hole drilled for the actual APU exhaust itself, since the exhaust sits flush with the fuselage. This is how it looked on my build: I am looking forward to seeing how your build turns out. Cheers, Markus
-
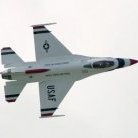
Hi, I recently started the GWH A-10C, deciding to build the aircraft of the 75th Fighter Squadron in the 2017 memorial livery for the Flying Tigers: A-10C 78-0597 74thFS 23rdWG ACC Moody AFB, GA | August 08, 2… | Flickr Fairchild A-10C Thunderbolt II - USA - Air Force | Aviation Photo #4717891 | Airliners.net Originally, it started out as a Hobby Boss build, with a ton of Phase Hangar Resin goodies. I was not to far into the build (I built the engines and was in the fitting process for the resin cockpit). Then came the GWH kit, and it promises a much more