Omega One Posted April 5, 2007 Share Posted April 5, 2007 haneto: Awesome work!!! seriouslly !!! Just one question?? where did you get the 1/72 scale drawing??? Regards and looking forward to your built Andrés Quote Link to post Share on other sites
Berkut Posted April 5, 2007 Share Posted April 5, 2007 haneto: Awesome work!!! seriouslly !!!Just one question?? where did you get the 1/72 scale drawing??? Regards and looking forward to your built Andrés Look here: http://www.airwar.ru/other/draw_fn.html :) Quote Link to post Share on other sites
Omega One Posted April 5, 2007 Share Posted April 5, 2007 thanks!!! Berkut!!! Quote Link to post Share on other sites
haneto Posted April 5, 2007 Author Share Posted April 5, 2007 How do you rescribe panels?And how are you getting rivets so straight? :) Hasegawa Tritool series are always my great help. :) Quote Link to post Share on other sites
Gambler Posted April 6, 2007 Share Posted April 6, 2007 haneto, those missiles just look superb. Keep up the great work, Jeff. Quote Link to post Share on other sites
Berkut Posted April 6, 2007 Share Posted April 6, 2007 Wow, I have never seen that hasegawa tools. I must get that one on middle. :lol: Quote Link to post Share on other sites
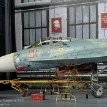
haneto Posted April 15, 2007 Author Share Posted April 15, 2007 (edited) Some progress. I spent half of the time dry-fitting/sanding the kit. The assembling is one of the worst I've touched. Some gaps are even over 3mm! And some place I had to use plastic sheet. I applied superglue for gaps within 2mm. The bottom side is even worse...... :wacko: I rescribed the panel lines and rivets AFTER assembling,which improved to be correct. The rough sanding on the bottom side will destroy any details if you make at first. Once again,Flanker DVD helped me a lot.You can hardly find good shots of the bottom surface from Internet. Good job,Flanker DVD staff! Apply the resin pylon,with the strengthen slash. The intake net.The real thing is coverd with something like a mesh at back. So I cut a piece of PE net and the result seems to be acceptable. I'll continue the rescribing/rivetting work on the body and intakes......That's really tiring,man...... Edited November 4, 2008 by haneto Quote Link to post Share on other sites
coneheadff Posted April 15, 2007 Share Posted April 15, 2007 Awesome Haneto!!! Quote Link to post Share on other sites
madmike Posted April 15, 2007 Share Posted April 15, 2007 Crikey! This is a most impressive build and in 1:72!! Keep up the excellent work, I am looking forward to reading more as you progress! MikeJ Quote Link to post Share on other sites
Su-34 Posted April 15, 2007 Share Posted April 15, 2007 Amazing! Cant wait for more! Quote Link to post Share on other sites
GodHammer Posted April 15, 2007 Share Posted April 15, 2007 A killing awesome job, following this topic really with interest! Hope to learn a bit of your skill, Haneto, very very good job! Quote Link to post Share on other sites
Hoops Posted April 15, 2007 Share Posted April 15, 2007 Continued awesome work Haneto, You may just inspire me to crack open my Heller kits, maybe. With that in mind, any update on if your friends at Voyager will be able to cast some more of those correction sets? Waiting patiently, -Hoops Quote Link to post Share on other sites
haneto Posted May 4, 2007 Author Share Posted May 4, 2007 (edited) Hi,fellows!Now I have a 7 days Labor Day long vocation here and that helped me archiving more progress of this built. The Flanker DVD is just EVIL,'cause it's drawing me to make a 1/72 plane in the 1/32 level details......even I didn't suppose to at first. :D Here I'd like to show my scrbing tools.As you can see,all of them are easy to buy on the market. The Hasegawa Tri-tool(with black rudder) is used by straight lines while the needle for curved lines. And the needle,also released by Hasegawa,is used for rivetting.As the weight is very fitable for you to control your fingers. As the rullers,I use Hasegawa,Lion Roar and plastic tape for electronics(this one's recommended!) It's the very first time for me to challenge a full rivetting experience on 1/72 scale(Again the result of Flanker DVD),and that was really exhausting...... B) As the space was very limited,I had to use the tape for such hatches. Of course,before rescribing I use super glue to fulfill the wrong lines on the kit and then sanding,which cost me a whole day...... And using another 2 days,the bottom surface was done. Then I used 2400 and 3600 sand paper to make surface smooth,then a tooth brush will be helpful for cleaning. Those holes were drilled for the pipes in engine area. The panel lines inside the eingine pod was a night mare...... As the super glue got clear after drying,you can still see the original panle lines and the assembing positions. Once again,I changed the top of the tail with the stainless needle for the strength. Edited November 4, 2008 by haneto Quote Link to post Share on other sites
haneto Posted May 4, 2007 Author Share Posted May 4, 2007 (edited) I also added some details in landing gear bays,and AIRES 1/32 resin stuff once again gave me a good reference. The yellow pipes are electric pipes.But the surface was too smooth so I applied some superglue and that changes a lot. B) Some 1/700 ship model used PE was also used in the built. To be continued...... :D Edited November 4, 2008 by haneto Quote Link to post Share on other sites
janman Posted May 4, 2007 Share Posted May 4, 2007 Impressive work, man! Quote Link to post Share on other sites
GodHammer Posted May 4, 2007 Share Posted May 4, 2007 ;) I think it should be clear enought.... Mighty job Haneto!!! Quote Link to post Share on other sites
Berkut Posted May 4, 2007 Share Posted May 4, 2007 That is just amaizing! I want that tools you use for rescribing, but i can not find them anywhere..... <_< Quote Link to post Share on other sites
upupandaway Posted May 4, 2007 Share Posted May 4, 2007 Whoa! This is really gonna be a kickass 1/72nd Susy. You really got everything in there. At first I wasn´t sure if it´s not a 1/32. Cool scribing. Quote Link to post Share on other sites
AnthonyWan Posted May 4, 2007 Share Posted May 4, 2007 What is that blue item in your photos? (Is it Hasegawa also? If so, where might I find one.) Oh and...you're crazy Haneto... :D The wheelwell details look wonderful... Quote Link to post Share on other sites
haneto Posted May 5, 2007 Author Share Posted May 5, 2007 Thanks a lot for the encouragement,man! What is that blue item in your photos? (Is it Hasegawa also? If so, where might I find one.) Hi there,Anthony It's the insulator tapes used in electric works,which is usually sold in normal shops. :) Quote Link to post Share on other sites
geedubelyer Posted May 5, 2007 Share Posted May 5, 2007 Heh, heh...if you go to this extent in 1/72nd scale I can't wait to see what you make of the 1/32nd scale Trumpeter version. Terrific detailling in the wheel bays. This is becoming a very exciting build and well up to your usual high standard Haneto. Keep up the great work. Quote Link to post Share on other sites
AnthonyWan Posted May 5, 2007 Share Posted May 5, 2007 Thanks a lot for the encouragement,man!Hi there,Anthony It's the insulator tapes used in electric works,which is usually sold in normal shops. Nope, not the tapes. The needle thing that has the blue handle...looks like hasegawa scriber...but its blue handle. Quote Link to post Share on other sites
olemanjoe Posted May 9, 2007 Share Posted May 9, 2007 WOW, you are sick, man! One day i hope to be as sick as you are....!!!!! :) Quote Link to post Share on other sites
Aggressor Supporter Posted May 9, 2007 Share Posted May 9, 2007 Wow on the detailing! Keep it up. Quote Link to post Share on other sites
mickey Posted May 9, 2007 Share Posted May 9, 2007 Amazing detailing there. I couldn't even face the rescribing in 1/32nd scale on the Flanker, and I find your work in the smaller scale beggars belief. Very inspiring! Cheers, Mickey Quote Link to post Share on other sites

Recommended Posts
Join the conversation
You can post now and register later. If you have an account, sign in now to post with your account.