Floyd S. Werner, Jr. Posted December 6, 2013 Author Share Posted December 6, 2013 Floyd, I've got a question about fuselage prep on the left side. In the picture above does the blister behind the red dot (remove antenna mount) need to be removed? I was test fitting the MMR pod and I think the blister is in the way. Please advise. It probably does. I haven't got that far yet. LOL. Working on the interior now Floyd Quote Link to post Share on other sites
Scooby Posted December 8, 2013 Share Posted December 8, 2013 Just started subscribing and saved all the pictures. Do anybody know if there are huge differences to the Canadian hook?? I can only see so much on the pictures available, and I live in the wrong part of the country.... Cheers H. I'll see what I can dig up for you, my buddy was the project manager for the purchase of the Chinooks for the RCAF. He just retired but I am sure he has info and images. I also have a few ex-squadron mates who have done the course and one is presently in the States doing the Chinnook course. I only wish there was a 1/48 option. Quote Link to post Share on other sites
Intruder_bass Posted December 9, 2013 Share Posted December 9, 2013 I believe the blister has to go. Scooby, there might be one coming soon in 1/48 scale... I am not authorized to say more, but maybe Mike Belcher can clear this up ? Quote Link to post Share on other sites
Winnie Posted December 9, 2013 Share Posted December 9, 2013 I'll see what I can dig up for you, my buddy was the project manager for the purchase of the Chinooks for the RCAF. He just retired but I am sure he has info and images. I also have a few ex-squadron mates who have done the course and one is presently in the States doing the Chinnook course. I only wish there was a 1/48 option. And I'd be in your debt!! Cheers H. Quote Link to post Share on other sites
norbert Posted December 9, 2013 Share Posted December 9, 2013 Parcel arrived today, happy I never gave up hopping the set will come out one day. Andy and Floyd, you did a great job here ! When you have the parts in hand, you feel how crazy this conversion project was. Now a big dio project to magnify the great work done here ! Norbert Quote Link to post Share on other sites
hawkwrench Posted December 10, 2013 Share Posted December 10, 2013 Somebody post a pic of what the box top and artwork look like. Sure would like to see what all the hoopla is about! Tim Quote Link to post Share on other sites
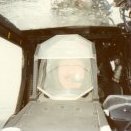
Floyd S. Werner, Jr. Posted December 10, 2013 Author Share Posted December 10, 2013 Check the very beginning of this post Floyd Quote Link to post Share on other sites
hawkwrench Posted December 10, 2013 Share Posted December 10, 2013 Wow Floyd, that looks awesome! I just wish I could have got a set, buuut someone got married instead! Great job my friend! Tim Quote Link to post Share on other sites
mark31 Posted December 10, 2013 Share Posted December 10, 2013 Hé Floyd recievd my set yesterday and i must say woooooooow. Great job on this set. Today i will take a closer look at the parts at the moment i have only one small part broken but notting that i can fix. Mark Quote Link to post Share on other sites
Floyd S. Werner, Jr. Posted December 10, 2013 Author Share Posted December 10, 2013 Well the color, black, was painted and the details were picked out. It is a shame that most of this will not even be seen on the finished aircraft. I know it is in there though. Here is the complete cockpit minus the seats. There are no less than seven different blacks in there. The overall color was Lifelike Deep Cockpit. That was given a filter of SIN Grey for Panzer Grey. When that was dried, a dry brush of Model Master Steel to give it a metallic feel. Then small sponges were used with Tamiya Zinc and Model Master Steel to replicate the wear patterns in around the cockpit. This was enhanced with some Mig Pigments, Desert Sand. Apple Barrel paints were used for the various colors around the cockpit. The instruments were added from aeroscale. Grey pencil was used to pick out the MFD knobs and some other minor items. Tamiya Clear Green, Smoke, and Clear Blue were used on various MFDs. The seats were painted with Tamiya Flat Black with a very light dusting of grey. They are fabric so they shouldn’t be worn. The belts were painted with Apple Barrel paints. When dried the shoulder harnesses were given SIN filters of Blue for Panzer Grey. The seatbelts got SIN’s Brown for Desert Brown filter. The buckles were painted with Model Master Aluminum. Here is the completed cockpit subassembly. Quote Link to post Share on other sites
Loach Driver Posted December 10, 2013 Share Posted December 10, 2013 Very nice work so far, Floyd. As you say, it will be a pity that so much of the fine detail will not be visible when the canopy goes on. LD. Quote Link to post Share on other sites
MH-47E/G_Graduate Posted December 11, 2013 Share Posted December 11, 2013 (edited) You'll still be able to see some of it when you look up from the ramp... Very Nice. Definitely did your research didn't you. Edited December 11, 2013 by MH-47E/G_Graduate Quote Link to post Share on other sites
hawkwrench Posted December 11, 2013 Share Posted December 11, 2013 NICE work Floyd! Looking really, really nice!!! Tim Quote Link to post Share on other sites
Eagle1 Posted December 12, 2013 Share Posted December 12, 2013 Hi Floyd, You sir have out done yourself. I just received my MH-47 conversion set today and all I can say is WOW!!!! This set is incredible. It was well worth the wait. Thanks. Chris Byrne "Eagle1" Quote Link to post Share on other sites
MarcelP Posted December 12, 2013 Share Posted December 12, 2013 Mine arrived too. Fantastic. Now I have to wait till my home renovation is finished.... Quote Link to post Share on other sites
Floyd S. Werner, Jr. Posted December 12, 2013 Author Share Posted December 12, 2013 Update 8 Just a quick update. I forgot to add the circuit breaker panels so here they are installed. I had to move the fire extinquisher forward slightly. I added brake lines to the pedals but these will never be seen. I know they are there The avionics shelf and area were the next little project I took on. I used the Cobra Company CH-47D Update set. I think this is an essential set now that I’ve been building the model. Here are the shelves themselves. Now I’m taking on the aft transmission area before I tackle the interior. I’ll be using the Cobra Company set for this as well. Quote Link to post Share on other sites
mark31 Posted December 13, 2013 Share Posted December 13, 2013 Great work so far nice to see all the parts are comming toghether. Mark Quote Link to post Share on other sites
MH-47E/G_Graduate Posted December 13, 2013 Share Posted December 13, 2013 Is the troop commander seat part of the original kit or the Cobra update kit? Your brake lines will be visible in the "chin bubble" windows. I'm trying to figure out how to add mine. If only I were as skilled as you guys1 Quote Link to post Share on other sites
MarioK Posted December 13, 2013 Share Posted December 13, 2013 Got mine yesterday and can't say anything less than spectacular :) I love the conversion and is worth it. Keep up with the great job of building yours for the rest of us. Quote Link to post Share on other sites
Chief Snake Posted December 14, 2013 Share Posted December 14, 2013 Is the troop commander seat part of the original kit or the Cobra update kit? Your brake lines will be visible in the "chin bubble" windows. I'm trying to figure out how to add mine. :crying2:/> If only I were as skilled as you guys1 :worship:/> The seat comes in the Cobra Company CH-47D cockpit detail set. Use fine lead wire to make the hydraulic lines coming into and out of the pedals. Chris M Quote Link to post Share on other sites
Winnie Posted December 19, 2013 Share Posted December 19, 2013 (edited) Patiently awaiting mine now. Delay is purely mine, as I was late in getting payments in twice!! Oh well, I can begin by preparing the rest of the stuff tho! have some pour-stubs to remove! Question... Did the new 47F/G move the APU forward?? see there is an exhaust above the cabin entry door (above and forward). Cheers H. Edited December 19, 2013 by Winnie Quote Link to post Share on other sites
MH-47E/G_Graduate Posted December 20, 2013 Share Posted December 20, 2013 No, the APU is still at the back of the aircraft above the ramp area. The exhaust forward of the cabin door is for the heater. Quote Link to post Share on other sites
drhornii Posted December 25, 2013 Share Posted December 25, 2013 Can't wait for the "G" model cockpit with the CAAS system. 5 displays and slight center panel differences and it is good to go! Quote Link to post Share on other sites
Ishthe47guy Posted December 26, 2013 Share Posted December 26, 2013 Man, I need to check this forum more often. The things I miss... If its worth anything, I'd like to point something out... The boxes circled shouldn't be there for this model. Those are the SAS boxes, which were on the A-C models. That area is now open to the flight control closet. That area is covered by a strip of soundproofing going from the ceiling to the floor, with the same quilted pattern all the other soundproofing has. Quote Link to post Share on other sites
Check Six Posted December 26, 2013 Share Posted December 26, 2013 Just found this build. Very nice start! Quote Link to post Share on other sites

Recommended Posts
Join the conversation
You can post now and register later. If you have an account, sign in now to post with your account.