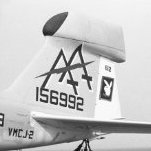
RichB63 Posted January 27, 2023 Share Posted January 27, 2023 (edited) Sometimes a single photograph provides the spark of inspiration for a new modeling project. This particular picture from Joe Zerbe’s collection, posted here with his kind permission, delivered in just such a way. It was taken in August 1975 at Nellis AFB, Nevada and depicts 64-0815, a McDonnell Douglas F-4C Phantom ll assigned to the 57th FWW. ‘815 was one of 36 Charlie models modified for the SAM suppression role and taking on, at least informally, the designation EF-4C Wild Weasel IV. I chose the sublime Tamiya F-4B kit in 1:48 as a starting point. Edited February 26, 2024 by RichB63 Quote Link to post Share on other sites
phantom Posted January 27, 2023 Share Posted January 27, 2023 Nice project, but you have the wrong kit. Wings, Landing gear, cockpit, pylons just the beginning of things you need to change. Easier to start with a Hasegawa C. Quote Link to post Share on other sites
RichB63 Posted January 28, 2023 Author Share Posted January 28, 2023 (edited) Tail first! The rudder was carefully removed, later to be reinstalled deflected as commonly seen on parked jets. Also, the navy style antenna on the forward fin cap was sanded away. I incorporated the beautiful Master-Model brass leading edge air data probes. Some extra work is required to ensure the proper alignment and secure fit of these parts. The following sequence of photos illustrates the steps involved. To correct the fin cap profile, a small section of stretched sprue was glued in place and filed to shape, providing just enough fill to improve the look. Edited September 19, 2023 by RichB63 Quote Link to post Share on other sites
RichB63 Posted January 28, 2023 Author Share Posted January 28, 2023 (edited) Divide and Conquer The air intake at the base of the fin was refined with .005 inch plastic card. Edited April 23, 2023 by RichB63 Quote Link to post Share on other sites
RichB63 Posted January 28, 2023 Author Share Posted January 28, 2023 (edited) On 1/27/2023 at 4:58 PM, phantom said: Nice project, but you have the wrong kit. Wings, Landing gear, cockpit, pylons just the beginning of things you need to change. Easier to start with a Hasegawa C. Hi phantom…of course you’re correct. I’m (foolishly) going about it the hard way! Edited December 21, 2023 by RichB63 Quote Link to post Share on other sites
Incaroad Posted January 28, 2023 Share Posted January 28, 2023 The hard way indeed, take a look here for some inspiration! http://soyuyo.main.jp/f4c/f4c-1.html Great Start! Quote Link to post Share on other sites
phantom Posted January 28, 2023 Share Posted January 28, 2023 18 minutes ago, RichB63 said: Hi phantom…of course you’re correct. I’m (foolishly) going about it the hard way! Well, going by the photos you have all ready shown, you know what your getting into! Quote Link to post Share on other sites
RichB63 Posted January 28, 2023 Author Share Posted January 28, 2023 (edited) Welding Up close, the Phantom’s fuel drain mast has a crude, agricultural appearance. I tried to improve the look of the kit part with "weld beads" fashioned from very thin stretched sprue cemented into place with Tamiya Extra Thin. A beading tool was used to give them a distressed texture. The drain openings were carefully hollowed out using a low-speed drill fitted with a #92 bit. Stretched sprue support rods complete the look. Edited April 10, 2023 by RichB63 Quote Link to post Share on other sites
RichB63 Posted January 28, 2023 Author Share Posted January 28, 2023 1 hour ago, Incaroad said: The hard way indeed, take a look here for some inspiration! http://soyuyo.main.jp/f4c/f4c-1.html Great Start! Hi Incaroad, Thanks for the link! Jumpe Temma is one of my modeling heroes. He shows us that anything is possible. He has a keen eye for shapes and proportions and his scale drawings are the best I’ve seen. Cheers, Rich Quote Link to post Share on other sites
wardog Posted January 28, 2023 Share Posted January 28, 2023 Hello, RichB63, excellent choice for your next build. Perhaps the Tamiya F-4B is not the best kit to convert to a "C" model but you certainly have all the skills necessary to make the modifications. What you've done so far is nothing short of perfection; I can't wait to see how this build progresses. -Elmo Quote Link to post Share on other sites
RichB63 Posted January 28, 2023 Author Share Posted January 28, 2023 (edited) On 1/27/2023 at 11:42 PM, wardog said: Hello, RichB63, excellent choice for your next build. Perhaps the Tamiya F-4B is not the best kit to convert to a "C" model but you certainly have all the skills necessary to make the modifications. What you've done so far is nothing short of perfection; I can't wait to see how this build progresses. -Elmo Thanks Elmo! I realize that the Tamiya Bravo kit is an odd choice on which to base this conversion, especially as there are several very good Charlie models available in 1:48. But I feel as though Tamiya’s offering is in a class by itself, as close to Tomb perfection as there is. Besides, as you know, I enjoy fiddling around with kits. Having said that, I’m very aware of the challenges ahead. I may well discover I’ve ventured a bit too close to the sun! We’ll see. Some Scotch and Mr. Surfacer With the addition of formation strip lights (Scotch Magic Tape - green label) and the application of some Mr. Surfacer 1200, I’m calling the vertical tail finished. It’s been put away for safe keeping while I move on to the fuselage mods: basically, the removal and addition of numerous panels, access doors and fasteners across the airframe, hinted at in the photos below where black CA glue has been used to fill recessed lines and fasteners around the engine exhaust area. Edited May 6, 2023 by RichB63 Quote Link to post Share on other sites
A-10 LOADER Posted January 28, 2023 Share Posted January 28, 2023 WOW, that fuel dump is incredible ! Keep up the excellent progress. Steve Quote Link to post Share on other sites
Mr.Happy Posted January 29, 2023 Share Posted January 29, 2023 Amazing work Rich. Quote Link to post Share on other sites
cruiz Posted January 29, 2023 Share Posted January 29, 2023 That is some fantastic craftsmanship; I love the way you pay attention to those small details, which in my opinion, make the model more realistic. Thanks for sharing. Quote Link to post Share on other sites
wardog Posted January 29, 2023 Share Posted January 29, 2023 A warning to all modelers, and especially F-4 Phans, stay tuned to this build as Rich's techniques and craftmanship are on another level. I've been following Rich on other modeling sites and often blown away at his creativeness and "out of the box" thinking. Rich will surely amaze you as he progresses with this build! Quote Link to post Share on other sites
crackerjazz Posted January 30, 2023 Share Posted January 30, 2023 Wow, that's some exceptional work, RichB63! Following along : ) Quote Link to post Share on other sites
ExchefAndy Posted January 30, 2023 Share Posted January 30, 2023 Yep, this is terrifying... and I cannot turn away! Low and behold, a new bar is being set right before us, I'm definitely watching this come together 😲 Andy Quote Link to post Share on other sites
Crutch Posted January 30, 2023 Share Posted January 30, 2023 YGBSM!!! Quote Link to post Share on other sites
Thadeus Posted January 30, 2023 Share Posted January 30, 2023 Ok, You are making us wait for the wings. I've seen J (or C) ->B conversions in 1/32. But the other way around seems pure madness. Just like adding weld lines to the fuel dump valve. I'm afraid to watch, and yet I can't take my eyes off. Amazing work. Quote Link to post Share on other sites
phantom Posted January 31, 2023 Share Posted January 31, 2023 (edited) On 1/30/2023 at 12:37 PM, Thadeus said: Ok, You are making us wait for the wings. I've seen J (or C) ->B conversions in 1/32. But the other way around seems pure madness. Just like adding weld lines to the fuel dump valve. I'm afraid to watch, and yet I can't take my eyes off. Amazing work. Yeah, I did the 1/32 J into B conversion. Bought the ready to go resin and installed it. THIS conversion is madness!! But being done at an amazing level. Outstanding Rich. Edited January 31, 2023 by phantom Quote Link to post Share on other sites
Ikon Posted January 31, 2023 Share Posted January 31, 2023 Right kit or not, you are certainly the right modeller! Great level of work on the fin and fuel dump. Quote Link to post Share on other sites
kellyF15 Posted January 31, 2023 Share Posted January 31, 2023 WOWWWWWW. This is going to be a fun one to watch! Quote Link to post Share on other sites
vonjhn68 Posted January 31, 2023 Share Posted January 31, 2023 Excellent start - very impressed. Quote Link to post Share on other sites
RichB63 Posted February 2, 2023 Author Share Posted February 2, 2023 (edited) @A-10 LOADER, @Mr.Happy, @cruiz, @wardog, @crackerjazz, @ExchefAndy, @Crutch, @Thadeus, @phantom, @Ikon, @kellyF15 and @vonjhn68 Thank you all very much for your kind words. I’m grateful (and humbled). Blacklining Several panel lines, doors and access panels across the airframe were eliminated, and new ones added, in an effort to “de-navalise” this Phantom. Black cyanoacrylate glue was used as a filler. Here are some of the areas that received this treatment: Panel 124 At first glance, panel 124 (below) looks like a perfect circle centered along a horizontal join line. Indeed, all of the drawings that I referenced depict it as such. But, in fact, it’s oblong and sits slightly below the centerline. Louvers …and other details. The louvered air conditioning exhaust vents proved more tedious and time consuming than I envisioned. I’m happy to have this work behind me. Also visible in the following photos are three small weasel specific antennas, just ahead of the NLG bay. Another Wild Weasel mod, just beginning to take shape here, is the faired over missile trough. This area will be covered by a large equipment palette and strike camera. Edited July 11, 2023 by RichB63 Quote Link to post Share on other sites
ExchefAndy Posted February 2, 2023 Share Posted February 2, 2023 Don't be humbled 😉, just keep doing what you're doing! It's bloody marvellous and so beyond my skill level as akin to looking at the Sun. Just let us mere mortals soak in the brilliance, and by per chance I achieve something close to this... well... I'd have sold my soul Awesome Andy Quote Link to post Share on other sites

Recommended Posts
Join the conversation
You can post now and register later. If you have an account, sign in now to post with your account.