haneto Posted March 11, 2007 Share Posted March 11, 2007 (edited) Hi,folks! There's a long time that I took no action here.So hereby I report the progress archieved recently. I decided to make a 1/72 Flanker before starting my 1/32,in order to get more sense and knowledge of the most beautiful bird ever built. As I've compared the most famous two 1/72 kits in the thread as below,I decided to use Airfix kit as a base and kit-bashing with Hasegawa one(at first). [Flanker PK]Airfix vs Hasegawa And these are the goods I used and willing to use in this built. spam spam spam 1/72 Su-27(Airfix) Hasegawa 1/72 Su-27(For kit-bashing at first,but......) Eduard 1/72 Su-27 PE set(for Hasegawa/Revell) Extratech 1/72 Su-27 PE set(for Airfix,almost USELESS!) Begemot 1/72 Su-27 Family(1) decal Lindenhill 1/72 Su-27 full stencil decal Equipage 1/72 Su-27 wheels PVD 1/72 Su-27 pitot tube Flightpath 1/72 Su-27 ladders PE NeoMega 1/72 Su-27 resin cockpit set+vacuum canopy Some was not included in the photo,while I found the most valuable reference is the 1/32 resin stuff! What I need to do is only scaling down them! At first,cut off the part on Airfix fuselage,which proved to be too small. And add the PVD pitot tube(great detail but also high price) to the radome. BTW,I used the pitot tube described for MiG-29 on instruction while the one for Su-27 looks quite odd. I even wonder if they mistook the package? As for the kit-bashing plan at first,I would use the clear canopy parts from Hasegawa to make them fit for Airfix fuselage. And I found the IRST on Hasegawa windscreen is too big and has a wrong angel. So I decided to scratch-build one.I add the special glue for clear parts in the holl of IRST at back,and sand from front to get the entire windshield. But I didn't expect that after drying the glue become something like geri! This is the plan I made at first for kit-bashing. Edited November 4, 2008 by haneto Quote Link to post Share on other sites
haneto Posted March 11, 2007 Author Share Posted March 11, 2007 (edited) And after some sanding work+dry-fitting,I got the shape.Looks good though a little odd...... And add some details inside...... Only after releasing the masking tape,I found that I over-sanded the whole canopy from bottom! The total height of canopy is spot on,but the the height of windshield and canopy themselves is too low! So I decided to re-challenge the canopy making......with the regretness of wasting my EXPENSIVE Hasegawa kit's clear parts...... This part on Airfix is too high.I added some AB putty inside and sanded it outside. Edited November 4, 2008 by haneto Quote Link to post Share on other sites
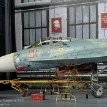
haneto Posted March 11, 2007 Author Share Posted March 11, 2007 (edited) Some details.Most are scaled down from AIRES 1/32 resin one. Using masking tape for the texture of cloth. After painting. Scratch-built IRST What's inside!?A little stainless ball with some plastic details. The clear part is from Hasegawa but the size is too big. I had to sand+polish it after gluing. From inside. The cockpit. Panel by Extratech PE(Only this part is useful! ) Cockpit by NeOmega resin one Some small parts by Eduard PE And this time again the canopy thing! I want every detail I added inside can be seen clearly after built so I used vacuum one. With the help of electronic tools,I made the fuselage fit for the windshield also by repeated sanding+dry-fitting. The windshield is painted clear smoke+clear orange from inside before glued to fuselage. Edited November 4, 2008 by haneto Quote Link to post Share on other sites
haneto Posted March 11, 2007 Author Share Posted March 11, 2007 (edited) The plastic material is used for the no-clear part for canopy. Of course it'll be sanded to fit the fuselage and rescribed the lines. Details around IRST. The fitting of this Flanker is as terrible as the other Airfix kits. Especially the nose area. The curve here is wrong,corrected. The battery in my DC is used up so I only took 2 angels. To be continued...... Edited November 4, 2008 by haneto Quote Link to post Share on other sites
Su-34 Posted March 11, 2007 Share Posted March 11, 2007 (edited) Amazing start, and thats a lot of AM and other kits! So i see you are goin' to do the Trumpeter kit after this :lol: Edited March 11, 2007 by Su-34 Quote Link to post Share on other sites
PapaSmurf630 Posted March 11, 2007 Share Posted March 11, 2007 Simply stunned. I love your work Haneto. Quote Link to post Share on other sites
seb91 Posted March 11, 2007 Share Posted March 11, 2007 How long was the wait !!!!! The first lesson has begun..... <_< The final will be a beauty.....as usual... :lol: :) Seb Quote Link to post Share on other sites
ChernayaAkula Posted March 11, 2007 Share Posted March 11, 2007 Just wonderful! Quote Link to post Share on other sites
skuki Posted March 11, 2007 Share Posted March 11, 2007 Very nice, I can hardly wait to see 1/32 Flanker. Quote Link to post Share on other sites
geedubelyer Posted March 11, 2007 Share Posted March 11, 2007 :o Ah yes, this is gonna be GOOD :lol: ;) :huh: Quote Link to post Share on other sites
Flankerman Posted March 11, 2007 Share Posted March 11, 2007 Wow!! That is some serious detailing there Haneto - your 1:72 cockpit is more detailed than my 1:32 scale one! :lol: I can understand you replacing the Airfix windscreen/canopy with the bigger Hasegawa one - but what nosecone/radome are you using ?? Looking at the photos, it is a different colour to the Airfix plastic?? Keep posting progress - I am in awe of your work. :huh: Ken Quote Link to post Share on other sites
janman Posted March 11, 2007 Share Posted March 11, 2007 Nice work, haneto! Lovely details - just the way I like it! Quote Link to post Share on other sites
Mikeew Posted March 11, 2007 Share Posted March 11, 2007 Superb work Haneto!! That front cockpit scratch details with the masking tape etc is simply amazing for the scale...I await more progress with interest! regards, Mike Quote Link to post Share on other sites
Laurent Posted March 11, 2007 Share Posted March 11, 2007 Hhhhhh ! :( Laurent whose jaw is lying on the floor Quote Link to post Share on other sites
Aggressor Supporter Posted March 12, 2007 Share Posted March 12, 2007 That is one good looking Flanker build. The details look great. Can't wait to see it done. Quote Link to post Share on other sites
aidy Posted March 12, 2007 Share Posted March 12, 2007 Absolutely beautiful detail work! Quote Link to post Share on other sites
kaburaya Posted March 12, 2007 Share Posted March 12, 2007 Beautiful Haneto, what scheme are you going to finish her in? Quote Link to post Share on other sites
KRI76 Posted March 12, 2007 Share Posted March 12, 2007 OMG! Haneto: you´re doing some incredible work there! I will follow this build with max attention! One question: what kind of tape is the yellow one that you show when sawing the cockpit area of the Airfix kit? /Kristian Quote Link to post Share on other sites
haneto Posted March 12, 2007 Author Share Posted March 12, 2007 Thank you indeed for your encouragement,fellows! I'll keep posting while more archivement got. :) I can understand you replacing the Airfix windscreen/canopy with the biggerHasegawa one - but what nosecone/radome are you using ?? Looking at the photos, it is a different colour to the Airfix plastic?? You're welcome,Ken!It was your judgement which gave me the inspiration to start with this awful kit. The nosecone is also Airfix one.Alanger used bluish grey plastic for the common parts for Su-27/27UB(as you see in the pics),but leave the special parts for Su-27 singel seat in a mid-gery plastic. Though I think many of you Flanker lovers have already be informed that Trumpeter will release a brand-new 1/72 Su-27 this year,I still wanna find out the value of the old Airfix kit and make an "Only One" Flanker for myself. And here I still have to pay my honor to Airfix kit,which was molded about 17 years ago and get the whole line and details marvelly spot on. Quote Link to post Share on other sites
haneto Posted March 12, 2007 Author Share Posted March 12, 2007 (edited) Beautiful Haneto, what scheme are you going to finish her in? :) It's quite hard to decide,in fact...... I would make an operational Russian Flanker at all,as I love that blue-grey Tri-colour camos! Maybe a "Red 01" "Cobra Mouth" Navy bird or a "Blue 38" "Devil Eye" in Kilp-Yavr AB? Any suggestion will be welcome! :) Edited February 5, 2008 by haneto Quote Link to post Share on other sites
haneto Posted March 12, 2007 Author Share Posted March 12, 2007 One question: what kind of tape is the yellow one that you show when sawing the cockpit area of the Airfix kit?/Kristian It's the very normal Tamiya masking tape. :) Very suitable for cloth texture expression. And you may also use tissue for more rough texture expression. Yufei Quote Link to post Share on other sites
KRI76 Posted March 12, 2007 Share Posted March 12, 2007 Hhmmm... Do you mean that this one is Tamiya tape? /Kristian Quote Link to post Share on other sites
Andre Posted March 12, 2007 Share Posted March 12, 2007 Do you mean that this one is Tamiya tape? I think Haneto used the Tamiya tape on the glare shield, this looks more like Dymo labelwriter tape to me. Lovely work, anyway! Cheers, Andre Quote Link to post Share on other sites
haneto Posted March 12, 2007 Author Share Posted March 12, 2007 Hhmmm...Do you mean that this one is Tamiya tape? /Kristian Oh,Andre got the close answer——this is the insulator tapes used in electric works. :) It's very thick and malleable.Especially suitable for rescribing works in modelling. Quote Link to post Share on other sites
Andrew D. the Jolly Rogers guy Posted March 12, 2007 Share Posted March 12, 2007 Fantastic work so far! Gonna be quite a project! Quote Link to post Share on other sites

Recommended Posts
Join the conversation
You can post now and register later. If you have an account, sign in now to post with your account.